Showing posts sorted by relevance for query makes things easy. Sort by date Show all posts

Saturday, March 4, 2017

a make-do bathroom makeover! ~ Like Mother Like Daughter

Read article : a make-do bathroom makeover! ~ Like Mother Like Daughter

{At the end of this post you will find paint colors to update your almond fixtures, and notes about sources. The Amazon links are affiliate links.}

Working with almond fixtures ~ Like Mother, Like Daughter

I have come to that point where either I show you some pictures of my bathroom makeover in its not-quite-complete form or I give up altogether, because in real life, the “done” things very quickly get to be decidedly worn out, even as you are trying to finish up the details.

And that would not be good, would it, for me to wait so long that the new things got old. So that’s what I’m doing — showing you the way it is in real life, namely, not quite done (or ever likely to be!).

I have one million things to tell you.

We redid two bathrooms at once, simply because they are right next to each other and it seemed to make sense in terms of economy of scale. I’m not sure if that turns out to be correct. It certainly makes sense in terms of one’s willingness to return to chaos after one stage has been dealt with. It also makes sense when the second one is completely unusable, as opposed to the first which is just crumbling.

Here is a diagram/plan of our second floor. Those of you who know me well, know my little attempts to give you an overview of things… which may or may not be helpful.

Working with almond fixtures ~ Like Mother, Like Daughter

What this is conveying to you, in my own wacky way, is that in an old house, choices have to be made, usually according to things known as “stacks” — places where plumbing gets put in and it’s just simpler to go up with it to the next floor than to, you know, actually put it where it’s needed.

Thus, yes, I go a far piece to get to the bathroom. (The Chief also does, but, you know.) And those bathrooms are next to each other. Because, plumbing.

I will show you the other one at some point. We are putting shelving up and then I hope to!

Here are some befores. Please remember that befores are usually taken at the very last minute, after the leaks have gotten bad and pretty much when the demo has begun and suddenly you’re like, “Let me stop the hating for a minute, just for the sake of the blog.” So don’t judge me too harshly; it wasn’t quiiiittte this bad. Well, not till the very end.

BEFORE:

BEFORE: Working with almond fixtures ~ Like Mother, Like Daughter

The leaks had sprung, and that’s what the towels are all about. In my dreams, I would have had an upscale construction company come in here and gut everything, and I would have put in black and white tile and white porcelain fixtures. There would be a freestanding tub with a shower; I don’t see what’s wrong with that! I like it, and it’s old-fashioned and timeless. Plus, way easier to bathe a baby in, versus a dumb jacuzzi and too-small shower.

However, that was not to be.

It’s just too expensive to rip out these built ins. Let this be a warning to you! Try not to build things in. That tub — not going anywhere. Likewise the vanity. It would just cost so much to replace it with its built-in sinks.

That meant that we had to work with the almond. I know. But because of that, I’m here to tell you the best way to do that in terms of decorating!

BEFORE:

BEFORE: working with almond fixtures ~ Like Mother, Like Daughter

Somewhere along the way, when I was still nursing that black-and-white dream of mine, we replaced the old almond (terrible and malfunctioning) toilet with this nice white one.

My reasoning — what would be the point of putting in new almond one if we were on track to gut this bathroom and make it all NOT ALMOND?

Yeah. After crunching the numbers (and recovering consciousness, and paying the tuition bill), we did end up getting one to match, and this beautiful white number is in the new laundry room.

Now, I want you further to note the golden oak trim. Baseboards, windows (sorry, no befores of that), and the radiator cover. I spent a lot of time trying to figure out how to incorporate almond fixtures and golden oak trim, and then I came to my senses.

The trim was getting painted.

AFTER:

Working with almond fixtures ~ Like Mother, Like Daughter

Working with almond fixtures ~ Like Mother, Like Daughter

I took the radiator cover down to the garage and spray-painted it. It’s at times like this that spray-paint earns its keep. Painting all that metal screen with a brush would have been a nightmare of drips and surfaces!

Working with almond fixtures ~ Like Mother, Like Daughter

I also spray-painted the radiator underneath. It had been white and the white showed through the mesh and contrasted with the black. However, I would not do that again — spray painting inside is not a good idea!

We got a bigger shower. The space above the new wall is open on the theory that air circulation is a good thing.

Working with almond fixtures ~ Like Mother, Like Daughter

The trick with the almond is to go a bit darker on the walls, and a white-leaning-towards-gray-taupe (taupe is beige with black in it, or brown/black with white in it, however you want to look at it) for the trim.

Black accents lift everything up out of the 70s-90s. I painted the light fixtures black and got new glasses for the sconces.

Working with almond fixtures ~ Like Mother, Like Daughter

I do really love the flooring. It’s vinyl plank (not laminate sheets). It’s completely waterproof and floats on the subfloor — in this case, partial tile and partial plywood. Just covers it all up and provides a warm, easy to clean surface. I love the color of it.

I call it “Escape from Golden Oak.”

Working with almond fixtures ~ Like Mother, Like Daughter

Working with almond fixtures ~ Like Mother, Like Daughter

The paint and a bunch of the black we had already decided on in the last go-round (the real before featured blue wallpaper, which, who puts wallpaper in a bathroom I ask you, and blue is not a good way to uplift almond). The vanity had been golden oak; I hadn’t thought to take a before picture (there is a similar one on this blog), but I was very pleased with how the hardware went from blah to fab, just with the color change.
Working with almond fixtures ~ Like Working with almond fixtures ~ Like Mother, Like Daughter, Like Daughter
Working with almond fixtures ~ Like Mother, Like Daughter

Working with almond fixtures ~ Like Mother, Like Daughter

Working with almond fixtures ~ Like Mother, Like Daughter

Working with almond fixtures ~ Like Mother, Like Daughter

Working with almond fixtures ~ Like Mother, Like Daughter

Working with almond fixtures ~ Like Mother, Like Daughter

Working with almond fixtures ~ Like Mother, Like Daughter

Working with almond fixtures ~ Like Mother, Like Daughter

We did update the faucets. Surely you can see why…

BEFORE:

Working with almond fixtures ~ Like Mother, Like Daughter

BEFORE: Working with almond fixtures ~ Like Mother, Like Daughter

AFTER:

Working with almond fixtures ~ Like Mother, Like Daughter

I will say that the surround of the tub and the countertop and backsplashes are all Corian. I like that surface. I would have liked it not to be almond, but oh well.

Working with almond fixtures ~ Like Mother, Like Daughter

One little note you might not think of: The nice-looking black and chrome toothbrush holder from Target (as seen in the before pic just above)?

No good.

No matter how much you rinse the toothbrushes, the dried residue is white! Making your holder look gross. I spray painted mine white.

Working with almond fixtures ~ Like Mother, Like Daughter

There are nice touches in old houses…

Working with almond fixtures ~ Like Mother, Like Daughter
Before:

BEFORE: Working with almond fixtures ~ Like Mother, Like Daughter

After:

DSC_0144

Things I would do at some point:

Touch up the black of the vanity and the frames of the mirrors

Spray paint the towel ring between the two mirrors black

Replace the window over the tub so that it opens (which, among other things, would allow for it to be cleaned on the outside; it’s over the roof of the garage, so a cleaning isn’t happening otherwise!)

Replace or paint the faucet of the tub

Line the curtain to make it look a bit more substantial — this requires coming across a good length of muslin at some point

Paint and sources:

Walls: Olympic, Sienna Sand (which may be the Benjamin Moore name which we originally used, but they can make it at Lowe’s)

Trim: Valspar Cliveden Mist (first we primed the oak well)

The black is just some random black in the case of the vanity (I don’t remember, but just don’t get a blue-black) or black spray paint

Ceiling paint: Take a tip from me and use glossy paint for your bathroom ceilings, preferably one that is mold-resistant — this was a huge upgrade from the regular ceiling paint that had been on there before

Flooring: Shaw’s Matrix Regency Vinyl Plank Flooring in Gunstock, from Lowe’s (I bought this after buying a similar product from Home Depot; I was actually hoping for a lighter color (which I think doesn’t show as much dirt). I was checking out with enough flooring for both bathrooms and caught sight of a sample laid out. My, it was ugly! So I turned right around and returned it all! After much texting of photos to Rosie and a considerable amount of agonizing over the fact that some colors are in stock and some are decidedly not and anyway how are you supposed to tell, I found this one at Lowe’s. I love it.)

Toilet: Gerber

Shower: Got it from the plumbing supply store — it is 5′ wide and has a built-in seat! The door is from Lowe’s and is suspended from the top, making it easier to clean

Faucets: Ufaucet from Amazon. These are very nice and the pop-up drain is metal, not plastic, and the price was right

Towel racks/hooks: Spray painted regular hooks black; Phil made the peg board; carved wooden hook from Marshall’s

Paris map: Available at art stores that sell wrapping paper, for under $4, or here on Amazon for more. I decoupaged it onto a spray-painted piece of particleboard that we had, so the whole thing cost me $5

Curtain fabric: JoAnn’s

Other art: Thrifted, or decoupaged greeting cards — the “abstract art” is actually a picture of a Gee’s Bend quilt, and however much a source of contention it is in my family, I love it for the sweet thriftiness it represents

Shout-out to Bridget who helped me choose the fabric and who did a lot of painting!

Tuesday, December 5, 2017

30 Ways To Upgrade Your Apartment On A Budget

Read article : 30 Ways To Upgrade Your Apartment On A Budget

So you’ve just moved into your first apartment on your own (or with roommates), and you seem to be baffled by how expensive everything is! Well don’t worry, because there are ways to upgrade your apartment on a budget. Sure, you pay electricity and internet.. and water..and heat. There is some serious budgeting needed in order to live comfortably. I also understand that you want to know more than just “put baking soda in your fridge to avoid it from stinking up.” So here are 15 great ways to upgrade your apartment while on a budget! Good luck!

*This article is in collaboration with Kayla Nannariello.

1. Use Command Hooks!

The most standard tool among students! Command hooks have a universal purpose, to make life easier. I have command hooks for clothes, I have command hooks for lights, I have command hooks for my whiteboard and anything else I want to hang. they can hold a lot of weight depending on the size of hooks you get. I have hooks for my keys, my umbrella, any dangling wires and even my night light! These little life and space savers not only make it easier to find stuff, but also make your place look so much cleaner and organized…something you definitely want to see when you come back from a long day of classes. This way you will have a place to put your keys instead of throwing them around and regretting it the next morning when you’re rushing around.

2. Use the free cups and bottles you get around campus fairs (housing fair, clubs and organizations fairs, career fair.)

Don’t just use them to drink; use them as pen stands, stands to hold your dish washing brush, fill them up with change that you don’t want in your wallet. I covered my cup with three layers of paper on the top and made a slit through the center and there you have it, your college piggy bank (you’re going to need that money for laundry and err..)
The bottles particularly, can be used to store pretty much anything. One of my bottles is filled up with paper clips. The other is in the fridge so I have cold water when I need it, and another one makes for an easy lime-juice dispenser.

3. Don’t hold back, get a huge trash can.

This is by far the most convenient thing I have done for myself in the apartment. We bought a 55 gallon trash can from Walmart and now we save on trash bags all the time…and the best part? We don’t have to take it out very often. If you want to budget and you’re lazy, this is a win-win. Moreover, these giant cans have a cover, so they don’t stink up the apartment even if you decide to dump food that’s days old because, come on, let’s face it, every college student forgets to throw away old food for a long time because they actually forgot or they’re just procrastinating.

4. Keep those twist ties you get with almost anything you buy.

You know when you buy a loaf of bread or something that has wound up wire over it? And you decide to throw it away? Don’t. These things can come in handy at any time in your apartment. Leaving for summer and don’t want to let the cutlery just lie around? Use this to wind up the spoons together and store them away. Phone charger too long for where its plugged in? Wind it up a bit and hold it together with this! Tape can make it sticky, very easily. Opened a pack of Doritos and want to save it for later? Don’t leave it open, use these!

5. Use an old or cheap blanket as a window blind.

I’m not kidding, some blankets at Walmart go for less than $8, and if you are renting an apartment, it’s highly unlikely that it will come with fancy blackout curtains. Get a blanket, and use command hooks to hang it up right around your window. Put two loops at the bottom corners so you can roll it up and hook it to the hooks on the top to make a blind, there you go! Cheap and easy blackout curtains to help you sleep in after that rough Friday night.

6. Use over-the-door hooks.

You don’t want to have to deal with putting 5 command hooks up when you know you need them there, and you want something that you can load up more than just the capacity of those sticky magicians. They’re cheap and there are so many options on Amazon. There are no restrictions for these and you do not need to do any work, just stick the hooks over the door so they hold on and hang away! In any case, most rental apartments will not allow you to drill holes and screw in hooks and this is the only alternative to get hooks as strong.

7. Get LED strip lighting for your apartment.

Ever get that feeling when you don’t want any lights on but also want to be able to see and move around your room? Here’s your solution, and it’s pretty cool. These lights go for anywhere between $15-$25, and they come in lengths up to 32 feet! You simply put them across the top of your room’s walls with command hooks (of course) or if the wall is flat enough then you can even use their built-in adhesive. They have a remote, and they are LEDs, so they’re barely using any electricity. They have brightness control and color changing capabilities for when you’re throwing that Saturday night party. It’s easy, cheap and will impress any guests. They can set the mood, become an ideal everyday light and even become party strobe lights.

8. When life gives you lemons, CLEAN!

You know how after you make a glass of lemonade, you throw out the squeezed lemon…right? Wrong. This is the perfect way to save yourself from over-spraying the kitchen with Febreze. Just throw that thing into the sink disposal, run it and run warm water as you do so. Crushed lemon will release a fresh aroma, much better than using any spray since it’s acidity will clean as well. Got a dirty or stinky microwave? Grab any microwavable mid-sized bowl and fill it halfway with water, cut a lemon in half and squeeze both halves only a little into the water, not all the way. Now dump them into the water and microwave for 3 minutes. Once it’s done, your microwave will smell fresh and will be much easier to clean!

9. Use a giant bowl of water to keep your room air from being too dry.

The weather gets dry and cold in the winter, which means we all start having dry hands, and feel really dehydrated. Our apartment heaters can be the culprit in this dry air problem. A simple solution is to take a large bowl, fill it with water and simply place it in your room. This works, and it works well. It will keep the air slightly humid and especially if you’re from a less cold region, you will be saved from terrible and painful dry skin. Save your money and don’t buy those heavy and space hogging humidifiers, do this instead!

10. Use Brita filters!

If you’re the kind that likes to drink bottled or filtered water, you’d be spending at least $4 a day or more than those who drink tap water. But what if I said you could drink filtered tap water? Look no further! If you don’t already know about Brita jugs and filters, you need to know. These things have filters built into them, so it’s as easy as filling up a jug by turning on the faucet. It even reminds you when to change a filter, and no its not every week, it’s around every 4 months.

11. Buy everything in bulk.

If you’re at Walmart and you love getting orange juice for that night, it is very likely that you will come back to get more. Instead, save yourself the trouble and the money…buy a giant jug of it, or even four jugs of it. Buying bigger packs saves more than you think, and you will have to make less trips, so there’s time and energy saved too! This applies to pretty much anything from frozen food to toilet paper. I would even recommend buying the large boxes of laundry detergent/pods. You’re not going to stop doing laundry, so you might as well stock up.

Using Amazon’s ‘dash buttons’ is a pretty neat way to be lazy too. Just press the button when you’re running low and there you have it, delivered supplies to your doorstep. They even have these things for Red bull and Gatorade cases, and they don’t cost anything extra. You get a discount on your first order that matches the amount you paid to get the button so that’s pretty neat and convenient.

12. Buy Windex, a lot of it.

This magical solution we all know is much more useful than you think it is. You can use it to clean counters, tables, wall stains, floor spills and pretty much anything that your apartment life can throw at you. Simply buy a refill after your first spray bottle. Fear not, Windex can even clean your stained bathroom mirror very easily so you can look good and feel fresh every morning!

13. Buy space-savers for literally everything.

I have one for snacks, one for stationery and one for cutlery. We also have one in the living room which helps when we simply leave our stuff out. There are sizes that fit on a table to keep small items and sizes that stand alone and can even be used as a bedside table or in my case, a place to keep the bowl of water so the air doesn’t get too dry!

14. Look into Mainstays products.

They make inexpensive household items such as the space-savers I mentioned. They also make furniture, so if you’re looking for a desk in your room, a chair, a comfortable chair to watch TV in, sheets, blankets and anything else you might need, they probably have it. Remember, most of these items are the cheapest when the semester starts and the large stores are having their sales. Most of my kitchen, including plates, cooking vessels and cutlery is from Mainstays, they have great deals and it’s definitely worth it.

15. Add some Throw Pillows!

Throw pillows are a great way to spruce up your apartment without spending too much     money. They come in millions of prints, so you’ll always be able to find ones that match your personal style and the look you’re going for!

16. Use decorative baskets as opposed to plastic storage bins.

Baskets are a great alternative to plastic storage bins. They act as decor but keep your things organized just as well! There are so many cute basket options out there whether you enjoy wired baskets, canvas, or woven ones and they come in all shapes and sizes to fit into whatever space you need!

17. Wall art makes a huge difference!

Dress up any boring drab walls you have in your apartment with some wall art. The possibilites here are endless! You can even buy just the prints or download prints from sites like Etsy and add your own frame.

18. Add slipcovers to your furniture.

Do you have an old beat up couch and can’t afford to buy a new one? No worries, just buy a slipcover. Slipcovers are awesome because they come in so many different colors and designs, and you can switch them out whenever you want a new look!

19. Make your space more inviting with picture frames.

Another cheap way to spruce up your apartment is to buy cute picture frames and fill them with your favorite pictures! It’s a great way to add a personal touch to your apartment. This will make your living space feel more cozy just like the home you grew up in!

20.  A rug.

If you don’t like your flooring, area rugs are a great way to cover it up. They come in so many different sizes that you’re bound to find one that will fit your space. A good rug can do wonders for an apartment by covering up any messed up flooring and making your apartment look bigger than it actually is.

21. Set out some candles.

They’re cheap, they smell good, and they act as decor. Candles have a great way of turning any drab apartment into an inviting atmosphere!

22. Decorate with artificial succulents.

Fake succulents are great because they require no maintenance. And unlike real plants, you don’t have to worry about replacing it when it dies.

23. Your table lamps can make a statement.

Instead of buying simple lamps for your end tables, get more interesting ones. Not only will they dress up the room, but they are bound to be a conversation starter.

24. Buy simple furniture.

When buying furniture, don’t buy anything crazy. Go for things that are neutral colors and won’t go out of style and can look timeless in any setting.

25. Choose the right comforter.

Your comforter can make or a break a room, and unless you are absolutely in love with a printed comforter, I wouldn’t buy it. Instead, go for a solid color, preferably a neutral. This way you aren’t limited on how you decorate your room. The solid color also gives the room a very clean feel.

26. Opt for placemats.

Placemats are a super cheap way to make your dining room or kitchen look instantly more put together.

27. Get a shower curtain.

Shower curtains take up the most room in a bathroom, so make sure yours is something that people won’t mind looking at. Resist the crazy printed ones and instead, go for a simple print that will dress up your bathroom and make it seem brighter and bigger.

28. Add a good throw blanket into the mix.

Throw blankets are great because they give a cozy feel to the room and it’s always great to have a blanket nearby, but they also work as decoration.

29. Add some mirrors to your walls.

Mirrors are amazing because they make the room look bigger and they tend to draw in people’s attention.

30. If you ever need anything for your apartment, always look it up Amazon first.

When I was setting up my apartment, there were many things I found that I didn’t even know would help me so much! For example, many of my sockets have a switch extension, so I can turn them off while I am not using them, without unplugging them. This is especially useful for behind the bed and under the desk sockets, since unplugging requires a lot of effort and plugging it back in is even worse…you might even have to move the entire piece of furniture. Power strips, USB adapters and anything you can think off, it’s probably cheaper on Amazon.

Do you have any other good ideas on ways to upgrade your apartment on a budget? Share in the comments below!

shareonpinterest

30 Ways to upgrade your apartment on a budget

*This is a sponsored post. All opinions are my own.

Featured Image source:http: //homelk.com/apartments/cute-college-apartment-bedrooms-for-girls

image


Tags: apartment essentials, apartment hacks, things you need for your first apartment, upgrade your apartment, upgrade your apartment on a budget, ways to upgrade apartment

Sunday, September 3, 2017

Celebrating Earth Day with Reverie Farms Bath and Body Products – Never Say Die Beauty

Read article : Celebrating Earth Day with Reverie Farms Bath and Body Products – Never Say Die Beauty

Saturday April 22 is Earth Day, and it’s more important than ever to do things to help protect the environment and to advance science to that end. I actually remember the first Earth Day oh so long ago. It was a very big deal because so little was being done at that time to protect our air, water and earth. Many years later, some things have improved but others not so much.

Press Sample - Affiliate Links

Using earth and body-friendly products is a small way to do something to help our planet and ourselves, hopefully while doing other more impactful things to protect Mother Earth.

Today, I’d like to talk about a new-to-me brand, Reverie Farms & Soaps.

Reverie Farms and Soaps

I discovered Reverie Farms and Soaps very recently. A few weeks ago, in fact.

Reverie Farms is an actual family farm located in Argyle Texas, not too far from Dallas-Fort Worth. I have a friend who lives in nearby Denton TX, so I hope someday I’ll have a chance to visit the farm myself. They have tours!

In addition to making natural and organic soaps, other bath and body products and laundry soap, they sell their own farm fresh eggsNigerian Dwarf Goats and Anatolian Shepherd dogs. How cool is that?!

credit: Reverie Farms

credit: Reverie Farms

Reverie Farms has a nicely edited list of products that they sell:

  • bar soaps in unscented as well as in a range of natural scents
  • foaming hand soap
  • soap savers (at the best price I’ve seen!)
  • body scrub
  • liquid laundry soap.

I’m a bespoke soap fiend so I was thrilled to get a chance to try out their bar soap and their foaming hand soap.

Reverie Farms <a href=foaming hand soap and bar soap, neversaydiebeauty.com" width="908" height="1024" />

Natural Bar Soap

The Reverie Farms natural organic based bar soap is biodegradable, vegan friendly, and made with organic oils of sunflower and/or safflower, coconut, and sustainably sourced palm, essential oils, and rosemary extract. The sunflower, safflower, coconut, and palm oils are certified organic ingredients.

Importantly, the bar soap is NOT made with artificial ingredients like synthetic fragrances, dyes or preservatives. Reverie Farms uses organically grown products whenever possible. The soaps are scented only with essential oils, and they are colored with organic herbs and plant extracts. The soap base recipe is made from 100% certified organic oils.

Their are 10 different scents to choose from:

  • Citrus Fusion
  • Lavender
  • Citrus Lavender
  • Cleansing Lemon Twist
  • Sage Lemongrass
  • Walk In The Forest
  • Peppermint
  • Sensitive Shea
  • Herb Garden
  • Unscented.

<a href=Reverie Farms Citrus Fusion bar soap, neversaydiebeauty.com" width="807" height="1024" />

I am currently using Citrus Fusion. It has a mild citrus scent that that is gender neutral. It makes just the right amount of lather, and though it is hydrating, it isn’t greasy. Unlike some of the other hydrating bar soaps that I use that make the bottom of my tub really slippery, Reverie Farms Citrus Fusion does not.

The 4 oz. bar soap priced at $6 is a large bar that is going to last me a long time. Some bar soap seems to melt away in the shower, but this one doesn’t. Plus it fits perfectly on my soap saver. Frankly, I wish I had purchased my soap saver from Reverie Farms because theirs is more affordably priced at $3.50.

credit: Reverie Farms

Natural Foaming Hand Soap

I like to keep liquid soap on my bathroom vanity and at the kitchen sink. Lately I’ve been getting into foaming soaps because they’re ready to go when you pump. I was happy to get to try Reverie Farms Natural Foaming Hand Soap. Importantly, the pump itself is wide which makes it easy to pump. The soap comes out in a rich but delicate foam.

Reverie Farms Sandalwood Natural Foaming Soap, neversaydiebeauty.com

Like the bar soap, it is a biodegradable, natural organic-based soap that is biodegradable, vegan friendly, and made with organic oils of sunflower* and/or safflower*, and coconut*, vegetable glycerin*, rosemary extract and essential oils (the * means certified organic ingredient). Formulated for sensitive skin. It feels smooth and moisturizing, though with my dry hands I always follow up with hand cream after I wash my hands.  It has  no synthetic detergents or preservatives, parabens, and it is Non-GMO.

The foaming hand soap is available in several scents:

  • Lavender
  • Peppermint
  • Sandalwood
  • Lemongrass
  • Rosemary
  • Unscented.

I am using Sandalwood. Like the bar soap, it is a mild, gender neutral scent. The Natural Foaming Hand Soap plastic pump bottle contains 8 oz. and is priced at $6.25.

Other Products

As I mentioned, Reverie Farms also sells Body Scrub in 4 oz. jars in about 6 different scents for $6.25 as well as Natural Liquid Laundry Soap in 32 oz. bottles for $9.00. I’d like to try them both next. I really could use the Natural Liquid Laundry Soap because it’s good for sensitive skin, and it is perfect for delicates like my new silk pillowcase.

credit: Reverie Farms

credit: Reverie Farms

So visit the Reverie Farms website if you can’t make it out to Argyle Texas to visit the farm itself. With both Mother’s Day and Father’s Day coming up, I think the bar soaps, foaming soaps, and body scrubs would make for a really wonderful pampering basket of cleansers that are effective but gentle on skin as well as gentle on the earth. Plus you can get 10% off on your first purchase with the discount code for Never Say Die Beauty readers: NSDB417 (the code doesn’t expire but it can be used only once)  😛

Happy Earth Day!

Click here for reuse options!
Copyright 2017 Never Say Die Beauty

image

Monday, July 17, 2017

You Okay for Time? | Kaori Fujino

Read article : You Okay for Time? | Kaori Fujino
Translated from Japanese by Ginny Tapley Takemori

For my best friend’s wedding present, I sent her a potted sansevieria. I compared product photos and prices online, selected one within my budget, addressed it to her new apartment, and hit send. I thought a leafy plant would be a more thoughtful gift than crockery or towels.

I called her soon after.

‘Did you get it?’

‘Yes, thank you! I love it – hope it’s okay, though.’

I knew what she meant. She was the only one in our class who’d failed to grow a hyacinth bulb in water, and she’d even made a cactus rot. The reason I’d chosen a sansevieria out of all the many leafy plants was, shall we say, out of consideration. The shop blurb said the sansevieria was stronger and easier to look after than any other plant, and on top of that it produced negative ions thereby improving indoor air quality, making it the perfect gift. ‘Stronger and easier to look after than any other plant’: that meant even she’d be able to care for it. She wasn’t a child any more after all, not by a long stretch – and she was married, to boot. There had been times when I thought she’d probably never marry, but she did. In which case she should at least be able to care for one of these.

I didn’t tell her that.

‘It’ll be fine,’ I said simply, full of affection for her. ‘The instruction leaflet was enclosed, right? Make sure you read it.’

‘Oh, hang on a sec. Ryo wants to say thank you too.’

The sound of her breathing receded, and her husband exhaled into my ear.

‘Hey, how are you?’ he said cheerfully. ‘Thanks for the wedding reception.’

He was referring to the fact I gave a speech on behalf of the bride’s friends. I put a lot of effort into it, feeling all warm and fuzzy as I rediscovered so many memories of her. They all sparkled, like a little brook. Everything that happened between us, the things she said, the things I said, were all washed away out of reach, leaving only the freshness of crystal clear water. How was I to convey this modest joy, pleasantly cool yet still warm, to everyone there? In a corner of my mind I knew I was being condescending. And yes, I was disdainful of my friend. But this didn’t diminish my friendly feelings towards her. So I put my whole heart into giving the speech. I talked about how gentle and kind she was, how serious and candid and unaffected. I really like my friend. I always did, and I still do.

My friend’s husband laughed and said he would make sure she didn’t let my gift die. My friend came back on the line.

‘You okay for time?’ That’s what she always said when she wanted a long chat. I was okay for time. I was surprised she was, being newly married, but it was just like her really.

‘It’s fine, no problem. Ryo’s going to have a bath now.’

And so she started talking, just like she always did.

The subject was her husband. She discovered new things about him every day, she said. Occasionally she lowered her voice and spoke about amusing details with great relish: how she couldn’t contend with the grime on his shirt collar just by rubbing it with detergent and washing it; how he coughed up phlegm in the toilet twice a day; the dull, heavy smell of sweat that filled the bedroom after a sound night’s sleep; the appalling potency of his bad breath first thing in the morning. How he folded his pants neatly and put them away. How he was particular about which shampoo and conditioner he used. How he’d been upset that they didn’t sell his preferred products in the local drug store, so he’d ordered them online.

‘Isn’t it weird? It’s only shampoo and rinse – any would do, surely?

‘It’s conditioner,’ I corrected her. ‘Even you always use the one your mom chose, don’t you?’

‘I have to. My hair goes everywhere if I don’t.’

Whenever my friend stayed in hotels, she never touched the shampoo provided but instead lined up her own little refillable bottles on the edge of the bathtub. If I ever suggested she stayed over at my place, she would recoil and excuse herself in a small voice saying she hadn’t brought her shampoo with her.

‘I never knew men were fussy about that sort of thing. I always thought they were okay with using just shampoo and didn’t need rinse.’

‘Conditioner,’ I corrected her again.

‘Oh, right. So what’s the difference between conditioner and the rinse that I use?’

‘Yours is treatment.’

‘Oh, is that what it is?’

My friend’s voice suddenly brightened. ‘Hey, Ryo! Sure, I was just about to hang up.’ The words that came through her cell phone hadn’t been directed at me, but rather arrived as a ripple from her voice echoing throughout a large sealed room empty but for herself. Although her new home was a fifty-six square meter two-bedroom condo.

‘So, come and visit, won’t you?’ she said quickly.

‘Sure, I’ll visit. Sometime soon.’

I know her really very well. After all, she is my best friend. For example, it was obvious to me that she knew very little about her boyfriend when she married him, even after dating for seven years. All she’d known about him apart from his basic personal information was his taste in films, his taste in clothes, his taste in food, his taste in women – and most importantly what he liked about her and how much. She’s lacking in imagination and didn’t need to know any more. I knew, naturally, that there were sides to her boyfriend she didn’t know about, and that she wasn’t even aware she didn’t know about them.

I also knew all about their sex life. They hadn’t had sex at all during the last two years they were dating. They’d done it more frequently at the beginning of their relationship, but it had slowly died out. There were all kinds of reasons: he was busy with his work, or she had her period, or they preferred to go see a movie together rather than spend time cooped up in a bedroom, or there was an art exhibition they wanted to see, or they would go two hours by train to eat cake at a café featured in a magazine, or they’d arranged to go out with me or some other friend. I knew she was a little suspicious about it, and also that she was unhappy about it. But I also knew that she was convinced he wasn’t being unfaithful, that he was devoted only to her, and truly loved only her. And it was true. During those seven years, she had often invited me out to lunch with the two of them, and we’d also gone out together in a big group of friends to karaoke and barbecues. On those occasions I’d been able to casually sound him and his friends out, and I had to conclude that she was right. I was pretty good at that sort of thing – at ferreting out gossip, and seducing spoken-for men. He was clean. That was when I first thought my friend would probably marry him. It’d be more fun if it wasn’t the case, though.

I hoped she wouldn’t let the sansevieria die right away. I hoped there wouldn’t be an awkward situation with her feeling she’d wronged me by letting it dry out or rot.

It was rarely me who called her. It was always she who called.

‘You okay for time?’

‘Sure. How’s the sansevieria?’

‘It’s doing great!’ she said enthusiastically. ‘Even though I’ve only watered it twice since it arrived. I wanted to water it more, the poor thing, but Ryo said the instructions said not to water it too much so I forced myself to be patient. And it seems to like it like that. It’s really tough, isn’t it?’

‘Really? That’s great.’

‘Listen, you know what? Ryo still doesn’t do it.’

‘Doesn’t do what?’

‘Look I told you we hadn’t been doing it. For about two years.’

‘What? You are kidding me, right?’

‘It’s true.’

But I wasn’t as surprised as I’d made out, and she wasn’t all that depressed about it either. She told me about how affectionate her husband was. He wants to hold hands even at home. He’s concerned when my friend has to work overtime and comes home late, and goes to the station to meet her. He won’t eat dinner until she comes home. He wants to eat with her, and will wait for hours. Dinner is almost always ready-made meals or easy-cook packets from the supermarket. My friend always lived at home so she can’t cook very well, and she doesn’t have time to practise. Her husband doesn’t complain at all, and just smiles. He can’t cook either. He lived alone for a long time so you’d have thought he would have learned how to, but my friend overlooks this point. In bed, they talk together. She has a lot to talk about and he hangs on to her every word, so that by the time they’ve finished talking they are both dead tired, and the atmosphere isn’t conducive to sex.

‘He’s a bit like a parent, I guess. No, he’s much more overprotective than a parent,’ she said happily. ‘Just when I thought I’d finally managed to get away from my parents, I go and marry a father figure. How tedious!’

I’d known that if she ever married it would be to a parental substitute.

‘When are you coming over?’ she asked. ‘Come while the sansevieria is still healthy.’

‘Uh-huh.’

‘What about this Saturday?’

‘Sorry, it’s the company trip that day.’

‘Well, what about the following Saturday? Weekday evenings are fine too.’

‘I’ll try to work out my schedule.’

A photo arrived to my cell phone. It was a sansevieria. It filled the screen, with the top cut off and the background barely visible. All I could tell was that the curtains were a similar shade of green as the plant. It hadn’t withered yet. I was just about to email my friend when she called.

‘Did you see it?’ Her voice was louder than usual.

‘I saw it.’

‘It’s grown a lot, hasn’t it?’

‘Has it? I can’t tell.’

‘It has. It’s sending out new shoots from the side, too. Could you tell?’

‘Oh, really? No, I didn’t notice that.’

‘Dad says it’s about time we repotted it.’

‘Dad?’

‘Oh wait, I’ll hand you over.’

‘Yoko-chan, long time no see. Thanks for everything at the wedding reception.’

It was her mother, not her father.

‘Oh, you’re welcome. It really has been a long time, hasn’t it?’

‘You know, your speech was so moving that I cried. And you gave them such a nice present too. Thank you so much.’

‘Oh, not at all.’

‘Please do keep being good friends.

‘I will.’

My friend came back on the line.

‘Sorry, Mom said she really wanted to say hello to you.’

‘Are your Mom and Dad over to visit?’

‘Yes. They were worried that Ryo and I aren’t eating properly, so they made some lunch and brought it over. Enough for four. Mom’s just heating it up and putting it out on the plates now. Sorry she bothered you. Dad and Ryo are watching TV.’

I strained my ears. My friend’s voice was exceptionally clear, and the background was hushed. I couldn’t hear any sound from the TV or microwave, or the clatter of plates.

‘Oh, Dad said to say hello. Ryo too. So, what about it? When are you coming over? Hold on a sec . . . Ryo says he can make Wednesday or Friday this week.’

‘Uh-huh.’

I hung up the phone, got into bed, and thought about my friend’s parents. I know them quite well. They also know me quite well. They probably thought my friend was a virgin until she finally got married. As if.

My friend is an only child, and while her parents are parents, they are also her closest friends. They are really unbelievably close. She tells them everything. She does so because they want to listen.

Her parents could hardly wait for her to come home from school, cram school, work, or a night out, so she could tell them about it. When she was happy they were happier, when she laughed they laughed louder, when she was sad they were sadder, when she was angry they were angrier, they worried endlessly about things before she did, they liked everything about her, and their attitude showed that they accepted everything about her. My friend talked and talked and talked. She talked about absolutely everything. Her parents listened ad infinitum.

They assume her best friend does the same, but they’re wrong. As her best friend I can guarantee that just being best friends doesn’t mean you want to hear about anything and everything. Of course, if she says she wants me to listen, I listen. And I actually have been listening. That’s what being best friends is about. But in fact, pretty much the only thing a best friend wants to hear about is how far her friend went with her boyfriend.

And that is pretty much the only thing that her parents didn’t want to hear about. They hoped she would fall in love like everyone else, and wanted it all to go well. It wasn’t like they made sex a taboo subject – as long as it was about her friends, not her, not their daughter. They didn’t want her to have sex. Not when she was 16, nor 20, nor 23, nor 29, nor even 32. Sex was part and parcel of marriage. They made themselves very clear on this. Whenever the subject came up, it was the only time they stopped being friends and put on utterly implacable, stern parent faces.

My friend had sex on the sly. During the day, expeditiously, quietly, holding her breath. She maintained appearances, not staying out all night, and only going on trips with me or other girlfriends.

‘Tell them you’re staying at mine,’ I told her. ‘Then you can stay over at his.’

It was the same with trips. ‘What’s the problem with telling them you’re going with me, and going with him instead?’ I’d say.

My friend never once used me. Not when we were 16, nor when we were 32. But I don’t think her parents were stupid enough to really believe that she was a virgin right up until she married at 33. Just like my friend wasn’t stupid enough to actually keep her virginity.

My friend always was demure. While I and other girlfriends were giving our youth a mauling, getting battered and toughening ourselves up, my friend simply put her youth on her knee and absently picked at it with her fingernails. She began to feel an anguish that she couldn’t tell her parents about. And so it was my turn. I listened to her anguish. It wasn’t the fact that sex was forbidden that was causing her so much distress, it was that she wanted to abandon herself to her parents in the way she always did, but wasn’t able to.

But I’m not disdainful of my friend because she does whatever her parents tell her to, nor because she hasn’t experienced adventure or recklessness. It’s because she’s empty.

‘I always get the feeling that I’m not a participant in my own life,’ she confessed to me.

And it’s true. A large part of her belongs to her parents, and the rest of her is mine and her boyfriend-of-the moment’s. Now her husband’s.

‘You okay for time?

‘Sure.’ Of course I am.

‘My parents have been coming over three times a week since then. They come when Ryo and I are at work, fill the refrigerator with ready made meals, and go away again.’

‘Really?’

‘Ryo’s happy because it’s tasty, saves us money, and it makes things easy for us.’

‘But you’re not?’

‘Not really . . . after all, we’re supposed to be newly-weds but it doesn’t feel like that. But then, Mom’s cooking is tasty, and it really is a big help, I guess.’

Then she told me they’d finally had sex again last night. She was especially happy because her husband had initiated it, not her. She also talked about having children. Last night they’d used contraception out of habit, but at her age, if they wanted children she’d better hurry up. Before they married, her husband had said he wanted two children. I knew this. He’s one of two brothers. My friend, on the other hand, wouldn’t mind having just one, and they’d argued a little over this. I knew this too. But now her husband had started saying that maybe one child would be enough. He’d love a cute girl who looked just like her. But my friend has also changed her mind, and tells me she wants two. It would be good if both were boys, she said.

‘After all, they’d have more freedom to live their lives the way they want.’

‘Really? Doesn’t it depend on the person?’

‘Oh, someone’s at the door. Wait a bit – I’ll call you back.’

She hung up. Who had come? I didn’t know.

Ten minutes or so later, she called again.

‘It was a delivery.’

‘Really?’

‘What on earth is this?’

I said nothing and waited. Now I could hear the sound of my friend clumsily using a cutter, the sound of her slashing tape, the sound of her ripping the package open even though the tape wasn’t completely cut, the sound of her removing the packaging.

‘What the heck? . . . Soil and a plant pot.’

‘Soil?’

‘It says “Soil for growing sansevieria.” There’s a trowel, too.’

She looked at the invoice. It was in her husband’s name.

‘You okay for time?’

‘Yeah.’

‘It was a present. From Ryo. For our half-anniversary, he said.’

‘What?’

‘Half-anniversary. Our wedding.’

My friend told me the sansevieria I’d given them was growing fast and putting out a lot of new roots, so it was time to separate it out. She and her husband had studied up online about how to separate the roots and repot them, and they’d carried it out in their living room on their day off, and ended up getting soil all over the wood flooring.

‘After all, we didn’t want to take it out onto the balcony and let bugs get into the soil. We thought it would be enough to just spread out newspaper, but we underestimated the amount of soil. It got everywhere when we pulled the plant out of its original pot.’

‘So, did it go well?’

‘Probably. Right now both pots look very much alive. We leave the curtains open for the plants while we’re out at work. We’re a bit worried about sun damage to the flooring, but we feel too sorry for them not getting enough light. Did you know that new sansevieria roots are joined together underground by a fat stem called a rhizome?’

‘Hah.’

‘You’re supposed to snap it off, but I made a mess of it . . . so Ryo cut it.’

‘I see.’

‘And then you’re supposed to leave the break to dry for two or three days before potting it, but we couldn’t wait, so Ryo went and got the hairdryer and gave it a blast with that until it looked like it was dry enough. I was worried it might die after we repotted it.’

‘Really? Was it okay?’

‘Seems so. The both of them are getting bigger by the day. We’ll have to separate them out again before long.’

She said that next time they were going to make one for her parents. And one for me.

‘You can take it home with you when you come over to visit.’

‘Oh, but . . . I don’t need one!’

‘Um, you okay for time?’

‘Yes, sure. No problem.’

She burst into tears, heaving great sobs while I tranquilly listened. She sniffled, then blew her nose, cleared her throat, and cried again. It had been a while, but it wasn’t the first time. Whenever my friend wants to cry, I let her. She’s crying because she hasn’t got anything she needs to talk about. She wants to talk, she wants to unburden herself, but there’s nothing left so all she can do is cry. She did this once to her parents. They panicked. They feared something terrible had happened to her, that maybe someone had bullied her, but she said no, nothing had happened. They thought that was even more serious, that the problem was so big she couldn’t talk about it.

My friend’s parents held her tight, shook her, lost patience with her and scolded her, calmed down and comforted her, doing everything they could to get it out of her. It was such a tremendous onslaught that she couldn’t ignore them. Still crying, she desperately thought about it. She wasn’t allowed to cry for nothing. She had to give them a reason.

She told them she’d had a huge fight with her best friend. Me, that is. ‘Best friend? Which one?’ her baffled parents asked. My friend gave my name. To be honest, until that moment, we hadn’t been best friends. But so what? From the moment she named me as her best friend, that’s what we’ve been.

I don’t ask her why she’s crying. I wait until she finishes, however long it takes. I’m okay for time.

My friend at last calmed down and muttered ‘Sorry’ with an embarrassed laugh.

‘How’s the sansevieria?’ I asked sympathetically.

‘It’s fine. Really fine. It’s growing more and more leaves. We’re really good at separating the roots now. How many pots do you think we have now? Come over soon and see!’

‘Sorry, I’m just so busy.’

By the time I finally managed to visit my friend’s new home, two years had passed since her wedding. While I’d been so busy, she’d had a child. A boy. She sent a photo to my cell phone of the newborn swaddled in white linen and laid down on the flooring with a sansevieria leaf next to him. The leaf, longer than the baby, was like a double-edged sword with a sharp pointed tip.

‘Baby and sansevieria both doing well,’ read the message.

On the appointed day, I left work early and went to a department store where I bought some blue baby rompers and had them wrapped with a blue ribbon. Then I went to the basement food hall and bought five custard puddings.

‘He’s such a boy, even though he’s just a baby. He’s so naughty!’ My friend told me on the phone. She also said, ‘When I told my parents you were coming over, Yoko, they were delighted and started going on about how much they wanted to see you too. Do you mind? Mom said she’d cook us up a feast. Ryo’s all fired up too and said he’ll come home early to help. He’s been learning how to cook from Mom lately. It’s weird. Dad’s the same as ever. The moment he comes over he goes straight to sit in front of the TV.’

I arrived at my friend’s condo and pressed the button on the interphone at the entrance. She answered right away, as though she’d been waiting.

‘Come in!’ she said, and the automatic door opened. ‘Get the elevator to the seventh floor. Turn left out of the elevator, and it’s the door at the far end. And I’m sorry, but we’re all a bit tied up at the moment. The door isn’t locked, so just come on in.’

In the elevator I jiggled my shoulders to straighten my jacket, and adjusted my grip on my handbag and the bags with the gifts I’d brought with me. I followed her instructions and soon stood before the apartment door. One side of the shared corridor was open, and the faint sound of the traffic below reminding me of my childhood. I put my hand on the cream-colored door. As she’d said, it wasn’t locked. I went inside and quietly closed it behind me.

A narrow hallway stretched out before me and opened out into the living room. But I couldn’t understand what I was seeing. Beneath a diffuse, warm-colored light, an expanse of thick, densely-growing blades of tall grass stretched out before me. When I took a closer look, it appeared to be growing out of soil spread directly onto the flooring.

Still, I had to take off my shoes. Hemmed in by a folded-up baby buggy and the walls, along with flat shoes and sandals, men’s leather shoes and sneakers, I remained standing upright and wiggled my ankles to release my heels from my pumps. I felt utterly unnerved, barely managing to put my stockinged feet in a space on the flooring where there was no soil. It was only when I’d accomplished this that I realized that it wasn’t grass at all, but leaves. Leaves of sansevieria.

I had only seen the sansevieria in photos. I held my handbag and the paper shopping bags in my left hand, and with my right hand I touched the leaves. They were hard, fleshy and cold. They were a deep green, with a deeper green, almost black stripes, and yellowish edges. They were smooth with the slight roughness of dust, and didn’t really strike me as something living.

The apartment was hushed. I forced my way through the closely-clustered leaves. I could tell my stockings had ripped underfoot. The only sounds were those I was making: the faint sound of my breathing, the rustling of my paper bags, the murmur of the sansevieria as I cut through it, pushing it away with my hands and forcing it aside with my body, crushing it underfoot.

Photograph © Carl Lewis

Friday, February 9, 2018

Delta Shower Doors - Design Your Own Shower Doors In Three Easy Steps!

Read article : Delta Shower Doors - Design Your Own Shower Doors In Three Easy Steps!

delta-logoWhat's This?The last time we remodeled our master bathroom, Ronald Reagan was president, a first-class stamp was 24¢, and the Dow Jones Industrial Average was around 1,900. At the time, we tiled the walls and floor, put in a stock vanity and toilet, and installed a 4’ one-piece shower with sliding glass doors. A few years ago, we replaced the vanity, and the room still looks pretty good overall. Taking a closer look, though, the faucets are getting tarnished, and the glass doors are looking pretty dated and beat. Recently, the folks at Delta offered us an opportunity to try out a new service they are offering in conjunction with the Home Depot. Put down your copy of 1984, and take a look. We’ll show you how easy it is to customize and order your own Delta Shower Doors!

<a href=delta shower doors" width="460" height="375" class="size-large wp-image-25841" />The old 1980’s doors look ok from a distance…<a href=delta shower doors" width="460" height="311" class="size-large wp-image-25889" />But a closer look shows it’s time to update.

The process is fast, easy, and almost fun—not an adjective you normally associate with buying a shower door. To begin, you first select what type of Delta Shower Doors you need—sliding tub, sliding shower, or pivoting shower. If it’s a shower door, you’ll need to know the measurement for the width; there’s a link on the first page that shows you where to measure.

<a href=
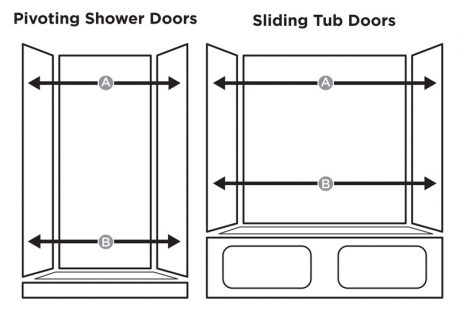
delta shower doors" width="460" height="311" class="size-large wp-image-25885" />The Delta Shower Doors website shows what measurements you need.

At this point, you have two choices: choice one is to choose your door type and finish the design process online, which is simple and takes just a few minutes. Choice two is for those who hate doing anything online, or who just want to get out of the house, and perhaps go somewhere that has people strolling about in orange aprons, eager to help you get through the design process. It turns out Home Depot is the only place to go since Delta Shower Doors are available in-store exclusively there. Here’s a quick overview of the process from Delta:

[embedded content]

Assuming you want to do it online, after choosing your door type, just click on the red banner that says “Step 1: Choose Your Glass.” Crazy as it sounds, this is where you’ll choose your glass. There are eight styles to choose from, including various patterns and textured glass. If you like to keep an eye on things while you’re showering, you can even select clear glass.

In the next step, you’ll choose the track for your Delta Shower Doors. You can select chrome, nickel, bronze, or polished brass. In each step of the process, prices are clearly shown for each option, and a little monitor on the upper right shows your selections so far, along with a running total cost. There is also a picture on each page, and whenever you make a selection, the picture is updated automatically to show what your door will look like.

<a href=
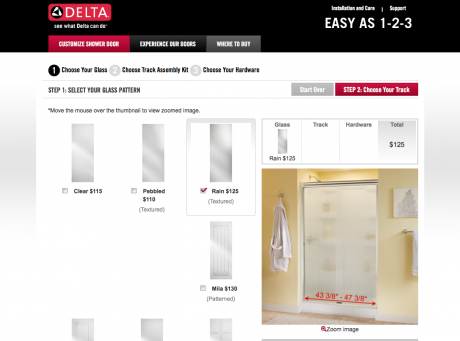
delta shower doors" width="460" height="341" class="size-large wp-image-25824" />Designing your doors online is fast and easy…

The final step is to select your hardware. There are four styles of towel bars to choose from, depending on your tastes. If keeping it simple is your style, take a look at “Simplicity.” Looking for something with a bit more panache? “Panache” might be just the thing. The other two offerings don’t lend themselves to cheesy references; you’ll just have to look for yourself.

And that’s it, you just designed your own Delta Shower Doors! Just click on “See Your Design” to—you guessed it—see your design. At this point, you’ll also be able to look through several accessories that coordinate with your design, including faucet sets, towel bars, toilet paper holders, drawer knobs and even flush levers for your toilet! Click on “Add To Cart,” and you’ll be taken to the Home Depot web site. First, select your delivery method; you can choose to have it shipped to the nearest Home Depot for free, or to your home for a fee. Proceed to the checkout, pay, and sit back and dream how splendid your baño will look when your designer door arrives!

<a href=
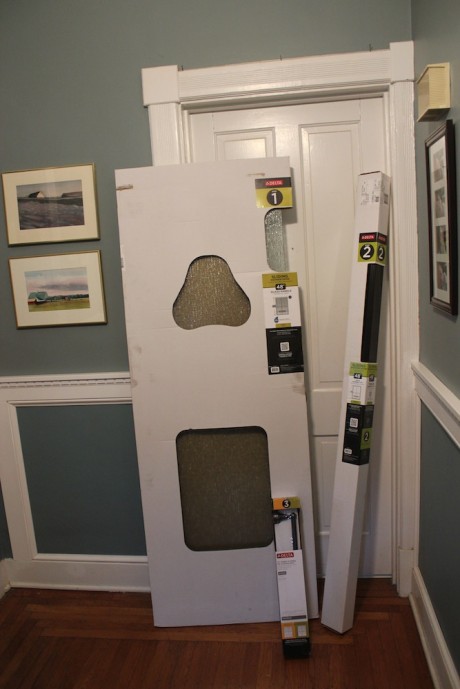
delta shower doors" width="460" height="689" class="size-large wp-image-25825" />Eight days after ordering, the Delta Shower Doors arrived

The order for my custom doors was placed on October 7th. On October 15th, a big ol’ truck rolled up, and a box of Delta Shower Doors landed on our side porch. Not bad, I’ve had stock special orders take longer than that to arrive. The doors are shipped by ground freight; when they get to your area, the trucking company will contact you to set up a delivery date. If you’re hiring someone to do the installation, tell them when to show up, and your mission is complete. On the other hand, if you have average DIY skills, and some basic tools, you can do your own installation. This will save you some money, and earn you the awe and respect of everyone you meet.

The HomeFixated Guide To Installing Your Delta Shower Doors

If your tub or shower is new, and you don’t have to remove an old set of doors, you have permission to scroll down to “Delta Shower Doors – By The Book.” Otherwise, the first step in the installation process is to make the old stuff go away. If your old doors are still in good shape, your local Habitat for Humanity or other salvaged-goods store may accept it for resale. This accomplishes several things: it eliminates your disposal problem (some trash haulers may not take large items), it keeps usable stuff out of the landfill, and you might even get a tax write-off!

Most shower doors are installed the same way: upright brackets go at either end of the shower, and are screwed into the edges of the tub or wall. A track fits in between them, and sits on the edge of the tub or shower. Finally, the top rail is attached to the top of the edge brackets. After all that is in place, you tip the doors into place, where little wheels glide along an overhead track. Usually there is a center bracket in the bottom track to separate the doors, and hold them into the track. To take it apart, we’ll simply reverse the process. And now for the first HomeFixated tip of the day: spreading a towel on the shower floor will help protect it, and will also keep screws and debris out of the drain.

First, pop out the old doors. Usually you can do this just by unscrewing the dividing bracket, lifting up on the doors, and tilting them into the shower. Once the doors are off, unscrew the side brackets and tip them in toward the center. There will probably be caulk wanting to hold them in place; use a painter’s multitool or a flat-bladed razor scraper to convince them to give it up; just be careful not to scratch your walls or chip your surround.

<a href=
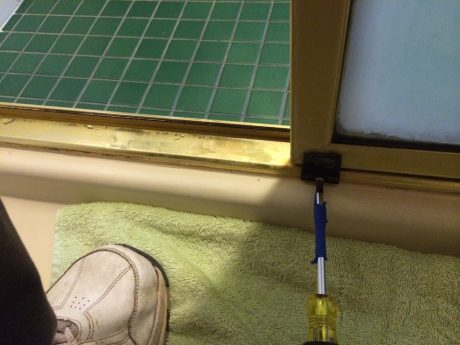
delta shower doors" width="460" height="345" class="size-large wp-image-25827" />First, remove the divider from the bottom track…<a href=delta shower doors" width="460" height="345" class="size-large wp-image-25830" />Tip the doors in, and pop them out of the top track<a href=
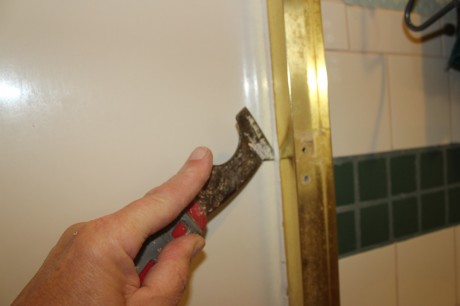
delta shower doors" width="460" height="306" class="size-large wp-image-25833" />Carefully break the caulk bond…<a href=delta shower doors" width="460" height="306" class="size-large wp-image-25832" />Unscrew the wall jambs…

At this point, you should be able to tip the sides and top outward. The bottom rail is usually just held in place by caulk; scrape it off, and the rail should pop right out. Use your flat-bladed razor scraper, and a sponge with some cleaner that’s safe for your shower’s surface, to get the rest of the caulk and years of accumulated nastiness off the entire opening area.

<a href=delta shower doors" width="460" height="306" class="size-large wp-image-25838" />Tip the header and wall jambs out…<a href=
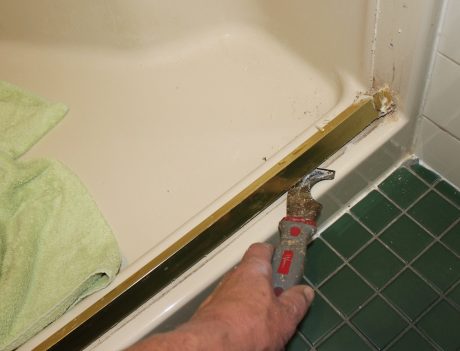
delta shower doors" width="460" height="351" class="size-large wp-image-25837" />Break the caulk bond, and pry up the bottom track…<a href=
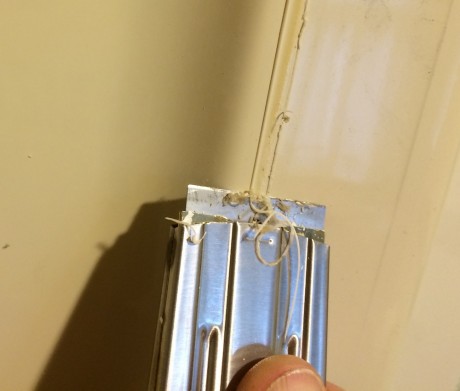
delta shower doors" width="460" height="391" class="size-large wp-image-25836" />Scrape up any remaining caulk<a href=
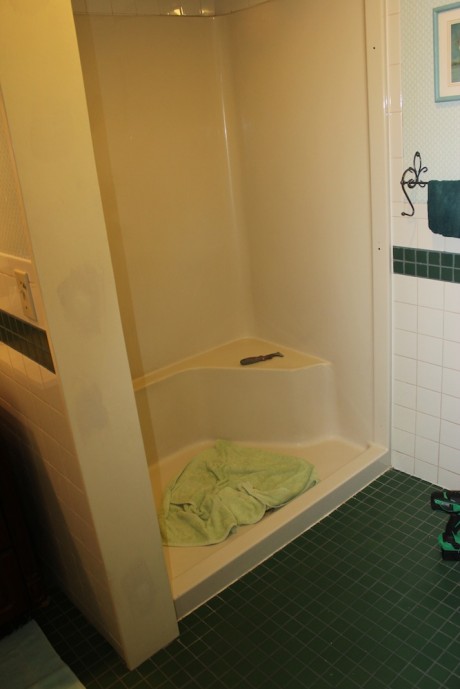
delta shower doors" width="460" height="689" class="size-large wp-image-25839" />Give it a good cleaning, and you’re ready for your new doors!

And that’s it, you’re ready to install your sporty new Delta Shower Doors! If you want to see how the pros do it, Delta has a series of helpful installation videos. The following is their sliding shower door installation video:

[embedded content]

Delta Shower Doors – By The Book

Even if you’ve done a shower door installation before, it’s a good idea to read the instructions. The instruction manual that comes with your Delta Shower Doors is excellent, very clear and thorough. The first page gives a list of all the tools and supplies you’ll need to install your doors, so a good first step is to round everything up. Unpack the doors and rails, and make sure all the parts are there. Some of the parts are stuck in the packing foam, so don’t pitch anything until your installation is finished. I’ll give an overview here, but the manual has much more detail, and is, as they say, profusely illustrated.

The wall jambs go in first. The jambs must sit flat against the shower wall and the threshold; if you have a tile wall, or a tub or shower with a perfect 90° angle where the wall meets the threshold, you’re set. If you have a tub or shower where there’s a curve there, you’ll need to round off the bottom of the side rails to conform to the curve. This is no big deal; the instructions tell you to use a coin to mark the contour onto the jamb. What they don’t tell you is that you probably won’t be able to SEE that mark!

<a href=
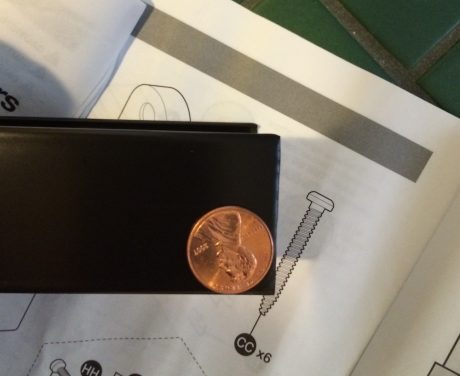
delta shower doors" width="460" height="376" class="size-large wp-image-25845" />You can use a coin to mark the radius.

A little HF tip: put a piece of masking tape on the jamb, and make your mark on it. Use a pair of tin snips or a hacksaw, and cut to that approximate shape. Finish smoothing it to the right shape with a file or angle grinder. You can also use an angle grinder to do the whole process; that’s what I did, just be careful not to get carried away with it.

<a href=delta shower doors" width="460" height="345" class="size-large wp-image-25846" />Use snips, a file, or a grinder to shape the jambs.<a href=
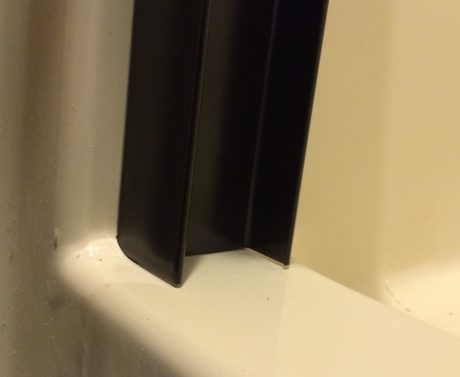
delta shower doors" width="460" height="377" class="size-large wp-image-25847" />A good, tight fit in the corner.

Place the wall jambs against the wall, centered on the bottom ledge. Use your level to plumb them, then temporarily tape them in place. Next, you’ll drill a 1/8” pilot hole through the three pre-drilled holes in the wall jambs into the edge of the shower. Take the jambs back off the wall, and use a 5/16” bit to enlarge the pilot holes.

<a href=
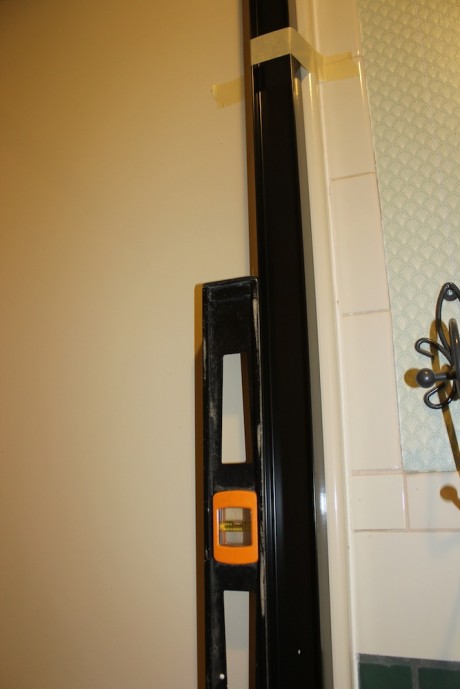
delta shower doors" width="460" height="689" class="size-large wp-image-25848" />Plumb up the wall jambs. Masking tape holds them in place.<a href=delta shower doors" width="460" height="306" class="size-large wp-image-25849" />Drill 1/8″ pilot holes through the pre-drilled holes in the jambs.<a href=delta shower doors" width="460" height="362" class="size-large wp-image-25850" />Remove the jambs, and enlarge the holes to 5/16″.

Push the supplied wall anchors into these holes, and snug them in gently with a small hammer. Reposition the wall jambs, and screw them to the wall. Your screws will be used to attach bumpers to the top and bottom holes, and a special center bumper in the middle. Hey—your walls are done!

<a href=
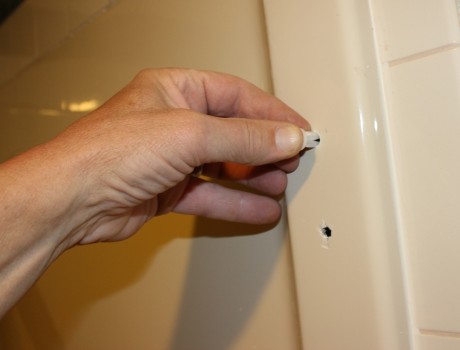
delta shower doors" width="460" height="350" class="size-large wp-image-25851" />Push wall anchors into the 5/16″ holes unless you’re drilling into a stud…<a href=
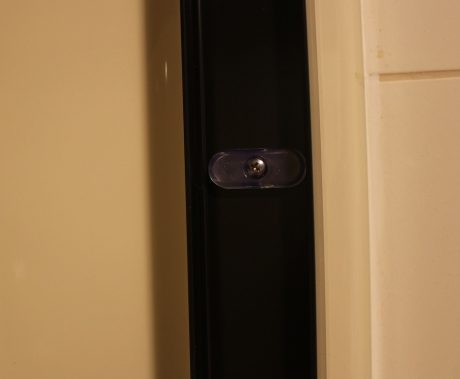
delta shower doors" width="460" height="379" class="size-large wp-image-25852" />Screw through the bumpers and into the anchors.<a href=delta shower doors" width="460" height="689" class="size-large wp-image-25853" />You’re jambin’!

Laying Some Track

Now it’s time to cut the bottom track. The kits will fit various sizes of tubs and showers; getting an accurate measurement will give you a good, snug fit you need to measure the distance between the two jambs. This can be tricky to do, as it’s an inside measurement. Here’s another HF tip: measure from one end to an even number around the center of the threshold, and make a mark. I chose 24”. Now, measure from the other end to that same mark, and add those two numbers together. My second measurement came to exactly 19”, making my total length 43”.

<a href=
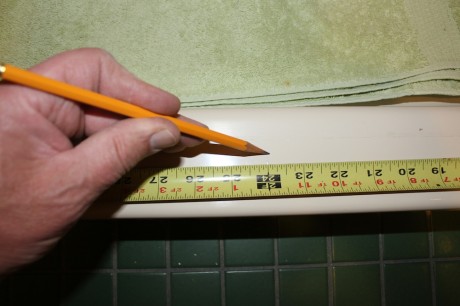
delta shower doors" width="460" height="306" class="size-large wp-image-25855" />Measure about halfway from one side of the track, and make a mark…<a href=
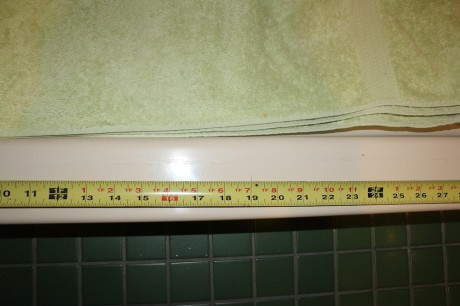
delta shower doors" width="460" height="306" class="size-large wp-image-25856" />Measure to that mark from the other side, and add ’em up.

Now you need to transfer that measurement onto your bottom track, and mark it for cutting. Our track hardware was bronze, which makes it really hard to see any marks. I used the tape trick again, putting a piece of masking tape on the track and making my mark on it. To avoid unnecessary foul language and elevated blood pressure, double check your measurements and marks before you cut! You want a nice, square cut, so use a miter box with your hacksaw. Make sure it’s deep enough to accommodate a 3” wide piece of material; that’s how wide my top track was. Make your cut, and use a file to smooth any burred edges. By the way, another tip the folks at Delta repeated several times was DO NOT CUT THE TOP AND BOTTOM TRACKS TO THE SAME LENGTH! They are correct, don’t do it!

<a href=
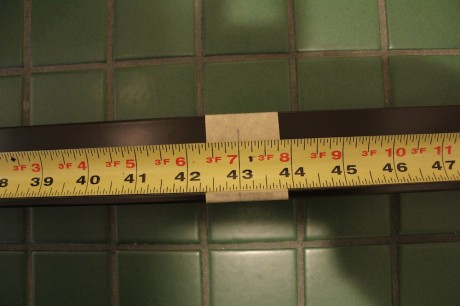
delta shower doors" width="460" height="306" class="size-large wp-image-25857" />A piece of tape makes your mark easier to see.<a href=
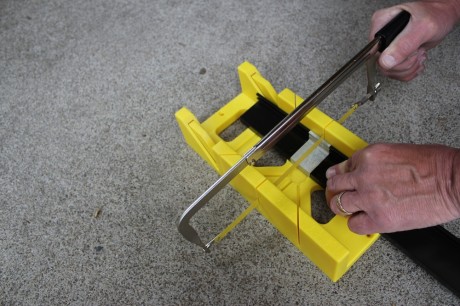
delta shower doors" width="460" height="306" class="size-large wp-image-25858" />A basic miter box gives you a smooth, square cut.

There’s a piece of gasket material in the kit; slide it into the groove in the track, and cut it to length. Now test fit your track between the jambs. Undoubtedly, it’s a perfect fit; if not (due undoubtedly to a shoddily-made tape measure or something else beyond your control), remove the track and file it to size. When all is well, fill the groove on the bottom of the track with silicone sealant, and press it into place between the jambs.

<a href=
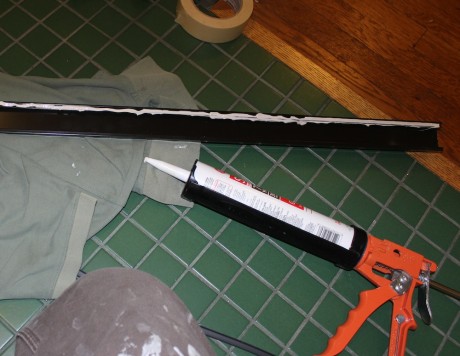
delta shower doors" width="460" height="356" class="size-large wp-image-25859" />After test-fitting the track, apply silicone sealant underneath it…<a href=delta shower doors" width="460" height="306" class="size-large wp-image-25860" />Insert the track between the jambs, and press it into place.<a href=delta shower doors" width="460" height="689" class="size-large wp-image-25861" />Three sides finished!

Next up: the top track. For this, you’ll measure the distance between the two shower walls, above the wall jambs. This is another tricky measurement to get accurately. If you’re replacing a previously-installed unit, here’s a little cheat that worked for me: measure the OLD upper track, assuming it fit properly. Mine did, so it was easy to get the exact measurement. If you’re not so fortunate, here’s an easy way to get the measurement using materials at hand: take a piece of cardboard from the packaging, and make a mark exactly 12” from a square end of it. (Alternatively, you could use a 12″ ruler or a framing square). Hold the square end against one wall, and measure over from the other wall to your 12” mark. Add the two together, and there you go! Transfer the measurement to the top rail, again using a piece of masking tape, grab your miter box, and make the cut. Again, be sure to double-check your measurement first. De-burr the end, hold the top rail over the wall jambs, and push it into place. The hardest part is done!

<a href=delta shower doors" width="460" height="306" class="size-large wp-image-25862" />If you removed an old door, just measure the old top track.<a href=delta shower doors" width="460" height="306" class="size-large wp-image-25863" />Mark the top track for cutting.<a href=delta shower doors" width="460" height="689" class="size-large wp-image-25864" />Press the top down over the wall jambs.

I Can See Clearly Now – Or Perhaps Obscurely

And now for the most rewarding segment of your Delta Shower Doors installation, the shower doors! Remember the foam I told you not to throw away? That’s where the hanger brackets were lurking. Two brackets go on each door; the inside door gets installed first. The doors are identical, so grab one and install the hangars using the pre-drilled holes in the door, making sure the grooved sides of the brackets face the label side of the glass panel. Snug up the screws but don’t go all Incredible Hulk – you don’t want to risk cracking the door, and having to explain to your friends why there’s a blue tarp hanging in your shower opening. Now just lift the door into the upper track, until the rollers rest on the track. Make sure the side of the door with the label is facing in.

<a href=
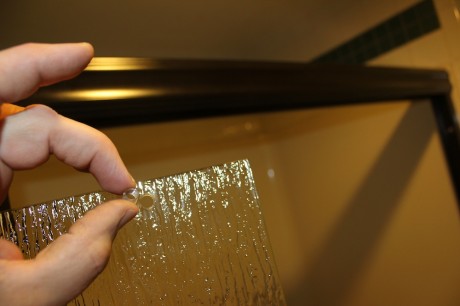
delta shower doors" width="460" height="306" class="size-large wp-image-25866" />Insert a bushing into the hole…<a href=delta shower doors" width="460" height="345" class="size-large wp-image-25867" />Snug up the door hanger…<a href=delta shower doors" width="460" height="306" class="size-large wp-image-25868" />When both hangers are in place…<a href=
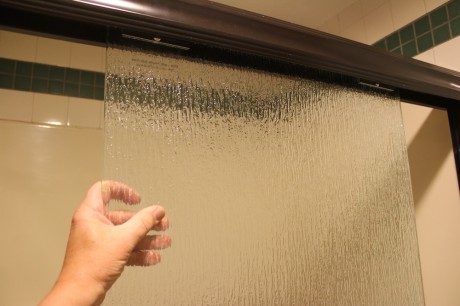
delta shower doors" width="460" height="306" class="size-large wp-image-25869" />Lift the inside door into place on the inner rail.

Now repeat the process with the other door, but this time with the smooth side of the bracket facing the label side of the door. Lift the door into the top track, making sure the bottom of the door is inside the bottom track. Wow, it’s starting to look like a shower!

<a href=
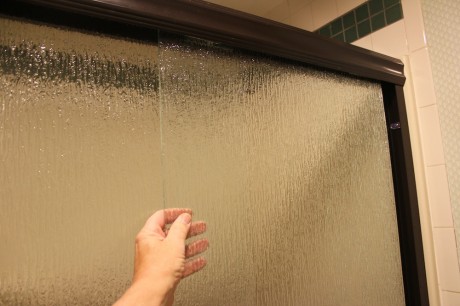
delta shower doors" width="460" height="306" class="size-large wp-image-25870" />Now repeat the process with the outer door, and lift it onto the track.

If the doors don’t meet the walls properly, they can easily be adjusted. Pop the door back out of the track, and loosen up the rollers. There are three holes the roller can be inserted into; to raise the glass, use the lower hole. To lower it, use the upper hole. Snug the roller up, and re-hang the door.

<a href=delta shower doors" width="460" height="345" class="size-large wp-image-25871" />To adjust the door, remove the screw that holds the wheel on…<a href=delta shower doors" width="460" height="345" class="size-large wp-image-25872" />Use a lower hole to raise the door, a higher one to lower it.

Once the doors are aligned properly, it’s time to install the divider on the bottom track. Measure the bottom track, find the center, and position the divider there, with the doors in the grooves. Drill 1/8” pilot holes through the edge of the divider into the bottom track, and secure it with the two self-tapping screws. Your Delta Shower Doors are secure, and you’re almost finished!

<a href=delta shower doors" width="460" height="370" class="size-large wp-image-25873" />Center the lower divider, drill pilot holes, and screw it into place.<a href=delta shower doors" width="460" height="689" class="size-large wp-image-25874" />Almost finished!

Sealing the Deal

To keep the water on the inside of your beautiful new Delta Shower Doors, take your silicone sealant and seal along the entire length of the wall jambs and bottom track, both inside and out. 100% pure silicone works best, and there are varieties made specifically for bathrooms, with mold inhibitors. All that’s left to do is install the door handles or towel bars you selected. The exact installation will vary according to your hardware, but all are designed to be used with the pre-drilled holes in the door.

<a href=delta shower doors" width="460" height="306" class="size-large wp-image-25875" />Use good silicone sealant around the entire inside and outside of the track.

Mine was very straightforward. I just inserted the rubber bushings into the holes in the door, slid a rubber gasket over the escutcheon and the handle post, and threaded them together through the hole. I installed one end, then put a bit of silicone on the towel bar, slid it into the post, and installed the other end. Easy peasy!

<a href=
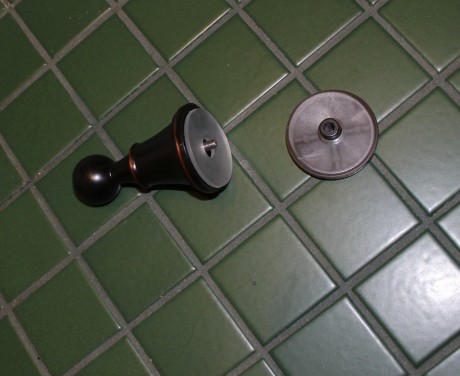
delta shower doors" width="460" height="376" class="size-large wp-image-25876" />No tools are needed for this towel bar, the pieces are threaded.<a href=
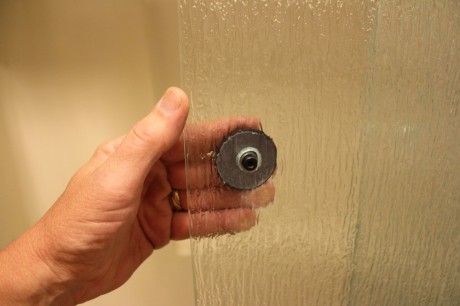
delta shower doors" width="460" height="306" class="size-large wp-image-25877" />Hold the back piece up to the door…<a href=
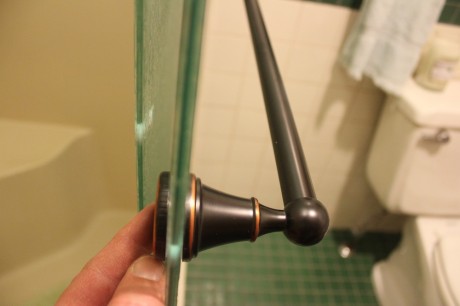
delta shower doors" width="460" height="306" class="size-large wp-image-25878" />insert the other side, and spin it snug.<a href=
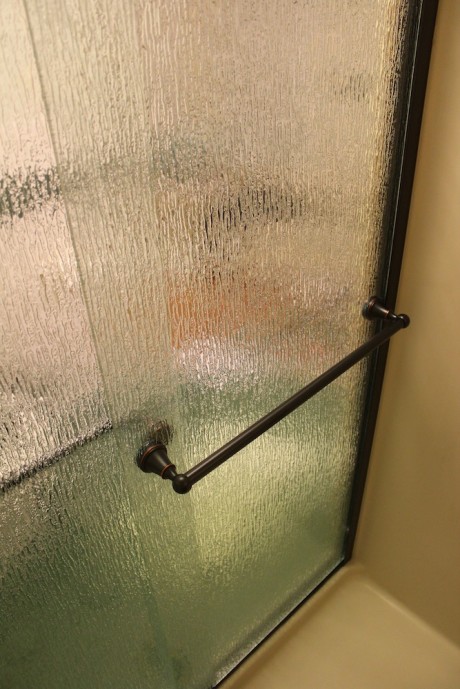
delta shower doors" width="460" height="689" class="size-large wp-image-25879" />Towel bars in, and lookin’ good!

I summoned my wife, and we stepped back and admired the transformation, what a difference! It looked great, until I opened the door and saw the old faucets and drain. Replacing them will be our next move, the spiffy new doors made us realize just how crappy the old fixtures had gotten over the past three decades. Meanwhile, the Spousal Seal of Approval was issued.

<a href=delta shower doors" width="460" height="306" class="size-large wp-image-25880" />The new hardware highlights how beat the old fixtures are…<a href=
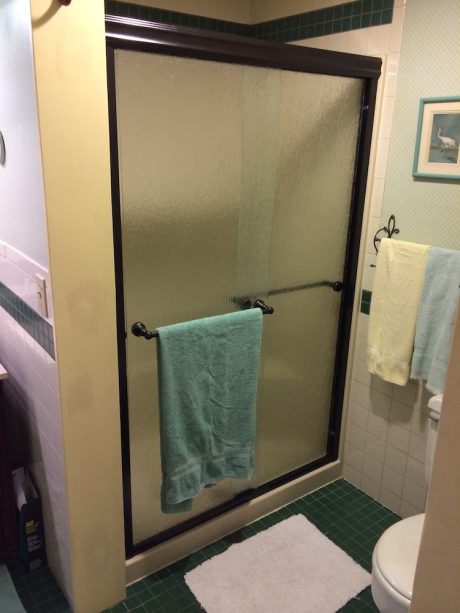
delta shower doors" width="460" height="613" class="size-large wp-image-25884" />But the doors look great!

Design Your Own Delta Shower Doors

I think the custom Delta Shower Doors concept is great. The materials are very good quality – the weight on the shower doors was about twice that of those I took out. Fit and finish is excellent, everything you need to do the installation is included, and the instructions are very good. The design and ordering process was quick and easy, and the available options should enable most buyers to design a set of shower doors that’s exactly what they want. The only quibble I had with the entire process was that it’s difficult to see exactly what the various types of glass look like, at least that was the case on my Mac. Some higher-res photos might help with that.

Pricing is very competitive with stock units, where you’re limited to whatever configuration happens to be on the shelf. With the Delta Shower Doors, you’re the boss. Don’t like pebbled glass? Go with the Mission style. Tired of the polished brass (yep!)? Get the rubbed bronze or brushed nickel. Got some fancy shmancy towel racks on the wall? Get a matching fancy shmancy towel bar on your shower door.

The flexibility is great, you can get exactly what you want, and you can control the cost. I designed a similar setup in chrome, with pebbled glass, and the total cost came to $210. You can further control your costs by choosing to pick up your Delta Shower Doors at a nearby Home Depot for free, but if your schedule is crazy, you can have it shipped to your home for $55 or so. The doors come with a limited five-year warranty.

<a href=
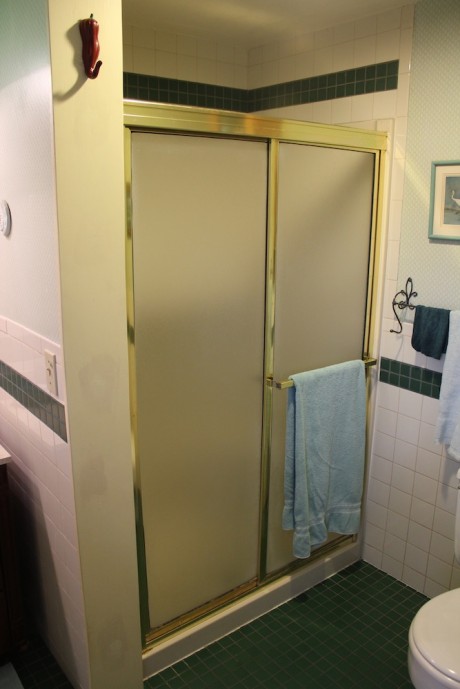
delta shower doors" width="460" height="689" class="size-large wp-image-25891" />Before…(not bad from a distance; scary up close)<a href=
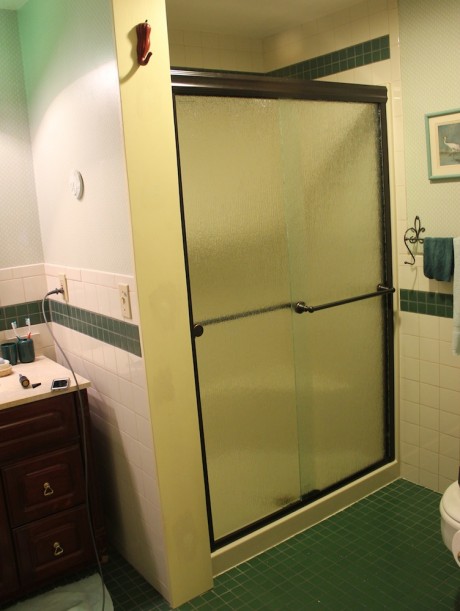
delta shower doors" width="460" height="611" class="size-large wp-image-25883" />And after–three hours after, to be precise!

Ready for the three-step program? Design YOUR custom doors before November 3rd, 2014, and you can enter a sweepstakes to win $1,000 or your own set of custom Delta Shower Doors!

More Info - via DeltaShowerDoors.com