Read article : How to Plumb a Basement Bathroom
Adding a basement bathroom
Adding a basement bathroom is a big, complicated project. But that doesn’t mean you can’t do it. Thousands of DIYers successfully tackle the job every year, and so can you.
We will focus on installing the “DWV” system (drain, waste and vent), which is the most difficult part of plumbing a basement bathroom. The DWV system requires some hard labor—breaking up concrete—and enough know-how to construct it so waste will be carried away without problems. You supply the labor; this article will supply the know-how.
The materials for the DWV system shown here cost about $250. Plumbers’ labor rates vary a lot by region, but most licensed pros would charge $1,200 to $2,000 for a job similar to the one shown here.
Find the main drain line
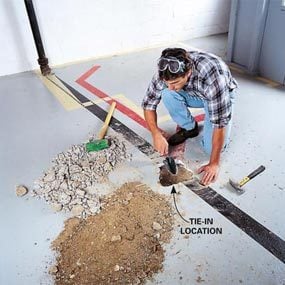
Photo 1: Locate the main drain
Break through the concrete to verify that the main line is where you think it is and that it’s deep enough to allow adequate downhill slope in the new drain lines.
You’ll have to connect new drain lines to an existing line under the basement. So before you can do any real planning, you have to find that line. First, locate the “main stack,” the large (3 or 4 in. diameter) vertical pipe that runs into the basement floor. From there, the pipe runs under the floor and out to the city sewage system under the street. But it may run at an angle rather than straight out to the street. Look for a cleanout plug along the street-facing wall of the basement. If you find one, that’s most likely the spot where the line exits your home. And usually, the line runs straight from the main stack to the cleanout.
If you have a private septic system, your main line will run toward the location of the drain field. If you’re unsure where the line is, you have a couple of options. You can punch through the floor where you think it is (Photo 1). You might end up enlarging that hole or breaking a second exploratory hole, but that’s not as bad as it sounds; all it will cost you is some wasted time and a couple of extra bags of concrete mix when you patch the floor. Your second option is to get a plumber to help. In most areas, a brief house call will cost you $75 to $150. Some plumbers have access to high-tech equipment that locates lines precisely, but expect to pay $200 for that service.
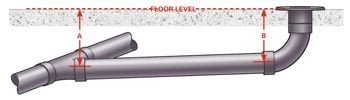
Slope Makes the Sewage Flow
Drain lines require a downhill slope of at least 1/4 in. per linear foot (see note below) so that waste flows smoothly through the pipes. To determine if your plan allows for that, take a few measurements:
A: The depth of the center of the main line (at the tie-in point).
B: The future depth of the horizontal pipe beneath the drain.
Now do a little math: (A – B) x 4 = the maximum length (in feet) of the drain line, from the main to the end of the horizontal pipe under the drain. If A is 13 in. and B is 10 in., for example, the maximum length of the drain line is 12 ft. (13 – 10 = 3; 3 x 4 = 12).
If your main line isn’t deep enough, you’ll have to locate fixtures closer to the line or install a sewage ejection pump.
Note: Some local codes allow 1/8 in. per foot with 3- or 4-in. pipe.
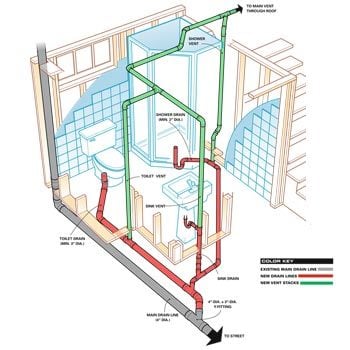
Plan the system
Once you’ve located the line, you’ll have to make sure it’s deep enough to allow downward slope in the new drain lines that will run from your future bathroom. Then grab a pencil and mark out the whole bathroom on the basement floor: walls, toilet, sink, shower and finally the drain lines.
Consider it all a preplan at this point. Chances are, you’ll have to make some changes as the plan develops. You may want to mock up sections of the system and lay them out on the basement floor using sections of pipe and an assortment of fittings. When the whole system is planned, mark it out on the floor. For photo clarity, we marked out bold lines on the floor. But simple spray paint is fine for drain lines.
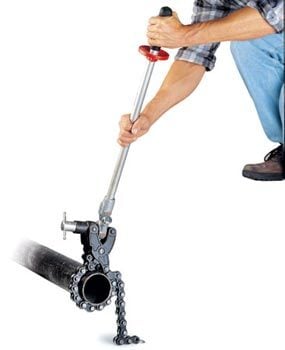
Rent a Snapper
A cast iron pipe snapper works by tightening a cutting chain until the pipe cracks. They’re available at tool rental stores. Old cast iron pipe can crush rather than crack. If that happens, you’ll have to abandon the snapper and cut the slow way: with a reciprocating saw. If you have plastic pipe, cutting into the main is quick and easy with a reciprocating saw.
Trench the floor
A plain old sledgehammer will bust up a basement floor. Breaking through at the tie-in point (see Photo 1) may take a few dozen whacks. But once you have a starter hole, the job gets easier because the concrete has space to crack and break off. Within a few minutes, you’ll learn to aim your blows and bust out a neat trench line. Pick out the larger chunks of concrete as you go. Ideally, most of your trench will be just wide enough for your spade. When digging, toss the dirt on a pile separate from the larger chunks of concrete. You don’t want big chunks in the soil you’ll use for backfill later.
Build the drain system

Photo 2: Break out a section of drain
After completing the trenches for the new lines, cut into the main line so you can install a Y-fitting. Our tie-in point was near an existing hub, so we cut out the hub. Make sure no one runs water (or flushes!) while the line is open.
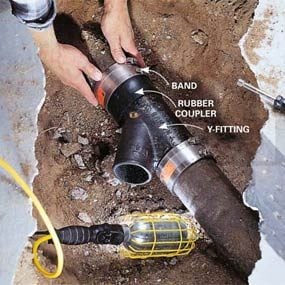
Photo 3: Tie into the drain
Slip rubber couplers onto the main line, insert the Y-fitting, slide the couplers over the joints and tighten the bands. Then plug the inlet and grant your family the freedom to flush again.

Photo 4: Build the drain system
The location of the drains and vents is critical—check and double-check your work before you glue joints together. Determine where the exact location of the shower drain will be after the walls are framed. Cap open pipes to keep sewer gas out of your home. Don’t bury the lines until the building inspector has approved your work.

Photo 5: Patch the floor
Backfill the trench with soil and screed 3 in. of concrete over it. Pack the soil firmly so it won’t settle later. Smooth the concrete with a steel trowel.
Begin the drain system by cutting into the main line (Photo 2) and splicing in a Y-fitting (Photo 3). We used a no-hub cast iron Y-fitting to tie into our cast iron main. But you can use a plastic Y-fitting instead if you glue short sections of pipe into the Y-fitting to accommodate the rubber couplers. Use that same method to tie into a plastic main.
For your DWV system, you can use ABS plastic (as we did; Photo 4) or PVC. Both are easy to cut and join. The hard part of any underground pipe work is building branches that end up exactly where you want them while maintaining a constant slope of at least 1/4 in. per running foot.
Here are tips to help you get it right:
- Buy twice as many fittings as you think you’ll need and a few types that you don’t think you’ll need. Return the leftovers when the job is done.
- If you don’t have a torpedo level, buy one (see Photo 7). It’s the handiest tool for checking the slope of pipes.
- When a section of pipe is complete, pack dirt under and around it to keep it from shifting as you build other sections.
- Know the “rough-in” of your toilet (the distance from the wall to the center of the drain, most likely 12 in.). Don’t forget to account for the thickness of framing and drywall.
- Backfill the trenches with care (Photo 5). You want to pack the soil tightly to prevent settling later, but be sure not to move the pipes as you tamp the soil.
Build the vent system
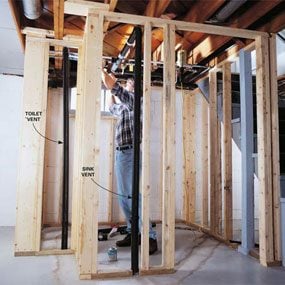
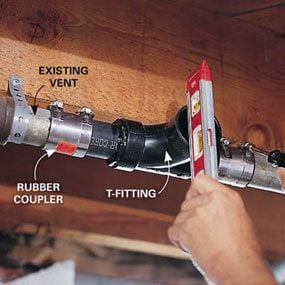
Photo 6: Build the vent system
After framing the bathroom walls, assemble the vent lines. We ran our vent lines below the floor joists and later framed a lower ceiling to hide the pipes.
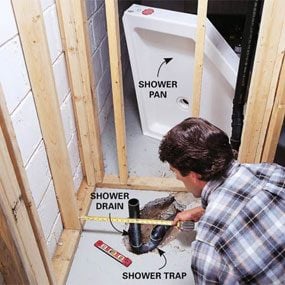
Photo 8: Position the shower drain
Set the shower pan in place and measure from the walls to determine the exact location of the drain. Assemble the drain and trap without glue. Then set the pan in place again to check your work before you finally glue up the fittings.
The vent system is a lot simpler than the drain system. We ran vent lines under the floor joists (Photo 6) and framed in a lower ceiling later. If you want to preserve ceiling height by running pipes through the joists, you’ll have to bore some large holes, which can weaken the joists. To avoid that, see “How to drill through floor joists.”
In most basements, you can tie your new vent system into the line that vents the laundry sink. Our plumbing inspector allowed us to connect our new 2-in. vent line to an existing 1-1/2-in. vent. Before cutting a section out of the old steel vent, we installed extra metal strapping to support the pipe during and after cutting.
Note: Plumbing codes vary by locality. The rules we give in this article generally follow the strictest codes. Your local rules may be more lenient about issues like vent sizing, the choice of fittings, etc.
Waste line Q & A
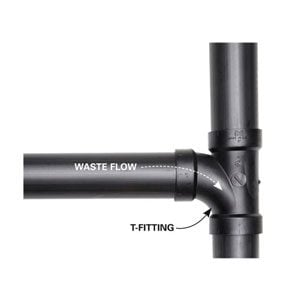
When should I use a T-fitting?
Use a T-fitting in drain lines to connect a horizontal pipe to vertical pipes. It can also be used to tie vent lines into horizontal drains or to join vent lines.
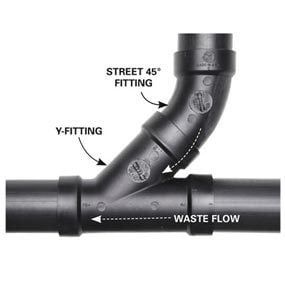
When should I use a Y?
In the drain system, use a Y-fitting to connect horizontal pipes (Photo 3). Along with a 45-degree “street” fitting, you can use a Y-fitting to run vertical drainpipes into horizontal pipes as shown. A Y-fitting can also be used in vent systems.
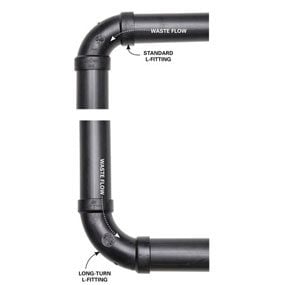
Why does the home center carry three different types of L-fittings?
- A standard L-fitting is used for horizontal-to- vertical flow in drain systems.
- A “sweep” or “long-turn” L-fitting is OK for almost any situation and is required in two situations: horizontal-to-horizontal turns and vertical-to-horizontal turns (as shown). But it can be used in any situation where space allows.
- Use a vent L-fitting only in vents.
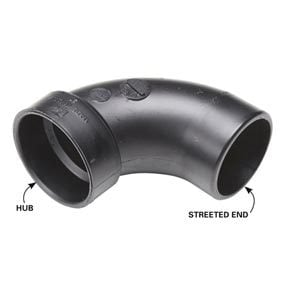
What’s a street fitting?
Standard fittings have hubs that fit over pipes. A street fitting has a “streeted” end that fits into a hub, so you can connect it directly to another fitting without using a section of pipe. That saves labor and space.
What size drainpipe should I use?
The toilet requires 3-in. or larger. Use 2-in. for the others; pipes smaller than 2 in. aren’t allowed beneath a concrete slab.
Venting Q & A
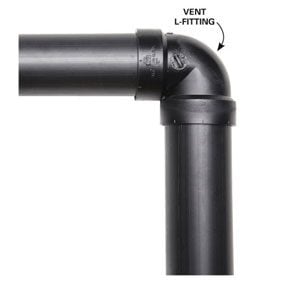
Vent L-fitting
A vent L-fitting can be used anywhere in the vent system, but only in the vent system—never where waste flows. The other two types of L-fittings are OK for venting, too.
What’s the vent for?
A plumbing vent is kind of like the air intake on a gas can; it lets in air. Without venting, a slug of sewage racing through a waste line creates air pressure and vacuum in the pipe. That means noisy, gurgling drains. Even worse, vacuum can suck all the water out of traps, allowing sewer gas to flow freely into your home. Yuck.
Vent-to-trap distance—there’s a limit
Every drain needs a trap, and every trap needs a vent. The maximum distance between the trap and vent depends on the diameter of the pipe.
Memorize these distances for midterm exams:
For 1-1/4″ pipe, the max. horizontal distance to vent is 30″ For 1-1/2″ pipe, the max. horizontal distance to vent is 42” For 2″ pipe, the max. horizontal distance to vent is 5′ For 3″ pipe, the max. horizontal distance to vent is 6′ For 4″ pipe, the max. horizontal distance to vent is 10′
Note: A toilet has a built-in trap, so it doesn’t need one in the drain line. It still needs a vent, though.
Can vents run horizontally?
Yes, but horizontal vent lines must be at least 6 in. above the “spill line,” which is the level where water would overflow the rim of a sink, tub or toilet.
What size vent pipes do I need?
A typical bathroom like the one we show (sink, toilet, shower or tub) requires a 2-in. vent. You could run smaller pipes to the sink or shower, but it’s usually easier to use one size for the whole system.
Required Tools for this Project
Have the necessary tools for this DIY project lined up before you start—you’ll save time and frustration.
In addition you will need a
cast iron pipe snapper and a
torpedo level.
Required Materials for this Project
Avoid last-minute shopping trips by having all your materials ready ahead of time. Here’s a list.