Showing posts sorted by relevance for query work breaking things. Sort by date Show all posts

Saturday, August 12, 2017

Renovate a 1950s Bathroom | Family Handyman

Read article : Renovate a 1950s Bathroom | Family Handyman

Big splash, low budget

Some say that if you wait long enough, Everything—including 1950s bathrooms— comes back in style. But “in style” doesn't necessarily mean “in perfect shape” or “in sync with today's lifestyle.” Such was the case with the bathroom shown here. Moisture problems had caused peeling paint and sticking vanity drawers, while 50 years of wear and tear had taken a toll on the grout, fixtures and hardware. However, the owners, Mary Jane and Bruce Pappas, saw too many things going for the space to completely gut it, such as unique tile work that was still in excellent shape.

“The whole point of buying this fifties house was to create our 21st century life here while honoring the original architecture and detail,” says Mary Jane, who is a professional interior designer. “Bruce and I wanted to complement and elevate what was already here and reuse as many materials as we could.” And by doing so, they were able to reach their goal of updated function on a modest budget. The couple were able to avoid expensive demolition work and get the bathroom they wanted for just under $5,000. “The results for the investment are extraordinary,” says Mary Jane Pappas.

Updated, But Still Original

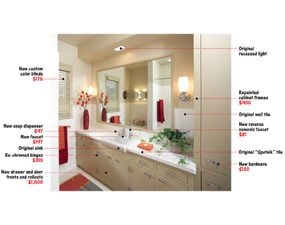
This bathroom now has greater utility and a clean, contemporary look— without breaking the bank.

Updated bathroomUpdated bathroom

ReDO, reuse, recycle

Renovate a 1950s Bathroom

Vintage tile

The vanity's vintage “Sputnik” tile pattern inspired the khaki color scheme of the bathroom and adjoining bedroom.

Renovate a 1950s Bathroom

New rollouts, old cabinet

The vanity cabinet is original, but for about $1,500, the new door and drawers were constructed with wipe-clean Melamine bottoms and maple sides decked out with metal slides.

Renovate a 1950s Bathroom

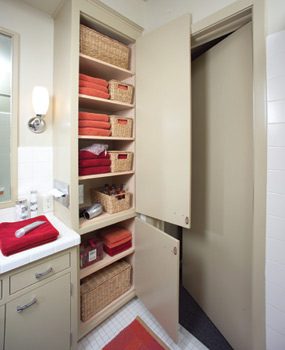
Updated storage closet

Adjustable shelving with Melamine surfaces was added along with a replacement tissue box holder. A hidden cabinet outlet keeps a hair dryer ready to roll and the electric toothbrushes charged.

After adding an exhaust fan to handle the moisture problem, they began dealing with the cosmetics, as explained by Mary Jane Pappas.

Freshening tiled surfaces
A professional tiler was brought in to repair the period tiles that had seen 53 years of bathroom life. By tuckpointing broken edges and freshening the grout, the tiler brought the surfaces up to standard. “The tile is unique to the era; we embraced the retro feel of it. It was in great shape and worth saving.”

Vanity drawers and doors
Another great example of the couple's “reuse it” philosophy lies in their treatment of the vanity. Years of water damage had made the drawers difficult to open, but instead of scrapping the entire piece, the Pappases hired Thomas J. Ross of Ross Custom Cabinetry Inc. to build new rollout drawers and cabinet doors for it and adjustable shelving for the attached linen closet. “Before, the cabinet drawers were only simple wooden boxes resting in a wooden cabinet. It was a struggle to pull 'wood-on-wood' drawers, especially when they were damp. Now that they're equipped to glide on rollers, it's like having a new piece of furniture. And when you think of the floor, tile and drywall work that we would have incurred had we demolished and installed all new cabinetry, that decision saved thousands.”

Paint, pulls and hinges
The vanity face-lift continued with several coats of an enamel paint and re-chromed hinges and the addition of contemporary drawer pulls. “We re-chromed the hinges because the plates had a unique screw pattern and I didn't want to add any additional screw holes to the vanity and risk the old holes showing.” The original mirror was saved by painting its trim the same color as the vanity.

Sink faucet
The Pappases wanted to add a soap pump and a water filter to their bath sink. By changing the old, widespread faucet for a single-lever faucet, they were able to avoid the expense of either buying a new sink or drilling new holes. The change in style left two unused holes for the new accessories.

Lighting
The old sconces were replaced with lights that better match the new drawer pulls and add a contemporary flair to the room.

Keepers! The '50s heat fan and tissue dispenser
The couple wanted to maintain the items that, like the heat fan, were still stylishly serving a useful function in the bathroom. “It's a nice amenity and it still worked, so why get rid of that?” They were even able to save the original metal tissue dispenser housed in the linen cabinet. It could no longer hold tissue boxes because the dispenser slot was vertical instead of the modern horizontal style. “But the same company, Brobick, now offers a replacement dispenser that fits tissue boxes perfectly.”

The tub
Replacing a bathtub affects the tile surrounding it, the walls above it and the plumbing below it. Keeping the existing tub saves tremendous time and money. So the tub stayed put, while some of the more easily changed elements around it were replaced. One of the first changes was to oust the shower door. “In a small bathroom, a flexible shower curtain creates a sense of spaciousness. And I use my bathtub every day, so a shower door is just not practical,” Pappas says. The original tub had a single showerhead with a bathtub faucet. Now a low-cradled hand shower, perfect for tub bathers, easily sets into an adjustable height showerhead fixture, adding to the usefulness and elegance of the bathroom.

Simple details make the difference

Renovate a 1950s Bathroom

Custom blind

Instead of settling for an off-white window blind in the bathroom, Pappas used a window blind company to create a custom window treatment to match the wall color. (Small rooms appear even smaller with a different color window treatment.) “For $175, getting an exact color match is a great deal,” says Pappas.

Renovate a 1950s Bathroom

Towels and rugs

The towels and bathroom rug proved to be a shopping challenge. “I wanted to find rich colors to work with the khaki walls and the cabinetry. I found high-quality towels I love from an online store, but searched and searched for a matching rug that would stand up to a wet environment. Finally I had a custom one handmade to match,” says Pappas.

Renovate a 1950s Bathroom

Shower curtain pull

A last little splurge of elegance lies in the Kravet silk tassel shower curtain pull ($75). Costing half as much as the Restoration Hardware shower curtain itself, the tassel adds a touch of luxury to this otherwise thrifty remodel.

Having saved a bundle by retrofitting many existing systems in the bathroom, the Pappases had some budget left to indulge in a few accessories.

Wednesday, May 24, 2017

RV Plumbing Tips – Cleaning RV Faucets, Sink Drains & Shower Wands

Read article : RV Plumbing Tips – Cleaning RV Faucets, Sink Drains & Shower Wands

The effects of hard water on RV sinks, faucets and drains can be an ongoing problem for RVers. This page describes a few tips for how we remove these pesky mineral deposit buildups from our bathroom and kitchen sinks in our fifth wheel trailer and keep the water flowing smoothly in our shower wand and RV toilet rinse sprayer.

<a href=RV plumbing tips for cleaning RV faucets and drains and removing mineral deposits" width="731" height="384" class="size-full wp-image-50990" />

RV plumbing tips for removing mineral deposits and cleaning RV faucets and drains.

We like the water to flow freely in our RV vanity sink faucet, kitchen sink faucet and in the shower and RV toilet sprayer wands, however, periodically these faucets begin to spray water in weird directions because their inner workings have gotten clogged up by mineral deposits from the hard water.

In our bathroom vanity, our first step is to remove and clean the screen filter in the faucet. Sometimes the faucet tip can be unscrewed by hand, but if we’ve let it go too long, we have to use a pair of pliers to break the faucet tip free due to corrosion that makes it impossible to unscrew.

Remove <a href=RV faucet screen with pliers" width="701" height="515" class="size-full wp-image-50993" />

Remove the RV faucet screen (with pliers if it’s stuck!)

Then we unscrew the entire screen assembly from the faucet.

Disassemble RV faucet

The faucet tip unscrews from the faucet.

Dirty <a href=RV faucet screen" width="681" height="518" class="size-full wp-image-50995" />

Ugh… the screen is pretty dirty. No wonder the water comes out funny!

This time the screen was very corroded. We remove the corrosion and mineral buildup by putting all the pieces in a bath of white vinegar for 20-30 minutes or so.

Prior to putting the pieces in the white vinegar bath, it is a good idea to make note of the order that these parts go into the faucet assembly!

Soak RV faucet parts in white vinegar

After noting how the pieces go together, soak them in white vinegar.

After the bath, the bits of corrosion can be seen in the white vinegar!

RV faucet parts get cleaned with white vinegar

Here are all the pieces. You can see the dirt that came off in the vinegar bath!

Using an old toothbrush, we scrub each piece until it is clean.

Use toothbrush to clean <a href=RV faucet screen" width="681" height="534" class="size-full wp-image-50997" />

Use a toothbrush to get the screen totally clean.

RV faucet cleaning with toothbrush and white vinegar

Scrub all the parts with the toothbrush.

Then we reassemble the pieces in the correct order and orientation.

Reassemble RV faucet after cleaning 2

.

Reassemble RV faucet after cleaning 1

Reassemble the pieces.

Put RV faucet together after cleaning it 2

.

Put RV faucet together after cleaning it

.

To make it easier to remove the faucet tip the next time we do this job, it helps to grease the threads with a marine PTEF lubricant prior to screwing the assembly back onto the faucet.

Lubricate RV faucet with PTEF lubricant grease

Lubricating the threads makes it easier to unscrew next time!

Lubricate RV faucet after cleaning

.

Reassemble RV faucet

Screw it back into the faucet.

RV faucet cleaned and lubricated

Ta da! Now the flow will be smooth and full.

Our trailer has white plastic sinks in the bathroom and kitchen, and these sinks often develop a skanky brown ring around the sink drain. For years, we relied on Comet to clean these sinks. We sprinkled it on the entire sink, let it sit for a bit, and then scrubbed.

We recently discovered that Baking Soda is just as effective!! The fantastic thing about Baking Soda is that it is non-toxic. This is wonderful not only for our gray water holding tanks but also for the RV dump stations as well as the septic fields and municipal waste water treatment systems that are downstream from them.

It’s also really cheap!

Tips for cleaning an <a href=RV sink drain" width="751" height="394" class="size-full wp-image-51008" />

White plastic RV sinks are prone to getting ugly stains.

Dirty <a href=RV sink drain" width="701" height="511" class="size-full wp-image-51009" />

Yuck!

We simply sprinkle it on the sink and then scrub the sink with a damp Scotch-Brite scrubbing pad.

<a href=RV sink drain cleaning with baking soda" width="721" height="495" class="size-full wp-image-51010" />

Sprinkle the baking soda in the sink and scrub the stains with a damp scrubby pad.

What a great result — a wonderfully squeaky clean sink!

<a href=RV sink drain is sparkling clean" width="701" height="483" class="size-full wp-image-51011" />

Sparkling!

The drain plug also gets gummy, and we use an old toothbrush to scrub it clean with either baking soda and/or Murphy’s Oil Soap (a handy all around biodegradable cleanser).

In an RV that is used for dry camping a lot, like ours, the bathroom vanity sink drain can get really gross really quickly because in an effort to conserve fresh water not much clean water gets flushed down the drain.

This can result in foul odors in the sink drain, and it’s pretty unsightly too.

So, we do two things.

First, we scrub the inside of the bathroom sink drain with an old toothbrush. To get a longer reach down the drain, we taped our toothbrush to an old tent stake we had lying around. Anything long and narrow will work.

Toothbrush and extension rod to clean <a href=RV sink drain" width="800" height="256" class="size-full wp-image-51013" />

Tape an old toothbrush to a long stick to reach deep down the RV sink drain.

Cleaning an <a href=RV sink drain" width="721" height="481" class="size-full wp-image-51014" />

Scrub inside the sink drain.

We also scrub the sink drain plug.

Second, to keep the RV bathroom sink drain fresh smelling, we use Happy Camper Holding Tank Treatment which we’ve found is a particularly good deodorizer. We put scoop of powder in an old water bottle, fill it up with water and shake it well (the bottle gets warm as the enzymes get activated!), and then pour it down the drain.

Most of it goes into the gray water tank, but a small amount stays in the bathroom sink drain p-trap and does its magic there, killing off the offensive odors.

Use toothbrush to scrub <a href=RV sink drain plut" width="721" height="481" class="size-full wp-image-51012" />

Scrub the sink drain plug with a toothbrush.

To keep our RV shower in tip-top shape, we clean the drain there as well. The biggest problem in our RV shower drain isn’t foul odors, because the shower drain gets flushed with lots of water everyday. Instead, the challenge with the RV shower drain is accumulated hair.

In a house, it’s easy enough to use a powerful cleanser like Drano to clean out any clogs caused by hair, but we don’t want strong chemicals like that sitting in our gray wastewater holding tank. Afterall, we want the enzymes and bacteria in the Happy Camper and Unique RV Digest-It holding tank treatment products we use to thrive and go to work breaking things down!

So, we use a long spring hook (and flashlight) to pull the hair out. It just takes a few minutes and then the drain is clear.

Some RV shower stalls may have drain components that can be removed for cleaning. Ours doesn’t.

Cleaning hair from an <a href=RV shower drain" width="631" height="539" class="size-full wp-image-51015" />

Use a spring hook to pull hair out of the RV shower drain.

Periodically, the RV shower wand gets crudded up with mineral deposits just like our RV sink faucets do. Again, we rely on white vinegar to clean up the deposits clogging the spray holes in the shower nozzle.

First, we pour the white vinegar through the shower wand to let it soak from the inside.

Tips for cleaning an <a href=RV shower wand" width="681" height="712" class="size-full wp-image-51016" />

The RV shower wand can be cleaned with white vinegar.

Then we soak the shower wand’s face in a bath of white vinegar.

Tips for cleaning an <a href=RV shower wand" width="751" height="421" class="size-full wp-image-51017" />

Put the RV shower wand face down in a white vinegar bath to clean all the little holes.

If we’ve let a little too much time pass, we’ll also use a toothpick to clean out each hole in the shower head. We use bamboo toothpicks because they hold up well in water. Ordinary wooden toothpicks tend to disintegrate when they get wet. A scribe also works well.

The before-and-after difference in the flow of water through the shower wand is startling. When half of the little holes are blocked from mineral deposits and the other half have an impeded flow, the water can feel like needles on your skin. After cleaning the wand, it is more like a waterfall.

Clean each hole in an <a href=RV shower wand with a toothpick or scribe" width="681" height="516" class="size-full wp-image-51040" />

Use a toothpick or scribe to clean each hole in the shower wand.

Lots of RVers love the Oxygenics RV shower head. We don’t use it because it doesn’t work well with the low water pressure we use to conserve water since we dry camp every night, but for RVers who get water hookups a lot, these shower heads are extremely popular. Of course, in hard water areas, these shower heads will need periodic cleaning as well.

The RV toilet bowl rinsing wand is also subject to corrosion from mineral deposits, and after a while when we go to rinse the toilet bowl we find the water flow from the sprayer is restricted and funky.

<a href=RV toilet sprayer wand cleaning" width="721" height="481" class="size-full wp-image-51018" />

The RV toilet sprayer wand gets clogged with minerals too.

Again, it’s easy to unscrew the end of the toilet spay wand, put it in a white vinegar for 20-30 minutes, scrub it a bit with a toothbrush, and then put it back on the wand.

RV toilet rinse wand cleaning

Unscrew the tip of the toilet rinsing wand and soak it in white vinegar to clean the holes.

As an aside, if you have energy leftover after cleaning all your RV sinks, faucets, drains and spray nozzles, a spray bottle filled with a water and white vinegar mixture is super for washing the windows. As I wrote this, some flies got in our trailer and Mark started spraying them when they landed on the window next to him using a spray bottle filled with water and white vinegar. Besides slowing them down and killing them, he was really impressed with how clean the window was when he finished!

So, these are a few of the things we do to keep our sinks and drains flowing smoothly in our life on the road in our RV.

We hope they help you too!

Subscribe
Never miss a post — it’s free!

A recap of some of the goodies mentioned in this post:

Below are some of our most POPULAR POSTS (also in the MENUS above)

RV UPGRADES, SYSTEMS & TIPS MONEYFULL-TIME RV LIFESTYLE
  • RV Boondocking - Tips for how to live in an RV off the grid
  • Which RV Is Best for Full-Time Living? - Transitioning from a house to an RV - Which RV makes the best home?
  • Full-time RV Lifestyle Tips - Full-time RVing Logistics - Mail, Domicile, Insurance, Warranties, Saving Money at RV Parks
  • Internet & Phone Access for RVers - An inexpensive, minimalist solution for internet access on the road
  • RV Dump Stations & Compost Toilets - How to do the dirty deed at the RV dump PLUS RV Composting Toilet tips
  • Choosing a Trailer for Full-time RVing - Why the payload capacity is so important
  • Learn RVing the Fun Way!! - Go Cheap, Go Small, Go NOW and have a blast in little RV!
  • Free RV Campsites - Resources for locating campsites for boondocking
  • Glimpses of the Full-time RV Life - Anecdotes from the road and essays about living the RV dream.
  • Travel Photography Tips! - All the cameras, gear, books, blogs and tools we used to learn to take great pics!
GEAR STORE
  • Gear Store - A list of the goodies, equipment and gear we've found useful in our RV lifestyle!
LIBRARIES of ARTICLES

Our most recent posts:

More of our Latest Posts are in the MENU.
New to this site? Visit RVers Start Here to find where we keep all the good stuff!!

Monday, May 15, 2017

Making Bifold Doors Into A Screen To Hide The Water Heater

Read article : Making Bifold Doors Into A Screen To Hide The Water Heater

We know this was supposed to be the final chapter when it comes to our big basement makeover, but because we tackled two different DIY projects (making a screen to block off our fugly water heater and frosting the windows for 100% privacy that still lets in the light) we realized it would be crazy to try to squeeze all those step by step photos and instructions into one post… so we’re breaking it down to two. Just look at it as twice the fun. So without further ado, here’s how we made a custom screen to hide our eye-sore of a water heater with $18 worth of secondhand bi-fold doors and a quart of punchy bright green paint (stay tuned for the window-frosting tutorial coming soon).

Before we get into all the nitty gritty details, we should remind you what the aforementioned water heater looks like. Remember this guy?

Of course the room has come a long way from that point (we added a rug, brought in a bike rack, upgraded the the lighting situation, papered the insides of the armoires, hung some art, brought in some storage, and organized our paint). But the frighteningly gross water heater remained… taunting us with its hideousness. We debated springing for a tankless variety, but because we’re big fans of working with what you have (and didn’t want to cart off our fully functional water heater to a landfill) we opted to create a screen that will block off the water heater along with the ugly trap door in the wall behind it (which leads to the crawl space under the house). And when this water heater finally breathes it’s last breath we’ll definitely consider upgrading to a tankless one (and we’ll still be able to use the screen to hide the unsightly trap door in the wall behind it).

But how did we end up with a giant screen without blowing our meager basement budget (many store-bought ones are in the $100-300 range and a bunch of those weren’t even tall enough to work for our space)? We just brainstormed materials that we could use to whip one up on the cheap. Here’s how it all went down.

Step 1: Locate three adequately tall bi-fold doors that are sturdy enough to stand on their own and will easily obscure a 6′ water heater. After debating the use of everything from all-weather curtain panels hung from the ceiling to bookcases on wheels (which could be pushed aside for water heater access) we finally decided a screen was the perfect solution for our space. And what’s an easier way to make a screen than hinging three bi-fold doors together and calling it a day? At first we thought about cutting a full sized door in half but bi-folds are like pre-cut doors, so they’re ready to go. Even better. Plus they’re easy to move, relatively simple to find, and definitely would add some playful color to the room if we opted to paint them a bold hue.

So a plan was born. For just $18 we snagged these three bi-fold doors at our local Habitat For Humanity ReStore (they were having a 40% off door sale when we went in- uh, awesome!). Plus they already came with enough hinges to join them all together and create one large screen. Jackpot.

When we got to the checkout the lady was like “um, you’re missing a door” (since there are supposed to be four) but we explained that this wonky set of three bi-folds was actually perfect for us since we were going to make a screen by joining them together and didn’t need a fourth. She seemed excited for us until we mentioned that we were going to attempt to shove them into our good ol’ Nissan Maxima. Then she just shook her head and muttered good luck. Of course we took it as a personal challenge…

That’s me flashing my victory smile. A lot of people write to us and ask how we take on so many projects with such a small car. We’re just like anyone else with a modestly sized ride… we squeeze things in when we can and call John’s sister and beg to borrow her Ford Explorer when we can’t. In a pinch we’ve even been known to rent a pick-up truck from Home Depot for a few hours, just to cart something around. It’s all about, in the words of the ever-fabulous Tim Gunn, making it work.

Tip: when you recline the front seat and place large objects in the car as we did above, you can actually fasten the passenger side seat belt across them, which can help keep things safely in place so they don’t slide around and encroach on the person in the back seat- especially when she has an ever-expanding belly full of baby to protect).

Step 2: Place bi-fold doors on cardboard (for painting) and hinge them together in the room where your screen will be living (to avoid the annoyance of building it in one place and then moving it halfway across the house afterwards). When we finally got our precious cargo home we placed the doors on a large piece of paint-ready cardboard, hinged them together with the free hinges that we inherited with the doors, and stepped back to take a look. By golly this just might work. We also did a bit of puttying/sanding to fill in any recessed parts of the doors and smooth out anything that wasn’t exactly ready for paint (but for $18 pre-used doors, they weren’t bad at all).

Step 3: Paint your newly made screen. That’s it. You’re done. I guess we should elaborate a bit. We used one quart of semi-gloss latex paint by Behr, which we had color matched to Benjamin Moore’s Bunker Hill Green 566. Two coats later John was finished. I love this whole being pregnant thing. No painting for me (of course for the impending bathroom and nursery projects we’ll be using no-VOC paint so I’ll be back on painting duty, but for the separate entry basement we figured low-VOC Behr paint worked for us- and at just $14 for the quart it put our total cost for the entire screen project at… (drumroll please)… $32!

We love the happy burst of emerald green that it brings to the space (it complements the paper behind the armoire doors, the large green tupperware bins we brought in, the storage boxes in our Ikea workstation, and even the subtle green stripes in the rug). And the function is great. It definitely hides the ugly stuff but still makes it easily accessible. Best of all, there’s still more than enough room- over 35″-  to walk to the other side of the basement, roll out our bikes, etc.

So that’s how you give an old set of bi-fold doors a whole new life on the cheap. We’ll be back with a window frosting tutorial followed by an entire basement project wrap-up (complete with photos from start to finish and even a budget breakdown for your viewing pleasure). And while we’re on the subject of repurposing bi-fold doors, have you guys reused doors or windows in any interesting ways? We’d love to hear how you’re giving old household staples a second life with a bit of DIY determination so do tell.

Psst- Want to look back on our big basement makeover from start to almost-finished? Here’s the first post, the second post, the third post, the forth post, the fifth post, the sixth post, and the seventh post. Ah memories.

Monday, October 9, 2017

How to Clear Drains, Prevent Smells and Use a Makeshift Sump Pump

Read article : How to Clear Drains, Prevent Smells and Use a Makeshift Sump Pump

Most Popular
Home maintenance isn't restricted to repairs. In fact, certain tasks-- when performed regularly--may actually prevent things from breaking in the first place. But when things do go wrong (and it's inevitable that they do), we have some backup plans that you can try before you grab the phone to call for pro. Appliances and plumbing are the most frequent offenders, but they also often can be the simplest to care for. From the gutters to the living room carpet, there's a reliable method for keeping every part of your home clean, safe, and well maintained.
2:48

Drain odors are making your kitchen an unpleasant place in which to spend time.

THE QUICK FIX

Pour a cup of white vinegar down the drain, let it stand for 30 minutes, then rinse with hot water.

2:49

You're right in the middle of preparing that big Thanksgiving feast, when your kitchen sink chokes on all the grease that you've been allowing to go down the drain.

THE QUICK FIX

Use a heating pad wrapped around the drain trap (or a hair dryer if you're willing to hold it there) until the metal becomes hot. This will melt the grease and allow you to flush it away with a running stream of hot water.

The odors wafting out of your garbage disposal are more fitting for a sewer than a kitchen sink.

THE QUICK FIX

Disposals can retain food bacteria in the blades, making for an olfactory nightmare. Clean out the unit with a cup of white vinegar followed by a flush of very hot water.

5 simple steps to prevent drain clogs.

THE QUICK FIX

Stopping clogs is a battle fought on two fronts. First, you should be careful about what goes down the drain. Second, you need to take regular action to clear small deposits that inevitably form in any drain.

1. Use drain screens to keep hair, soap scum, and other solids from making their way into the drain.

2. Never pour grease down the drain, and clean greasy pots and pans as thoroughly as possible with a paper towel before cleaning in hot water in the sink.

3. Never dump chemicals such as paint or paint thinners down a drain--even a shower drain or utility sink.

4. Clean all your sink stoppers regularly.

5. Once a week (make it a regular part of your weekly cleaning schedule) pour boiling hot water down your drains.

Your bathroom sink is draining little but your patience.

THE QUICK FIX

55 The handy plunger is one of the best tools for a slow-moving drain. Fill the sink with a few inches of water to provide a good seal around the plunger. Next, stuff a wet rag into the overflow opening of the sink. Try to completely fill the opening so that you get a good seal. By blocking the opening, no air can reach the drain, which greatly increases the effectiveness of the plunger. Finally, plunge away.

Your drain won't--and the plunger you have isn't strong enough.

THE QUICK FIX

In an emergency, you can use a wet/dry shop vacuum to help clear a clog. Put the mouth of the vacuum hose over the drain opening and seal around it with a wet cloth (also plug up any overflow holes). Turn the vacuum on and off quickly until the clog clears.

Soap scum and the residue of other body and hair products have packed your shower drain to capacity.

THE QUICK FIX

If simple plunging, hot water, or chemical drain cleaners don't work, you may need a more powerful ally. Run a garden hose in through a nearby window and secure it in the opening of the drain (drying the shower floor thoroughly and duct taping the hose securely in place is a good option). Once you're certain the hose has been sealed in the drain, turn on the spigot full force and it should blast the clog free.

Dangerous Additions: How not to unclog a toilet.

THE QUICK FIX

Trust us, nobody likes to plunge a toilet. But the frustration that comes from having a clog can lead to some inadvisable home remedies. Never put boiling water down a toilet. Although it seems like this might break up a clog, the water in your toilet is cold (in winter, it may be very cold) and the difference in temperature can lead to damage to your toilet or pipes. If for any reason you put bleach into the toilet, do not combine it with any other cleaner or chemical clog remover. The combination could create deadly chlorine gas. For most toilet clogs, the best answer is usually a mechanical one, such as a snake or-- sadly--the old-time plunger.

A big rain has flooded your basement. And since it knocked out the power too, your usually reliable sump pump won't pump.

THE QUICK FIX

If you live on a slope, try making a siphon. First, fill a garden hose with water from the outside spigot. Seal one end with your thumb and have a friend seal the other. Place one end through the cellar window and into the standing water. Then, have your friend carry the other end as far downhill as possible (the outlet has to be below the intake). Release your thumbs and let gravity do the rest.

The water in the trap of your basementfloor drain dried up, and now your cellar smells vaguely of nasty, nasty things.

THE QUICK FIX

Pour nontoxic plumbing antifreeze down the drain to fill the trap. You can use water in a pinch, but it evaporates faster than antifreeze, so you'll need to repeat the process more often. If you have pets in your home, make sure to block access to the area.

Advertisement - Continue Reading Below
More from Popular Mechanics: