Drive 2.3 miles through beautiful, scenic winding road through the forest and you arrive at this modern rustic showplace, with its wraparound decks that offer stunning views from every angle. Soaring ceilings and enormous windows let in lots of light and bring the outside in, and the all-wood, rustically decorated interior is warm and cozy.
The family room, with its leather sofa, wood burning, freestanding fireplace and breathtaking 360º view, is adjacent to the kitchen that features wood cabinets, granite countertops, stainless steel appliances, toaster oven, and coffee maker. When it’s time to prepare a meal after a fun day of mountain activities there’s plenty of seating at the dining table for eight plus 4 more at the breakfast bar.
For entertainment, you’ll find billiards, board games and puzzles in the game room, flat screen TVs there, in the family room and all bedrooms, Xbox and PS3 game system, and wireless Internet throughout the cabin. But in this stunning setting, you’ll want to stay outside as much as possible, kicking back in a rocking chair or the glider, soaking in the hot tub, firing up the gas grill for an al fresco dinner, or settling into an Adirondack chair by the warmth of the fire pit.
When it’s time to turn in for the night, you’ll choose between four airy, ceiling-fan cooled bedrooms, three of which have king beds, luxury bedding, private baths with shower or tub/shower combo, and large closets. The upstairs master bedroom has a vaulted ceiling and loft. The fourth bedroom is outfitted with a twin bunk beds and a single, ideal for kids.
There’s also a laundry on the main level, and a roomy gravel driveway out front. But as with any vacation experience, it’s all about the memories you’ll make with family and friends and the fun you’ll have in a magical setting, and at Bearrel of Fun you’ll find all that and more.
High Speed Wireless Internet Connection
Sleeps 8 (3 kings, twin bed, bunk beds)
Game Room - regulation billiards table, 65” flat screen TV with sound bar and surround sound speakers, Xbox, PS3, sofa, ottoman, ceiling fans, board games, puzzles
Media - satellite, local phone, loft area sound system connected to DISH TV to broadcast music/sports/TV to ten speakers in the cabin including outside decks
Family Room - leather sofa and loveseat, wingback chair, 360° metal wood burning fireplace, 40” flat screen TV, coffee table, end tables, lamps
In February, Nepal is cold. In the mornings, in the shadows, after the sun goes down and whenever you’re indoors, it’s freezing. And most houses in Nepal don’t have central heating and rely on solar panels instead, so although there’s a certain amount of warmth when in the sunshine, the temperature drops rapidly when you’re out of it.
I spent a month in Kathmandu, where I volunteered at an orphanage and taught in the local school. I also spent a few days at Chitwan National Park and in Pokhara, but the vast majority of my time was spent in Kathmandu. So here are my packing tips for the capital city, suited in particular to travellers, volunteers and backpackers who aren’t going trekking.
Nota bene: The best tip for dressing in Nepal is to wear layers, in order to cope with a climate that changes throughout the day. That way you can strip off and layer up again, depending on the time and location. As a general rule of thumb, I always wore at least a top & long sleeved shirt, plus my fleece – and I always kept another layer in my bag too, just in case!
1 pair of jeans: warm enough to be worn in the chilly mornings/evenings or at work – plus they’re smart enough to teach in!
1 pair of lightweight full length or capri trousers: to wear during the day or when it’s particularly sunny.
1 pair of comfortable yoga pants (optional): great for long bus journeys, casual days or for some extra warmth in bed!
2 pairs of leggings: an extra layer under jeans or worn by themselves when it’s warmer.
>>Check out these great pants for traveling women.
4 – 6 tops: I took a range of strap tops, vests and sleeved t-shirts, but the tops/vests were only worn as base layers. It’s also a good idea to keep your shoulders covered, as Nepal is predominantly a Hindu country and the cultural norm dictates it.
2 long sleeved shirts/cardigans: a necessary layer addition to whatever top you’re wearing.
1 fleece: I lived in my fleece, so make sure it’s one you’re comfortable wearing a lot!
1 lightweight sweater: good for a quick extra layer that can be removed as necessary
1 waterproof jacket: I didn’t bring a waterproof with me and had to buy a fake North Face one in Thamel when the rains started. Check the weather forecast before you go, but definitely take a waterproof just in case.
5+ pairs of underwear: the exact amount is a personal preference, but do bear in mind that you could be hand washing (see below), so quick dry material is often a good suggestion.
2 – 3 bras: decide on colours when you’ve chosen what tops you’ll be packing.
Socks: I took about three pairs of socks to Kathmandu, and regretted not having more. I didn’t envisage that I’d be taking off my shoes in people’s unheated houses and wandering around the cold floors; my socks were filthy in no time, and it took me a while to find standard elasticated socks to buy instead of the typical thick hiking socks which didn’t fit inside my trainers!
* I didn’t take skirts or dresses with me to Nepal, but some of my tops were long enough to be worn over leggings. The Hindu culture doesn’t accept shoulders or knees being uncovered, plus I felt like teaching required me to be as smart as I could manage with my clothes collection – so trousers and tops sufficed.
Nepal packing list - Flora Baker in Nepal on Elephant" width="600" height="450" class="size-full wp-image-5620" />
The only opportunity to wear my bikini was during the elephant bathing at Chitwan National Park. I still wore leggings and a t-shirt too, but it was sensible to be in my suit!
Lightweight trainers: I spent the majority of my time in waterproof trainers, but I did wish I had slightly nicer shoes to wear while teaching opposite the stunning female staff at my school, all dressed in saris.
Hiking shoes with ankle support: these are essential if you’re planning on trekking. Otherwise you can get away with just wearing trainers!
Sandals/flipflops: the condition of the Nepali roads and the cold, wet weather didn’t encourage my wearing of flipflops, but they were still useful for the shower and walking around the house. Although I did succumb to the sock/flipflop combo on a few cold occasions.
Razor: Although I embraced the hair during my time in Kathmandu, chances are you’ll want to remove yours.
Mooncup: I recently purchased one of these babies and now am a little bit in love with it. I took tampons to Nepal but they aren’t that easy to find on the ground so I’d definitely suggest investing in a Mooncup! (We’re big supporters of menstrual cups here at HPL, and especially the Diva Cup!)
In Nepal, almost all power is run via hydroelectricity, so a system of load shedding is in place, which provides energy to different areas of the city for a few hours at a time. Although there’s an official schedule for when the accompanying power cuts occur, it’s not strictly adhered to – and this often means a lack of hot water, no electric light and a difficulty in knowing exactly when to charge your electrical items.
Often you’ll find that your area doesn’t have any electricity during the night – so if you’re out all day, a sensible option is sometimes to leave your electronics plugged in and the outlet switched on. You won’t be overcharging your appliance or rinsing the electricity as chances are it will only be on for a few hours anyway!
Laptop or tablet (plus charger): An optional choice, but they’re great to back up photos, talk to friends and family over Skype, and blog about your adventures. There are plenty of internet cafes in Thamel though.
iPod (plus charger): Listening to music is a great way to relax or keep you company on long bus journeys. It’s also a great icebreaker with the person sitting next to you!
E-Reader (plus charger): Great for reading on the go.
Camera (plus charger): Indispensable if you want to take photos to show your family and friends back home. Plus Nepali children (and adults!) adore looking at photos of themselves!
Adapters: Because Nepal is a developing country, it has a few different types of socket, including the European and the Indian, so taking a universal travel adaptor is probably your best bet.
Sleeping bag and/or silk liner: Most guest houses and hostels will provide you with sheets and/or bedding, but I like to be prepared and at least have a liner with me. It’s an extra layer of warmth plus you know it’s clean!
A bandanna / scarf to cover your nose and mouth: Kathmandu has some of the most polluted air in the world, and if you don’t cover your face when walking around the city and weaving through the traffic, it’s absolutely certain that you’ll get a cough and/or a cold.
Sunglasses & sunscreen: I didn’t wear sunscreen for my first few days in Nepal because I was so cold I assumed the sun wasn’t strong. Then I endured a red, burnt nose to go with my head cold! The sun in Nepal is pretty high risk, so definitely keep a bottle of sunscreen to hand – and wear sunglasses when it’s bright.
Hat & gloves: Always good to have with you, but they can also be found in abundance in Thamel.
Head torch: I found mine indispensable in a number of situations; when the streetlights went out on a particularly pothole filled road; navigating my way through the house to the bathroom; and one particularly scary toilet experience.
Medicine (in particular, diarrhoea medication): Three days after I started my anti malarials (in preparation for travelling onwards to India) I came down with an acute attack of diarrhoea. I still don’t know if it was a direct side effect of my anti malarials but it lasted for about three weeks and was utterly horrific. You should never be without sachets of dioralytes and Imodium.
Refillable water bottle: The tap water is not safe to drink in Nepal, but you can often find filtrated water in large barrels at hostels, shops and hotel receptions, which charge a small fee to fill up your own bottle.
Eye mask and earplugs: The streets of Kathmandu can be very noisy, even at night. If you’re staying in a hostel then these two items are usually indispensable.
Copies of important documents (passport, vaccination certificates, travel insurance) & spare passport photos: Because you never know when you might be asked to show them.
Thamel is the main tourist district of Kathmandu, and it’s stuffed to the gills with all the kit you’ll ever want or need for hiking; every slogan slapped across a tshirt for souvenir shopping; and brightly coloured pyjama trousers for attempting to blend in with the local hippies.
Bartering is expected in Nepal, and it’s advisable to be even more confident about the prices you haggle for in Kathmandu – and Thamel in particular. That said, there’s obviously a limit to how low you can go without taking it too far – most of the stall owners make very little money so it should be kept in mind.
In terms of beauty regimes, threading is very common in Nepal. So if you want some perfectly defined eyebrows while travelling then don’t hesitate to pop in to a local salon – and you might even make friends with the women working there!
There are plenty of launderettes in Thamel for clothes washing, but depending on where you stay you could find yourself doing a fair bit of hand washing in the ubiquitous wash tubs that live in every Asian bathroom. With this in mind, make sure you take some detergent or clothes soap – and perhaps consider if the clothes you take are quick dry or a real chore to wash by hand! After days of damp clothes littering my cold bedroom, I started wishing I’d brought slightly thinner material with me…
About the Author: Flora is a travelling storyteller with a self-penned obsession for the weirdnesses of the world. She chronicles her adventures at Flora The Explorer, but you can also find her waxing lyrical about various travelling oddities on Facebook and Twitter.
Read article : Here's where you'll find a 'misfortune teller' and a man cleaning a bath - in the name of art
A street can look very much like its neighbour but there’s one that is bound to stand out this weekend after a special artistic makeover.
For 363 evenings of the year it is plain Victoria Avenue, Whitley Bay , but for the remaining two – this weekend, August 19 and 20 – it becomes ArtHouses.
This year’s ArtHouses, the eighth, includes a fairground with a difference, a series of “guerrilla-knitted bollard-warmers” and a man whose artistic performance is to consist of cleaning someone’s bathroom.
Members of the public, of course, are invited to watch.
ArtHouses was born at the same time as the Whitley Bay Film Festival back in 2010 and Tracey Tofield, who lives just round the corner on Esplanade Place, was involved with both.
From Carol Lynn's ArtHouses work, It's All About The Dots (Image: ArtHouses, Whitley Bay Film Festival)
What started as a small idea got bigger so the work of staging ArtHouses is now being shared by four people, including Tracey, who works in the fine art department at Newcastle University.
“It has grown from one (my house) to two houses, a back lane and an ice-cream van through to dilapidated beach shelters, hairdressing shops, cafes and the Panama Swimming Club as a Whitley Bay-wide event,” she said this week.
“ArtHouses has settled on Victoria Avenue for a few years now for logistical reasons – and also, Victoria Avenue is the perfect site.”
As well as being pedestrianised and having sea at one end, it has plenty of people happy to get involved, either hosting art events in their homes or generally helping out.
Tracey said artists Rob Smith and Sophie Buxton had even moved into the street since the first event took place in 2010 and were now among the co-curators.
“Lots of people and different houses have been involved over the years and in 2012 we had things at the Metro station, on the beach and all over the place.
“To be honest, it got a bit too big to manage. It is a volunteer event, very much in line with the film festival.
“But it is still very well attended over the two days. I counted 250 people on the street once.”
This year, as well as helping to manage the event, Tracey will be running a “pop-up fairground” on the community garden at the top of Victoria Avenue.
Part of Sneha Solanki's installation at ArtHouses 2017 (Image: ArtHouses, Whitley Bay Film Festival)
She promises a Lego version of hook-a-duck , a “murder mystery lady” called Hermione Poirot and a “misfortune teller”.
Lighting will be by sculptor Richard Broderick and there will be a contribution from Sneha Solanki who lives in Whitley Bay but has worked all over the world.
“She’s a really strong artist and she’s going to put on a sort of science and art performance and installation,” said Tracey.
Whatever happens, one Victoria Avenue householder is going to finish up with a sparkling bathroom, thanks to Rob Laycock.
“He’s been involved with ArtHouses for quite a long time and has done different performances,” said Tracey.
“He did one called Bounce which involved a trampoline but this year he’s going to clean a bathroom.”
Rob will do well to upstage Helen Schell’s performance, Undress, which took place on the beach in 2013.
People watched as she lay in a rockpool and then swam away when her dress dissolved.
This year dressing up rather than dressing down is the name of the game, largely thanks to the local ‘knit and natter’ group whose members, with the support of the lottery-funded Big Local, have knitted cosy covers for the bollards.
ArtHouses takes place on Saturday and Sunday from 6pm to 10pm. Find details of this and the film festival attractions at www.whitleybayfilmfestival.co.uk .
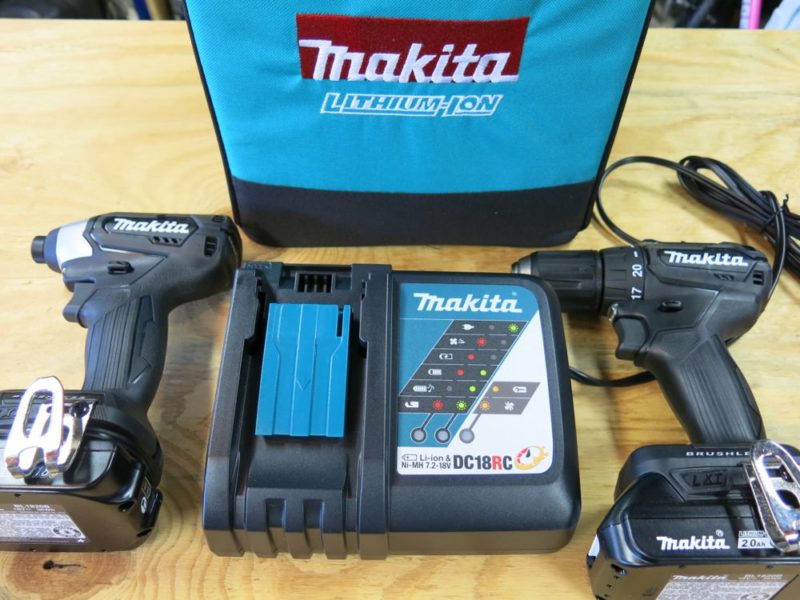
This post is sponsored by The Home Depot. Tool brands take their colors seriously, and when one of them deviates from the color everyone recognizes them by, it means one of two things: 1) They are making a statement to differentiate a particular tool, or, 2) their brand manager is getting fired. Makita has recently made a chroma-curious move and released a new line of 18v Cordless tools in, wait for it, black! They sent us their 18V LXT Sub-Compact Combo Kit (CX200RB) several months ago, which includes both the Makita Sub-Compact Drill (XFD11ZB) and Makita Sub-Compact Impact Driver (XDT15ZB). We’re pretty sure their brand manager isn’t getting fired over the new color scheme, so let’s talk about these new tools, and why you might want to own them.
[embedded content]
As we all know, it’s a cordless world out there when it comes to power tools. Even outdoor power equipment is making the rapid progression toward cordless technology. Just about every power tool, including those many thought would “never” go cordless, are available in cordless platforms. All that cordless goodness does come at a cost. For one thing, things can get messy when it comes to battery platforms and chargers. I often dream of a day when all the tool companies come together to pursue a universal standard for chargers and batteries. From a consumer standpoint, being able to use one charger and any brand’s battery would make life a lot easier.
The Makita Sub-Compact CX200RB Kit
Unfortunately, that’s not likely to happen for a variety of reasons. For one, many tool brands invest a great deal in innovation focused on batteries, chargers and the tech that enables batteries to communicate with both chargers and the tools themselves. Those same companies aren’t going to be excited to join in a sharing circle of competitors, singing Kumbaya as they exchange their hard-fought intellectual property. Brands also benefit from practical brand loyalty here too. The tool companies that offer a large variety of the most appealing tools can encourage some buyers to stick to a single brand’s cordless platform exclusively. If you don’t believe that, check out some of the photos posted to social media showing loyal tool users showcasing mountains of red, blue, green or yellow cordless tools.
Even if you stick to one brand, you’re likely going to have tools in both 12v and 18v lines. Which brings us to this current review. Makita is looking to bridge the gap between 12v and 18v lines by providing the compact form factor users love in the 12v platform, with much of the power and performance users love about the 18v platform. For some of you, this might mean you leave some or all of your 12v gear behind and just carry your 18v tools, batteries and charger.
Comfortable ergo with a compact form-factor make the Makita Sub-Compact tools feel like a natural extension of your hand
One of the great things about 12v tools is their ergonomics. Many 12v drills and drivers just feel better than some of their bulkier 18v counterparts. The Makita sub-compact drill and it’s sibling impact driver feel more like a 12v tool in your hand, and that’s thanks to Makita’s choice to use a brushless motor that’s smaller in size than what you would find on a comparable 18v tool. While some bulkier 18v tools can feel awkward and cumbersome to wield, the Makita sub-compact tools instead feel like a natural extension of your arm (albeit with a lot more torque). And, because there isn’t a 12v battery crammed into it, the trim and slender grip on the sub-compact actually feels even better than many chunkier 12v grips.
The sub-compact benefits don’t stop with how the tool feels in your grip, they’re also relatively light, especially if you’re using the lightweight Makita 2.0 Ah battery. At just 2.8 and 2.6 lbs for the drill/driver and impact driver respectively (with the 2.0 battery), arm fatigue is kept to a minimum.
One of several tasks for the Makita Sub-Compact tools – drilling through solid bambooThe bamboo benchtop was no match for the Makita sub-compact drill
I used the 18V Sub-Compact Drill and Driver on a variety of tasks including installing recessed alarm sensors, drilling glass, assembling office furniture, installing a flat screen, installing a bench vise on a bamboo bench-top, removing a glass shower door assembly, installing closet railings, drilling into plaster, and general tasks for around the home. Some of that work was done off-site and these Sub-Compact tools were compelling to bring along since I suspected I might need more juice than a 12v might provide, but I also didn’t want to lug bulkier tools along. I dropped the Makita Sub-Compact Drill and driver into a tool bag filled with other tools and I didn’t feel like I was lugging my shop with me.
Lots of clutch settings and a bright LED. We didn’t use the clutch given that we had the sub-compact impact driver on call.
This nimble powerhouse delivers 0-1700 RPM with a tiny 6-3/8″ overall length. You can adjust fastening torque from 20 different settings via the ring next to the chuck, or set it in drill mode to disable the clutch. The tool features two speeds, with the higher speed intended for lower-load activities. I found the optional belt clip handy given that the tool isn’t likely one you’ll slip into your toolbelt pouches. That’s one downside to the Sub-Compact line – 12v tools (assuming you’re using a lower capacity slim battery) are sleek enough that many users store them in their tool pouches. Despite the Sub-Compact’s very trim size, you won’t be likely to do that given the bulkier 18V form-factor. One little known fact is that you can use this tool like a manual screwdriver by switching the forward/reverse switch to neutral. However Makita recommends you don’t get carried away and try to loosen rusted lugnuts this way. Frankly, assuming you have both these tools on hand, you’ll probably want to use the driver drill more or less exclusively for drilling and the Sub-Compact Impact Driver for fasteners.
The Makita sub-compact drill / driver drilling out a dense door frame for a home automation sensor.
While not exactly ninja-quiet, the impact driver delivers a punishing 0-3900 impacts per minute to coerce fasteners into submission. It sports an even smaller 5-5/16″ overall length, making it ideal for tight-quarters fastener combat. At the base of the tool, you’ll find a somewhat confusing array of options for controlling the impact force. I’ll walk through each here, since they are not intuitively obvious (or, they weren’t to me anyway).
The indicator lights/settings weren’t quite as intuitive as we’d like.
There are three separate areas with indicator lights “S” for “Soft”, “H” for Hard and “A” for Assist Mode. Soft mode is engaged when just the light under the S is lit. It’s best for working with smaller fasteners and more delicate materials. Maximum impacts in S mode is 1600 IPM. If you’re in “H” or hard mode both the S and H lights are lit. I found this a little confusing as typically indicator lights are on one setting or another, not both. Presumably Makita lit both to indicate you can still operate the tool in the lower IPM range, but I think a single indicator light would make things more clear to users. In hard mode the tool delivers up to 3900 IPM’s. Plenty of impacts for most screws and reasonably-sizes bolts out there. Lastly, “A” or assist mode will automagically start screws slow and then gear up to higher speeds and impacts once you’re on track. This is great for longer fasteners and if you’re tool lazy to adjust speed yourself. “A” mode has the same maximums as the Hard setting by the way. In a world of Low-Medium-High or 1-2-3 settings, I think S-H-A isn’t as clear as it could be.
Both tools have an onboard LED light just under the chuck / bit holder that lights during operation and stays lit about 10 second after. The light position casts a pretty significant shadow and isn’t super-bright, but it’s still useful if you’re working in a dark space. I found it very helpful working in a couple dark closets. As with many other Makita tools, you’ll find a fuel gauge on the battery itself rather than on the body of the tool, which is handy to for checking charge level on batteries that aren’t slid into a tool.
The 18v batteries have onboard charge status, handy for checking charge even if the battery isn’t hooked up to a tool.
Another nice bonus to the 18V battery is that it makes a much more stable stand than trying to balance the barrel-style 12V battery tools (many of which will simply fall over). You can set these Makita Sub-Compact tools on the ground, a nearby shelf or table and they’re ready to grab and go.
Both drill and driver stand up easily and are very stable when compared to trying to stand up a 12v barrel-style battery
The 18V LXT Sub-Compact Combo Kit (Cx200RB) we tested comes in a cube style carrying case that, sadly, is not black (which means it does NOT match my ninja outfit). While it handily fits the tools and charger, with room to spare for batteries and accessories, I can’t see carrying that cube anywhere, even with the included shoulder strap. The cube is bulky and better-suited to storing your lunch. With ninja-style tools like these, I’ll instead tuck them away in more agile storage when transporting them.
While functional and spacious, we weren’t in love with the cube-style carrying case.
The new 18V LXT Sub-Compact line from Makita has a lot going for it: great ergonomics, compact size, light weight and plenty of power for most applications you would want to use them for. Whether you’re a pro looking to minimize how much gear you’re toting, or you’re a homeowner looking for the convenience of a 12v tool, with many of the power advantages of an 18V tool, the Makita Sub-Compact Drill/Driver and Impact Driver is a great value and a winning combination. Plus, they’re black, which is awesome!
Buy the Makita CX200RB kit from our sponsor The Home Depot
You can find the 18V LXT Sub-Compact Combo Kit (Cx200RB) for a very reasonable $239 price tag at The Home Depot. The kit includes both Sub-Compact tools, 18V charger, two 2.0AH batteries and the lunch box, errr, I mean storage case.
Buy Now - via Home Depot
I acknowledge that The Home Depot is partnering with Home Fixated in sponsored content. As a part of the sponsorship, Home Fixated is receiving compensation for the purpose of promoting The Home Depot. All expressed opinions and experiences are our own words. This post complies with the Word Of Mouth Marketing Association (WOMMA) Ethics Code and applicable Federal Trade Commission guidelines.
Read article : Best Water Parks In Seattle « CBS Seattle
By Jeffrey Totey
You would think that with all of the rain that we see in Seattle on a yearly basis, people around here would get tired of getting wet, but that just isn’t the case. The greater Seattle area features a nice mix of water-based entertainment including waterslides, pools, spray parks and more. Here are five of the best parks.
Wild Waves Theme and Water Park 36201 Enchanted Parkway S. Federal Way, WA 98003 (253) 661.8000 www.wildwaves.com
Located in Federal Way, Wild Waves is two parks in one. The water parks features many waterslides, “raging rivers,” group raft rides, activity pools, the Hook’s Lagoon water playground, warming tubs and more. Some summer nights feature outdoor movies at the wave pool. If you’re feeling waterlogged, you can stumble over to the other half of park that features a collection of roller coasters and thrill rides like the Brain Drain drop ride and a huge flume ride plus a collection of family-friendly rides and others just for the little ones. The park is popular, so get here early to make the most out of your day. While this option is probably the most fun, it is also the most expensive of the lis, so choose your adventure wisely.
Henry Moses Aquatic Center 1719 Maple Valley Highway Renton, WA 98057 (425) 430-6780 www.rentonwa.gov/living/
The city of Renton recently unveiled the Henry Moses Aquatic Center which has super-sized your average city pool. Here you’ll find two 26-feet high waterslides, a six-lane lap pool, a 9,000-square foot pool that has a zero-depth entry and wave machine, a water spray play area, a lazy river, a toddler water area, and island lagoon. The park also features a “Shark Bites Café” concession area as well as lockers, bathroom/shower facilities and plenty of shade to get out of the hot sun if necessary.
Lynnwood Recreation Center and Pool 18900 44th Ave. W. Lynnwood, WA 98036 (425) 670-57325 www.lynnwoodwa.gov/PlayLynnwood/RecCenter
Wright Park 501 South I St. Tacoma, WA 98405 www.metroparkstacoma.org/wright-park
This spray park is part of the 27-acre arboretum that features a “splash pad” with spray-able features and figures. However, you might want to tire your kids out at the playground first before taking the plunge. The park is beautiful with lots of shade-giving trees and plenty of places to picnic too. Best of all, it’s free!
Willis Tucker Park 6705 Puget Park Drive Snohomish, Wa 98296 www.snohomishcountywa.gov
Up north in Snohomish you’ll find the Splash Pad that features a bounty of fun-sounding features like the tricky soaker, aqua dome, water jelly, aqua jumper, power spinner, power volcano, and splash palace. Just don’t arrive between 2:30 and 3:30 p.m. as all of the water is shut off for maintenance or use that time to break out the picnic lunch and some fun in the large sand box.
Related: Best Activities for Summer Thrill Seekers in Seattle
Read article : Bathroom Door Frustration and Solution (Turn Bi-Fold Doors Into French Doors)
This bathroom is such a good example of how one project is dependent upon another. Immediately after I finished the floor, I wanted so badly to jump right in and start adding the wainscoting to the walls. It would be relatively quick, easy, and would give me some immediate gratification. But I can’t do that just yet, because I first need to install the vanity and the countertop and see exactly how high those will be after installation. Since I’m adding a decorative tile trim on the wainscoting that will also act as the backsplash for the vanity, I need the precise height, and I can’t get that without the vanity and countertop being constructed and installed. But I can’t install those until I know exactly how much room the wainscoting trim will stick out on the door wall since the left side of the vanity will be sitting right up against it, so that has to be installed first. But I can’t install that until I trim out the door, so really I need to install door trim before doing anything else.
But UGH…that door. I’ve been dragging my feet on trimming out that door.
Ever since I installed the new door in the bathroom, I’ve been dissatisfied with it. It’s a 32-inch door (which is the narrowest I can use for Matt), and if you’ll remember, I moved it over about ten inches from its original position so that I could have room for a wider vanity that goes all the way to the side wall (i.e., the door wall).
I thought that I would be satisfied with a standard door because that’s what was there before. When the door is open, it covers the linen storage area behind it, just as it did before, and that configuration never bothered me with the old bathroom. But with the door moved over enough to accommodate a vanity, the door no longer opens up a full 90 degrees. At most, it opens maybe 85 degrees. Maybe 80 degrees. It just really bothers me, and it makes the room feel smaller.
Plus, the previous linen closet was strictly utilitarian. There was nothing pretty about it, so it didn’t bother me at all that it was covered up when the door was open. But I plan on making the new linen storage area actually part of the design of the room. In other words, I’m hoping it’ll turn out not only providing useful storage, but also being pretty. So I don’t really want it covered by the door.
But as much as it’s been bothering me, I just couldn’t think of another solution. If it’s installed like it is now, it covers the linen storage area. Obviously I can’t install it so that it swings into the bathroom the other way or it’ll cover the vanity. If I install it so that it swings out into the hallway, and it opens to the right (while standing in the hallway looking towards the bathroom), there’s not enough space for it to open all the way against the wall, and that would drive me crazy. This isn’t exactly drawn perfectly to scale, so you’ll just have to take my word for it.
If it opens to the left, the door will cover part of the area that will eventually be a hallway (currently the master bedroom closet).
And obviously, if there’s no room on the outside of either of these walls for the door, then there’s no room inside the walls for pocket doors, at least not if I want the pocket doors to open all the way. And yes. Yes, I do want the door to open all the way.
So I’ve been thinking that I was just stuck with it the way it is. Then yesterday, it dawned on me that I could buy a 32-inch bi-fold door, remove the hinges connecting the two halves of the door, and install them like French doors opening into the hallway! That way the linen storage area won’t be covered, and each small door will have plenty of clearance in the hallway so that they can open flat against the wall, and not cover over anything they shouldn’t.
(Obviously I’m using the term “French door” loosely here, since by definition, French doors have glass in them, and I’ve already ruled that out. My doors will be solid, and I’m simply referring to configuration of two doors used together in one doorway.)
Then I did what I always do when I have an idea, but I’m not quite sure if it will look right. I headed to Houzz to see what I could find. This one is my favorite.
Now they probably didn’t use actual bi-fold doors turned into French doors like I plan to do, but I think the final result will be very similar. Here are a few more examples of skinny French doors.
Eclectic Bathroom
Transitional Bedroom by Dallas Media & Bloggers Angela Flournoy
Now there is one obvious difference between my bathroom and the ones in the pics above. Those are all master bathrooms connected to a master bedroom, and mine will be a guest bathroom off of a hallway. But I think it’ll still work, and I think it’s the best option. It’ll definitely be a little unconventional, but it’s just one of those quirky things that comes with the territory when you’re trying to take a 1948 house and make it work for today. But I really do think it’ll look great when it’s finished!
After seeing those pictures, and seeing how good those doors look, I decided to do some searching to see if others had taken bifold doors and turned them into French style doors. And yes, of course, there are several. Danielle at 2 Little Superheroes turned her bi-fold pantry door into French style doors.
And Tricia at Simplicity In The South turned her laundry room bi-fold doors into French style doors.
I came across several more examples, but those were my favorites. So I’m gonna go for it! Of course, since they’ll be opening out into the hallway, that means that I need to actually finish the wall (i.e., remove old drywall, remove shiplap, and install new drywall) at least on that one hallway wall before I can install the new doors. I got to work on it yesterday, and got all of the drywall removed, as well as a good portion of the shiplap. Hopefully I can get new drywall up today, and get started on those doors. I’m actually very excited about this plan! It’s definitely unconventional for a guest bathroom, but I think it’ll look great!
Regardless of whether you live in an apartment or a house, the bathroom is one of the most important rooms in the home.
A practical and modern bathroom dramatically enhances the appeal of any home, so if you’re planning a bathroom renovation it’s important that you get the details right. So if you’re looking for a host of handy tips and tricks to help you turn your tired and impractical bathroom into a relaxing and luxurious retreat, you’ve come to the right place.
Before you start thinking about design ideas, colours, and choosing shower heads and tiles, you need to sit down and work out exactly what you want to achieve with your bathroom renovation.
If you’re renovating an ensuite to create a peaceful space where you can unwind, warm tones and a modern free-standing bathtub might be high on your wish list. If you need a bathroom for your growing family, then durable materials and plenty of storage will be essential inclusions.
So take the time to develop a clear idea of what the bathroom will be used for and any features on your must-have list. Once that’s done you can start planning the finer details.
The right layout is essential to create a functional and comfortable space, so consider ambience, flow and practicality when deciding on your bathroom layout. Speak to an architect or a builder about the functionality and layout of the space. There’s a seemingly endless array of floorplan options available, though you may be constrained by the location of existing plumbing connections. Consider the features you want in your bathroom, for example maximising natural light or ensuring an easy flow from the bedroom through to your ensuite shower, when deciding on the right layout.
The shower is one of the features of your bathroom that will get the most use. From choosing a screen for privacy to deciding on a shower head to sourcing the right water flow, there’s plenty to think about when selecting your shower. You can choose a fixed or hand-held shower head, massage showers, waterfall showers and high- and low-pressure jets. In terms of shower screens, do you want a framed, frameless or semi-frameless screen, or perhaps no screen at all? Chat to an interior designer and shop around at bathroom specialist stores to learn more about the different options available on the market and how they fit into your plans.
A contemporary bathtub is a must — and there’s a seemingly limitless range of beautiful designs to choose from. There are freestanding tubs that are statement pieces in their own right, recessed baths that use minimal space, easy-access baths for the elderly or those with a disability, as well as full jacuzzi setups for a touch of luxury. However, if you live in a second-storey house, be mindful of having a bath on the second floor as the weight of a full bathtub may put pressure on the upper floor. The amount of space available is also going to have a big influence on the bath you select.
Every bathroom needs a sink, but if you and your partner are usually getting ready at the same time, could the space benefit from his and hers sinks? Ample storage space is a must for any vanity unit, while looks should never be neglected in order to ensure that the vanity you select matches the rest of the bathroom. The right vanity will combine good looks and handy storage options with plenty of usable bench space. From wall-mounted vanities to cabinet vanities and even minimalist vanities with a simple shelf system, there’s a huge range of choices available.
From taps and towel rails to frameless shower screens, the right fixtures and fittings are practical inclusions that complement the design of the rest of the bathroom. Taps come in an extensive selection of materials, including chrome, brass, gold and stainless steel, and there’s no limit to the styles available depending on the space available and the look you want to achieve. The sink, shower, bathtub and toilet should all serve a practical purpose but should also seamlessly integrate with their surrounds and complement one another perfectly.
Tiles play a hugely important role in determining the look and ambience of your bathroom. From floor tiles to wall tiles and even special feature borders, choosing the right tiles is crucial to the success of your bathroom renovation. It can also be a daunting process, You’ll need to consider the ambience you want to create in your bathroom, your colour scheme, the size of tiles you want and how they will be laid out. For example, do you want to use contrasting tiles to add a feeling of space to a small bathroom, or do you want tiles with a textured surface to create a unique and interesting feature? Tiles come in ceramic, glass, natural stone, porcelain and clay, so research the looks and benefits of each option before making your choice.
A bathroom with insufficient storage space is impractical and cluttered, so make sure you’ve got ample room for all the toiletries, towels and other odds and ends you need to store in your bathroom. Vanity cabinets, shelves and drawers are the obvious places to keep your items so they don’t clutter up the rest of your bathroom, but there’s plenty more you can do to maximise storage space. There’s a huge range of clever internal hardware options available to cleverly use the available space, while a recessed niche built into the shower cavity is great for storing shampoos, soaps and the like. Even installing a simple ledge-style shelf can help keep the vanity top free of mess.
Last but certainly not least, don’t overlook the importance of lighting in creating a welcoming and refreshing space. The bathroom is one area of the house where it’s important to be able to see clearly, but where you can also relax in comfort if that’s what you feel like doing. Whether you’re looking for soft LED down lighting, a feature pendant that stands out or simply the warmth of natural illumination, include lighting considerations in your initial renovation plan. Light fixtures will obviously need to be moisture-proof and capable of standing up to life in your bathroom, while you may also want to consider heat lamps if you live in a cold area. One other thing to remember when choosing lighting is energy usage - the right choices can make a noticeable difference to your power bill.
When you’re renovating a bathroom, space is the final frontier. In a larger space, having more room to work with often means that you have more flexibility to add privacy and create different zones for each bathroom task.
When you’re renovating a bathroom, space is the final frontier. In a larger space, having more room to work with often means that you have more flexibility to add privacy and create different zones for each bathroom task.
Unfortunately, most bathroom renovators only have a limited area to work with, so they need to take advantage of clever ideas and design solutions that help them make the most of the available space. For example, a normal hinged door can eat up much more space than you have to spare, so a sliding door can offer a better solution. Other great space-saving and space-creating ideas include wall-mounted toilets, neutral colour palettes with occasional bursts of colour, and including handy built-in storage nooks and crannies wherever possible.
Renovating a small bathroom means you’ll also have to be more ruthless when deciding what belongs on your bathroom wish list. For example, while soaking in a hot bath might sound appealing, are you really willing to sacrifice such a large amount of floor space to include a tub?
If you’re keen to save as much money as possible on your bathroom renovation, you may want to consider a DIY project. While this lets you take control of your bathroom renovation, it’s always wise to think about your options before going the DIY route as bathroom renovations can become complicated very quickly.
Some jobs are fairly simple for the DIY renovator, such as stripping out your old bathroom and prepping the space for your new bathroom. Other jobs, for example waterproofing and tiling, you might also be able to do yourself if you have the right experience under your belt.
Plumbing and electrical work will need to be done by the professionals, however. A good plumber can help you through your renovation from start to finish, so find a plumber you trust before you start knocking down walls or stripping out tiles.
From tiles to toilets, there are several options when you need to stock up on the right supplies for your bathroom renovation. A good place to start your search is a large hardware store like Bunnings, Masters Home Improvement or Home Timber and Hardware. This will give you a good idea of some of the fixtures and fittings available to include in your bathroom.
It’s also a good idea to browse specialist renovation and bathroom supply stores — research online to find one near you, and where you find one bathroom store you’ll often find a few more. There’s a huge range of products to choose from for every aspect of your renovation, from the smallest of tiles to the largest of freestanding baths, so take the time to consider all the options available before making your decisions.
Do your research. Jump online and visit local bathroom renovation specialists to see what kind of materials and fixtures are on offer. Speak to architects, building experts and bathroom renovation specialists to ensure that your renovation plan and budget is feasible. Source several quotes from different suppliers before deciding which company to go with.
Plan ahead. Don’t start your renovation unless you know exactly what you want to achieve. Getting halfway through your project and then deciding that you don’t like the layout, you want different tiles or you’d like to make room for a bigger bath can be an expensive and stressful mistake. Work out exactly what you want before you reach for a hammer.
Make a budget and stick to it. Bathroom renovations have something of a reputation for unforeseen costs and budget blow-outs. Around $15,000 to $20,000 is a realistic estimate for many bathroom projects, see our guide on the costs of bathroom renovations, but sit down and work out the material and labour costs for your project. Once you’re fully aware of how much your project should cost and how much you can afford, it’s time to start work.
Know what you can do — and what you can’t. While DIY renovations are great for saving money, it’s important that you don’t get ahead of yourself when choosing what jobs to take on and what to leave to the professionals. If you’re at all unsure about your ability to complete a particular task, you’re much better off getting the experts in to avoid problems occurring later down the track.
Take your time. While it can be frustrating having your bathroom out of action for a couple of weeks or more, when you’re doing it yourself it’s important not to rush things. Measure everything twice and be certain you’re doing the right thing before you cut, lay or install anything.
Plumbing costs. You might want to completely rearrange the features and layout of your bathroom, but take note that plumbing costs can sometimes make this prohibitively expensive. Moving plumbing pipes and outlets for sinks, toilets, showers and baths can cost thousands of dollars, so you may be better off leaving some fixtures where they are to lower your costs.
Read article : Best Plants That Suit Your Bathroom
We put plants in our living rooms and bedrooms, even in the kitchen so, when you think about it, there’s no reason to not include the bathroom in this list too. In fact, there are lots of plants that do well in the bathroom than in other areas of your home because they need the humidity.
View in gallery
In addition to their decorative appeal, most houseplants also help purify the air. Use them to improve the air quality inside your home. But before you choose the best houseplants for your bathroom, consider the environment it offers.
View in gallery
Some plants do well in spaces with low light, some need high humidity levels, some need lots of space, etc. Some of the best plants for low light environments are the alow, the bamboo, the orchid, the snake plant and the spider plant.
View in gallery
Another thing to take into consideration is where you’ll be placing these plants. A nice option is the countertop. It’s ideal for small plants. You can also place them by the tub, on the windowsill, in a corner, on a shelf or you can hang them on the wall. There are lots of options so now all you have to do is choose the plants you want to include in your bathroom décor.{image sources:1, 2, 3}.
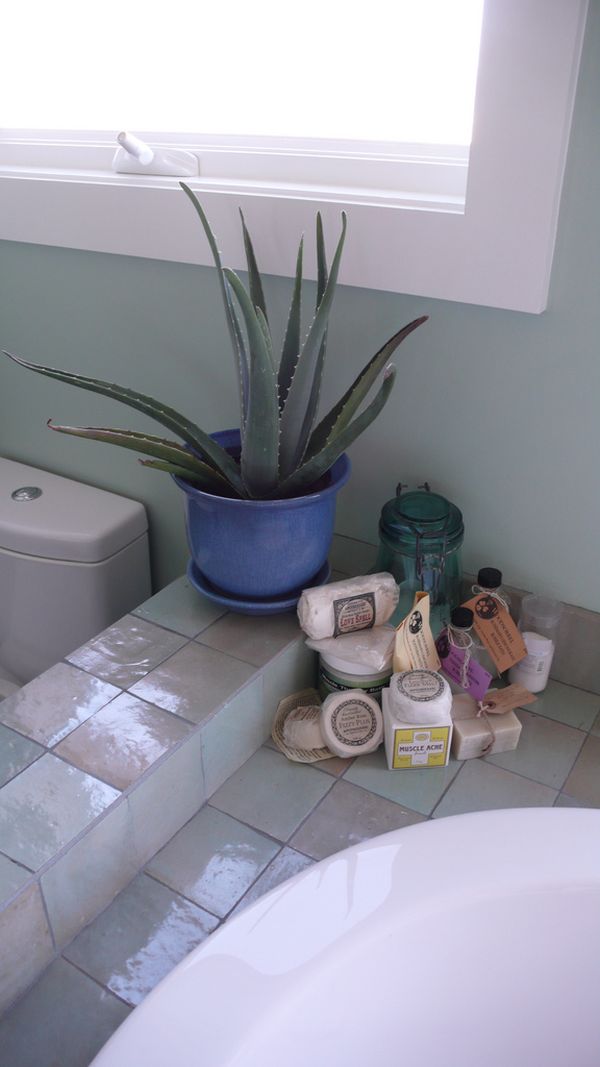
View in galleryA good place for an aloe plant is close to the window but not in direct sunlightUse a transparent container to show off the interesting shape of this plantAny free corner or surface would be great as long as there’s some sunlight
Aloe Vera is a succulent plan species and it has been widely grown as an ornamental plant. Although it needs some amount of sunlight, the alow plant can burn under too much sun and this makes it a great candidate for the bathroom. It doesn’t need lots of water to survive so the humidity should be fairly enough to keep it healthy.{image sources 1, 2, 3}.
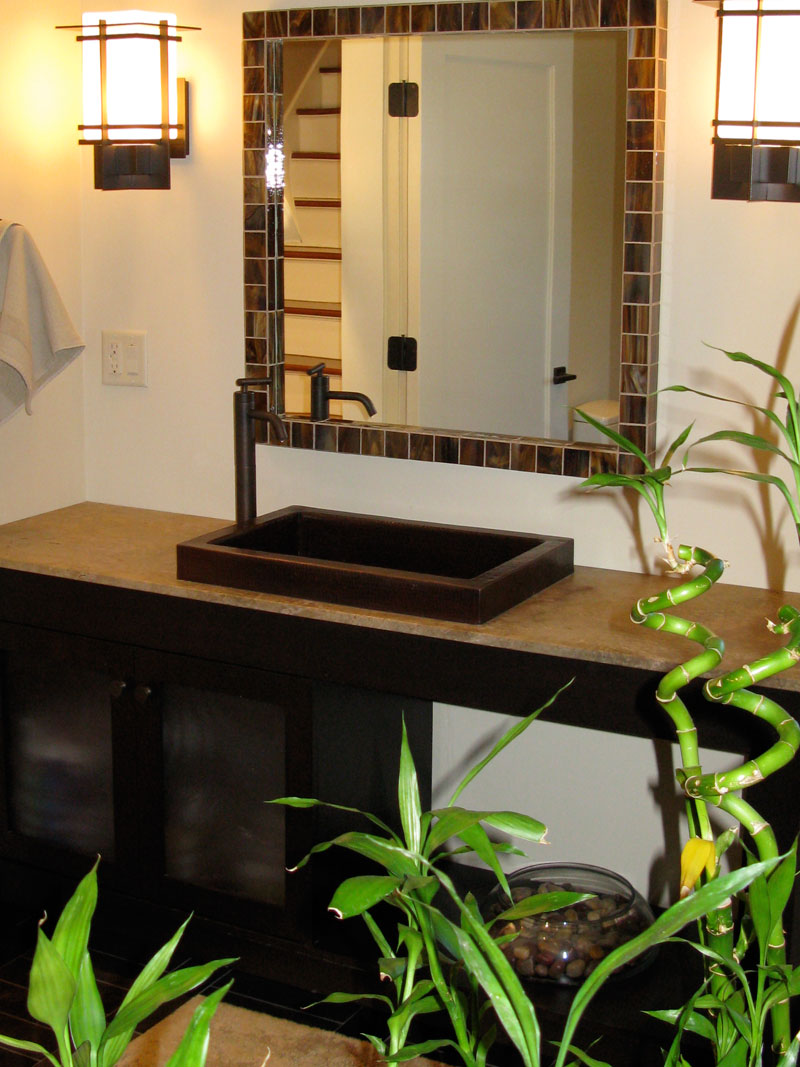
View in galleryPlace the plant by the window and it will grow towards the lightBecause bamboo grows relatively tall, you should find a place for it on the floorView in galleryThe bamboo almost dissapears into the background with all the cheery colorsView in galleryMake a modern statement with a pot of lucky bambooThere’s plenty of space for plants in small bathrooms if you keep the décor simple
Bamboos are some of the fastest growing plants in the world so take this into consideration if you decide to use it as an ornamental species. There are ways to control the growth of bamboo plants. For example, you can surround them with a physical barrier. You can also control their shape and create all sorts of interesting designs.{image sources: 1, 2, 3}.
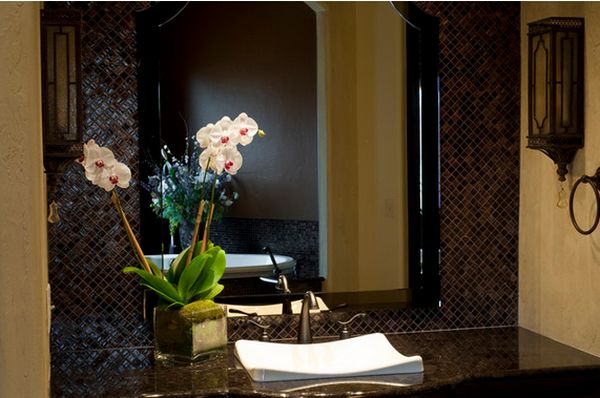
View in galleryBecause it’s a relatively small plant, the orchid would look great in the sinkView in galleryPlace it on the countertop by the mirror to add some freshness to the bathroomView in galleryThe beautiful and graceful flowers will cheer up any décorChoose a white orchid for a bright bathroom to maintain an airy lookView in galleryOrchids are perfect for modern interiors because of their subtle eleganceAnother good place for an orchid is by the tub
Orchids are one of the largest families of flowering plants with more than 20,000 species. They do well in warm and humid environments and they’re all beautiful ornamental plants. All orchids are perennial herbs so you’ll only get to enjoy them for part of the year. Their flowers feature a variety of colors. White orchids are among the most popular.{image sources: 1, 2, 3, 4, 5,and 6}.
View in galleryThe snake plant is perfect for the space under the sinkView in galleryThe shape of this plant makes it wonderful for the corner spacesView in galleryYou can place it on the countertop, although when it grows tall it should stay on the floorView in galleryThis little corner by the tub is a perfect place for the plant
The snake plant, also called mother-in-law’s tongue (feel free to guess why) or Saint George’s sword is a species of flowering plant which needs little light and water to survive. It’s a great corner plant and a wonderful air purifier. It is widely used as an ornamental plant in both indoor and outdoor environments.{image sources: 1, 2, 3 and 4}.
Because of the shape, the spider plant looks great on a pedestal such as this one
Spider plant is a common name for several different plants but, most commonly, we use it to refer to Chlorophytum comosum. This one is also called airplace plant and it’s a flowering perennial herb. It grows to about 60 cm high and it has long narrow leaves. It’s a popular houseplant, mainly because it’s very easy to care for.
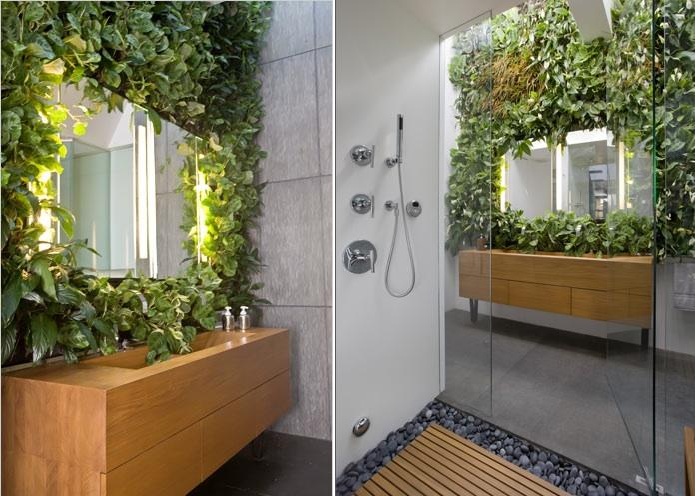
View in galleryIf you don’t have tiles on the walls, find a way to prevent the mosture from damaging themView in galleryYou don’t necessarily need big plants to get the look you wantView in gallerySome planters are specifically designed to be mounted verticallyA gorgeous vertical planter that fits perfectly in this modern bathroomView in galleryThis lush green wall includes a variety of plants such as ferns and lavenderBe creative and find ways to bring nature into the bathroom
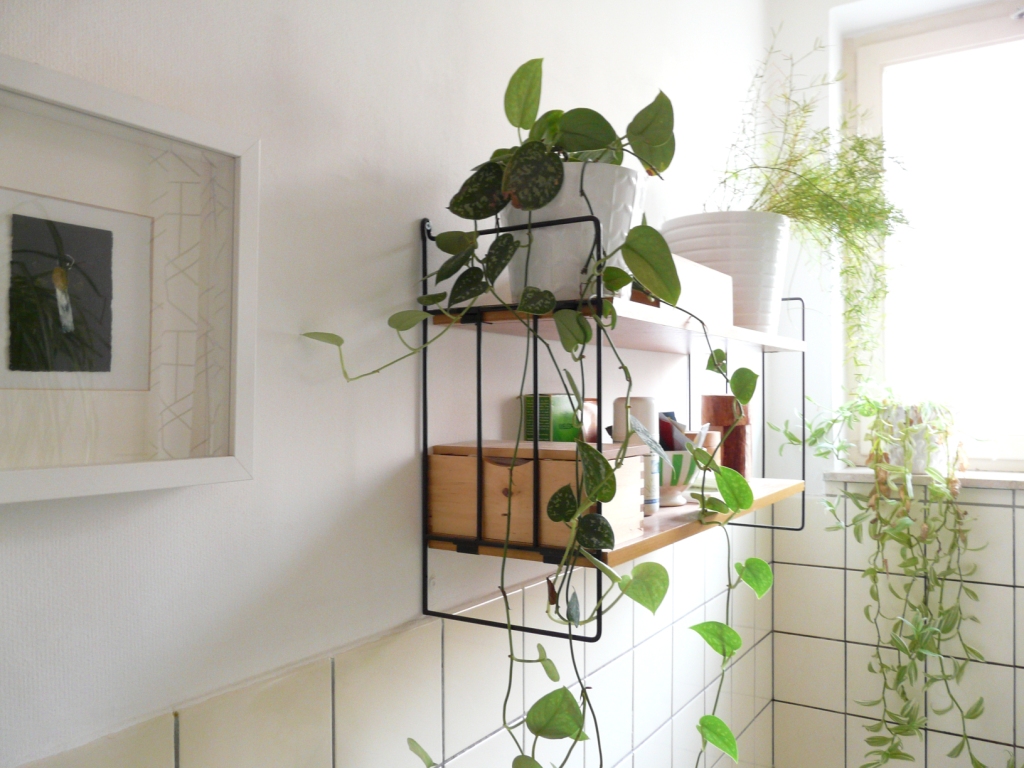
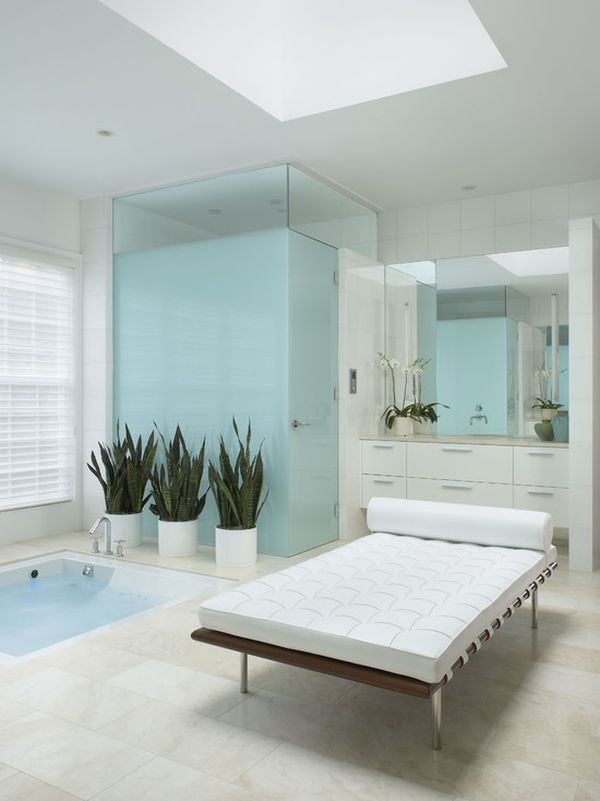
If you really want your bathroom to look like a spa, then you’ll need more than just a little potted plant. You might want to consider having a vertical planter or a green wall. For example, you can use the wall adjacent to the tub, although the warmth might be too much for some species so choose carefully. Such a feature requires constant attention and care.{image sources: 1, 2, 3, 4 and 5}.
View in galleryA tree with big leaves does well in the corner, surrounded by natural light
Having a tree in your home is definitely something special. In spaces such as the living room there might be enough space for a big tree with a think trunk but the bathroom space is usually limited so if you insist on having a tree in there you should pick something smaller.
View in galleryHang a plant above the tub. It’s practical and you save floor spaceIf possible, find a way to hang the plants in front of the window
Hanging plants are very popular and appreciated because they’re some of the most practical types. You can save a lot of space with a hanging plant if you actually hang it from the ceiling or from a hook. You can experiment and find interesting ways to display hanging plants in your bathroom.

 Nepal packing list - Flora Baker in Nepal" width="600" height="450" class="aligncenter size-full wp-image-5621" />


 The Makita Sub-Compact CX200RB Kit
 Comfortable ergo with a compact form-factor make the Makita Sub-Compact tools feel like a natural extension of your hand
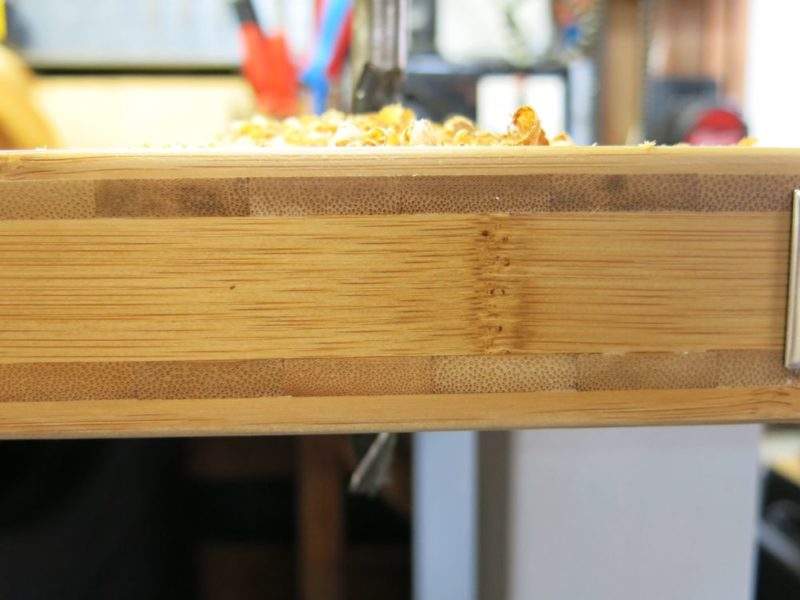 One of several tasks for the Makita Sub-Compact tools – drilling through solid bamboo
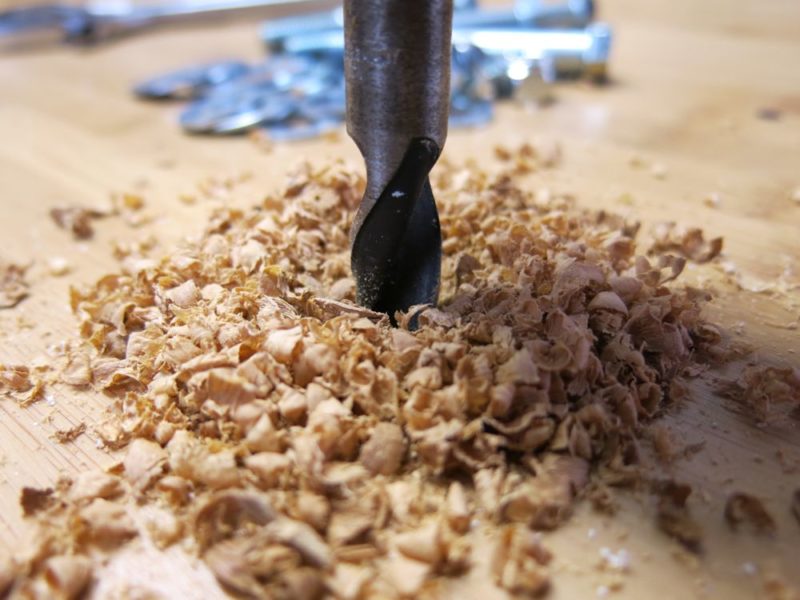 The bamboo benchtop was no match for the Makita sub-compact drill
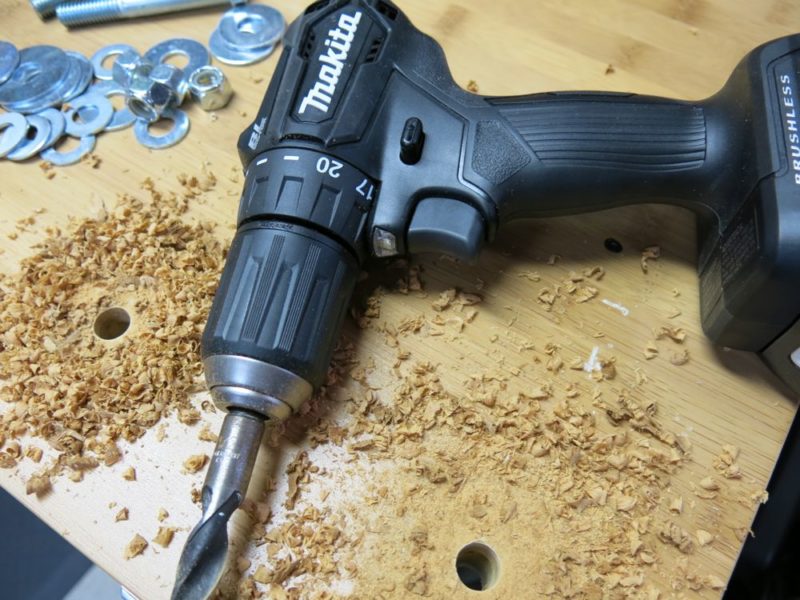 The bit got hot, but the drill stayed cool
 Lots of clutch settings and a bright LED. We didn’t use the clutch given that we had the sub-compact impact driver on call.
 The Makita sub-compact drill / driver drilling out a
  Once the holes were drilled, the Makita sub-
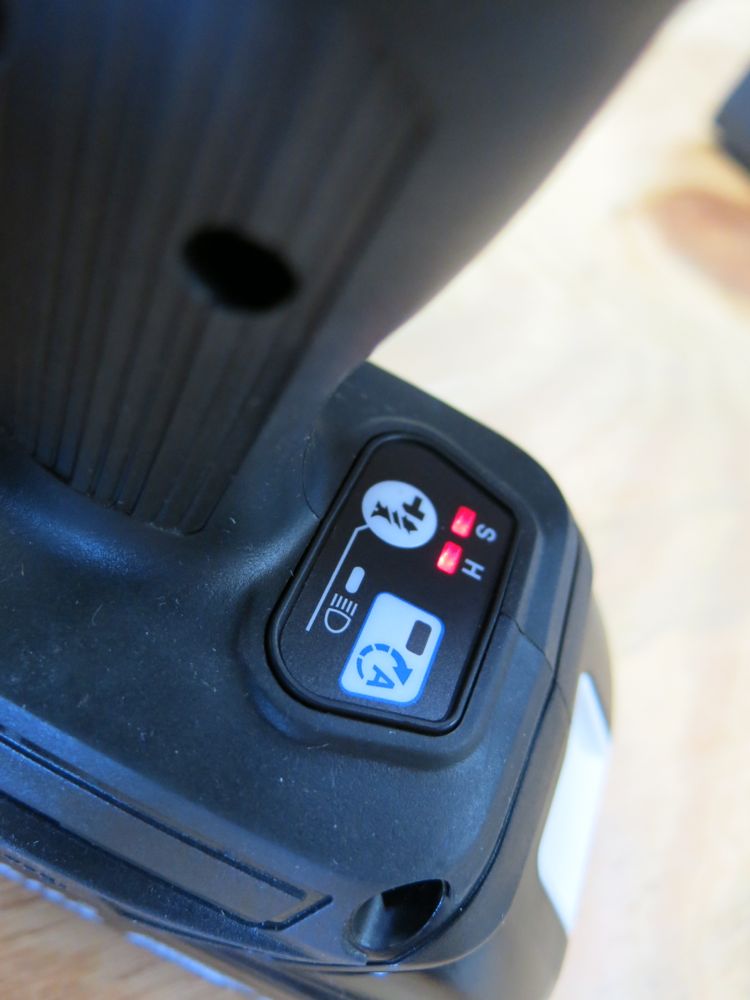 The indicator lights/settings weren’t quite as intuitive as we’d like.
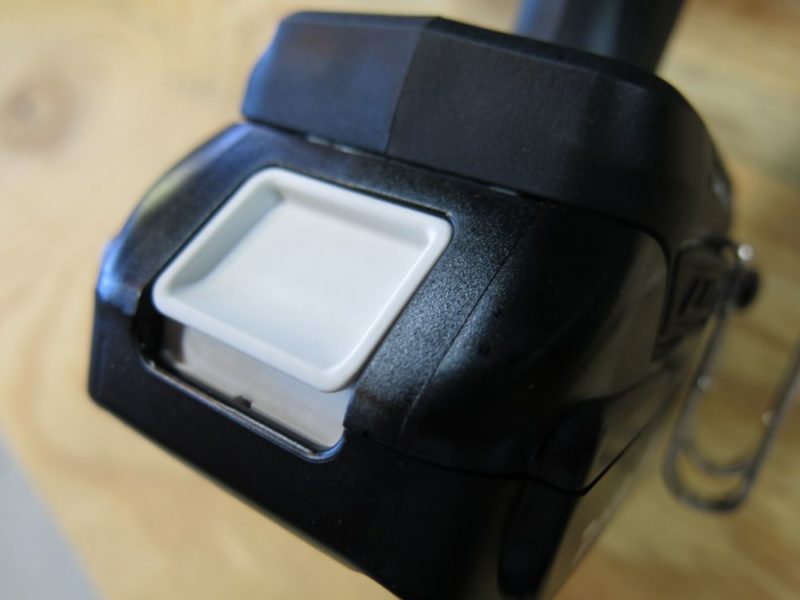 A
A 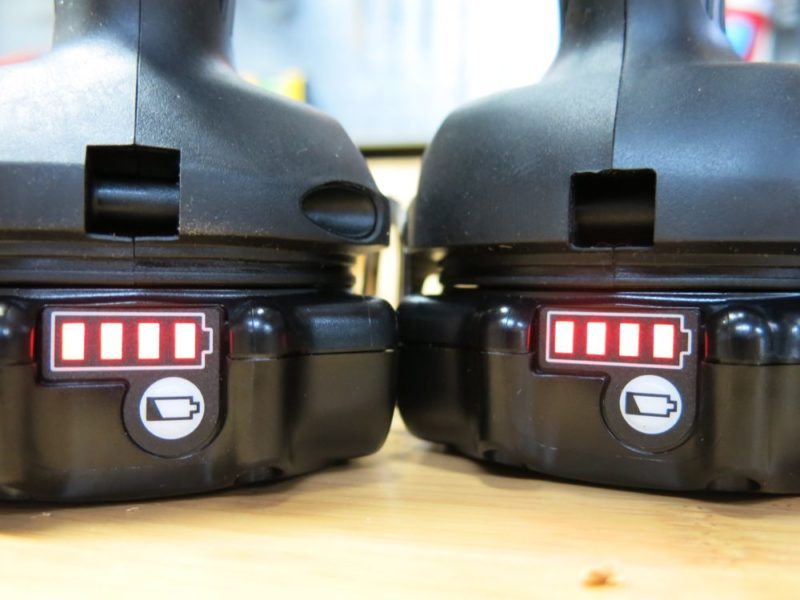 The 18v batteries have onboard charge status, handy for checking charge even if the battery isn’t hooked up to a tool.
 Both drill and driver stand up easily and are very stable when compared to trying to stand up a 12v barrel-style battery
 While functional and spacious, we weren’t in love with the cube-
 Buy the Makita CX200RB kit from our sponsor The Home Depot


 Traditional Bedroom by
  Eclectic Bathroom
 Transitional Bedroom by Dallas Media & Bloggers Angela Flournoy
 Contemporary Bathroom by

 Regardless of whether you live in an apartment or a house, the bathroom is one of the most important rooms in the home.
 For example, do you want to use contrasting tiles to add a feeling of space to a small bathroom, or do you want tiles with a textured surface to create a unique and interesting feature? Tiles come in ceramic, glass, natural stone, porcelain and clay, so research the looks and benefits of each option before making your choice.


 Any free corner or surface would be great as long as there’s some sunlight
 Because bamboo grows relatively tall, you should find a place for it on the floor

 There’s plenty of space for plants in small bathrooms if you keep the décor simple

 Choose a white orchid for a bright bathroom to maintain an airy look
 Another good place for an orchid is by the tub


 Because of the shape, the spider plant looks great on a pedestal such as this one


 A gorgeous vertical planter that fits perfectly in this modern bathroom
 Be creative and find ways to bring nature into the bathroom
