Showing posts sorted by relevance for query plan the system. Sort by date Show all posts

Saturday, February 24, 2018

How to Plumb a Basement Bathroom

Read article : How to Plumb a Basement Bathroom
Adding a basement bathroom

Adding a basement bathroom is a big, complicated project. But that doesn’t mean you can’t do it. Thousands of DIYers successfully tackle the job every year, and so can you.

We will focus on installing the “DWV” system (drain, waste and vent), which is the most difficult part of plumbing a basement bathroom. The DWV system requires some hard labor—breaking up concrete—and enough know-how to construct it so waste will be carried away without problems. You supply the labor; this article will supply the know-how.

The materials for the DWV system shown here cost about $250. Plumbers’ labor rates vary a lot by region, but most licensed pros would charge $1,200 to $2,000 for a job similar to the one shown here.

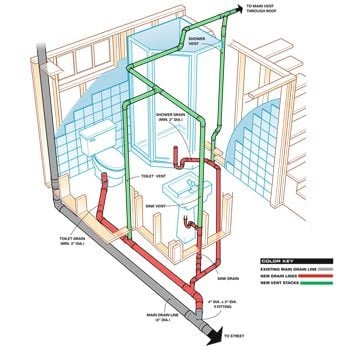
Figure A: Plumbing a basement bath

Connect the basement bathroom plumbing to the existing drain and vent lines in the floor and ceiling.

This illustration shows the basics of how to plumb the waste and vent in a basement bathroom.

Find the main drain line

How to Plumb a Basement Bathroom

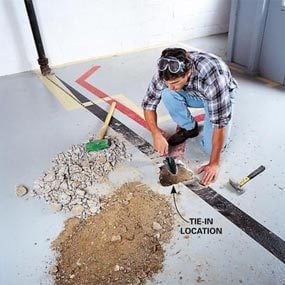
Photo 1: Locate the main drain

Break through the concrete to verify that the main line is where you think it is and that it’s deep enough to allow adequate downhill slope in the new drain lines.

You’ll have to connect new drain lines to an existing line under the basement. So before you can do any real planning, you have to find that line. First, locate the “main stack,” the large (3 or 4 in. diameter) vertical pipe that runs into the basement floor. From there, the pipe runs under the floor and out to the city sewage system under the street. But it may run at an angle rather than straight out to the street. Look for a cleanout plug along the street-facing wall of the basement. If you find one, that’s most likely the spot where the line exits your home. And usually, the line runs straight from the main stack to the cleanout.

If you have a private septic system, your main line will run toward the location of the drain field. If you’re unsure where the line is, you have a couple of options. You can punch through the floor where you think it is (Photo 1). You might end up enlarging that hole or breaking a second exploratory hole, but that’s not as bad as it sounds; all it will cost you is some wasted time and a couple of extra bags of concrete mix when you patch the floor. Your second option is to get a plumber to help. In most areas, a brief house call will cost you $75 to $150. Some plumbers have access to high-tech equipment that locates lines precisely, but expect to pay $200 for that service.

Slope Makes the Sewage Flow

Drain lines require a downhill slope of at least 1/4 in. per linear foot (see note below) so that waste flows smoothly through the pipes. To determine if your plan allows for that, take a few measurements:

A: The depth of the center of the main line (at the tie-in point).
B: The future depth of the horizontal pipe beneath the drain.

Now do a little math: (A – B) x 4 = the maximum length (in feet) of the drain line, from the main to the end of the horizontal pipe under the drain. If A is 13 in. and B is 10 in., for example, the maximum length of the drain line is 12 ft. (13 – 10 = 3; 3 x 4 = 12).

If your main line isn’t deep enough, you’ll have to locate fixtures closer to the line or install a sewage ejection pump.

Note: Some local codes allow 1/8 in. per foot with 3- or 4-in. pipe.
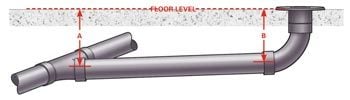
When you lay out the plumbing for the basement bath, make sure you have 1/4-in. per ft. slope.

Plan the system

Once you’ve located the line, you’ll have to make sure it’s deep enough to allow downward slope in the new drain lines that will run from your future bathroom. Then grab a pencil and mark out the whole bathroom on the basement floor: walls, toilet, sink, shower and finally the drain lines.

Consider it all a preplan at this point. Chances are, you’ll have to make some changes as the plan develops. You may want to mock up sections of the system and lay them out on the basement floor using sections of pipe and an assortment of fittings. When the whole system is planned, mark it out on the floor. For photo clarity, we marked out bold lines on the floor. But simple spray paint is fine for drain lines.

Rent a Snapper

A cast iron pipe snapper works by tightening a cutting chain until the pipe cracks. They’re available at tool rental stores. Old cast iron pipe can crush rather than crack. If that happens, you’ll have to abandon the snapper and cut the slow way: with a reciprocating saw. If you have plastic pipe, cutting into the main is quick and easy with a reciprocating saw.
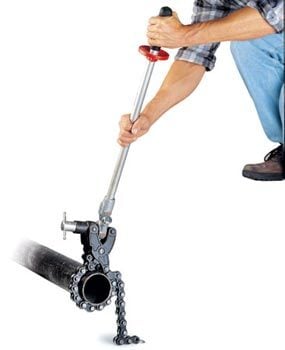
If the waste line is cast iron, cut it using a snapper.

Trench the floor

A plain old sledgehammer will bust up a basement floor. Breaking through at the tie-in point (see Photo 1) may take a few dozen whacks. But once you have a starter hole, the job gets easier because the concrete has space to crack and break off. Within a few minutes, you’ll learn to aim your blows and bust out a neat trench line. Pick out the larger chunks of concrete as you go. Ideally, most of your trench will be just wide enough for your spade. When digging, toss the dirt on a pile separate from the larger chunks of concrete. You don’t want big chunks in the soil you’ll use for backfill later.

Build the drain system

How to Plumb a Basement Bathroom

Photo 2: Break out a section of drain

After completing the trenches for the new lines, cut into the main line so you can install a Y-fitting. Our tie-in point was near an existing hub, so we cut out the hub. Make sure no one runs water (or flushes!) while the line is open.
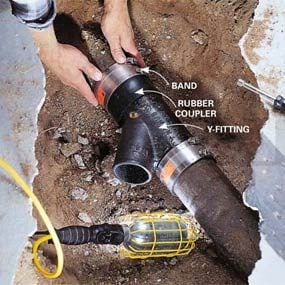
How to Plumb a Basement Bathroom

Photo 3: Tie into the drain

Slip rubber couplers onto the main line, insert the Y-fitting, slide the couplers over the joints and tighten the bands. Then plug the inlet and grant your family the freedom to flush again.

How to Plumb a Basement Bathroom

Photo 4: Build the drain system

The location of the drains and vents is critical—check and double-check your work before you glue joints together. Determine where the exact location of the shower drain will be after the walls are framed. Cap open pipes to keep sewer gas out of your home. Don’t bury the lines until the building inspector has approved your work.

How to Plumb a Basement Bathroom

Photo 5: Patch the floor

Backfill the trench with soil and screed 3 in. of concrete over it. Pack the soil firmly so it won’t settle later. Smooth the concrete with a steel trowel.

Begin the drain system by cutting into the main line (Photo 2) and splicing in a Y-fitting (Photo 3). We used a no-hub cast iron Y-fitting to tie into our cast iron main. But you can use a plastic Y-fitting instead if you glue short sections of pipe into the Y-fitting to accommodate the rubber couplers. Use that same method to tie into a plastic main.

For your DWV system, you can use ABS plastic (as we did; Photo 4) or PVC. Both are easy to cut and join. The hard part of any underground pipe work is building branches that end up exactly where you want them while maintaining a constant slope of at least 1/4 in. per running foot.

Here are tips to help you get it right:

  • Buy twice as many fittings as you think you’ll need and a few types that you don’t think you’ll need. Return the leftovers when the job is done.
  • If you don’t have a torpedo level, buy one (see Photo 7). It’s the handiest tool for checking the slope of pipes.
  • When a section of pipe is complete, pack dirt under and around it to keep it from shifting as you build other sections.
  • Know the “rough-in” of your toilet (the distance from the wall to the center of the drain, most likely 12 in.). Don’t forget to account for the thickness of framing and drywall.
  • Backfill the trenches with care (Photo 5). You want to pack the soil tightly to prevent settling later, but be sure not to move the pipes as you tamp the soil.

Build the vent system
How to Plumb a Basement Bathroom

Photo 6: Build the vent system

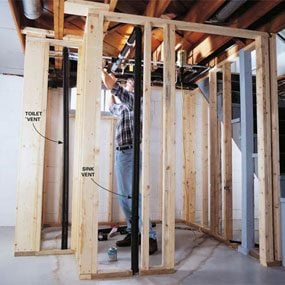
After framing the bathroom walls, assemble the vent lines. We ran our vent lines below the floor joists and later framed a lower ceiling to hide the pipes.
How to Plumb a Basement Bathroom

Photo 7: Connect to an existing vent

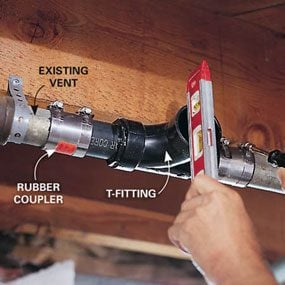
Glue short sections of plastic pipe into a T- or Y-fitting, cut out a section of the existing vent pipe and make connections with rubber couplers.
How to Plumb a Basement Bathroom

Photo 8: Position the shower drain

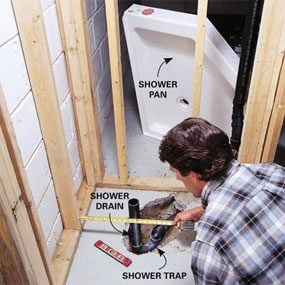
Set the shower pan in place and measure from the walls to determine the exact location of the drain. Assemble the drain and trap without glue. Then set the pan in place again to check your work before you finally glue up the fittings.

The vent system is a lot simpler than the drain system. We ran vent lines under the floor joists (Photo 6) and framed in a lower ceiling later. If you want to preserve ceiling height by running pipes through the joists, you’ll have to bore some large holes, which can weaken the joists. To avoid that, see “How to drill through floor joists.”

In most basements, you can tie your new vent system into the line that vents the laundry sink. Our plumbing inspector allowed us to connect our new 2-in. vent line to an existing 1-1/2-in. vent. Before cutting a section out of the old steel vent, we installed extra metal strapping to support the pipe during and after cutting.

Note: Plumbing codes vary by locality. The rules we give in this article generally follow the strictest codes. Your local rules may be more lenient about issues like vent sizing, the choice of fittings, etc.

Waste line Q & A
How to Plumb a Basement Bathroom

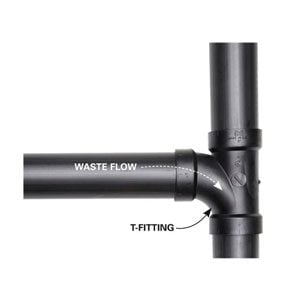
When should I use a T-fitting?

Use a T-fitting in drain lines to connect a horizontal pipe to vertical pipes. It can also be used to tie vent lines into horizontal drains or to join vent lines.
How to Plumb a Basement Bathroom

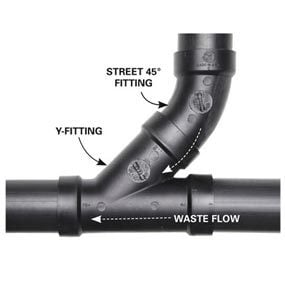
When should I use a Y?

In the drain system, use a Y-fitting to connect horizontal pipes (Photo 3). Along with a 45-degree “street” fitting, you can use a Y-fitting to run vertical drainpipes into horizontal pipes as shown. A Y-fitting can also be used in vent systems.
How to Plumb a Basement Bathroom

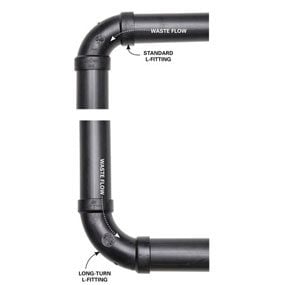
Why does the home center carry three different types of L-fittings?

  • A standard L-fitting is used for horizontal-to- vertical flow in drain systems.
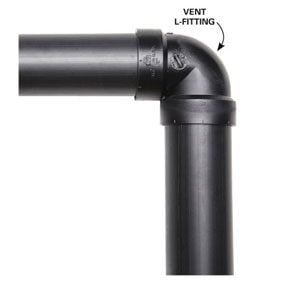
  • A “sweep” or “long-turn” L-fitting is OK for almost any situation and is required in two situations: horizontal-to-horizontal turns and vertical-to-horizontal turns (as shown). But it can be used in any situation where space allows.
  • Use a vent L-fitting only in vents.
How to Plumb a Basement Bathroom

What’s a street fitting?

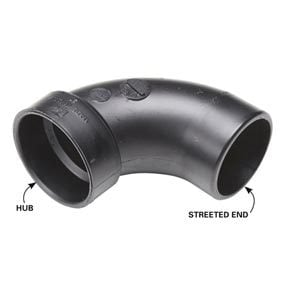
Standard fittings have hubs that fit over pipes. A street fitting has a “streeted” end that fits into a hub, so you can connect it directly to another fitting without using a section of pipe. That saves labor and space.

What size drainpipe should I use?
The toilet requires 3-in. or larger. Use 2-in. for the others; pipes smaller than 2 in. aren’t allowed beneath a concrete slab.

Venting Q & A
How to Plumb a Basement Bathroom

Vent L-fitting

A vent L-fitting can be used anywhere in the vent system, but only in the vent system—never where waste flows. The other two types of L-fittings are OK for venting, too.

What’s the vent for?
A plumbing vent is kind of like the air intake on a gas can; it lets in air. Without venting, a slug of sewage racing through a waste line creates air pressure and vacuum in the pipe. That means noisy, gurgling drains. Even worse, vacuum can suck all the water out of traps, allowing sewer gas to flow freely into your home. Yuck.

Vent-to-trap distance—there’s a limit
Every drain needs a trap, and every trap needs a vent. The maximum distance between the trap and vent depends on the diameter of the pipe.

Memorize these distances for midterm exams:

For 1-1/4″ pipe, the max. horizontal distance to vent is 30″ For 1-1/2″ pipe, the max. horizontal distance to vent is 42” For 2″ pipe, the max. horizontal distance to vent is 5′ For 3″ pipe, the max. horizontal distance to vent is 6′ For 4″ pipe, the max. horizontal distance to vent is 10′

Note: A toilet has a built-in trap, so it doesn’t need one in the drain line. It still needs a vent, though.

Can vents run horizontally?
Yes, but horizontal vent lines must be at least 6 in. above the “spill line,” which is the level where water would overflow the rim of a sink, tub or toilet.

What size vent pipes do I need?
A typical bathroom like the one we show (sink, toilet, shower or tub) requires a 2-in. vent. You could run smaller pipes to the sink or shower, but it’s usually easier to use one size for the whole system.

Required Tools for this Project

Have the necessary tools for this DIY project lined up before you start—you’ll save time and frustration.

In addition you will need a cast iron pipe snapper and a
torpedo level.

Required Materials for this Project

Avoid last-minute shopping trips by having all your materials ready ahead of time. Here’s a list.

Friday, January 12, 2018

Dream Camper Floor Plan Contest

Read article : Dream Camper Floor Plan Contest

Dream Camper Floor Plan Contest – Part 2 http://www.truckcampermagazine.com/news/dream-camper-floor-plan-contest-part-2/"> Dream Camper Floor Plan Contest – Part 2&BODY=I found this article interesting and thought of sharing it with you. Check it out: http://www.truckcampermagazine.com/news/dream-camper-floor-plan-contest-part-2/"> 12 more reader submitted dream floor plans including raw concepts, wild ideas, and subtle refinements.  And the winner of the first ever dream truck camper floor plan contest is… floor-plan-contest-winner Just last week we visited a prominent truck camper manufacturer and the subject of our dream camper floor plan contest came up.  We talked with great excitement about the variety of ideas our readers were presenting, and encouraged them to study the plans when they debuted.  No, we didn’t give them a sneak peak.  It’s more fun to tease. None of the submitted designs, including mine, are anywhere near production ready.  That was never the intention or spirit of this contest, nor is it possible without delving into details like plumbing, electrical, and code compliance.

The true potential of this contest is to give truck camper users from around the United States, Canada, and the world the opportunity to directly inspire professional truck camper design teams.  You know, the folks responsible for the truck campers you see debut here on Truck Camper Magazine, at RV shows, and dealer lots?  This was your shot to show them your big idea, and possibly change the course of truck camper design history.

I know, crazy talk.  Then again, crazier things have happened.  I’m going to lobby the industry to take your designs and ideas seriously, as I do with our bi-annual truck camper survey coming up this fall.  Together, we will change the course of campers.

Far be it for us to determine who should win the best dream camper floor plan, except that’s exactly what we had to do.  This is, after all, a contest, and we are the big cheese, cheesette, and cheese-cat for this electron-only magazine.  After considerable review, and a tail gesture we interpreted as positive, we have a winner.

The winner of the first ever dream truck camper floor plan contest is…

Karl Pettitt, Elmhurst, Illinois – Winner

Camper-Floorplan-pettitt-slide-out

Above: Click to enlarge this floor plan and the others below to see them bigger.

Although I don’t currently own a truck camper, I would like to in the future.  I often think of what an ideal floor plan would be so this was a fun exercise.  I first did the layout in a program that was to scale.  The dimensions should be pretty accurate.

The floor length is 11-feet.  The total length is 19-feet, 9-inches.  The width is 8-feet.  It’s a single-slide, dry bath, flatbed model.

Although there are a few flatbed model campers on the market, I think there is a great deal of room for more.  Specifically, I think there is room for a larger model that takes full advantage of the ability to place the door anywhere.

To this end, I created a floor plan layout that places the door towards the front of the curb side of the camper.  This allows for greater flexibility in the placement of the bathroom, which I put across the entire rear of the camper.

The slide allows space for both a dinette and a small couch that can turn into a bed.  Placement of the kitchen towards the front, along with the heaviest components such as the fresh water tank, battery bank, and propane tanks, will help in keeping the center of gravity as close to the front as possible.

The placement of the entertainment center allows for viewing either on the main floor or the cabover.  There is overhead storage above the kitchen and couch that makes up for the lack of floor cabinets.  There is also ample windows allowing light in from either side of the camper as well as views.  I think this would make an ideal camper for a family with the potential to sleep up to six people without the use of a bunk.

#16 – David Miller, Branson, Missouri – Honorable Mention

camper-floor-plan-miller-non-slide

My camper is designed with the premise that the most important things about a truck camper use are (1) the nice, soft, queen bed for sleeping, and (2) the nice bathroom for showering; not a wet bath.

The dining aspect needs less emphasis because, typically, the meals are simple and small.  In most cases, weather dependent, we eat outside at the picnic table.  Thus there is no need for a large dining table.

There is also no need to accommodate guests for sleeping.  If the grandkids are camping with us, they will sleep in a tent outside.  The concept of having the table convert to a bed is unnecessary, and a waste of space for us.

The attached drawing is for a non-slide design to fit a full-size short bed pickup.  I figure this camper will hang over the back of a 6’6” truck bed by approximately 27-inches.

Here are the wonderful features of my perfect truck camper:

It has a dry bath and shower.  This is extremely important.

The dining area has been reduced in size to only seat two adults.  The table is curved and the back of the seat cushion is curved to give the feeling and seating of a corner booth in a restaurant.  The only slight difficulty is that the person who sits down first will have to slide in and cannot get back out until the other person stands up, but, that is just like a corner booth in a restaurant and won’t be too much of a hassle.

There is a closet on both sides of the bed in addition to the foot lockers.  The television is mounted above the table, on the wall of the dry shower.

As you can see, the bed and the dry shower get the most emphasis, and the dining facilities are minimized.  It’s the perfect camper for two adults who want to shower every day after a good nights sleep.

#17 – Jake Schultz, Washington – Honorable Mention

A Folding Camper for the Ford Ranger

This camper is designed to be less than 780 pounds to work within the payload limit of a Ford Ranger.  It’s also designed to be 64-inches wide, with a maximum travel height of 82-inches.  These dimensions allow the camper to fit into a standard 84-inch garage in the folded configuration.

The camper features a full stand-up heigh interior of 76-inches, as shown.  A sun-dome could be added for an additional three-inches of interior height.

The camper has a double-pivot folding hard wall roof and sides with an open and panoramic cabin.

The camper can be used in one of four configurations:

1. Wide open with magnificent panoramic views to the aft sides and back.

2. Open to the aft sides and back, with screen netting in place.

3. Polycarbonate window panels in place (inboard of netting) for inclement weather.

4. Window panels in place and privacy curtains on the interior.

There would be comfortable seating for two at the dinette with the cushions angled slightly inward to account for the wheel well.

The camper would feature a modified full-size bed available at all times.  There would be a 24-inch cabinet for hanging clothes under the foot of the bed.

To save weight, the roof would be built for structure and snow loads only, not to stand on. The floor would be to stand on only if the camper is on the ground or in the bed of the truck, again to save weight.

There would be no jack stands.  The camper is suspended from the owner’s home garage root trusses to remove and store.

There would be an ice chest under one seat and Porta-Potti under the other.  There would be no refrigeration systems or black water tank.

All systems are in one four-foot module along the right side for minimum weight and system run lengths.  The module contains the propane tank, propane heater, two-burner stove, sink, fresh water tank, grey water tank, battery, converter, inverter, and small item storage.

#18 – Mark Larson, Phoenix, Arizona – Honorable Mention

camper-floor-plan-larson-non-slide

This is my drawing for one of my dream campers.  Please excuse the poor scale on the toilet, lavatory, and kitchen sink.

I know this would be better as a flatbed model because of the side aisle going to the cabover and the location of the shower.  It could also be an above the bed rail model.  I’m with you wanting a camper with no slide outs.  You had a great design of your own.

#19 – Kari Miller, Branson, Missouri – Honorable Mention

camper-floor-plan-Kari-miller-non-slide

My truck camper is the best design ever.  Here are the great features:

1. There is actually a solid wall between the over cab bedroom and the rest of the camper.  This creates total privacy, similar to a fifth wheel with an isolated separate bedroom.

2. The step to the bedroom is offset so there is not direct line of sight into the private bedroom.

3. There is room at the foot of the queen-size bed to access the closet and a real two-drawer dresser, which is what is needed for storing clothes in a camper.

4. A narrow, but deep and tall closet is behind the refrigerator is accessed from the step.

5. Instead of wasting room on a full table top and a table that converts to an unnecessary bed, this camper has a bar top for dining.  The seating consists of two bar stools which can be clamped down for traveling.  People spend many hours sitting on a bar stool so, obviously, these would be comfortable.  Plus, for most eating situations, people will either sit outside at the picnic table, or go out to eat at a restaurant.  There is a big window over the bar top so it would be pleasant sitting.

6. There is a slide-out pantry between the bar top and the range

7. The bathroom has a dry shower, which is important.

8. This camper should fit in a full-size short-bed pickup.  There are no slides, and it is
hard-sided.

#20 – Mike Cianci, Loveland, Colorado

floor-plan-contest-cianci-non-slide

Here’s my plan.  It’s fairly basic.  I chose a wet bath because it’s easier to clean.  Put it in the forward section near the wardrobe with a privacy curtain so nobody has to see your business.  And it’s easier to keep the bed/bath/dressing area cleaner.

I chose wardrobes with shelves or drawers which is more practical than hanging closets.  Who is bringing their tux and ball gown while truck camping?  There are overhead bins throughout where practical.

There would be LED lights, two batteries on a movable tray, and a small solar setup.  Only simple shades are necessary; no cornice, or valance boxes around the windows.

There would be 12-volt and 110 AC throughout, two Fantastic fans – one in the bedroom and kitchen – and an air conditioner   There would be a full-size skylight/dome in the bath with a side wall exhaust vent.

The sofa could be a jack knife-style, or have storage underneath.  And it would have two pull-out tray tables mounted in or adjacent to the armrest.  Plus it would pivot for easy egress from the sofa while eating or using computer, similar to tray tables on airliners in first class.

The television would be on standard pivot for bedroom and living room viewing, and would recess in a cabinet above the slide out pantry.  The rear exit door would have a platform deck for easy entry/egress.

#21 – Kevin Pinassi, New York, New York

Floor-Plan-KevinP-1Floor-Plan-KevinP-2

#22 – John Wells, Hollidaysburg, Pennsylvania

camper-floor-plan-wells-slide-infloor-plan-wells-slide-out-version

My design is a modification of the Chalet Ascent S100F, a limited production model (six total!) that Chalet discontinued to pursue production of their more profitable double and triple-slide models.  We love ours because it is completely usable with the slide in or out.

It has huge floorspace when the slide is out for entertaining friends and for ladies to dress in Civil War hoops (don’t ask).  The front bath allows a full height pleated curtain immediately behind the dinette to be drawn across to create a dressing room with access to bath, bed, and wardrobe.

There are no appliances in the slide, minimizing slide-out weight, and wear and tear on electrical and gas connections while maximizing efficiency of the refrigerator.  While we love our camper, please allow me to debut … drum roll… The Wellspring S110F.

My modifications to Chalet’s original design are as follows:

There would be 10-inches of increased length in the main cabin.  On the slide-out side, this extra wall space at the junction of the overcab and cabin strengthens the exterior at the crucial front corner tie-down.  We have already noticed flexing at this point and have taken steps to greatly reinforce this important structural location.  On the kitchen side, this extra 10-inches allows an increase in much-needed counter space, as well as under and over cabinetry.

I would also add about four to five inches to the side-to-side width of the wet bath.  The wardrobe doors and bathroom door would still function even with the slide in.

Additionally, I’d add half-penguin cabinets to the night stands at either side of the bed in the nose of the overcab.  These units would be open-shelved on the sides, half-depth and about 3/4 height, with a small rail or lip on the shelves and top edge to keep books, phones, clock, etc from falling out during travel.

I’d also add a three drawer cabinet with open top shelf and top rail at the foot of the bed on the bathroom side.  I’ve avoided the side hampers as I feel they add significantly to the difficulty of changing the bedclothes, though they could be added quite easily as an option.

#23 – Bob Dold, Monson, Massachusetts

floor-plan-dold-non-slide

Attached is my submission for the dream floor plan contest.  It is based off an EarthRoamer layout modified with a fore/aft dinette and an undercover slide-out compressor refrigerator chest.  I chose the slide-out compressor fridge since they are more efficient than a three-way refrigerator, and it allows for additional counter space.

One of my favorite features of the EarthRoamer plan is how the closet and bathroom doors can be opened and secured to provide a changing area outside the wet bath with access to the closet.  The wet bath has a wooded floor grate to provide a cleaner surface for the bath when the shower isn’t being used.

Access to the toilet cassette is through the rear storage door which drops down and can be used as a counter when cooking outside.  Another door above the horizontal door to the left of the spare tire can be used to store chairs and other lighter items out of the weather.

I prefer the side entry design as it allows the entire back wall to be used for storage and it allows access to the camper from the curbside when parked without having to remove bikes/trailers from the back of the camper.

The pantry to the left of the closet would be a bank of drawers with a window air conditioner unit above to provide for cool air without the expense and height of a roof mounted unit.  The dinette would be a little under three feet wide and can convert to a single bed if needed.

Large awning windows on either side provide lots of light and views with storage cabinets above them (not shown).  The overcab queen bed runs north/south to allow for getting out of bed without having to climb over your significant other, and has windows on both sides along with a skylight/Fantastic fan for good ventilation while sleeping.

Another feature I don’t see included on many campers any more is a pass through.  I would like the ability to stealth camp and having the pass through allows one to enter and exit the camper without having to go outside.

#24 – Floyd Schotel, Williams Lake, British Columbia

floor-plan-schotelnon-slide-pop-up

I’ve been dreaming up my ideal truck camper for a little while now, so you’re design contest is a great opportunity to share my napkin sketches!

For fuel efficiency, handling, and stealthiness, my ideal truck camper would be a low profile pop-up design to fit a 6.5-foot bed, full-size pickup.

The camper body extends past the bumper, dropping down for a low step-in side door.  Inside steps lead to the floor height.  This way the back of the camper is open to mount bikes, fuel, spares etc.  Also, the side door is a natural access to the curb or side picnic area.

Most of the windows are in the soft sides of the pop-up.  That way the camper will be more secure when in the locked down position.  In fact, the camper may look more like a service truck than a camper when in travel mode.

I’d keep the camper as small and tight to the truck as possible.  To keep things simple, I can do without a toilet/black tank, but a collapsable shower would be nice.

This camper is designed for boondocking and overland excursions as well as urban stealth camping.  I love the idea of taking my bed and a hot shower with me in a compact camper for a road trip.  No need to stress about finding a hotel, and a meal can be fixed anywhere, pronto!

#25 – Glenn Yauney, Milwaukie, Oregon

floor-plan-yauney-slide-out

Here is an idea of a dream truck camper floor plan.   We started with the floor plan of a 1140 Arctic Fox.   We added a rear slide-out and side entry.

We would prefer a camper with both a rear and a side slide-out.  When towing a trailer, a rear door entry is awkward, thus we prefer a side entry into the camper rather than a rear entry design.   We added a large closet in the rear slide-out opposite the entry door for boots, outdoor clothes, etc.

Storage space is also at a premium, so I propose one that has both ample wardrobe closets and storage space equipped with larger drawers.  You can’t have too much storage space.

Exterior storage isn’t shown, but basement and exterior storage are also a must.

#26 – TJ and Kelly Kretschmar, Kansas City, Kansas

floor-plan-kretschmar-non-slide

I am a mechanical engineer and have the ability to convert .pdf’s to CAD.  The Unimog part of the drawing can be found in the technical manual from Mercedes Benz website.  I printed the drawing to .pdf, then converted it to CAD.  I then printed the drawing for the Pangea concept and converted the drawing to CAD.

The reason I choose to draw this concept in CAD was to see if it was physically possible to put a garage bay in an expedition vehicle, and to incorporate my own ideas into the same space that would fit on a Unimog chassis with a single rear axle.

I deleted the interior of the lower living area so I could insert my own concept.  The items that I used from the original GXV drawing are the exterior walls, entry door, cassette toilet, and spare tires.  The loft area and access stairway is also GXV’s design, only with one bed instead of the two indicated in their drawing.

I used the Unimog drawing to make sure the entry door, center of gravity, and departure angle were going to work with the design.

We like the Pangea Lifting roof on a Unimog concept, but wanted it to double as a toy hauler.  We put one bed in the loft area to give the dinette area a sense of a vaulted ceiling.  The unit can be used in the down position for extreme cold weather.  The garage door folds down allowing access to spare tires.  The ATV slide out is similar to a Tommy Lift gate.

The camper would be able to detach with its own hydraulic jacks and allow for the installation of a dump bed.

This, of course, is just a dream.  For now our 1994 Hallmark Ute and 2006 Nissan Titan will have to suffice.

Truck Camper Information

Sunday, December 10, 2017

2013 Jayco Seneca 37FS - RV Magazine

Read article : 2013 Jayco Seneca 37FS - RV Magazine
Jayco discontinued the Seneca after the 2010 model year absence when Chevrolet discontinued the Kodiak medium-duty truck chassis. Reborn in 2012, the Seneca now features a Freightliner M2 Business Class chassis. The 2013 Seneca offers a host of upgrades and improvements and really raises the bar. While it’s available in four different floor plans, including a 37RB rear bath model and a 36FK model with fireplace and large mid-coach entertainment center, the particular floor plan we reviewed was the popular 37FS bunk bed model that can sleep up to eight people.
Photo 2/18   |   2013 Jayco Seneca 37fs front Three Quarter
Construction
For 2013, the Freightliner Business Class chassis features a front leaf spring suspension and a new fully automatic air-ride rear suspension system that gives this Super C a smooth ride reminiscent of a diesel pusher Class A motorhome. A 55-degree wheel cut allows for excellent maneuverability in tight spots.
');
');
Polished aluminum rims help set off the stunning full-body paint. Our particular coach came with the Espresso exterior paint décor and was protected against stone chips by a Diamond Shield paint-protection film.
Exterior
The massive three-piece chrome bumper gives the Freightliner chassis a real “big rig” look, plus you won’t need to replace the entire unit if you damage it when parking. Chrome heated and powered mirrors are augmented with rear and automatic side view cameras, which will display on the entertainment/navigation system by selecting that option on its touchscreen. A Carefree power patio awning provides plenty of shade in your patio area, and a keyless entry pad conveniently located near the entry door controls both the cab and entry power door locks. Deep tinted flush-mounted dual-pane windows give the motorhome a clean look and minimize wind noise. The front and rear fiberglass caps have a unique molded design with no corner seams to cause any leaks. Dual slide-outs are fitted with enclosed awning toppers for protection against debris and the elements.
optional exterior entertainment center includes a 32-inch LCD TV, AM/FM radio, and DVD player and is located behind a weatherproof cover in the patio area."> Photo 3/18   |   An optional exterior entertainment center includes a 32-inch LCD TV, AM/FM radio, and DVD player and is located behind a weatherproof cover in the patio area.
Living Area
Our Seneca was outfitted with the Mocha décor, which is one of three available décor packages. The wood floors and Washington Glazed Maple cabinetry with hidden hinges adds a warm look to the attractive interior and attention to detail, and the quality construction exceeds the fit and finish of some Class A motorhomes we’ve seen. The dual slide-outs in the 37FS open up the living and bedroom areas to provide plenty of floor space, and an 84-inch ceiling height ensures that you won’t be bumping your head. The soft-touch vinyl ceiling contains recessed halogen lighting throughout and a network of adjustable ceiling vents duct air from the dual 15,000 BTU air conditioners with heat pumps.
Photo 4/18   |   2013 Jayco Seneca 37fs living Area
The large front cap area sports a queen-size bed with a 32-inch LCD TV mounted on a powered swivel mechanism on the passenger side of that area. A rocker switch effortlessly allows the TV to swing out for whole-coach viewing or remain flat against the wall for bunk-area viewing or when not in use. A removable ladder affords easy access to the overhead bunk, and curtains can be used to separate that area from the rest of the motorhome. One optional feature, not included on this particular RV, replaces the overhead sleeping area with an entertainment center complete with 32-inch LCD TV and large storage cabinets to each side of the TV.
The driver-side Hide-a-Bed sofa located in the main slide-out makes into a bed for additional sleeping capacity. The Dream Dinette features a legless table that also makes into a bed by releasing a lever to effortlessly raise or lower the table. The comfortable booth seats are hinged to expose storage area beneath while a swivel recliner chair is located opposite the couch. The Flexsteel furniture features attractive UltraLeather upholstery, and seatbelts are provided at all locations, including the booth dinette.
The bathroom is equipped with a Thetford porcelain stool with foot flush and the shower is fitted with a circular enclosure with sliding frosted glass doors that prevent water from dripping on the floor when open. An overhead skylight provides warm, ambient lighting and additional height in the shower stall. The bathroom vanity also features a Corian top and a sink with an overhead medicine cabinet.
The bunk bed area is what separates this motorhome from the rest. The two stacked bunk beds are bound to be a big hit with young RVers. Each sleeping area has individual lighting, windows, and privacy curtains. A pair of optional entertainment centers is mounted in the ceiling above each bunk. Each flip-down display has an integral DVD player so that each occupant can view his or her own movie. External jacks for those all-important game consoles and headphones are provided as well as a storage pouch to place any auxiliary equipment to keep them out of the way. A cavernous drawer fitted with ball-bearing slides is located beneath the bunk beds and offers plenty of storage space for bedding or other large items.
The rear bedroom is equipped with a king bed with a comfortable pillow-top mattress. A large mirrored wardrobe complemented by a number of huge drawers in the bedroom slide-out at the foot of the bed provides tons of room for clothing. A 26-inch LCD TV is also placed there and is mounted on hinges to expose a deep storage area behind the flat screen. A large window located in the rear cap also serves as an emergency exit if needed.
Cockpit Area
The cockpit area is the typical Freightliner business class layout. The switches operating the cruise control are found on the dash. We would have preferred if they were mounted on the steering column for easier access because it was a bit inconvenient to reach. The Allison transmission’s T-handle shift lever is dash-mounted to the right of the steering column. The center dash area contains an entertainment and navigation system that uses a touchscreen to control the GPS navigation functions, radio, DVD, iPod, or rear-view camera functions. Immediately beneath this is the control panel for the Power Gear leveling jacks. A side cabinet located above the recliner contains the various controls used for the coach accessories, such as the Onan EC-30 automatic generator start module and a control panel for a Xantrex 1,800-watt true sine wave inverter that supplies power for the microwave oven and the RV’s entertainment systems. A holding tank monitoring panel and the slide-out operation switch are also placed here. Six-way power seats provide comfortable seating for both the driver and copilot. Power windows are also standard.
instrument panel includes a T-handle shift control for the Allison transmission as well as a radio/DVD/GPS system and controls for the Power Gear automatic leveling jacks."> Photo 5/18   |   The instrument panel includes a T-handle shift control for the Allison transmission as well as a radio/DVD/GPS system and controls for the Power Gear automatic leveling jacks.
Basement Area and Utilities
The basement storage space on the Seneca is nothing less than amazing. Every time I opened one of the side-hinged compartment doors, a spacious compartment made of tough, leak-proof Rotocast composite material was displayed. If you are one of those RVers who never has enough room to store your cargo, you’ll be very pleased with the Seneca. Excellent compartment height and wide swinging doors made it an easy task to load or unload cargo.
Photo 15/18   |   2013 Jayco Seneca 37fs basment Storage
A bank of four batteries is located in a forward driver-side compartment. These batteries are mounted on a slide-out tray for easy access when performing battery maintenance. The rearmost driver-side compartment houses an 8,000-watt Onan Quiet Diesel generator while a power cord reel makes quick work of rewinding the 50-amp power cord. A 10-gallon propane/electric hot water heater is located at the driver-side rear of the coach, while the 40,000 BTU propane furnace is located on the passenger side. A 56-pound chassis-mounted LP tank provides fuel for the water heater, furnace, and cooktop.
The plumbing service bay is spacious, offering plenty of room to store sewer hoses, fresh-water hoses, or a macerator pump. A whole-house water filter feeds the coach’s fresh-water system and an array of valves and controls offers access to operations such as filling the fresh-water tank, bypassing the water heater during winterizing, or operating the water pump. A paper towel holder, outside handheld shower attachment, black-tank flush attachment, and dump valves for the black and gray tanks complete that area.
storage bay features a long pass-through area that reaches to the far side of the RV for storing ladders or other tall items."> Photo 16/18   |   Basement storage space is cavernous in a Seneca. This particular storage bay features a long pass-through area that reaches to the far side of the RV for storing ladders or other tall items.
Driving the Seneca
Driving the Seneca imparted more of a big-rig feeling than in your typical Class C motorhome. The aerodynamically sculptured fiberglass hood tapers down at the front, which makes it easy to judge distances. The 340-horsepower Cummins diesel brought us up to speed rapidly, and the crisp handling of this chassis made the Seneca feel quite sporty for an RV. The hydraulic brakes were adequate to bring this 21,000-pound vehicle to a stop in short order, although it does take a bit more pedal pressure than the air brakes I am used to from driving Class A diesel pushers. This is a front-engine diesel chassis, so you won’t get the quiet sound of a rear engine diesel pusher, but I didn’t find the noise to be objectionable at highway speeds.
Photo 17/18   |   2013 Jayco Seneca 37fs floorplan
The change to the air-ride suspension that Jayco made during the 2013 model year is a welcome improvement. The fully automatic air-ride rear suspension system provided a much smoother ride. This is a big step forward for the Seneca and will probably make for an enticing upgrade to owners of earlier models with rear leaf spring suspensions.
The Seneca fills a sweet spot between typical Class C motorhomes and their more expensive Class A cousins. The Seneca is a great choice for Class A owners who want to downsize but don’t want to lose the quality, amenities, and storage that they are accustomed to. From its solid surface countertops, to its wood floor, to hardwood cabinetry with screwed stile construction, they may even find it exceeds what they were accustomed to. While large in size, most Class A motor-home floor plans aren’t designed to sleep many people. The 37FS Seneca can easily sleep eight, so large families will find this particular floor plan very desirable. For a couple who travels alone, the rear bath 37RB floor plan is another popular choice.
The torque and power of the Cummins diesel combined with a 10,000-pound trailer hitch means you won’t have any trouble hauling anything you need. Perhaps the most noticeable feature of the Seneca is its huge amount of storage space. With a generous cargo-carrying capacity in excess of 4,000 pounds, you can feel free to load it up.
Jayco has equipped the Seneca with a ton of upgrades as standard equipment. In fact, our well-appointed Seneca only had two options—a larger 8kW generator and the DVD players in the bunk beds. The only other available options that were not selected were a choice of combo or stackable washer-dryer and a front entertainment center to replace the overhead bunk. This pricing method is a plus at resale time because RV dealers generally look at base price without options when determining a trade-in value, so the Seneca should fare well when it’s time to trade up. Jayco backs the Seneca with a two-year bumper-to-bumper warranty, which is also a plus when comparing it to other motorhomes and does add a testament to the quality they put into this unit. With all these features packed into an attractive motorhome, the Seneca will be a tough act to beat.
Photo 18/18   |   2013 Jayco Seneca 37fs onan Generator
At a Glance
Base Price: $216,720 (MSRP)
Standard Features:
• Full-body paint
• Accuride aluminum wheels
• 32-inch exterior LCD TV in galley slide
• 1,800-watt true sine wave inverter
• 32-inch LCD TV in main living area
• 26-inch bedroom LCD TV
• 40,000 BTU LP furnace
• 10-gallon gas/electric DSI water heater
• King bed with pillow-top mattress
Customer Value Package
Includes:
• 12-cubic-feet refrigerator with ice maker
• Two 15,000 BTU ducted air conditioners with heat pumps
• Backup and side view cameras and monitor
• Convection microwave oven
• Power electric cord reel
• In-motion Minimax satellite dome
• Touch screen in-dash CD/DVD/MP3 sound system with GPS navigation
• Flexsteel UltraLeather driver (powered) and passenger (no power) seats
Optional Features:
• Onan 8,000kW Quiet Diesel generator (6kW standard)
• Dual CD/DVD players in bunk beds
Price as Tested $218,779 (MSRP)
Specifications
2013 Jayco Seneca 37FS
Gross Vehicle Weight (GVWR): 26,000 lbs
Gross Combined Weight Rating (GCWR): 33,000 lbs
Cargo Carrying Capacity (CCC): 4,639 lbs
Wheelbase: 275 in
Overall Length: 39 ft, 1 in
Overall Width: 102 in
Overall Height: 151 in
Interior Height: 84 in
Fresh Water: 81.5 gallons
Gray Water: 41 gallons
Black Water: 52 gallons
Chassis: Freightliner M2 Business Class front-engine diesel
Tires: Michelin XZE2 275/80R22.5 14 Ply Load Range G
Front Suspension: 8,000lb Taperleaf leaf springs
Rear Suspension: 18,000lb Airliner fully automatic air-ride suspension
Brakes: Hydraulic disc brakes, front and rear
Fuel Tank: 30- and 40-gallon saddle tanks (74-gallon total), plus 6-gallon DEF tank
Trailer Hitch Capacity: 10,000 lbs
Engine: Cummins 6.7L ISB with exhaust brake
Horsepower: 340 hp @ 2,800 rpm
Torque: 660 lb-ft @ 1,600 rpm
Transmission: Allison 2500 six-speed automatic

Thursday, December 14, 2017

Now this is a grand design and it's in Burbage

Read article : Now this is a grand design and it's in Burbage

This beautifully-designed modern home in Burbage hits that perfect point where a striking design doesn’t appear too abrasive.

When the current owners built this contemporary home in Rugby Road two years ago, the main drive was sustainability and low maintenance.

Now this property is on the market courtesy of Fine and Country, for a cool £650,000.

Built to high industry standards, it has exceptional insulation values and is supported by another rarity - an A-grade EPC rating.

With the balance of the warranty still available, this is an extremely economical house, and energy bills can be kept even lower with electricity provided by solar panels on the back of the house.

Additional benefits include an 11 zone gas-fired under floor heating to both the ground and a solid first floor.

A heat recovery whole house ventilation system is in place providing temperature control free from stuffy or stale rooms throughout.

Further modernities include A-rated aluminum powder-coated windows and doors, an alarm system, and a commercial quality Sarnafil single ply roof.

Property for sale in Burbage with Fine and Country of Rugby.
The front of the home in Rugby Road. Property for sale in Burbage with Fine and Country of Rugby.

Quietly tucked away on the street it still manages a double garage and a south west-facing private landscaped rear garden with a fishpond.

For living space, the property offers three to four reception rooms, four, possibly five bedrooms and four bathrooms, of which three are en suites.

Double doors open to the spacious open-plan hallway which has Amtico flooring that flows through most of the ground floor.

From here, an internal hardwood door gives direct access to the garage and there are full height windows and double doors overlooking the private courtyard.

A little further on a central oak staircase rises to the first floor with two stainless steel handrails.

The <a href=central oak staircase ascending from the hallway to the landing in this contemporary home. Property for sale in Burbage with Fine and Country of Rugby." src="src" />
The central oak staircase ascending from the hallway to the landing in this contemporary home. Property for sale in Burbage with Fine and Country of Rugby.

Heading first in to the smart open-plan kitchen one can see an extensive range of cream-fronted base units including twin-pan drawers and an integrated Smeg dishwasher.

Cooks can enjoy a Bosch electric fan-assisted double oven with a five-ring gas hob and a bespoke extractor above.

There is plumbing for an American-style fridge/freezer unit - just what is needed for those hot days - and three full-height spice racks and storage cupboards.

There are Quartz work surfaces with a built-in drainer and an inset Blanco sink unit and mixer tap.

Heading back out into the hall way, and to the right of the staircase, doors lead to the cloakroom which has a close-coupled toilet and a contemporary washstand.

The well-fitted study offers shelving, cupboards and a work station and is tucked away with a telephone point and two windows.

A view from the kitchen, past a dining area towards the <a href=central oak staircase. Property for sale in Burbage with Fine and Country of Rugby." src="src" />
A view from the kitchen, past a dining area towards the central oak staircase. Property for sale in Burbage with Fine and Country of Rugby.

In here an open doorway and curtains lead into the versatile media room which has black cabinets and wired for a large screen and surround sound.

It could provide a second office or a small sitting room for children if preferred.

On the other side the stairs, another door gives access to the private ground floor guest bedroom which has double doors overlooking the courtyard.

There are fitted quality wardrobes and an en-suite shower room, with a Grohe shower unit, pedestal wash hand basin, low-level toilet, quality ceramics, fitted mirrors, and an opaque window.

But the real selling point is the stunning open plan combined living, dining and morning room.

The stunning open-plan lounge is light and bright and is perfect to enjoy those cold but <a href=sunny winter afternoons. Property for sale in Burbage with Fine and Country of Rugby." src="src" />
The stunning open-plan lounge is light and bright and is perfect to enjoy those cold but sunny winter afternoons. Property for sale in Burbage with Fine and Country of Rugby.

This bright area provides flexible living space.

The main lounge area is double height with bi-fold doors overlooking the back garden and glazed windows above make it a very well-lit and impressive area.

The dining area is ideal for regular entertaining while the morning room has a side window overlooking the terrace and double doors to the garden.

This light and versatile area is designed for modern living and makes the ground floor extremely versatile and the space flows freely into the attractive garden.

Upstairs, the first floor landing has a large picture window with an inset roof window making this a visually stunning and bright area.

With full-height windows there is a fine vista from the galleried landing over the living area and the rear garden.

The master bedroom has engineered wood flooring with smart reading lights with TV and telephone points and two discreet slit windows with shutters allowing views of the ground floor.

Bi-fold doors (and insulated shutters) give access to the balcony which has a stainless steel and glass balustrade.

Bi-folding doors open out from the master bedroom onto the balcony over-looking the back garden. Property for sale in Burbage with Fine and Country of Rugby.

The en-suite has a double-width shower enclosure with sliding doors and a Grohe shower unit along with quality ceramics, a washstand with an oval basin and a close-coupled toilet.

A door leads to a dressing room with wardrobes, cupboards and drawer sets.

Naturally, this could provide a child's bedroom or nursery if required. It has engineered wood flooring with a window to the courtyard.

The second bedroom has a triple wardrobe along with storage cupboards. There are two windows and downlighters. The spacious family bathroom can also provide an en-suite to this bedroom.

There is a double-width shower enclosure, again with a Grohe shower unit, a white oval bath with freestanding monoblock tap a white washstand, and another close-coupled WC with fitted alcoves and storage.

There are porcelain floor tiles, wall ceramics and two full height opaque side windows allowing light to flood in.

The third double bedroom has a double wardrobe with downlighters and two windows.

The en-suite bathroom of the master bedroom. Property for sale in Burbage with Fine and Country of Rugby.

The en-suite has a close coupled WC, contemporary washstand and a shower enclosure with shower unit, porcelain floor tiles, wall ceramics, downlighters.

The convenient first floor utility room has plumbing facilities and houses the heating controls.

Like the ground floor, the first floor has low-level concealed lighting, downlighters, smoke alarm and an alarm sensor.

This property is nicely tucked off the road via a private driveway.

The garage to the front is at the end of a block-paved driveway providing ample parking for two large vehicles while the garage has an automatic up and over insulated sectional panel door.

There is light and power connected with a rear personnel door and a work bench.

To the side of the house is a well-stocked border with grasses, lavender and some colourful annuals.

There is a lockable side gate to the left of the garage leading to a deep storage shed for garden machinery.

On the far side of the house there is a private courtyard area with stone chippings and multi coloured paving slabs.

A wide gravel pathway leads round to the main garden.

The side garden and courtyard. Property for sale in Burbage with Fine and Country of Rugby.

The rear garden has been thoughtfully-landscaped and is a very low maintenance.

Facing south west it offers a good degree of privacy.

There is a sunny private terrace directly behind the house and a pathway leads to a seating area which offers the best view of the rear elevation.

The substantial fishpond was a feat of engineering with a raised viewing area, pump and filtration system.

It is raised above the garden and retained by a well-stocked rockery and some large pieces of local stone.

To the right of the path is high-quality astroturf with Welsh slate borders and two ornamental trees. There is a further slate border with a raised rockery planted with a colourful selection of grasses, heathers and specimen trees.

A view of the back garden looking back towards the house. Property for sale in Burbage with Fine and Country of Rugby.

The garden is enclosed on all three sides by wooden close boarded fencing, a neighboring garage wall, established conifer trees and a buddleia.

The elevated balcony is ideal to catch the last western rays of sunshine after a typical busy day.

Homes of this quality are rarely available so an early viewing is advised.

As the current owner, Gabriella said: “My husband and I had always wanted to build our own home, and when the opportunity arose in 2013 we jumped at the chance and we are absolutely thrilled with the result.”

For more details, and to make a viewing contact Fine and Country Rugby on 01788 820062.

SELLING POINTS

Number of bedrooms: 4 to 5;

Reception rooms: 4 to 5;

Bathrooms: 4;

Garden: Small, but beautiful;

USP: Amazing, unique contemporary home

Price: £650,000

Read More

Wednesday, May 24, 2017

Is water the next 'drug' for Mexico’s cartels?

Read article : Is water the next 'drug' for Mexico’s cartels?

Aug 14, 2017

Tamara PearsonA pipa, or water truck, filling up the underground well for shops in Puebla city. Credit: Tamara Pearson

It's rainy season here in Puebla, Mexico, and water is dripping through my concrete roof, taking chunks of plaster and paint from the ceiling with it. Ironically, we still don't have enough running water to shower everyday. Other people here have no running water at all, and our drainage system is in a state of utter abandonment.

Yet we all pay 10 times the rates of the rest of Mexico, because here in Puebla – unlike the rest of the country – our water is privatized. What's more, the men at the helm of the consortium that run it are a collection of corrupt millionaire and billionaire businessmen who have allegedly laundered money for some of the region's biggest drug cartels.

Throughout much of Mexico large, usually black, tinacos (water tanks) dot the roof tops of our concrete slums and towns. A lot of us have running water for just 15-30 minutes, twice a week, so we fill up the tinacos to cover the rest of the time. Many of the older tanks are made of asbestos, while the newer ones are a solid black plastic. A friend who lives around the corner has only a large container of water in his bathroom, while those in wealthier areas often have underground storage and much more regular water.

Most of us, however, have just 400 litres of water to last the household a week. In the US, a single person consumes that amount per day. In my home, we wash our clothes in a bucket, recycle that water to flush the toilet, collect the water from the shower for flushing, and only flush around once or twice a day. Showers are quick and had every three days or so.

My water bill is 630 pesos per month, while in neighboring Tlaxcala state, people pay 50 pesos per month. Everyone here has stories of being unfairly charged for water, or of going without any water for a year or two – despite constant complaints to the water company, Aguas de Puebla.

I was duly awarded a debt of 115,000 pesos when I first moved into my tiny apartment, located in the poor side of inner-city Puebla. For perspective, that's nearly four years’ worth of minimum wage. I spent four months battling the water company to get that corrected – spending 45 minutes each way on public transport to talk to them directly in their head office, and ringing them on a daily basis. Each time, they asked me to bring in more documents, placing the paperwork burden on me, instead of on themselves as the ones who made the mistake. They gave me excuses and promises that it would be resolved in three weeks’ time and to come back then, and even redirected me to other departments – ‘I'll put you through to water meters, maybe they can help with your case.’

Ultimately, some firm phone calls to the head of public relations of the company, with support from an incredible journalist friend, saw me meeting directly with PR, finally, the figure was fixed in their system in a matter of minutes. At the time, I put it down to the bureaucratic, inhumane habits of private corporations, but later I would realize just how much more sinister the problem was.

Tamara PearsonWater tanks on the rooftops of inner-city Puebla. Credit: Tamara Pearson

Illegal privatization

‘Baja California was the first state in Mexico to plan to privatize its water, but protests and resistance stopped that. Puebla was the second state,’ Fernando, an indigenous water activist in the Peoples Against the Privatization of Water group told me. He asked that I not include his last name, given the arrest warrants pending on a number of water activists, and the risk involved.

In 2013, the Puebla state government justified the privatization of water by arguing that the incoming company would invest the money necessary to improve the service, eliminate leaking pipes that saw 30 per cent of all water lost, and expand the reach of piped water. It passed the Water Law, that would allow the new company to set prices without oversight and to hire other private companies, and put out a call for bids in September that year. The government awarded the bid to Concessions Integrales, also known as Aguas de Puebla, three days before the consortium was actually formed and legally able to participate in a bid for tender. Though the governor had talked about a 30 year deal, that was extended to 60 years.

Narco business

No one imagined that one of the main companies behind Enrique Peña Nieto's presidential election campaign in 2012 would ultimately end up running Puebla's water supply system, in a consortium made up of other corrupt and scandalous companies.

Monex, Epccor, and Grupo Financiero Interacciones are the main companies involved in Aguas de Puebla, though reports of their exact shares in ownership vary. Monex itself told the press that it owned a ‘third’, but added that exactly who has how many shares was a ‘banking secret’.

Monex made news at the time for running Peña Nieto's campaign strategy of buying votes through the distribution of pre-paid cards, and funneling money to his campaigning fund. Reports suggest that this money, however, likely came from the Juarez Cartel – one of the oldest and most powerful criminal organizations in the country.

Mexico's election court ultimately ruled that there hadn't been any fraud, but many are skeptical of this ruling because Mexico's courts are known for their extremely high levels of corruption and political interference. Additionally, it wasn't the first time that Monex had allegedly been involved with major drug cartels. An investigation conducted by newspaper Reforma found a working relationship with the Arellano Feliz cartel in 2003, and with the Colombian cartel, Valle del Norte, in 2006. In 2008, Spanish authorities found that the Beltran Leyva cartel had changed some 78 million euros through Monex and a company called Intercam.

Epccor is owned by Juan Gutierrez, who is also president of Aguas de Puebla, and who also owned the company Gutsa, a key financial backer of the 1994 PRI presidential campaign (Peña Nieto's party). Gutierrez's companies have been repeatedly fined for mismanagement. Epccor, with it connections in the government, regularly receives contracts for public works like hospitals, roads, and airports; consistently spends more than it originally declared in its budget, and delays completion by years. The most recent case was a hospital which has spent nine years so far under construction, and still isn't finished.

Grupo Financiero Interacciones, run by the infamously corrupt and excessive rich Hank family, has strong links to the PRI and to the Juarez Cartel. Grandfather Hank, Carlos Hank Rhon, is a billionaire, and his family has been the subject of numerous reports of drug laundering on a massive scale, as well as assisting cartels with drug shipments, and large-scale public corruption. A World Policy Report from 1995 went so far as to describe Carlos Hank as the "primary intermediary between the multinational drug trafficking enterprises and the Mexican political system,” and Hank has been investigated for money laundering by Mexican, Swiss, and French judges.

One key strategy Hank is alleged to have used, was to buy food products with the money cartels made from selling cocaine in the US. Hank's companies had a monopoly on these food products, which they then sold back in Mexico. The Hank family has also colluded with Mexican state authorities to gain permits for their rooster fighting and horse racing, and to get significant debts pardoned. Son Jorge Hank Rhon has also been accused of using the gambling business for drug trafficking links and to launder money.

Tamara PearsonAn Aguas de Puebla office. Credit: Tamara Pearson

A broken system

With corrupt narcos running Puebla’s water, it's no surprise that the system is beyond dysfunctional. People have accused the company of charging for non-existing debts, of water supply issues and random bill increases, and of charging up to 3,000 pesos (a good month's wage) for meters to be installed. Some areas are supplied with contaminated water, whole suburbs have gone without water for weeks, the company charges to check people's broken connections, and people report that their meters aren't working but the company refuses to repair them and keeps charging an incorrect rate. People facing errors like mine tend to wait a year for a resolution, if they get any at all.

In May this year, communities from the south of the city protested and closed roads after going weeks without water, while Aguas de Puebla still charged them for it. They said that when they did get water, it ‘smelt bad and was yellow,’ while other communities went for three months without water because the company couldn't be bothered to fix the pump.

Businesses have also complained about large bills, pointing out at least six companies in the city that have monthly bills that amount to millions in pesos, ‘without a clear explanation why,’ they told a press conference.

Internally, workers at Aguas de Puebla have also complained stating that they were threatened with being fired on a daily basis and weren't paid promised bonuses. They said they were told not to inform people how rates were calculated, leading to people paying more than they should and they also claimed that the company had cut the petrol budget for company vehicles by 60 per cent, making it difficult for workers to go out and do repairs.

Aguas de Puebla does roll out the red carpet for some of its clients, however. ‘Many years ago, governor Mario Marin signed an agreement with Nealtican and Santa Maria Acuexcomac – towns in the valley of the Popo volcano – for their water,’ Fernando said. In exchange, the towns got sports courts and roads, but their good quality water is delivered by Aguas de Puebla to the wealthy part of town – Angelopolis, while ‘the worst water goes to the poor suburbs, where there's scarcity.’

Tamara PearsonJugs of water for sale. Credit: Tamara Pearson

Nothing lives without water

‘We can live without petrol, without electricity, but not without water. The government and the companies it colludes with think to themselves, if petrol is hugely profitable, how much money can you make from water?’ Fernando explained.

Indeed, even before the narco companies took over our water, it was already a big-profit industry and essentially privatized. Those facing water shortages, and those who can't drink their piped water, are forced to buy bottled water from private companies.

In 2014, Mexico was the largest consumer of bottled water in the world with almost US$8 billion in revenue that year and 234 liters consumed on average per person annually. The companies dominating the bottled water industry here are Danone (47 per cent), Coca-Cola (19.4 per cent) and Epura (7.1 per cent). Many people buy water in 20 litre jugs, or garafones, and in that case, small, local water providers account for around half of the market.

People lacking piped water will also pay pipas – large trucks that look a bit like tanker trucks – to pump water into their roof-based plastic water tanks. In Mexico City, some 40 per cent of water distributed this way is sold illegally.

The bottled water companies have also waged marketing campaigns to promote distrust in the quality of piped water.

Across Mexico, some 9 million people have no water pipes in their homes and a further 13 million people have piping, but the water is contaminated and leads to skin conditions and gastrointestinal infections. Seventy-five percent of the population live with water scarcity, but big business won't be offering a hand any time soon.

Tamara Pearson is a long time journalist based in Latin America, alternative pedagogy teacher, and author of The Butterfly Prison. She blogs at Resistance Words.