Showing posts with label storage. Show all posts

Monday, March 5, 2018

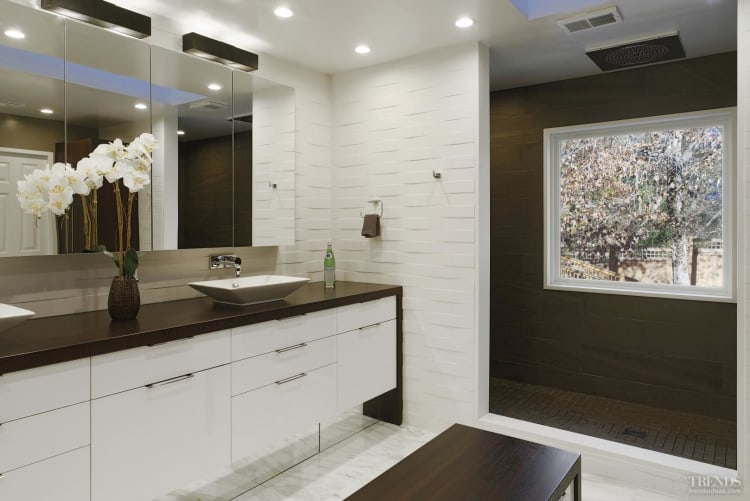
Modern white bathroom with textured tiles, shower zone and central bench with storage

Read article : Modern white bathroom with textured tiles, shower zone and central bench with storage

This bright, white bathroom features a textural tile wall and contrasting rich wenge wood surfaces
advertisment

When not one but several elements provide a stand-out feature in a bathroom design then the result is a sense of enveloping luxury.

Just such a feel was requested for this 28m2 bathroom by designer Paul Bentham at Jennifer Gilmer Kitchen and Bath. A sum of its parts, the project has several key features, says Bentham.

"However, the star of the renovated space is undoubtedly the undulating 3D wall tile. This creates a dramatic light and shadow play while fulfilling the agenda for a bright, white space."

Contrasting the white tiles, the tops of the vanity and central bench are in solid wenge, with waterfall sides. The natural wood is also sealed to make the surface impervious to water.

And the use of wood is continued on the framing for the huge mirror which expands the room visually and brings in light by reflecting the view out the window on the opposite wall.

advertisment

"The window's white quartz frame mimics wood trim but will last forever," says Bentham.

Replacing a seldom-used tub and tub deck, the designer set a generous shower area along the back wall of the house, with the picture window at dead centre. The shower zone has three areas, including a large central rainhead.

The square rainhead showerhead is flanked by his and hers showering points at opposite ends of the zone, each with its own fixed head and hand shower, tiled bench and storage niche.

"The Kohler Reve sinks are semi-recessed into the vanity benchtop," says Bentham. "Set on tall mirrored toekicks, the vanity, bench and storage cabinet, or armoire, all appear to float above the marble floor. Under the sinks, U-shaped drawers in solid walnut allow room for plumbing while still providing storage."

The designer also added storage space under the seat bench and in the armoire.

Credit List

Bathroom designerPaul Bentham, Jennifer Gilmer Kitchen and Bath
ContractorMARNIC Contractors
Cabinet makerPremier Custom Built
VanitySlab door, high gloss polyurethane to match Glacier
White quartz; countertop and legswenge, Durata Matte finish, waterfall legs
ArmoireSlab door, wenge veneer with high gloss polyurethane sheen
Bench, countertopWenge, Durata Matte finish, by Grothouse Inc
Toilet cubicleCustom frosted door, polished chrome hinges and handles
ToekicksMirror
BasinWhite Reve vessels from Kohler Sinks
FaucetsAllure Two Hole Basin Mixer, polished chrome, by Grohe
Shower fittingsGrohe, Euphoria Cube shower head and hand shower set, Rainshower F-Series spray, polished chrome
FloorCalacatta Gold
Shower tilesCertosa porcelain
Wall tilesWow wedge tile, white
LightingSconces above mirrors and medicine cabinets, Visual Comfort Studio Bowery in aged iron with Wax
AccessoriesEssentials Cube Collection in polished chrome, by
Grohe; towel warmerAmba Warmer with digital control by Vega; mirror with Wenge wood frame
Thresholds and window trimArctic White Quartz stone for shower curb and sides to the ceiling

Sunday, April 16, 2017

Wedge more storage into bathroom corner

Read article : Wedge more storage into bathroom corner

My “Room by Room” co-host, Shari Hiller, and I have decorated numerous bathrooms, and all of them share one common problem – not enough storage. Typically, the only places to store items are the medicine cabinet and under the vanity, neither of which offers much space.

We recently decorated a bathroom that had no storage whatsoever. The sink mounted directly to the wall, so there was no vanity. There wasn’t even a medicine cabinet. This bathroom needed help.

Shari helped by creating a skirt that attached to the sink and provided some covered space to “hide” things. Unfortunately, more storage was still needed.

I decided to build a tall corner cupboard, which would offer plenty of storage while taking up very little space in this small bathroom.

The materials I used:

  • 1/2-inch plywood
  • Circular saw
  • Wood glue
  • Nail gun (or hammer and nails)
  • Large square
  • Pencil
  • 1-inch cleats
  • 1/2-inch quarter-round molding
  • 1×2, 1×3 and 1×4 poplar lumber
  • Jigsaw with scroll blade
  • Hinges and hardware
  • Tape measure
  • Wood filler
  • Sandpaper
  • Primer and paint or stain

Measure the corner of the bathroom where the cabinet will be placed to get the desired dimensions. The featured project’s one side is 18 inches wide and the other is 18–1/2 inches wide (when attached together, each side will be 18–1/2 inches because of the plywood’s thickness).

Since the piece is angled, the sides and cleats need to be mitered at the front so the front facing will lie flush. Set the circular saw at a 45-degree angle and cut the plywood sides using a guide to keep the saw straight. Cut the cleats to size, being sure to miter the front ends.

Lay the sides next to each other on a flat surface. Use a large square to draw lines across both boards to mark where the 1-inch cleats will hold up the shelves. Run a bead of glue along the cleats and nail each in place. Assemble the two sides together using a butt joint, wood glue and nails.

Measure the inside of the cabinet from outer corner to outer corner and cut the shelves to size using a circular saw. Tip: When cutting plywood with a circular saw, cut with the finished (good) side down so chips don’t ruin the exposed surface.

Install the shelves to the inside of the cabinet by nailing each into the cleats and dress up the inside top edge using -1/2-inch quarter round. Cut 1×2 facing pieces to length to cover the front of each shelf.

For plain cabinet doors, measure the bottom opening and add -1/4 inch all the way around. Cut two doors this size.

Fill all nail holes with wood filler and let dry. Sand the entire piece and prime it if necessary. Once dry, paint or stain the piece as desired. Once completely dry, install the doors with chosen hinges and hardware.

Place the cupboard in the corner and make sure that it is secure. In the room we were working in, the floor was somewhat uneven. We found that our cupboard needed to have a few shims placed under the front edge to make it completely stable.

I was pleased with the project because it provided some much-needed storage. Shari was pleased for an entirely different reason: There were four shelves that needed accessories.

She added greenery, towels, decorative bottles and baskets. The accessories added color and texture to the piece, and gave the piece a nice, finished look.

This tall corner cupboard was just what this bathroom needed. Does your bathroom need a bit of extra storage? Why not give this cupboard a try? I guarantee: You’ll love the results.