Showing posts sorted by relevance for query Citric Acid. Sort by date Show all posts

Friday, May 26, 2017

DIY Oatmeal Bath Bombs - Soap Queen

Read article : DIY Oatmeal Bath Bombs - Soap Queen

Difficulty:Intermediate

Time:30-45 minutes

Yields:About 7 bath bombs

<a href=DIY Oatmeal Bath Bombs" width="700" height="1218" />

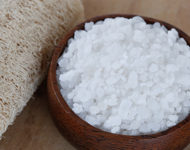
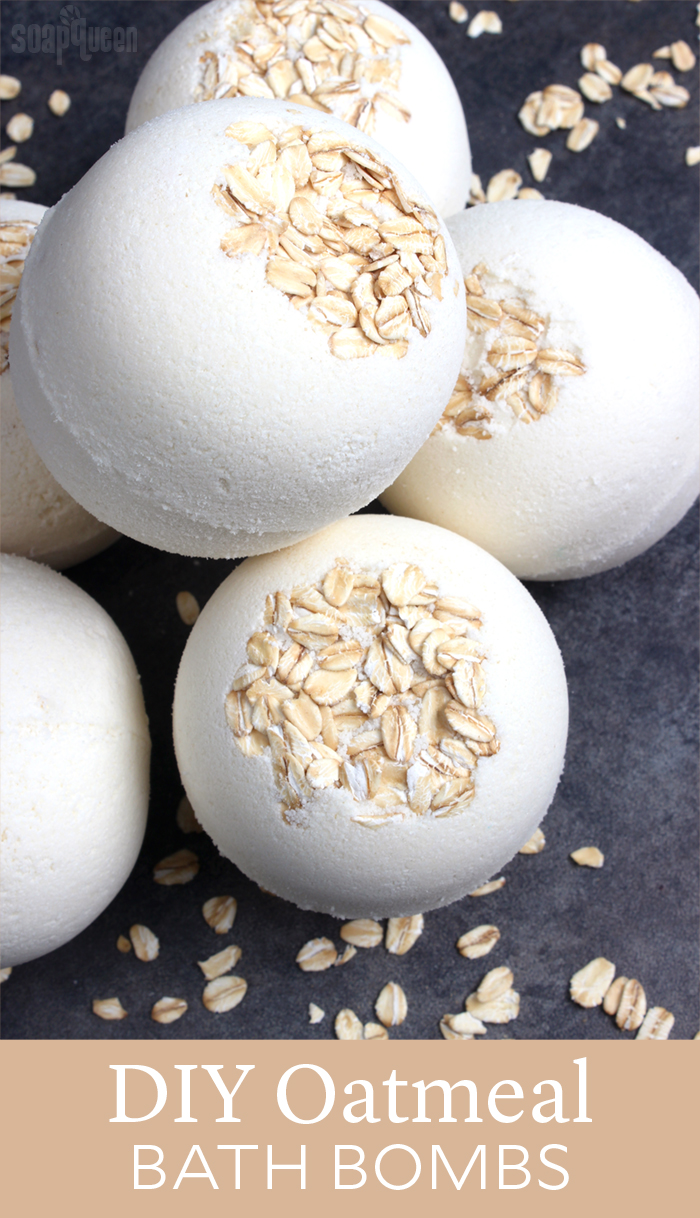
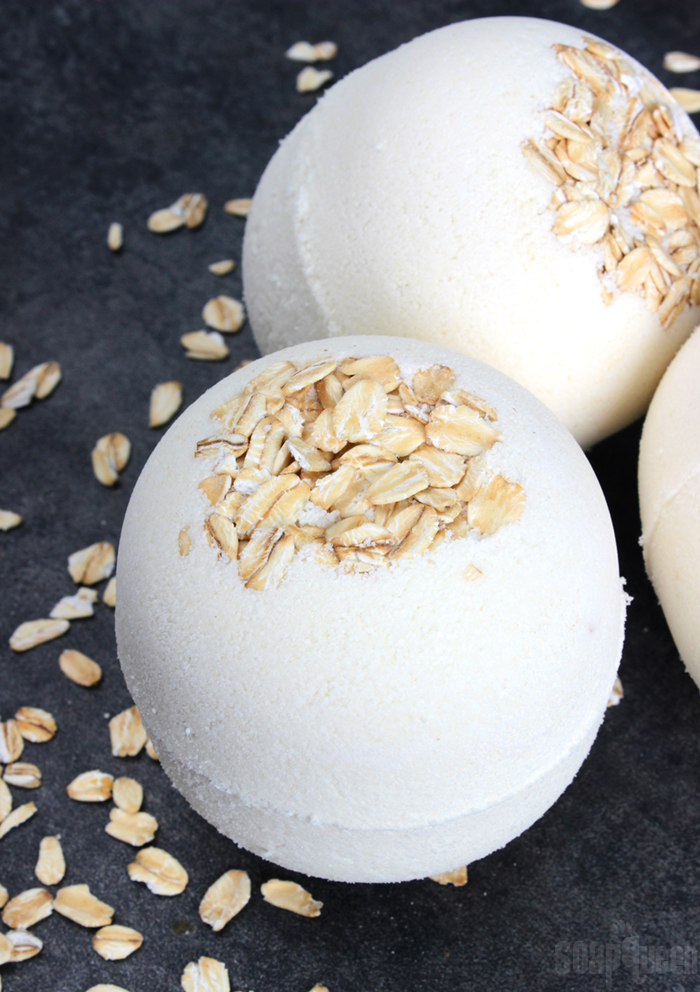
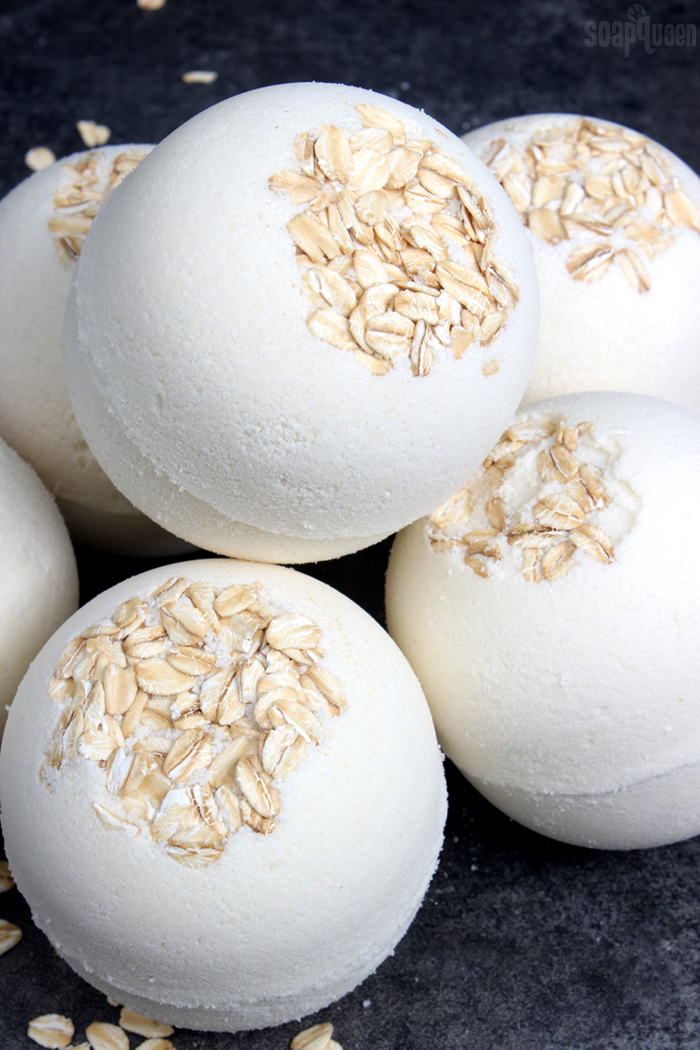
Oatmeal baths are well known for their skin-soothing properties. These Oatmeal Bath Bombs are made with oat extract and colloidal oatmeal to create a soothing bath experience. Colloidal oatmeal is micro-fine and fantastic for dry skin.

Oatmeal Milk and Honey Fragrance Oil gives these bath bombs a creamy, comforting scent. Cocoa butter adds structure and a chocolatey scent. A touch of oatmeal on top gives the bath bombs a finishing touch.

<a href=Oatmeal Bath Bombs" width="700" height="467" />

If you’ve never made bath bombs before, we recommend getting a batch under your belt that does not require a two-part mold. It can be a little tricky to get the perfect molding texture that will stick together and not crumble. Great recipe options for beginners include Rose Gold Bath Bombs and the Sand Dollar Bath Bombs. Watch the Surprise Bath Bomb video for tips on using the Stainless Steel Bath Bomb Mold successfully!

<a href=Oatmeal Bath Bombs DIY" width="700" height="992" />

What You’ll Need:
Stainless Steel Bath Bomb Mold
4 cups Baking Soda (Sodium Bicarbonate)
2 cups Citric Acid
1 oz. Colloidal Oatmeal
4 oz. Cocoa Butter
1 oz. Oat Extract
0.7 oz. Oatmeal Milk and Honey Fragrance Oil
0.6 oz. Polysorbate 80
Witch Hazel in a Spray Bottle
Optional: Cyclomethicone


Click here to add everything you need for this project to your Bramble Berry shopping cart!

OPTIONAL MOLD PREP: Cylomethicone helps the bath bomb release more easily. Pour a small amount on a cotton ball and coat both halves of the molds. This step is optional, but if you have never used the Stainless Steel Bath Bomb Mold before, it’s recommended.

OPTIONAL

ONE: In a large bowl, mix together the baking soda, citric acid, and colloidal oatmeal. To get rid of clumps in the mixture, you can push the powders through a sifter or break them up with your fingers. Citric acid has a tendency to take off nail polish, so wear gloves to protect your manicure. Thoroughly stir the ingredients together.

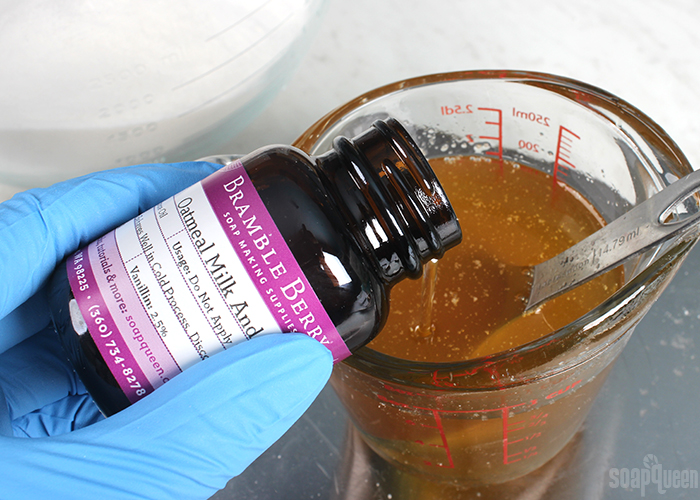
TWO: Add the cocoa butter to a small heat and fragrance-safe container and melt in the microwave using 30-60 second bursts. Be careful when removing from the microwave as the container may be hot. Add 0.7 ounces of Oatmeal Milk and Honey Fragrance Oil, 0.6 ounces of polysorbate 80, and 1 ounce of oat extract to the melted butter. Use a spoon to fully mix the ingredients together.

ONE
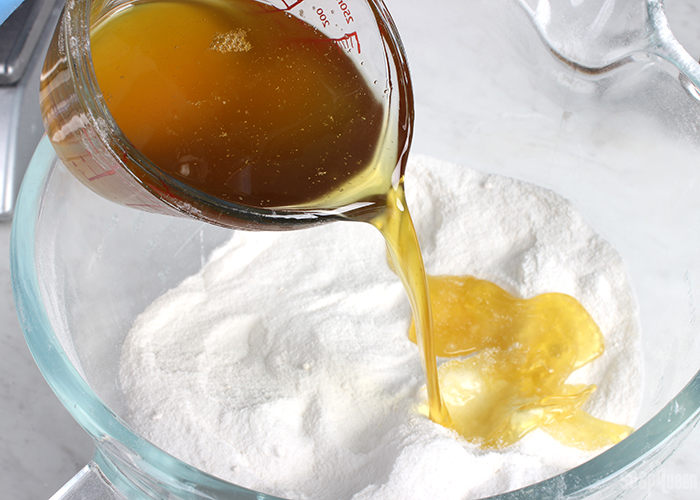
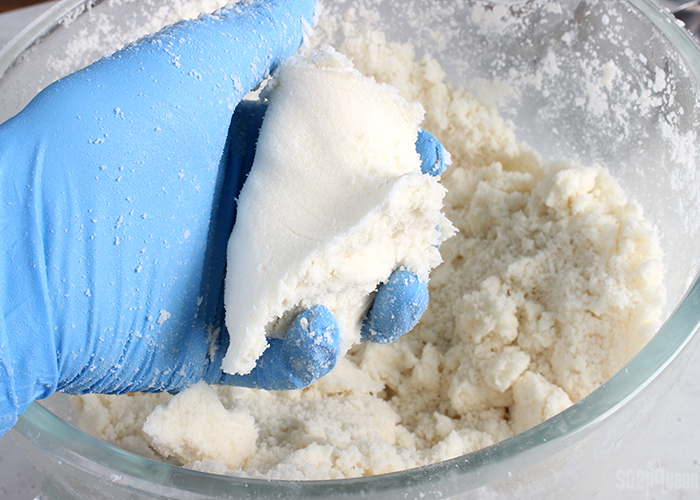
THREE: Add the oil mixture to the powder mixture. Use your hands to fully mix the ingredients together.

TWOTHREE
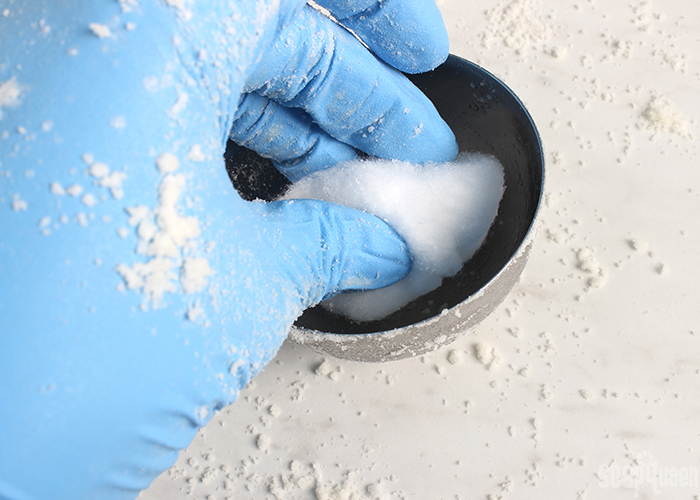
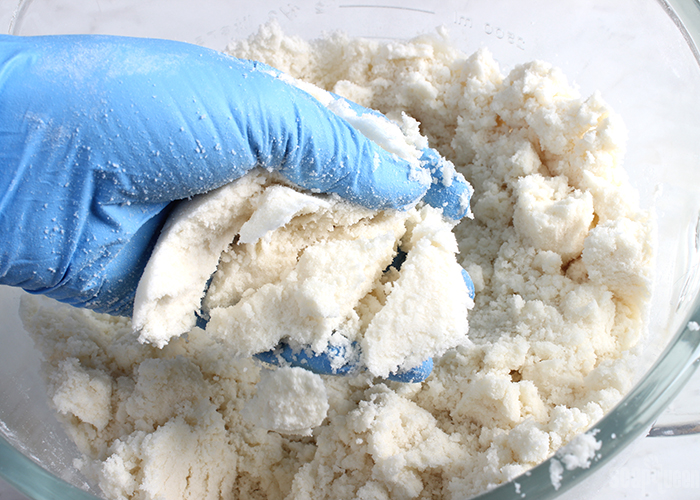
FOUR: Test the consistency of the bath bomb mixture. The perfect consistency for molding is a texture similar to damp sand that holds its shape when squeezed. If it’s too dry, use one hand to spritz the mixture with witch hazel and one to mix. Continue spritzing until the mixture holds its shape when squeezed. Below, you can see that the mixture forms a ball when squeezed. This means that the mixture will hold its shape in the mold as well.

FOUR
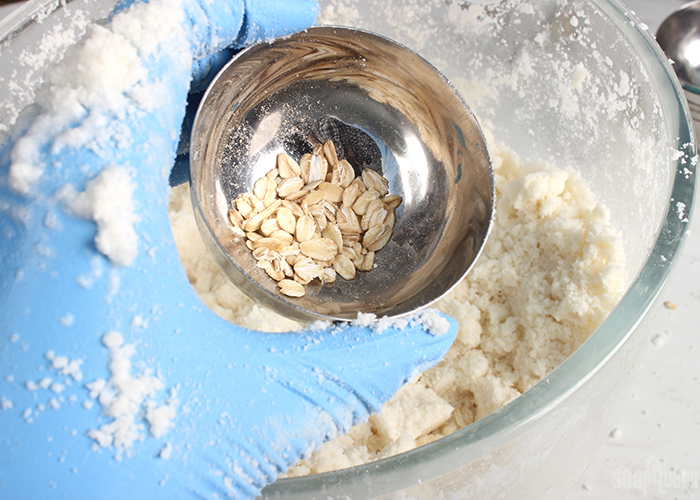
FIVE:
Add a pinch of oatmeal to the bottom of one half of the mold and cover it with bath bomb mixture. Press the mixture lightly into the mold. Fill the other half of the mold and press the mixture in lightly. Then, scoop more of the mixture on top until it’s mounded in the center. Fill up the second half of the bath bomb, mounding the mixture in the center again. Having loose bath bomb mixture on both sides of the mold and a mound in the center acts as the “glue” when they are pressed together.

FIVESIX: Press the two halves of the mold together firmly until they touch. Then, begin to twist and pull the top half off carefully. Once the top half is removed, allow the bath bomb to sit in the bottom half for several hours up to overnight. If they don’t stick together the first time, keep trying. It can be a little tricky to get the bath bombs to stick together, but practice makes perfect! See how to use the stainless steel molds in the How to Make Bath Fizzies video on Soap Queen TV.

SIXSEVEN: Repeat the process with the other bath bombs. When they’re unmolded, allow them to sit for 24 hours before using or wrapping in plastic wrap to protect them from excess moisture. Learn more about packing and storing your bath bombs in the How to Store Handmade Bath Products post.

Oatmeal Bath Bomb Tutorial

4.0 from 1 reviews

Mondo Oatmeal Bath Bomb DIY

image

These Mondo Oatmeal Bath Bombs feel soothing and luxurious in the tub.

Author: Soap Queen

Recipe type: Bath Bombs

Serves: About 7 Bath Bombs

Ingredients

  • Stainless Steel Bath Bomb Mold
  • 4 cups Baking Soda (Sodium Bicarbonate)
  • 2 cups Citric Acid
  • 1 oz. Colloidal Oatmeal
  • 4 oz. Cocoa Butter
  • 1 oz. Oat Extract
  • 0.7 oz. Oatmeal Milk and Honey Fragrance Oil
  • 0.6 oz. Polysorbate 80
  • Witch Hazel in a Spray Bottle
  • Optional: Cyclomethicone

Instructions

OPTIONAL MOLD PREP: Cylomethicone helps the bath bomb release more easily. Pour a small amount on a cotton ball and coat both halves of the mold. This step is optional, but if you have never used the Stainless Steel Bath Bomb Mold before, it’s recommended.

  1. In a large bowl, mix together the baking soda, citric acid, and colloidal oatmeal. To get rid of clumps in the mixture, you can push the powders through a sifter or break them up with your fingers. Citric acid has a tendency to take off nail polish, so wear gloves to protect your manicure. Thoroughly stir the ingredients together.
  2. Add the cocoa butter to a small heat and fragrance-safe container and melt in the microwave using 30-60 second bursts. Be careful when removing from the microwave as the container may be hot. Add 0.7 ounces of Oatmeal Milk and Honey Fragrance Oil, 0.6 ounces of polysorbate 80, and 1 ounce of oat extract to the melted butter. Use a spoon to fully mix the ingredients together.
  3. Add the oil mixture to the powder mixture. Use your hands to fully mix the ingredients together.
  4. Test the consistency of the bath bomb mixture. The perfect consistency for molding is a texture similar to damp sand that holds its shape when squeezed. If it’s too dry, use one hand to spritz the mixture with witch hazel and one to mix. Continue spritzing until the mixture holds its shape when squeezed. Below, you can see that the mixture forms a ball when squeezed. This means that the mixture will hold its shape in the mold as well.
  5. Add a pinch of oatmeal to the bottom of one half of the mold and cover it with bath bomb mixture. Press the mixture lightly into the mold. Fill the other half of the mold and press the mixture in lightly. Then, scoop more of the mixture on top until it’s mounded in the center. Fill up the second half of the bath bomb, mounding the mixture in the center again. Having loose bath bomb mixture on both sides of the mold and a mound in the center acts as the “glue” when they are pressed together.
  6. Press the two halves of the mold together firmly until they touch. Then, begin to twist and pull the top half off carefully. Once the top half is removed, allow the bath bomb to sit in the bottom half for several hours up to overnight. If they don’t stick together the first time, keep trying. It can be a little tricky to get the bath bombs to stick together, but practice makes perfect! See how to use the stainless steel molds in the How to Make Bath Fizzies video on Soap Queen TV.
  7. Repeat the process with the other bath bombs. When they’re unmolded, allow them to sit for 24 hours before using or wrapping in plastic wrap to protect them from excess moisture. Learn more about packing and storing your bath bombs in the How to Store Handmade Bath Products post.

3.3.3077

Monday, March 26, 2018

Hidden Color Bath Bombs - Soap Queen

Read article : Hidden Color Bath Bombs - Soap Queen

Difficulty:Intermediate

Time:15-20 minutes

Yields:2-3 fizzies

Here’s a fun idea for a colorful surprise hidden inside a bath bomb. This tutorial is perfect for getting kids to take a bath, because there’s enough colorant in each bath bomb to color the bath water. And since you can’t see the color until the bath bomb is activated, you have to be in the bath to get your surprise! I originally came up with this idea … well, you’ll have to see why this weekend. =)

Hidden Color Bath Fizzy

Scroll down to the bottom of the post to see a mini fizzy coloring water!

Recipe:

1.5 cups Sodium Bicarbonate (Baking Soda)

1 cup Citric Acid

12 mL Baby Powder Fragrance Oil

Teal LaBomb Colorant

Witch Hazel (in a spray bottle)

Droppers with Suction Bulb

2-3 Stainless Steel Bath Bomb Molds

Mesh Strainer

Click here to add everything you need for this project to your Bramble Berry shopping cart!

OPTIONAL MOLD PREP: To aid in the unmolding of the bath bombs, add 5-10 drops of Cyclomethicone inside each half of the Stainless Steel Bath Bomb molds. Swirl it around so that there is a nice coat covering the inside of the molds. Set the molds on paper towels in a way that allows the excess Cyclomethicone to run out. You want just the thinnest coat of Cyclomethicone inside the molds.

Adding Cyclomethicone

ONE: Place the mesh strainer over the top of a bowl. Measure the Sodium Bicarbonate and Citric Acid and pour into bowl through the strainer. Work any clumps through the strainer. TIP: Citric Acid and Sodium Bicarbonate (Baking Soda) can tickle your nose, so you might want to wear a mask if you’re sensitive.

TWO: Add 12 mL Baby Powder Fragrance Oil to the mixture. Using your hands, mix until the fragrance oil is not longer causing clumps. NOTE: If your child is very sensitive to fragrance, keep the fragrance out or decrease the amount to only 6 ml. Some children find fragrance overwhelming.

Adding <a href=Fragrance Oil" src="http://images.soapqueen.com/HiddenColorBB/AddingFO.jpg" width="498" height="498" />

THREE: Spray the mixture with 5-10 spritzes of Witch Hazel and mix in well. You want to add just enough moisture so that the mixture holds together, but isn’t soggy. Keep adding Witch Hazel until the mixture reaches a consistency that you like. I know my mixture is ready when I squish some fizzy mixture in my hand and it mostly holds together. TIP: For great live-action shots of the ideal consistency of bath bomb mix before putting it into a mold, check out our latest Soap Queen TV with guest Jeanee Duvall of Dirty Laundry! It’s at minute 3:30.

Spritz <a href=Witch Hazel" src="http://images.soapqueen.com/HiddenColorBB/SpritzWitch.jpg" width="498" height="498" />

FOUR: Fill one half of each of the Stainless Steel Bath Bomb molds with bath bomb mix, pressing the mix as compact as possible. Make a crater or divot with your thumb, about 1/2″ deep with about 1/2″ on all sides in the center of the mold. Add 10-15 drops of Teal LaBomb into each divot. Fill the divot with more bath bomb mix, and create a slight mound in the center of the mold.

Color in divots

FIVE: Fill the other half of each of the Stainless Steel Bath Bomb molds all the way with bath bomb mix, also mounding the center slightly. Press two halves of the mold together, one colored half and one uncolored half, until there is no gap between between the two halves.

SIX: Waiting no longer than about 5 minutes, unmold the bath bombs by slowly twisting the mold halves and removing one half of the mold. If the second half of the mold is not quite ready to release yet, wait 5-10 minutes and then gently tap the mold from behind.

TIP: Take a peek at this bath bomb video for tips on unmolding the Stainless Steel Bath Bomb molds.

What's AM going to do with those tiny fizzies?

This idea also works for coloring smaller amounts of water. Cut the recipe in half, and use a small mold like the Petite Bendy Star Mold. Use the same technique of filling the mold half full, but use just one or two drops of colorant per cavity. One tiny bath bomb with two drops of colorant will nicely color about a cup and a half of water. Why did I test out such a small amount? Check back this weekend as I reveal some super exciting Bramble Bump news!

Coloring the Water

Click here for a printable PDF of this tutorial.

Monday, October 30, 2017

16 Ways To Deep Clean Your Bathroom - And Keep It Clean

Read article : 16 Ways To Deep Clean Your Bathroom - And Keep It Clean
Deep Clean Your Bathroom - And Keep It Clean!

If there were one room in the house you were to hate cleaning the most, it would be the bathroom. Somehow it just always seems a little dirty, yet it’s the room we clean ourselves up in. All the dirt just somehow manages to find a way to store up in the little nooks and crannies we often forget about, where it gets worse until you eventually do something about it.

With just a few household items and these helpful tips, you’ll be on your way to effectively deep cleaning your bathroom in no time.

1. Make shower grout sparkle again

With a baking soda and bleach concoction, a toothbrush, and some time to scrub, you’ll have immaculate shower grout in no time.

image

2. Easily get rid of stubborn mold in caulking

By soaking cotton balls in bleach, you can get rid of stubborn mold the easiest way possible. Simply set the cotton balls along the stained or moldy caulking, allow it to sit overnight, and presto!

image

3. Accomplish a clean jetted tub

You don’t need the help of dish detergent or harmful cleaners to clean the small crannies of tub jets. With just the help of a little baking soda, vinegar, and water, you can let it soak and easily scrub it with a toothbrush and towel.


4. Clean out the bath drain

Throwing some Draino in there is an easy, quick fix, but it doesn’t get down to the root of the problem. By cleaning out your drain the old-fashioned way, you can. All you’ll need is a few tools to disassemble the tub stopper, vinegar, and baking soda.


5. Create a spotless plastic shower curtain

Did you know a plastic shower curtain can be cleaned in the washing machine?! Just add one or two cups of white vinegar to the load and a couple of towels to avoid the shower curtain clustering together. Make sure to allow it to air dry as the plastic will melt in the dryer.


6. Say goodbye to deep stains in the sink

This will take a little more time, as it is a three-step process. But you don’t have to worry about scrubbing until your hands burn with the help of a product known as “Bar Keeper’s Friend.”


7. Fix a slow draining bathroom sink

If you have a U-shaped trap, you know just how easily grime, hair, and other crap builds up. To ensure your sink works better for a longer period of time, you can completely clean it out with the help of this tutorial.


8. Remove hard water buildup with ease

Forget about CLR or other cleaners that promise to remove hard water buildup. With a mixture of white vinegar, dish soap, and lemon juice, the grime will be gone in no time.


9. Keep the toilet clean all year without scrubbing

Try making your own DIY tablets to clean the toilet. All you need is citric acid from the canning aisle, hydrogen peroxide, baking soda, vinegar, and any essential oil you prefer. PopSugar

image

10. Abolish hard-to-clean toilet rings

Did you know Kool-Aid actually contains citric acid that can break down grime and even hard water deposits?! Just sprinkle a little Kool-Aid (lemonade flavor only) around a toilet bowl, let it sit for a couple hours, and stubborn toilet rings are gone in no time.


11. Eliminate grout stains in the floor

To make your home look brand new again, a little powdered oxygen bleach and water can go a long way. Scrub the mixture into the floor, and watch it transform.


12. Make your own floor cleaner

Not only do store bought floor cleaners smell like chemicals, they don’t always clean as well as we’d like them to. You can make your own that will leave your floors in squeaky clean condition by mixing equal parts vinegar, water, and rubbing alcohol with a few drops of liquid dish soap. It will cut through grease easily, and you can even personalize it by adding your favorite essential oils to aid in the process and make your house smell wonderful. Tea tree oil, for example, is great for disinfecting.


13. Don’t forget to clean the bathroom exhaust fan

As one of the most neglected things probably in your entire home, it needs a good cleaning from time to time too. Because you’re taking the cover off to clean the entire fan, make sure you turn off the breaker to make sure you don’t accidently shock yourself. You can find a full tutorial here.


14. Rejuvenate your bathroom storage cabinet

Whether you have a cabinet under your sink, or on the other side of the room, go through your bathroom storage area. Consolidate products, get rid of anything you don’t use or need, clean it out, and add a shelf liner. You can make it more productive and organized by adding baskets, hooks, or a lazy susan.

image

15. Disinfect your toilet plunger often

After uses, rinse off the plunger by flushing the toilet a few times. Then, mix dish soap with bleach directly in the toilet, swishing the plunger around in the mixture. Your toilet and plunger can all be cleaned at the same time.


16. Remember to clean the toilet brush too

If you think about it, the toilet brush is probably one of the dirtiest things in your bathroom. Combine hot water with two caps of bleach, let the brush soak for an hour, and then rinse it off with hot water.

 image

Friday, April 21, 2017

Burke Williams Day Spa in the Heart of San Francisco • We Blog The World

Read article : Burke Williams Day Spa in the Heart of San Francisco • We Blog The World

I love the concept of day spas, especially when you want an luxury escape for a few hours, where pampering is the order of the day. When we travel, we often review spas as part of our hotel stay, which is different than purposely making the time for yourself either on your home turf or when you are on the road and wish to indulge in a wellness experience. After all, isn’t your body worth it?

Meet Burke Williams,an urban day spa which has been around since 1984 and has quite a few locations in California. They drew most of their influence from some of the top European day spas. I had an opportunity to get a couple of treatments at their facility based in the heart of San Francisco, which is easily accessible for San Franciscans and travelers alike.

Above, is my favorite part of the spa – their massive hot tub. There’s nothing like a large hot tub and rarely do you find them, even at 5 star hotel spas. The lights were dimmed, which only added to the tranquility.

Nearby is a cold steam room which I saw a woman enter while I was in the hot tub and not leave for ten minutes. Brrr – I didn’t have the courage to try it although I’m certainly aware of the health benefits of cold water immersion and alternating from hot water to cold water dips. We reviewed Refuge in Carmel last summer that focuses on Thermal Cycle which is hot and cold water process mixed with relaxation in between. 

Exposure to cold water and ice baths, also known as “cryotherapy,” is a popular technique among amateur and professional athletes as well. At Burke Williams, they also have a very large hot steam room as well and unlike so many steam rooms I’ve tried over the years, it’s actually hot. On-site, they also offer a hot dry sauna, which I relaxed in for around 15 minutes before my treatments — you never want to go into a dry sauna after having a facial.

Spa Baths

They have two tubs in the spa set in a private room where you can take a therapeutic bath. There are many restorative benefits of hydrotherapy and worth doing whenever you have a chance. Here, traditional spa baths are available only in conjunction with another spa service.

Microsilk Baths are available for booking without another service, however, they recommend doing one in conjunction with a massage or facial.

Wetroom Treatments

I tried one of their Wetroom Treatments which are simply divine. While I’ve had body scrubs and wraps before, I’ve never had a salt scrub, which is so renewing for the skin. They talk about your natural glow unfolding from one of these treatments, which couldn’t be truer from how it feels and how your skin looks afterwards. Anthony described my arms as having a “glow” to them and “more radiant.”  

Purposefully designed shower heads envelop your body in cascading streams of water, after which you are scrubbed down with sea salt to remove dead surface skin cells — they refer to it as the Salt Glo, although if you have sensitive skin, you can opt for the sugar exfoliation process instead.

After the salt is removed, they wash you down (front and back) and then apply oil to leave your body feeling ever so soft. I absolutely loved this experience and would recommend adding to another service you’re doing that day. Obviously if you get a facial, do the wetroom treatment first. 

Sea salt photo credit: Seasalt.com.

Facials

Of course they offer a myriad of massage treatments, however I opted for the Anti-Aging Facial. If you’re over 40, I’d strongly encourage it.

They use professional H2V products which helps to regenerate and firm skin cells. Botanically derived stem cells and H2V R3 Transform with Matrixyl peptides repair damage, increase your skin’s resiliency, and boost collagen production. I definitely noticed a different to my face’s texture and brilliance after the treatment.

The Anti-Aging Facial

I absolutely loved this very targeted and customized facial designed to repair damage caused by extrinsic aging. They cleanse your face before applying a Vitamin C peel, their first major step of the treatment.

The 30% Vitamin C infuses the skin with protective anti-oxidants that neutralize free-radical damage and help reverse DNA damage. Key Ingredients for wellness geeks, include Magnesium Ascorbyl Phosphate, Ascorbic Acid, Bromelain and Papain. This peel is also added to your hands and covered with warm mitts.

Then, they spray the first enhancement: Age-Defy, which is naturally fragranced with apricot milk and is formulated with potent peptides to repair and actively firm the skin to help reduce fine lines and wrinkles. There’s Chlorella in this spray, which is a micro green algae anti-oxidant rich in protiens and amino acids, Antarticine; a peptide with ability to regenerate and protect skin by retaining moisture and water, heal wounds, increase collagen and elastin production, as well as boost hydration.

After the spray, they move into the 22 point acupressure massage, which is their signature and something they do with all facials. The second peel and my favorite one comes next — the Pro Beyond Pumpkin and Enzyme Peel.

This peel is by one of the skincare lines I like a lot – Eminence. Note: it tingles quite a bit when it goes on (a rarity for me),something to consider if you have very sensitive skin.

The peel helps to accelerate the exfoliation process by removing dead skin cells, reducing the appearance of pigmentation, fine lines and sun damage. The natural enzyme content of yam and pumpkin leave skin appearing firm and radiant.

Bromelain breaks down connecting structure that holds surface skin cells together and papain breaks down surface dead skin cells for easier removal. It also includes Niacin &Vitamin B3 which when applied topically, acts as a vasodilator to increase circulation, bringing oxygen and nutrients to the skin’s surface.

She then did a Defy mask, which is a potent Resveratrol antioxidant blend that helps to protect and rich skin nourishing fatty acids repair and nourish the skin. Key Ingredients include Monoi oil, Evening Primrose oil, Dragons blood extract, Resveratrol, a powerful antioxidant typically associated with red wine. This helps to protect and nurture cells, improve cellular function, increase collagen production, and improve elasticity while also reducing inflammation.

Their second spray enhancement is a stem cell one which is naturally fragranced with Olive and Coriander and is formulated with skin rejuvenating Mexican Bamboo and Japanese Knotwood to signal skin cells and put them in repair mode. These plant based stem cells stimulate our own skin cells’ natural repair process to help eliminate fine lines and wrinkles.

Believe it or not, there’s more! Unlike so many spas that do not give you the full time (especially your full 60 or 75 minutes “hands-on), they are present every step of the way.

After the stem cell spray, they apply a Cranberry AHA Mask,  which is a special formulation designed to enhance the capabilities of the fruit acids combined with moisturizers to leave the skin looking fresher and more supple. Ceramides create a strong water binding capacity leaving the skin hydrated with a visibly smoother appearance. Key Ingredients include Cranberry kaolin, Citric Acid, Glycolic Acid, Lactic acid, Malic acid, Shea Butter, and Wheat ceramides. BRAVO!

They also massage your arms, hands and feet during the treatment before applying the final spray enhancement: Illuminating Enhancement. This one is naturally fragranced with Sicilian Orange and Honey and contains a time released form of Vitamin C that can remain active in the skin for up to a week. This active form of Vitamin C helps to inhibit melanin production while the citric activator spray instantly brighten the complexion.

Before you leave, they also apply an Eye-tox serum to reduce iron deposits under eye and improve hydration as well as a Youth Cell Activator, a Quench Moisturizer and Protect (their SPF).

Like all top notch facials, they did extractions after plenty of steam in the middle of the treatment as well.

While they offer some of the traditional custom facials you’d find at most luxury spas, including teen and gentleman’s facials, I wanted to also mention another unique one I’d love to try at a future time. While the Four Layer Resurfacing Facial is shorter than the anti-aging one, the process includes an intense 4-layer progressive peel to leave your skin hydrated and glowing. Papaya enzymes combine with beneficial Alpha Hydroxy Acids to erase fine lines and minimize imperfections. They also do a detox masque infused with antioxidants.

The Ambiance

Join me on a tour of the spa — you’ll absolutely love the ambiance and their wonderful attention to detail throughout.

williams-burkes-day-spa


Nail Pampering

You can also get your nails done in style. What’s nice is that they have over-sized chairs designed to hug your body. They offer hot cups of tea, a lavender-scented blanket for your legs, and an oatmeal pillow to support your neck.  

day-spa-san-francisco

They also offer other unique services such as body polishes, waxing and advanced eye lifts as well as “sprays” as an add-on to facials, such as stem cell and age defy sprays, which as noted above is included in the Anti-Aging facial.

Below, the vanity room.

burke-williams-spa

They also have a shop on-site where you can purchase water bottles, skincare products, leather bags, gifts and more.

shopping stuffed toys

Below is a view from one of the windows — it’s located on the top floor of a mall, the same level as a movie theatre and nothing else. Translation: it’s very secluded and enormous. Two thumbs up!! We would definitely return.

sf-mall

DETAILS:

Burke Williams Day Spa

845 Market Street #510

San Francisco, CA 94103

https://burkewilliamsspa.com

(415) 694-7980

_________________

Note: I was hosted by the spa but all opinions expressed are entirely my own.

Founder

Renee Blodgett is the founder of We Blog the World. The site combines the magic of an online culture and travel magazine with a global blog network and has contributors from every continent in the world. Having lived in 10 countries and explored nearly 80, she is an avid traveler, and a lover, observer and participant in cultural diversity.

She is also the CEO and founder of Magic Sauce Media, a new media services consultancy focused on viral marketing, social media, branding, events and PR. For over 20 years, she has helped companies from 12 countries get traction in the market. Known for her global and organic approach to product and corporate launches, Renee practices what she pitches and as an active user of social media, she helps clients navigate digital waters from around the world. Renee has been blogging for over 16 years and regularly writes on her personal blog Down the Avenue, Huffington Post, BlogHer, We Blog the World and other sites. She was ranked #12 Social Media Influencer by Forbes Magazine and is listed as a new media influencer and game changer on various sites and books on the new media revolution. In 2013, she was listed as the 6th most influential woman in social media by Forbes Magazine on a Top 20 List.

Her passion for art, storytelling and photography led to the launch of Magic Sauce Photography, which is a visual extension of her writing, the result of which has led to producing six photo books: Galapagos Islands, London, South Africa, Rome, Urbanization and Ecuador.

Renee is also the co-founder of Traveling Geeks, an initiative that brings entrepreneurs, thought leaders, bloggers, creators, curators and influencers to other countries to share and learn from peers, governments, corporations, and the general public in order to educate, share, evaluate, and promote innovative technologies.