Showing posts sorted by relevance for query diy projects for this room. Sort by date Show all posts

Monday, March 5, 2018

A Small 1960s Bathroom Is Completely Remodeled

Read article : A Small 1960s Bathroom Is Completely Remodeled

A few days ago, I got an e-mail from my mom that said, “Just wondering why you don’t have our bathroom under Rooms I Designed.” Good question! It’s one of my favorite projects I’ve ever done, so I definitely needed to get that post linked up under the “Rooms I Designed” tab.

So I searched for the post. And I searched again. And I searched some more.

I couldn’t find a post where I ever showed you my mom’s bathroom remodel! Could it really be that I never showed you? I could have sworn that I did, but for some reason that post has disappeared. So, I’m going to show you again.  If you’ve already seen this, please bear with me.  But I have a feeling that this will be new to many of you since this is a project that was completed just over four years ago.

The house, which is the house I grew up in, is a ranch style house that was built in the 60s. As I’m sure you know, bathrooms weren’t given much consideration in the 60s. They were generally small and utilitarian, and a far cry from the luxurious spa-type retreats that we expect of bathrooms today. Over the years, my mom had tried to update the room. At some point in the 80s or early 90s, the walls were wallpapered and the vanity got a coat of paint. But it was still just a small 1960s bathroom.


See what I mean?  Oh sure, the wallpaper could have been ripped down, the walls given a coat of paint, and the vanity replaced with something more updated.  But it still would have been a tiny bathroom…definitely not “master bathroom” material.

And then there was the matter of the shower.  This picture isn’t an optical illusion.  The door really was that narrow, and the shower itself was like a tiny, dark closet.


And of course, the room had the standard plate glass builders mirror and the standard 60s bathroom lighting.


The good news was that on the other side of the bathroom was a guest bedroom (one of five bedrooms in the house), so there was plenty of room for expansion.


So I got to work coming up with a plan.  The main priorities were a double vanity and a spacious shower.  My mom isn’t really a “bath” type of person, so she specifically requested that a bathtub not be included.  Here’s what I came up with…


Quite a difference, right?  You can mouse over the photo just below to see a quick view of the before and after floor plan.


I also did some drawings to work out all of the details. I knew I wanted the vanities to be separated by a center cabinet, and I also wanted mirrors with sconces installed on top of the mirrors. There were lots of other details, such as furniture feet, a clear glass tile accent, and oil-rubbed bronze faucets.


Opposite the vanity, on the wall with the door, I wanted to place a custom cabinet with two pull out sections to be used as laundry hampers.


In all, it took about three months from start to finish.  A load-bearing wall had to be dealt with, the slab foundation had to be broken up with a jackhammer to make a route for the new plumbing. It was a complete mess, but I think the results were well worth the inconvenience.

The vanity area is the star of the room, with custom made cabinetry, high rim sinks, marble countertops, glass door and drawer pulls, and pretty sconces.


The walls were given a Venetian plaster-type treatment called Lusterstone, which has a gorgeous sheen to it. The new shower is massive compared to what was in there before. And probably my favorite design detail in the whole bathroom is the four inches of clear glass tile that accents the top of the wainscoting.


The toilet is no longer front and center in the bathroom. It now has its own little area to the left of the shower, hidden a bit by the custom laundry hamper cabinet.


Thank you for letting me share this little stroll down memory lane! This was absolutely one of my favorite projects I’ve done…if not THE most favorite. The bathroom needed to be a traditional style bathroom to fit my mom’s taste (and the rest of the house), so as long as I stayed “traditional”, I pretty much had creative control over every design decision, and that’s every designer’s dream! And I have to admit, it was really fun creating a “dream room” for someone with completely different taste than my own. It allowed me to flex my design muscles a bit.

Here’s one more look at the before and after. Move your cursor over the picture to see a quick view comparison of the bathroom before and after the remodel.

DIY Projects For This Room

Okay, so there was only one DIY project for this room. What? You didn’t think I was going to teach you how to break up a foundation with a jackhammer or move a load-bearing wall, did you?!

:)

Monday, February 5, 2018

Home Tour: Our Bonus Room

Read article : Home Tour: Our Bonus Room

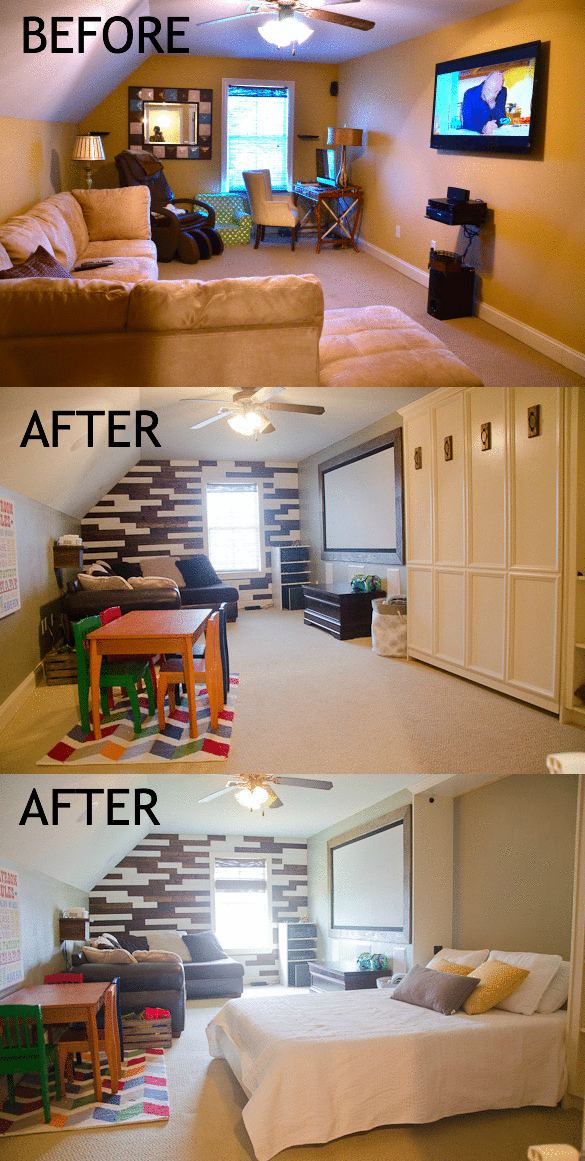
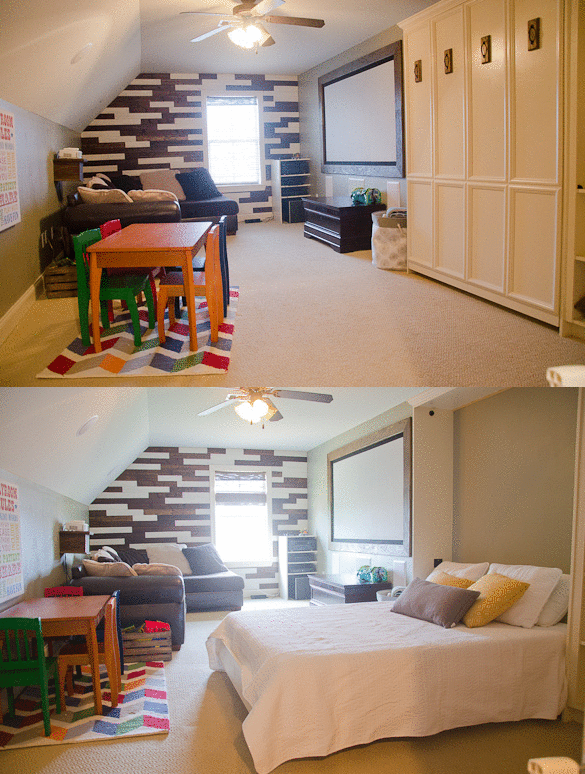
A homemade built-in murphy bed, custom made movie screen, play table with toys and a full bathroom allows our bonus room for three uses:  Guest room, theater room and play room all in one!

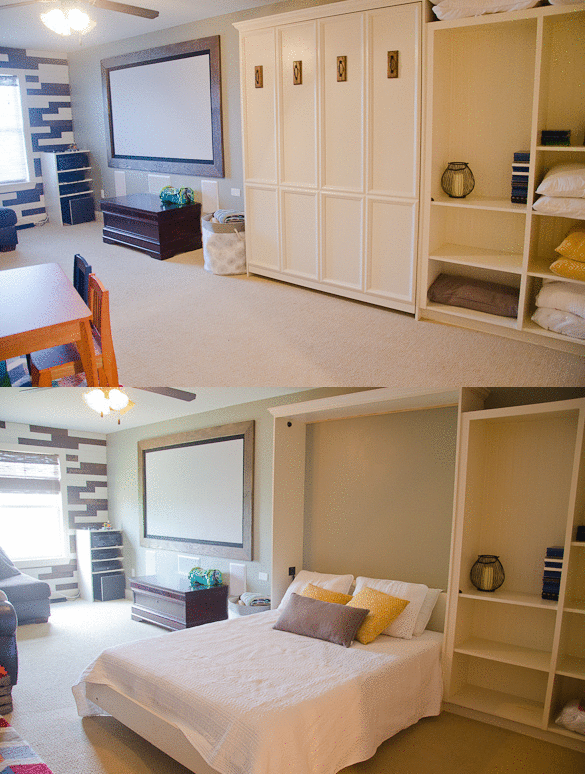
Home Tour: We use our bonus room for three uses in one! A DIY built-in murphy beds and shelves, along with a full bathroom turns this into a guest room, while it's also a theater room and a playroom!(The photos in this post are animated .gif photos, so they should switch back and forth continuously.)

Once in a while I like to give you a sneak peek into our home.  We bought it almost two years ago (in January) and have made many changes to make it just right for us.  We have a ways to go, but it has already come a long way into fitting our lifestyle.

Our house is three bedrooms with an upstairs bonus room that includes a full bath.  Since the boys take up two of the bedrooms and we, of course, have the master bedroom, we wanted to create a space that is a comfortable guest room for friends and family who visit.  The bonus room is perfect for our vision since it has a full bathroom, but we also want to use it for a playroom and theater room.

Home Tour: We use our bonus room for three uses in one! A DIY built-in murphy beds and shelves, along with a full bathroom turns this into a guest room, while it's also a theater room and a playroom!Do you know what a murphy bed is?  It’s a wall bed that pulls down when you need to sleep and folds up to store in the wall when you need the space in the room.  A murphy bed was the answer for us, but they can cost anywhere from $1,500 to $4,000!  Not exactly in our budget.  So Ben decided he could save us money and build one for around $300.

Ben may be a professor of Biblical studies and a very academic man, but he is also extremely handy with his hands.  In the last four years or so, he has proven to be quite the resourceful guy when it comes to house projects.  If there’s a problem or challenge, he figures it out.  I have to say, I’ve been totally impressed.

He’s built up quite the workshop in our garage, so when it came time to build a murphy bed, he was ready.  He researched plans and bought hardware then took a few weeks to build the frame and built-in shelving. We bought the mattress from Sam’s Club (a comfy foam one) and simple quilt and pillows from Home Goods.

Home Tour: We use our bonus room for three uses in one! A DIY built-in murphy beds and shelves, along with a full bathroom turns this into a guest room, while it's also a theater room and a playroom!

We’ve had this bed now for almost a year.  It stays folded up into the wall until we have overnight guests.  For every day use, it’s a playroom for the kids with a KidKraft play table and chairs I loooove from Amazon, and a theater screen that plays movies and video games.  We are waiting to travel to an IKEA store to buy toy storage baskets, then Ben will build shelves to hold those, as well.  (The cedar chest pictured under the movie screen is no longer there. We sold it.)

The movie screen is painted on the wall with special theater screen paint.  Ben built the frame around it with leftover wood that was in our garage when we bought the house!

We absolutely love our useful space in the bonus room.  This is the only room upstairs, and I’m so grateful it has a full bathroom, too, so that guests can have their private shower and toilet.  Every Wednesday, my friend who has seven kids (yes, SEVEN!) comes over after our Mom2Mom study at church, and her teenaged daughter watches all the kids in the bonus room while they play and my friend and I go out for girl time.  This space is perfect for them!  The kids watch a movie, or play video games and some play with the building toys or color.  Fun for all!

Do you have a room in your house that has multiple uses?  How have you made the most of YOUR space?

Tuesday, December 5, 2017

Cheap DIY Projects for the Bathroom - Joe Knows Blog

Read article : Cheap DIY Projects for the Bathroom - Joe Knows Blog

Joe KnowsDo you dream of having a luxurious spa-like bathroom but lack the funds for a complete remodel? Luckily for you, there are a few easy, cheap, and quick ways to transform your current bathroom into the luscious oasis of your dreams. Just pick your color scheme, grab a few simple tools, and head to the bathroom for the most inexpensive-yet-comprehensive bathroom DIY ever. 

Replace the Old Mirror 

mirror

Replacing the old mirror is an easy and cheap way to offer the whole bathroom a new look. Choose a mirror that looks nice with your new color pattern and decide whether you'd like an ornate one or a simplistic one. Ornate mirrors work best in traditional or olden-style rooms, while modern looks call for a simple design with a modest or absent frame. Measure the area -Advertisement-

you have to hang the mirror before you buy to assure it will fit and look nice. 

Paint an Accent Wall 

Even the smallest bathrooms can sport a trendy accent wall to add visual interest. Choose the wall you would like to display prominently, such as the wall behind the vanity. Paint this wall in a contrasting color to the rest of the bathroom. For instance, try a bright yellow wall with a green bathroom or a purple wall with a white bathroom. Pick colors that enhance your mood or help you relax, whichever emotion you'd like to evoke during your bath or shower time. Morning showers are more invigorating amidst bright orange or yellow walls, while evening baths are more relaxing cuddled in blue or green walls. 

Paint the Vinyl Flooring 

It's not necessary to replace the vinyl flooring in order to get a whole new look for the bathroom. Use a quality primer over the existing vinyl flooring, paint it with the color(s) you choose, and seal the paint with several coats of polyurethane. You can even embellish the floor with designs such as tile, stone, stencil or a checkered pattern.

If you're using bold designs on the floor, it's best to keep the walls simple, so the room doesn't get too busy. However, if you select a simple pattern, you can use it on the floor as well as the walls for a unique look. Try creating an ivy wonderland or a tropical jungle in your bathroom, if you dare. 

Make Your Own Custom Shower Curtain 

Custom shower curtains cost hundreds of dollars, but you can get the same thing by making one yourself. Measure the shower curtain rod and double that measurement. Then add two inches per side (left to right) and five inches top to bottom. This gives you the amount of fabric you need to buy.

Hem the fabric by 1 inch on the left and right sides, and along the bottom. Fold down 2 inches along the top and use it to make a loop to thread the shower curtain rod through. VoilĂ ! You have a custom-made shower curtain for just a few bucks. 

Replace Old Hardware 

Replacing the hinges, knobs, and handles on the vanity (not to mention the towel racks) are some more quick bathroom makeovers to consider. You can then match the new hardware to the new look or theme of your bathroom. When shopping for towel racks, consider one that will accommodate oversized bath towels like the ones used in spas.

Then you can truly create a spa-like experience in your bathroom. Remove the old hardware before painting and put the new hardware in after painting, so you don't damage the new paint with the installation. 

Create Your Own Framed Prints for the Walls 

vaseshelf

Beautiful framed prints are also costly, but you can make your own with cheap frames and pictures from calendars, old magazines, or books. Look for frames and magazines at the thrift store or garage sales. Cheap frames are also available at the dollar store. If you like, create a set of framed prints for each season of the year so you can change them up frequently and not get tired of them as quickly. 

Now there is only one thing left to do: fill the tub, light some candles, add your favorite bubble bath, and enjoy your new creation! 

Monday, May 15, 2017

Making Bifold Doors Into A Screen To Hide The Water Heater

Read article : Making Bifold Doors Into A Screen To Hide The Water Heater

We know this was supposed to be the final chapter when it comes to our big basement makeover, but because we tackled two different DIY projects (making a screen to block off our fugly water heater and frosting the windows for 100% privacy that still lets in the light) we realized it would be crazy to try to squeeze all those step by step photos and instructions into one post… so we’re breaking it down to two. Just look at it as twice the fun. So without further ado, here’s how we made a custom screen to hide our eye-sore of a water heater with $18 worth of secondhand bi-fold doors and a quart of punchy bright green paint (stay tuned for the window-frosting tutorial coming soon).

Before we get into all the nitty gritty details, we should remind you what the aforementioned water heater looks like. Remember this guy?

Of course the room has come a long way from that point (we added a rug, brought in a bike rack, upgraded the the lighting situation, papered the insides of the armoires, hung some art, brought in some storage, and organized our paint). But the frighteningly gross water heater remained… taunting us with its hideousness. We debated springing for a tankless variety, but because we’re big fans of working with what you have (and didn’t want to cart off our fully functional water heater to a landfill) we opted to create a screen that will block off the water heater along with the ugly trap door in the wall behind it (which leads to the crawl space under the house). And when this water heater finally breathes it’s last breath we’ll definitely consider upgrading to a tankless one (and we’ll still be able to use the screen to hide the unsightly trap door in the wall behind it).

But how did we end up with a giant screen without blowing our meager basement budget (many store-bought ones are in the $100-300 range and a bunch of those weren’t even tall enough to work for our space)? We just brainstormed materials that we could use to whip one up on the cheap. Here’s how it all went down.

Step 1: Locate three adequately tall bi-fold doors that are sturdy enough to stand on their own and will easily obscure a 6′ water heater. After debating the use of everything from all-weather curtain panels hung from the ceiling to bookcases on wheels (which could be pushed aside for water heater access) we finally decided a screen was the perfect solution for our space. And what’s an easier way to make a screen than hinging three bi-fold doors together and calling it a day? At first we thought about cutting a full sized door in half but bi-folds are like pre-cut doors, so they’re ready to go. Even better. Plus they’re easy to move, relatively simple to find, and definitely would add some playful color to the room if we opted to paint them a bold hue.

So a plan was born. For just $18 we snagged these three bi-fold doors at our local Habitat For Humanity ReStore (they were having a 40% off door sale when we went in- uh, awesome!). Plus they already came with enough hinges to join them all together and create one large screen. Jackpot.

When we got to the checkout the lady was like “um, you’re missing a door” (since there are supposed to be four) but we explained that this wonky set of three bi-folds was actually perfect for us since we were going to make a screen by joining them together and didn’t need a fourth. She seemed excited for us until we mentioned that we were going to attempt to shove them into our good ol’ Nissan Maxima. Then she just shook her head and muttered good luck. Of course we took it as a personal challenge…

That’s me flashing my victory smile. A lot of people write to us and ask how we take on so many projects with such a small car. We’re just like anyone else with a modestly sized ride… we squeeze things in when we can and call John’s sister and beg to borrow her Ford Explorer when we can’t. In a pinch we’ve even been known to rent a pick-up truck from Home Depot for a few hours, just to cart something around. It’s all about, in the words of the ever-fabulous Tim Gunn, making it work.

Tip: when you recline the front seat and place large objects in the car as we did above, you can actually fasten the passenger side seat belt across them, which can help keep things safely in place so they don’t slide around and encroach on the person in the back seat- especially when she has an ever-expanding belly full of baby to protect).

Step 2: Place bi-fold doors on cardboard (for painting) and hinge them together in the room where your screen will be living (to avoid the annoyance of building it in one place and then moving it halfway across the house afterwards). When we finally got our precious cargo home we placed the doors on a large piece of paint-ready cardboard, hinged them together with the free hinges that we inherited with the doors, and stepped back to take a look. By golly this just might work. We also did a bit of puttying/sanding to fill in any recessed parts of the doors and smooth out anything that wasn’t exactly ready for paint (but for $18 pre-used doors, they weren’t bad at all).

Step 3: Paint your newly made screen. That’s it. You’re done. I guess we should elaborate a bit. We used one quart of semi-gloss latex paint by Behr, which we had color matched to Benjamin Moore’s Bunker Hill Green 566. Two coats later John was finished. I love this whole being pregnant thing. No painting for me (of course for the impending bathroom and nursery projects we’ll be using no-VOC paint so I’ll be back on painting duty, but for the separate entry basement we figured low-VOC Behr paint worked for us- and at just $14 for the quart it put our total cost for the entire screen project at… (drumroll please)… $32!

We love the happy burst of emerald green that it brings to the space (it complements the paper behind the armoire doors, the large green tupperware bins we brought in, the storage boxes in our Ikea workstation, and even the subtle green stripes in the rug). And the function is great. It definitely hides the ugly stuff but still makes it easily accessible. Best of all, there’s still more than enough room- over 35″-  to walk to the other side of the basement, roll out our bikes, etc.

So that’s how you give an old set of bi-fold doors a whole new life on the cheap. We’ll be back with a window frosting tutorial followed by an entire basement project wrap-up (complete with photos from start to finish and even a budget breakdown for your viewing pleasure). And while we’re on the subject of repurposing bi-fold doors, have you guys reused doors or windows in any interesting ways? We’d love to hear how you’re giving old household staples a second life with a bit of DIY determination so do tell.

Psst- Want to look back on our big basement makeover from start to almost-finished? Here’s the first post, the second post, the third post, the forth post, the fifth post, the sixth post, and the seventh post. Ah memories.

Friday, August 11, 2017

Simple Tips for a Successful Bathroom Renovation

Read article : Simple Tips for a Successful Bathroom Renovation

From design inspiration to choosing the right materials and fixtures, we’ve got all the information you need to complete the perfect bathroom renovation project.

bathroom renovationRegardless of whether you live in an apartment or a house, the bathroom is one of the most important rooms in the home.

A practical and modern bathroom dramatically enhances the appeal of any home, so if you’re planning a bathroom renovation it’s important that you get the details right. So if you’re looking for a host of handy tips and tricks to help you turn your tired and impractical bathroom into a relaxing and luxurious retreat, you’ve come to the right place.

Getting started

Before you start thinking about design ideas, colours, and choosing shower heads and tiles, you need to sit down and work out exactly what you want to achieve with your bathroom renovation.

If you’re renovating an ensuite to create a peaceful space where you can unwind, warm tones and a modern free-standing bathtub might be high on your wish list. If you need a bathroom for your growing family, then durable materials and plenty of storage will be essential inclusions.

So take the time to develop a clear idea of what the bathroom will be used for and any features on your must-have list. Once that’s done you can start planning the finer details.

Design ideas for different projects

There are several features and factors you’ll need to consider when planning your bathroom renovation, including:

Layout

The right layout is essential to create a functional and comfortable space, so consider ambience, flow and practicality when deciding on your bathroom layout. Speak to an architect or a builder about the functionality and layout of the space. There’s a seemingly endless array of floorplan options available, though you may be constrained by the location of existing plumbing connections. Consider the features you want in your bathroom, for example maximising natural light or ensuring an easy flow from the bedroom through to your ensuite shower, when deciding on the right layout.bathroom

Shower

The shower is one of the features of your bathroom that will get the most use. From choosing a screen for privacy to deciding on a shower head to sourcing the right water flow, there’s plenty to think about when selecting your shower. You can choose a fixed or hand-held shower head, massage showers, waterfall showers and high- and low-pressure jets. In terms of shower screens, do you want a framed, frameless or semi-frameless screen, or perhaps no screen at all? Chat to an interior designer and shop around at bathroom specialist stores to learn more about the different options available on the market and how they fit into your plans.

Bath

A contemporary bathtub is a must — and there’s a seemingly limitless range of beautiful designs to choose from. There are freestanding tubs that are statement pieces in their own right, recessed baths that use minimal space, easy-access baths for the elderly or those with a disability, as well as full jacuzzi setups for a touch of luxury. However, if you live in a second-storey house, be mindful of having a bath on the second floor as the weight of a full bathtub may put pressure on the upper floor. The amount of space available is also going to have a big influence on the bath you select.

Vanity and basin

Every bathroom needs a sink, but if you and your partner are usually getting ready at the same time, could the space benefit from his and hers sinks? Ample storage space is a must for any vanity unit, while looks should never be neglected in order to ensure that the vanity you select matches the rest of the bathroom. The right vanity will combine good looks and handy storage options with plenty of usable bench space. From wall-mounted vanities to cabinet vanities and even minimalist vanities with a simple shelf system, there’s a huge range of choices available.

Fixtures and fittings

From taps and towel rails to frameless shower screens, the right fixtures and fittings are practical inclusions that complement the design of the rest of the bathroom. Taps come in an extensive selection of materials, including chrome, brass, gold and stainless steel, and there’s no limit to the styles available depending on the space available and the look you want to achieve. The sink, shower, bathtub and toilet should all serve a practical purpose but should also seamlessly integrate with their surrounds and complement one another perfectly.

Tiles

Tiles play a hugely important role in determining the look and ambience of your bathroom. From floor tiles to wall tiles and even special feature borders, choosing the right tiles is crucial to the success of your bathroom renovation. It can also be a daunting process, You’ll need to consider the ambience you want to create in your bathroom, your colour scheme, the size of tiles you want and how they will be laid out. layout bathroomFor example, do you want to use contrasting tiles to add a feeling of space to a small bathroom, or do you want tiles with a textured surface to create a unique and interesting feature? Tiles come in ceramic, glass, natural stone, porcelain and clay, so research the looks and benefits of each option before making your choice.

Storage space

A bathroom with insufficient storage space is impractical and cluttered, so make sure you’ve got ample room for all the toiletries, towels and other odds and ends you need to store in your bathroom. Vanity cabinets, shelves and drawers are the obvious places to keep your items so they don’t clutter up the rest of your bathroom, but there’s plenty more you can do to maximise storage space. There’s a huge range of clever internal hardware options available to cleverly use the available space, while a recessed niche built into the shower cavity is great for storing shampoos, soaps and the like. Even installing a simple ledge-style shelf can help keep the vanity top free of mess.

Lighting

Last but certainly not least, don’t overlook the importance of lighting in creating a welcoming and refreshing space. The bathroom is one area of the house where it’s important to be able to see clearly, but where you can also relax in comfort if that’s what you feel like doing. Whether you’re looking for soft LED down lighting, a feature pendant that stands out or simply the warmth of natural illumination, include lighting considerations in your initial renovation plan. Light fixtures will obviously need to be moisture-proof and capable of standing up to life in your bathroom, while you may also want to consider heat lamps if you live in a cold area. One other thing to remember when choosing lighting is energy usage - the right choices can make a noticeable difference to your power bill.

Bathroom design ideas

Back to top

Renovating a small bathroom

When you’re renovating a bathroom, space is the final frontier. In a larger space, having more room to work with often means that you have more flexibility to add privacy and create different zones for each bathroom task.

When you’re renovating a bathroom, space is the final frontier. In a larger space, having more room to work with often means that you have more flexibility to add privacy and create different zones for each bathroom task.

Unfortunately, most bathroom renovators only have a limited area to work with, so they need to take advantage of clever ideas and design solutions that help them make the most of the available space. For example, a normal hinged door can eat up much more space than you have to spare, so a sliding door can offer a better solution. Other great space-saving and space-creating ideas include wall-mounted toilets, neutral colour palettes with occasional bursts of colour, and including handy built-in storage nooks and crannies wherever possible.Small bathroom

Renovating a small bathroom means you’ll also have to be more ruthless when deciding what belongs on your bathroom wish list. For example, while soaking in a hot bath might sound appealing, are you really willing to sacrifice such a large amount of floor space to include a tub?

Do it yourself or get in the experts?

If you’re keen to save as much money as possible on your bathroom renovation, you may want to consider a DIY project. While this lets you take control of your bathroom renovation, it’s always wise to think about your options before going the DIY route as bathroom renovations can become complicated very quickly.

Some jobs are fairly simple for the DIY renovator, such as stripping out your old bathroom and prepping the space for your new bathroom. Other jobs, for example waterproofing and tiling, you might also be able to do yourself if you have the right experience under your belt.

Plumbing and electrical work will need to be done by the professionals, however. A good plumber can help you through your renovation from start to finish, so find a plumber you trust before you start knocking down walls or stripping out tiles.

What can you DIY and what's best left to experts?

Where to buy bathroom renovation supplies

From tiles to toilets, there are several options when you need to stock up on the right supplies for your bathroom renovation. A good place to start your search is a large hardware store like Bunnings, Masters Home Improvement or Home Timber and Hardware. This will give you a good idea of some of the fixtures and fittings available to include in your bathroom.

It’s also a good idea to browse specialist renovation and bathroom supply stores — research online to find one near you, and where you find one bathroom store you’ll often find a few more. There’s a huge range of products to choose from for every aspect of your renovation, from the smallest of tiles to the largest of freestanding baths, so take the time to consider all the options available before making your decisions.

Back to top

Top tips to help you save money on your bathroom renovation

  • Do your research. Jump online and visit local bathroom renovation specialists to see what kind of materials and fixtures are on offer. Speak to architects, building experts and bathroom renovation specialists to ensure that your renovation plan and budget is feasible. Source several quotes from different suppliers before deciding which company to go with.Shopping for a shower head
  • Plan ahead. Don’t start your renovation unless you know exactly what you want to achieve. Getting halfway through your project and then deciding that you don’t like the layout, you want different tiles or you’d like to make room for a bigger bath can be an expensive and stressful mistake. Work out exactly what you want before you reach for a hammer.
  • Make a budget and stick to it. Bathroom renovations have something of a reputation for unforeseen costs and budget blow-outs. Around $15,000 to $20,000 is a realistic estimate for many bathroom projects, see our guide on the costs of bathroom renovations, but sit down and work out the material and labour costs for your project. Once you’re fully aware of how much your project should cost and how much you can afford, it’s time to start work.
  • Know what you can do — and what you can’t. While DIY renovations are great for saving money, it’s important that you don’t get ahead of yourself when choosing what jobs to take on and what to leave to the professionals. If you’re at all unsure about your ability to complete a particular task, you’re much better off getting the experts in to avoid problems occurring later down the track.
  • Take your time. While it can be frustrating having your bathroom out of action for a couple of weeks or more, when you’re doing it yourself it’s important not to rush things. Measure everything twice and be certain you’re doing the right thing before you cut, lay or install anything.
  • Plumbing costs. You might want to completely rearrange the features and layout of your bathroom, but take note that plumbing costs can sometimes make this prohibitively expensive. Moving plumbing pipes and outlets for sinks, toilets, showers and baths can cost thousands of dollars, so you may be better off leaving some fixtures where they are to lower your costs.
Back to top

Thursday, March 29, 2018

Bathroom Remodel Ideas

Read article : Bathroom Remodel Ideas

More Bathroom Remodeling Ideas

Small Bathroom Makeover

Make a small bath stunning with an easy spring makeover that’s all about color, shine, and surfaces. Update a single element or transform the entire bath.

Learn More

Family Bath

Create a shared space that works for the entire family with affordable updates that add storage, function, and style.

Learn More