Showing posts sorted by relevance for query tiled for a big feel. Sort by date Show all posts

Saturday, April 15, 2017

A Small Bathroom That Feels Big

Read article : A Small Bathroom That Feels Big

The small bath problem and proposed solutions
A Small Bathroom That Feels Big

Lead photo

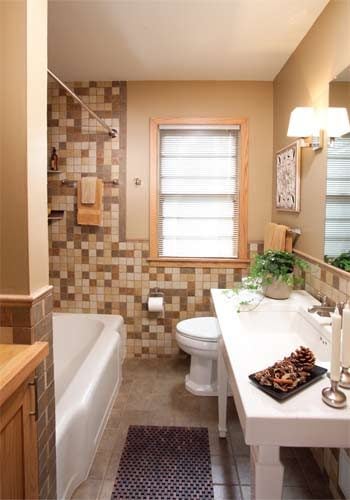
Bathroom after remodeling

The kitchen may be the heart of the home, but over the past 20 years, the bathroom has morphed into the home's soul—a savored refuge from our busy world. Once little more than utilitarian space, the bath has expanded, both in size and in role, to serve as a pleasing retreat.

How to create such a retreat in an ordinary, compact 5 x 9-ft. bathroom could easily leave the owner feeling like a, well, lost soul. Remodeling a bath built to accommodate a standard 5-ft. tub, a toilet and a vanity without adding footage can be a challenge.

Just ask Pam Peterson, who wanted to mine more space from her small 1954 bathroom. She turned to designer Matthew Rain of Abode Drafting, who, along with the remodelers at Mike Otto Construction, “grew” her limited space without changing the room's footprint and added modern elegance to a dated room.

Their solution relied on several fixes: reconfiguring the linen closet; brightening up the fixtures; updating the wall, tile and floor surfaces; and radically changing the vanity.

The Bathroom, Before and After

An oversized vanity and solid-color harvest gold tile visually shrank this already small bathroom.

With the installation of bright fixtures and right-sized pieces, this bathroom gains a big-time feel.
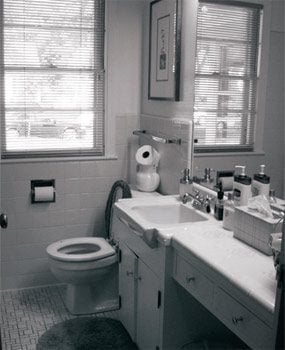
Black and white beforeBathroom before remodeling

Fewer doors, more space

A Small Bathroom That Feels Big

More storage, fewer swinging doors

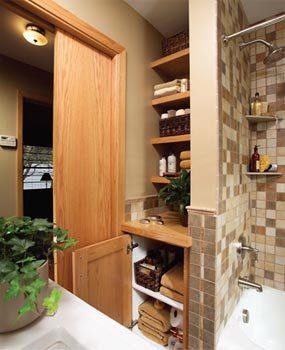
This corner is now functional storage with an open look and feel. Eliminating most of the cabinet doors and adding a pocket door created a greater sense of space.

Rain cleaned up the structural clutter by rethinking the original linen closet. It had four cabinet doors in the bathroom and another access door from the hallway. “With all those cabinet doors and the big bathroom door, I felt I was always dodging and weaving anytime I needed to get something,” says Peterson of the old layout. “Some door was always in the way.”

The new design turned a bad closet into a great one by shedding all but one of the bathroom cabinet doors and removing the hallway cabinetry entirely. “The new wall space in the hall allowed us to turn the old bathroom door into a pocket door. Eliminating a door 'in-swing' immediately gives a room a bigger feel,” says Rain.

The new bathroom storage area has five custom open shelves made of red oak (to match the room's new light-toned trim), perfect for stacks of towels (photo). “By leaving these shelves open, it also adds to the room's feeling of spaciousness,” says Rain, “and because you can quickly grab a towel, it's functional as well.”

Tiled for a big feel

A Small Bathroom That Feels Big

Mixed tile colors

The rough edges and rich colors of the tile create the illusion of natural stone, but in reality, it's low-maintenance porcelain. Because the mosaic style breaks up the color pattern, the eye perceives that the room is larger.

Despite the recent interest in retro fashion, there is little nostalgia for the old harvest gold look. In this bathroom, the wall and floor surfaces were replaced with an easy-to-clean porcelain tile in a palette of warm colors—including gold.

While the mosaic tile is beautiful, it also serves a design purpose. “Both the scale of the 2-inch tile and the random arrangement give the feeling of being in a larger room,” says Rain. He found 2-in. tile that could be ordered in a random mix, which took the guesswork out of how much of each tile color to purchase for a mosaic (photo). “The dark floor tiles in a larger format, here a 6-by-6, also add to the spaciousness,” Rain says.

Bright, clean and open for small spaces

A Small Bathroom That Feels Big

Photo 1: Open sink console

To accent the open space underneath the console vanity, a polished chrome finish P-trap was used.

A Small Bathroom That Feels Big

Photo 2: New faucet and a refinished tub

The brushed nickel finish was selected for its long wear and because “it simply doesn't show dirt as much,” says designer Matthew Rain. The bathtub was refinished so it would match the clean white color of the new fixtures.

Peterson wanted a crisp look that wasn't overly modern. “I didn't want anything too elaborate in this little bath. It's hard to appreciate things in such a small room because there is no place to stand back and take it in,” she says. “I wanted a look with simple lines.”

Rain selected nearly all of the fixtures and accessories from Kohler's Memoirs collection. “The style matched up well with my client's tastes and the products were 'right-sized' for the scale of the room,” says Rain, adding that shopping online saved him and his client hours of legwork.

After 50 years of use, the tub was beginning to show its age. Replacement wasn't feasible without either special ordering an expensive custom bathtub to fit the constraints of the room or undertaking a more extensive remodel. “Because it's a high-quality cast-iron tub, I decided to spend $500 to refinish it,” says Peterson (Photo 2). “It looks good and saved money in demolition and installation costs.”

Warranties on tub refinishing vary but usually hover around the five-year mark. “I've found that a refinished tub will last about seven years when it's used every day or around 10 with low use,” says remodeler Mike Otto.

The old vanity was dated and with its clunky style took up too much space in the small bath. A contemporary console sink with square legs was used as a replacement with eye-popping results (Photo 1). The console style offers enough space to place toiletries by the basin but without the chunkiness of a traditional vanity.

“This is probably one of the biggest changes in the room when it comes to opening things up,” says Peterson. “I had wanted some unique pieces in the room and this is definitely one of them.”

Wednesday, March 7, 2018

A Small Bathroom That Feels Big

Read article : A Small Bathroom That Feels Big

The small bath problem and proposed solutions

A Small Bathroom That Feels Big

Lead photo

Bathroom after remodeling

The kitchen may be the heart of the home, but over the past 20 years, the bathroom has morphed into the home's soul—a savored refuge from our busy world. Once little more than utilitarian space, the bath has expanded, both in size and in role, to serve as a pleasing retreat.

How to create such a retreat in an ordinary, compact 5 x 9-ft. bathroom could easily leave the owner feeling like a, well, lost soul. Remodeling a bath built to accommodate a standard 5-ft. tub, a toilet and a vanity without adding footage can be a challenge.

Just ask Pam Peterson, who wanted to mine more space from her small 1954 bathroom. She turned to designer Matthew Rain of Abode Drafting, who, along with the remodelers at Mike Otto Construction, “grew” her limited space without changing the room's footprint and added modern elegance to a dated room.

Their solution relied on several fixes: reconfiguring the linen closet; brightening up the fixtures; updating the wall, tile and floor surfaces; and radically changing the vanity.

The Bathroom, Before and After

An oversized vanity and solid-color harvest gold tile visually shrank this already small bathroom.

With the installation of bright fixtures and right-sized pieces, this bathroom gains a big-time feel.

Black and white beforeBathroom before remodeling

Fewer doors, more space

A Small Bathroom That Feels Big

More storage, fewer swinging doors

This corner is now functional storage with an open look and feel. Eliminating most of the cabinet doors and adding a pocket door created a greater sense of space.

Rain cleaned up the structural clutter by rethinking the original linen closet. It had four cabinet doors in the bathroom and another access door from the hallway. “With all those cabinet doors and the big bathroom door, I felt I was always dodging and weaving anytime I needed to get something,” says Peterson of the old layout. “Some door was always in the way.”

The new design turned a bad closet into a great one by shedding all but one of the bathroom cabinet doors and removing the hallway cabinetry entirely. “The new wall space in the hall allowed us to turn the old bathroom door into a pocket door. Eliminating a door 'in-swing' immediately gives a room a bigger feel,” says Rain.

The new bathroom storage area has five custom open shelves made of red oak (to match the room's new light-toned trim), perfect for stacks of towels (photo). “By leaving these shelves open, it also adds to the room's feeling of spaciousness,” says Rain, “and because you can quickly grab a towel, it's functional as well.”

Tiled for a big feel

A Small Bathroom That Feels Big

Mixed tile colors

The rough edges and rich colors of the tile create the illusion of natural stone, but in reality, it's low-maintenance porcelain. Because the mosaic style breaks up the color pattern, the eye perceives that the room is larger.

Despite the recent interest in retro fashion, there is little nostalgia for the old harvest gold look. In this bathroom, the wall and floor surfaces were replaced with an easy-to-clean porcelain tile in a palette of warm colors—including gold.

While the mosaic tile is beautiful, it also serves a design purpose. “Both the scale of the 2-inch tile and the random arrangement give the feeling of being in a larger room,” says Rain. He found 2-in. tile that could be ordered in a random mix, which took the guesswork out of how much of each tile color to purchase for a mosaic (photo). “The dark floor tiles in a larger format, here a 6-by-6, also add to the spaciousness,” Rain says.

Bright, clean and open for small spaces

A Small Bathroom That Feels Big

Photo 1: Open sink console

To accent the open space underneath the console vanity, a polished chrome finish P-trap was used.

A Small Bathroom That Feels Big

Photo 2: New faucet and a refinished tub

The brushed nickel finish was selected for its long wear and because “it simply doesn't show dirt as much,” says designer Matthew Rain. The bathtub was refinished so it would match the clean white color of the new fixtures.

Peterson wanted a crisp look that wasn't overly modern. “I didn't want anything too elaborate in this little bath. It's hard to appreciate things in such a small room because there is no place to stand back and take it in,” she says. “I wanted a look with simple lines.”

Rain selected nearly all of the fixtures and accessories from Kohler's Memoirs collection. “The style matched up well with my client's tastes and the products were 'right-sized' for the scale of the room,” says Rain, adding that shopping online saved him and his client hours of legwork.

After 50 years of use, the tub was beginning to show its age. Replacement wasn't feasible without either special ordering an expensive custom bathtub to fit the constraints of the room or undertaking a more extensive remodel. “Because it's a high-quality cast-iron tub, I decided to spend $500 to refinish it,” says Peterson (Photo 2). “It looks good and saved money in demolition and installation costs.”

Warranties on tub refinishing vary but usually hover around the five-year mark. “I've found that a refinished tub will last about seven years when it's used every day or around 10 with low use,” says remodeler Mike Otto.

The old vanity was dated and with its clunky style took up too much space in the small bath. A contemporary console sink with square legs was used as a replacement with eye-popping results (Photo 1). The console style offers enough space to place toiletries by the basin but without the chunkiness of a traditional vanity.

“This is probably one of the biggest changes in the room when it comes to opening things up,” says Peterson. “I had wanted some unique pieces in the room and this is definitely one of them.”

Thursday, December 7, 2017

Renovated Victorian townhouse

Read article : Renovated Victorian townhouse

‘When I first viewed our 1960s home, I couldn’t see anything good about it at all,’ remembers Elaine.

‘The whole house was dreadful. It was stuck in a time warp and everything was dated and falling apart.

‘I thought my partner Paul had lost the plot when he said he wanted to buy it, but once he explained his vision and we had the plans drawn up, I started to feel really excited,’ she continues.

‘It was the first big renovation project for both of us, but we just jumped into it head first.’

Fact file

  • The owners: Elaine Avery, 46, a full-time mum and landlady, and her partner Paul Reid, 42, sales director of an insulation company, live here with their daughter Olivia, five, and Elaine’s son, Alexander, 17
  • The property: A five-bedroom, early-1960s detached house
  • The location: Whitley Bay, North Tyneside
  • What they spent: The couple’s bathroom cost around £13,000

The property

Elaine had lived in a lot of places before meeting Paul, so this time she was looking for a ‘forever home’. The house was on a sought-after street and had a large plot, and the couple knew that they could add value by completely reworking the layout. They built an extension to include a large kitchen/diner, garden room and utility on the ground floor, plus two extra bedrooms and a home office on the first floor.

‘We sold our previous home quickly, and so we decided to move into rented accommodation during the five-month project,’ explains Elaine. ‘Around three-quarters of the house was knocked down and there was no water or electricity for a while, so it wasn’t feasible to live there.’

The bathroom

The original bathroom was a world away from the contemporary spa-like retreat that they now have. There was a small bathroom with a separate WC next door, which wasn’t conducive to family life, so the builders knocked down the dividing wall to create one large space. As the staircase was being turned around as part of their renovation plans, they were able to incorporate some of the landing area into the new bathroom. They also took some space previously occupied by the dated fitted cupboards along one wall, and from the extension on the opposite side.

‘The bathroom hadn’t been updated since the 1960s, and had a pink cast-iron bath with matching toilet and basin, as well as carpet on the floor,’ says Elaine. ‘I didn’t like having a shower over the bath and a big, high window near it. It definitely wasn’t to our taste, although my five-year-old daughter loved it as she said it was just like Barbie’s!’

Fixtures and fittings

While Paul focused on the structural side of the extension, Elaine was responsible for the overall look of the space. ‘It was quite hard to visualise, as it was going to change so much,’ she says. ‘I had to rely on the plans, so I found my mood board invaluable. I knew the style I was going for, as I’d looked through a stack of magazines for inspiration, and had an idea of the colours I preferred. Our previous bathroom was beige and cream, but this time I wanted grey, white and charcoal.’

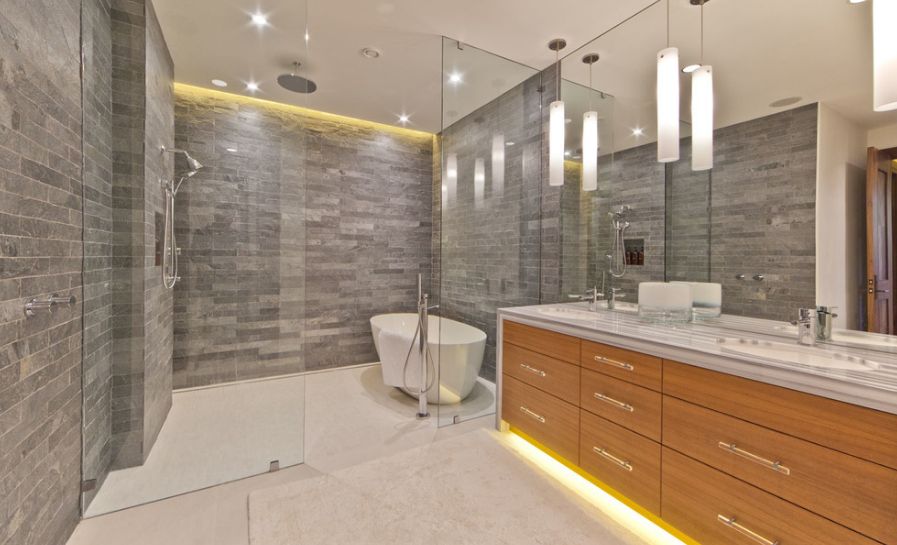
The two essential items on Elaine and Paul’s wishlist were a freestanding bath and a wet room-style walk-in shower. ‘I wanted a freestanding bath from day one, but a modern style rather than a traditional roll-top,’ says Elaine. ‘It had to fit all the way to the floor rather than having legs, so that it won’t gather dust underneath and is easy to clean.’

After visiting various showrooms, Elaine found a beautiful egg-shaped bath at local store Your Home Improvements. ‘They gave me the idea of raising it on a plinth with recessed lights,’ she says. ‘We had plenty of space, and it adds an extra dimension and really showcases the bath.’

The couple were also inspired by the displays at nearby Domani Bathrooms. ‘Although I didn’t buy everything from there, only the basin console and chrome support arms, it gave me lots of ideas, such as having the double basins,’ explains Elaine.

Tile designs

When it came to the tiling, a local tile showroom gave Elaine and Paul advice on which styles would work together. They decided to mix a range of four different designs, with large-format square floor tiles alongside rectangular wall tiles. ‘The tile company suggested a dark charcoal design by the shower and bath, with a stripe to highlight the twin basins, a pale grey everywhere else, as well as complementary mosaic tiles on the floor to demarcate the shower. We didn’t want a shower tray.

‘We were careful to use the charcoal-coloured tile in the right proportions, as we were conscious that it was quite dark. I think it worked really well to have the bath and shower area darker than the rest of the room, as it gives a nice contrast.’

Heating

Polished-chrome radiators and a storage unit next to the basins finish off the space perfectly. ‘I decided to position a radiator under the window and have two towel rails, as it’s such a large room and I hate being cold,’ explains Elaine. ‘I was worried that three heaters might be too many, but it works well and means there’s always a towel within easy reach.’

The finished project

The couple’s project went slightly over budget, mainly due to the cost of removing asbestos from the cupboards, but they tried to absorb any overspend by making savings elsewhere in the property. ‘I knew that if I spent a little extra on the bath, then I would be able to sacrifice having a wine cooler in the kitchen for instance,’ says Elaine.

Although the house still looked like a building site only weeks before they were due to move in, everything came together just in time. ‘I admit that I was getting worried, as we had to leave our rented accommodation,’ says Elaine. ‘The tilers were finishing off the bathroom after we moved in, but fortunately we were able to use our en suite for those few weeks.’

While admitting that she would never tackle such a big project again, Elaine loves spending time in her spacious new bathroom. ‘I’m proud of what we achieved, and we got a lot for our money,’ she says. ‘When I look back at the pictures, I can’t believe the transformation.’

Project notes

Elaine Avery shares her tips for designing a new bathroom

What I’ve learnt

‘Using several different suppliers helps to keep down costs. We shopped around to find the best deals, and compared prices online, as well as getting several quotes from plumbers for the fitting.’

My best advice

‘Plan ahead and always make mood boards. For mine, I cut out pictures from magazines, took photos of hotel bathrooms and collected tile samples to make sure that it would all work together. Remember to take your mood board with you when you visit showrooms, too.’

My dream spot

‘I love the deep, egg-shaped bath — it’s so luxurious. It’s great for Olivia as there’s lots of space for her to play, but I love having a long soak with a glass of wine and my Kindle. I made sure we created a recess next to the bath so that I would have somewhere for my glass!’

Favourite website

‘I’ve added houzz.co.uk to my bookmarked list of websites because it has so many fantastic ideas. I find the designs on there very inspiring, and there were so many amazing photographs of the exact style of bathroom I was looking for. I found the idea for our tiled shelving recess on the site — it’s the little details that add wow-factor. It was also helpful for showing how using different shades and textured tiles could give us a contemporary spa-style space.’

Essential buy

‘The walk-in shower area is brilliant. It’s great to have the handheld hose as well as the fixed overhead rain shower as it’s invaluable for cleaning. The discreet shower screens with a barely-there look were also a good choice and add to the wet room feel.’

If I did it all again…

‘…I would perhaps add more lighting over the shower. The space is a little dark as we had to block up one of the windows to build the extension.’  

The costs

Sanitaryware£5,400
Labour£5,000
Tiles£850
Showers and screen£820
Lighting£200
Radiators£650
TOTAL£12,920

Thursday, June 8, 2017

A thrilling walk on the wild side among the Big Five

Read article : A thrilling walk on the wild side among the Big Five

I used to love long road trips where I would stare through the car window at the hypnotising landscape.

My eyes would feel the pull of the alluring greenery, then my face would slowly edge closer to the window, and my cheek would flatten on the clear surface before I would cosily nod off.

I’d only wake at the next toilet stop for snacks for the rest of the trip ahead and continue the same nap exercise all over again.

Nowadays, my patience for sitting in the same position for anything longer than one hour is waning.

However, the scenic drive to the Mountain Zebra National Park (MZNP) brought back my childhood memories.

SANParks invited the media to view the park and the new accommodation set to open next month.

I was already excited as I boarded the afternoon flight from OR Tambo International Airport to Port Elizabeth since I had never been to the Eastern Cape port city before.

The flight took just over an hour.

On arrival, after picking up a minivan rental, we began the two-and-a-half-hour journey to Cradock and from there, the final 25km lap to the MZNP.

imagePEACEFUL: The cottages at the Mounain Zebra National Park. Picture: SANParks

On our arrival, it was time for dinner and to get better acquainted with the people I’d be spending the next two days with.

After checking into our accommodation, it was well after 11pm so we could not see much of the park.

The cottage in which I spent my first night was one of eight new two-sleepers that have been added to the park.

The look and feel of the cottages are more modern and spacious compared to the older four-sleeper family cottages.

The newer ones are tiled throughout with a fireplace and a bigger bathroom.

My cottage did not have a bathtub option, which may not suit people who enjoy a good soak after a long journey.

It being winter, the cottage felt that much colder. I would advise anyone who gets cold easily to pack an extra pair of socks and a pair of warm, snug slippers to keep warm.

There are 20 family cottages available and they have carpeting in the bedrooms.

The bigger plasma TV screens, the two-seater couches and easier-to-open sliding doors make the newer cottages ideal for the hot summer days to come.

The park boasts the Doornhoek guest house, which sleeps six people; two mountain cottages that can accommodate to 10 people in three bedrooms and 25 camping and caravan sites.

Two new luxury rock chalets have been built at the top of the main accommodation area.

The views from the spacious two-bedroom four-sleepers are breathtaking, certainly a sight to see.

imageHEIGHT OF LUXURY: A rock chalet at the Mountain Zebra National Park. Picture: Mpiletso Motumi

The bathrooms are en-suite and there is an additional outside shower for when the temperature sky-rockets to 40°C in the warmer seasons.

Ranger Sinethemba Tiem took us on an early-morning game drive to spot some of the animals. Black rhinos, gemsbok, brown hyenas and four cheetahs were reintroduced into the park in the early 2000s.

The MZNP was proclaimed a national park with just 1712hectares of land. Today, its current size is 28386ha, so there is a lot of land to see and three of the Big Five, including lions which were reintroduced into the park in 2013 after a 130-year absence.

Back in 1937, farmers managed to conserve a small herd of the endangered animal that became the founder population of the park. Later, 11 more zebra were donated to the park and today, there is a zebra herd of at least 1000.

Even more reason to celebrate is the down-listing of the zebras from the endangered species list at last year’s Cites CoP17.

Apart from seeing the zebra herd, a must is the cheetah-tracking trail that started at MZNP in 2011.

imageJUST A LITTLE TICKLE: And the trail ends within a whisker of a cheetah. Picture: SANParks

This activity is definitely not for the faint-hearted as it involves walking among the wild animals in the park on foot.

There are seven cheetahs, collared for monitoring to allow the rangers know where the animals are and how their movements affect their behaviour.

A telemetry device is used to determine the location of the cats by picking up the collar signal through a radio aerial.

Our trail was to find Angela, a cheetah that was born in the park.

image FINDERS KEEPERS: Sinethemba Tiem uses a radio aerial to track the cheetahs in the park. Picture: Mpiletso Motumi

Tiem gave us the only warning we needed - do not run.

“We walk together as a group. I’ll walk in front and if something happens, you need to listen to my instructions. Please do not run. Rather grab my belt if you feel like running. Listen to my instructions. If you run away from the group, you can’t be helped,” the ranger warned.

Tiem also gave instructions on what to do if we saw any three of the Big Five.

“If we see lions, they will give us a soft growl.

“That’s their way of telling us to back off.

“If it’s a buffalo bull and we are too close, we get out of the zone as quickly as possible and the bull will move away from us.

“For the black rhino if I say run, you run.”

After the warning, we walked quietly in single file for about 700m to get to the cheetahs.

If any of us needed the rangers’ attention, we would have to click our fingers.

When we eventually got to Angela and three other cheetahs resting under a tree, Tiem told us that he had seen them feeding on a female kudu just the morning before.

“They won’t be hunting or moving around much today because they are still full.”

The cheetah-tracking trail is one of many thrilling activities on offer at the MZNP.

Game drives, San cave-painting tours, 4x4 trails, bird watching, guided morning walks and self-drive game viewing are some of the other options.

imageSNAP HAPPY: A selfie on the way to the cheetah-tracking trail. 

If an early-morning game drive is in your plans, make sure to dress warmly as the ride will be windy and cold.

There is a swimming pool to cool off in during those sizzling hot summer days.

The park is part of the Camdeboo protected environment. This means that the land, totalling 286434ha, is conserved and protected in collaboration with farmers who own land surrounding the parks.

The MZNP celebrated its 80th birthday last month and SANParks held a special ceremony in commemoration on July 31, World Ranger Day, to mark the occasion.

If you are in need of an escape from the hustle and bustle of Joburg, the MZNP should be high on your list of go-to national parks in the country.

Saturday, August 12, 2017

Renovate a 1950s Bathroom | Family Handyman

Read article : Renovate a 1950s Bathroom | Family Handyman

Big splash, low budget

Some say that if you wait long enough, Everything—including 1950s bathrooms— comes back in style. But “in style” doesn't necessarily mean “in perfect shape” or “in sync with today's lifestyle.” Such was the case with the bathroom shown here. Moisture problems had caused peeling paint and sticking vanity drawers, while 50 years of wear and tear had taken a toll on the grout, fixtures and hardware. However, the owners, Mary Jane and Bruce Pappas, saw too many things going for the space to completely gut it, such as unique tile work that was still in excellent shape.

“The whole point of buying this fifties house was to create our 21st century life here while honoring the original architecture and detail,” says Mary Jane, who is a professional interior designer. “Bruce and I wanted to complement and elevate what was already here and reuse as many materials as we could.” And by doing so, they were able to reach their goal of updated function on a modest budget. The couple were able to avoid expensive demolition work and get the bathroom they wanted for just under $5,000. “The results for the investment are extraordinary,” says Mary Jane Pappas.

Updated, But Still Original

This bathroom now has greater utility and a clean, contemporary look— without breaking the bank.

Updated bathroomUpdated bathroom

ReDO, reuse, recycle

Renovate a 1950s Bathroom

Vintage tile

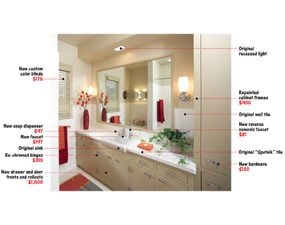
The vanity's vintage “Sputnik” tile pattern inspired the khaki color scheme of the bathroom and adjoining bedroom.

Renovate a 1950s Bathroom

New rollouts, old cabinet

The vanity cabinet is original, but for about $1,500, the new door and drawers were constructed with wipe-clean Melamine bottoms and maple sides decked out with metal slides.

Renovate a 1950s Bathroom

Updated storage closet

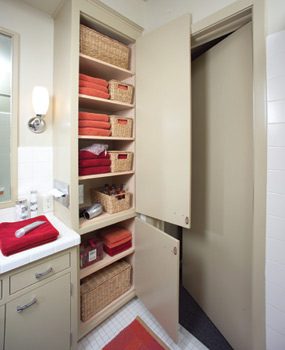
Adjustable shelving with Melamine surfaces was added along with a replacement tissue box holder. A hidden cabinet outlet keeps a hair dryer ready to roll and the electric toothbrushes charged.

After adding an exhaust fan to handle the moisture problem, they began dealing with the cosmetics, as explained by Mary Jane Pappas.

Freshening tiled surfaces
A professional tiler was brought in to repair the period tiles that had seen 53 years of bathroom life. By tuckpointing broken edges and freshening the grout, the tiler brought the surfaces up to standard. “The tile is unique to the era; we embraced the retro feel of it. It was in great shape and worth saving.”

Vanity drawers and doors
Another great example of the couple's “reuse it” philosophy lies in their treatment of the vanity. Years of water damage had made the drawers difficult to open, but instead of scrapping the entire piece, the Pappases hired Thomas J. Ross of Ross Custom Cabinetry Inc. to build new rollout drawers and cabinet doors for it and adjustable shelving for the attached linen closet. “Before, the cabinet drawers were only simple wooden boxes resting in a wooden cabinet. It was a struggle to pull 'wood-on-wood' drawers, especially when they were damp. Now that they're equipped to glide on rollers, it's like having a new piece of furniture. And when you think of the floor, tile and drywall work that we would have incurred had we demolished and installed all new cabinetry, that decision saved thousands.”

Paint, pulls and hinges
The vanity face-lift continued with several coats of an enamel paint and re-chromed hinges and the addition of contemporary drawer pulls. “We re-chromed the hinges because the plates had a unique screw pattern and I didn't want to add any additional screw holes to the vanity and risk the old holes showing.” The original mirror was saved by painting its trim the same color as the vanity.

Sink faucet
The Pappases wanted to add a soap pump and a water filter to their bath sink. By changing the old, widespread faucet for a single-lever faucet, they were able to avoid the expense of either buying a new sink or drilling new holes. The change in style left two unused holes for the new accessories.

Lighting
The old sconces were replaced with lights that better match the new drawer pulls and add a contemporary flair to the room.

Keepers! The '50s heat fan and tissue dispenser
The couple wanted to maintain the items that, like the heat fan, were still stylishly serving a useful function in the bathroom. “It's a nice amenity and it still worked, so why get rid of that?” They were even able to save the original metal tissue dispenser housed in the linen cabinet. It could no longer hold tissue boxes because the dispenser slot was vertical instead of the modern horizontal style. “But the same company, Brobick, now offers a replacement dispenser that fits tissue boxes perfectly.”

The tub
Replacing a bathtub affects the tile surrounding it, the walls above it and the plumbing below it. Keeping the existing tub saves tremendous time and money. So the tub stayed put, while some of the more easily changed elements around it were replaced. One of the first changes was to oust the shower door. “In a small bathroom, a flexible shower curtain creates a sense of spaciousness. And I use my bathtub every day, so a shower door is just not practical,” Pappas says. The original tub had a single showerhead with a bathtub faucet. Now a low-cradled hand shower, perfect for tub bathers, easily sets into an adjustable height showerhead fixture, adding to the usefulness and elegance of the bathroom.

Simple details make the difference

Renovate a 1950s Bathroom

Custom blind

Instead of settling for an off-white window blind in the bathroom, Pappas used a window blind company to create a custom window treatment to match the wall color. (Small rooms appear even smaller with a different color window treatment.) “For $175, getting an exact color match is a great deal,” says Pappas.

Renovate a 1950s Bathroom

Towels and rugs

The towels and bathroom rug proved to be a shopping challenge. “I wanted to find rich colors to work with the khaki walls and the cabinetry. I found high-quality towels I love from an online store, but searched and searched for a matching rug that would stand up to a wet environment. Finally I had a custom one handmade to match,” says Pappas.

Renovate a 1950s Bathroom

Shower curtain pull

A last little splurge of elegance lies in the Kravet silk tassel shower curtain pull ($75). Costing half as much as the Restoration Hardware shower curtain itself, the tassel adds a touch of luxury to this otherwise thrifty remodel.

Having saved a bundle by retrofitting many existing systems in the bathroom, the Pappases had some budget left to indulge in a few accessories.

Friday, February 9, 2018

Cheap Bathroom Remodeling Tips

Read article : Cheap Bathroom Remodeling Tips

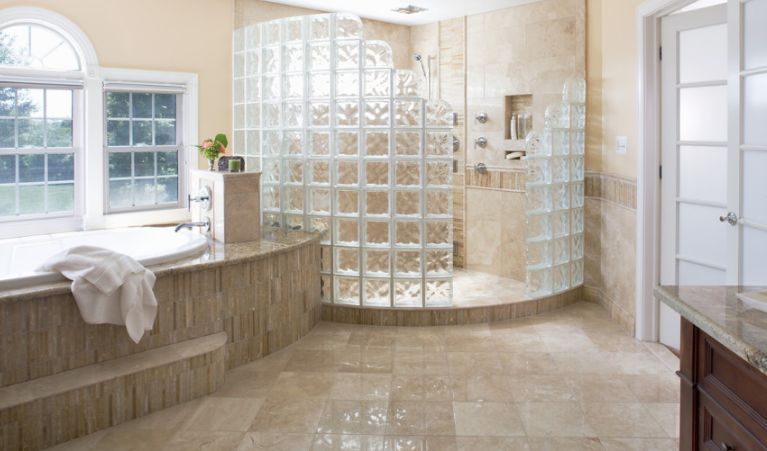
Marble tiles, a block glass shower enclosure, sober colored backsplash ideas, a beautiful wooden vanity with a vase of lilies sitting on it, and a lovely view from the bathtub! Isn't this the type of bathroom you would like to have in your home? I am sure you would. But if you are thinking that remodeling your current bathroom to make it look attractive is going to burn a hole in your pocket, you might want to think again. Remodeling doesn't always have to be in bigger numbers, since you can choose to make your bathroom look brilliant with affordable ideas as well. There are some unique things you could do with your bathroom interiors with a low-budget.

Remodeling a Bathroom on a Tight Budget

Right from adding a fireplace to your bathroom, to decorating the walls with beautiful accessories, you can have it all within an affordable price range. All it takes to make a bathroom look stylish and relaxing is some creative ideas to place the various areas in the room. There is a bathing, toilet, and a vanity area which can be designed in a unique way and decorated with bright and fresh colors. Adding accessories like wall decorations, candles, flowers or plants, toiletry closets, etc. can also work wonders. We have compiled some useful cheap bathroom remodeling tips, for your convenience.

Creating Unique Surfaces

  • When you think of remodeling your bathroom, the first thing that comes to your mind is repainting your bathroom walls and giving the ceiling and floor a new finish. Thus, when you create a new surface in any room most of your remodeling is done, as surfaces such as walls, ceilings and floors have a huge effect on the rooms.
  • To start with this, you can first think about a color combination that you would like to have in the bathroom. Pick colors that are neutral, such as; ivory, gray, yellow, green, violet, peach, etc., which are also colors that will give a sober and relaxing feel to the room.
  • When you choose a wall color, you have to make sure you pick a complementary ceiling color and a flooring option accordingly. Plain drywall ceilings and smooth tiled floors, or cheap laminate flooring can be excellent options to match the walls.
Inexpensive Bathing Accessories
  • After you have picked some suitable paint colors for your bathroom interiors, decide the type of accessories such as; bathtub, toilet, vanity area, shower enclosure, and storage area, you would want to have in your new bathroom. These are some essentials of any bathroom, which can be made stylish with some cheap ideas for remodeling a bathroom.
  • To start with the bathtub, instead of installing a new one (if it isn't cracked), build a deck around it (with laminate or stone surface) so you can place candles, and toiletries on the flat surface. If it needs to be changed, try to pick a unique shaped bathtub like; oval, rectangular, circular, etc. A Jacuzzi would be great, but slightly expensive.
  • The next is to choose the vanity area, which includes the sink, a mirror and an open or closed wooden/granite chest beneath the sink. There are a variety of shapes and colors to choose for the sink, and the chest can either be below the sink or the sink can be built in the chest.
  • Cheap backsplash ideas with a simple mirror could look attractive when paired with the sink and chest. Cheap tempered glass shower enclosure and ceramic or porcelain toilets could be your option if you want to remodel the bathing and toilet areas as well.
Simple Yet Attractive Decorations
  • One of the easiest ways of decorating the bathroom is to use minimum accessories to avoid overdoing.
  • Using colorful tile backsplash ideas can add brightness to the vanity area. Make sure the countertops are complementing the backsplash. You can make open granite chests built in the walls below the vanity to keep the bathroom spacious.
  • Ventilation is very important in bathrooms, therefore, make sure you have big windows with blinds or colored curtains (drapes are not advised). You can also add a room divider to give your modern designed bathroom interior a traditional touch.
  • More than making wooden cabinets (that are expensive) in your bathroom, I would suggest, have sections built inside the wall, so you can place not only toiletries but also decorations such as vases, flowers, pots, etc., on display. The floor can accommodate a few indoor plants around the bathtub or toilet, to include fresh greens inside the room.
You can use the aforementioned tips to remodel your bathroom without spending a lot of money. So make minimum use of wooden furniture and purchase stylish porcelain items so you spend in the right areas.
Advertisement

Thursday, June 8, 2017

Stylish Designs And Options for Shower Enclosures

Read article : Stylish Designs And Options for Shower Enclosures

The type of the shower enclosure you choose for your bathroom as well as its design have a big impact on the overall design and look of this space. So choose the style, the material and everything else carefully. The shower enclosure should, of course, match your style and preferences but it should also suit the bathroom functionally.

View in gallery

Frameless glass enclosures are particularly popular in contemporary bathrooms. Their extremely simple and transparent look offers the bathroom an airy and spacious look, enhancing its beauty without necessarily influencing the décor in any way.

View in gallery

A continuous, frameless shower enclosure can also contain the tub and can look like a simple space divider. This option suits large bathrooms and allows them to look and feel spacious and organized.

View in gallery

In that case, the glass enclosure an either be a full-height divider or it can have that small raised portion at the bottom that keeps the water contained. That element would coordinate with the flooring and the design would remain cohesive throughout.

View in gallery

The shower and the tub can be enclosed in the same space, encapsulated by glass and this doesn’t necessarily needs to occupy a large portion of the room. It can be a variation of a typical tub enclosure.

View in gallery

The shower and the sauna each have their own separate rooms. The shower is framed by walls on three sides and uses glass for the front one, allowing the space inside and the rest of the bathroom to communicate and to lend each other their spaciousness.

View in gallery

A tile and glass shower enclosure is another option. A frameless glass wall combined with tiled walls which can either go all the way up to the ceiling or merely go up to waste level would look good given the right layout and décor. This is a design which best suits traditional bathroom with a modern vibe.

View in gallery

A more unusual option is the glass block shower enclosure. It doesn’t have a door and the glass blocks which form it can be arranged in a variety of ways. The blocks have textured patterns which further highlight the shower’s interesting design.