Showing posts with label install. Show all posts

Monday, January 29, 2018

How to Install a Shower or Tub Faucet

Read article : How to Install a Shower or Tub Faucet
image

Hooking up a shower or tub faucet isn't as difficult as you might think. So long as you're comfortable with accurately measuring, drilling, and working with copper pipe, this project is well within reach. We broke the installation process down into easy-to-follow steps for optimal ease. Expect to spend at least half a day installing a shower or bathtub faucet.

Bathroom Faucet Basics

Before you Begin: Run Pipe and Choose Faucet

Before you begin, you'll want to install separate 3/4-inch lines to supply the shower. This extra step ensures good water pressure and protects the bather from temperature changes when another faucet is turned on or the toilet tank refills. You'll want to tap into the cold and hot water lines as close to the water heater as possible. If needed, move a stud to make room for the plumbing behind the tub.

You'll also want to choose the tub or shower faucet you're going to install. Follow the manufacturer's directions for plumbing the faucet. And, if your faucet does not have integrated shutoff valves, install shutoff valves in the lines to the valve. For optimal comfort, position the faucet about 28 inches above the floor for a tub, and about 48 inches for a shower. 

Leftover Pipes? Craft this Cute Side Table

Before you run pipes, choose the tub or shower faucet you're going to install. You'll want to follow the manufacturer's directions for plumbing the faucet. And, if your faucet does not have integrated shutoff valves, install shutoff valves in the lines to the valve. For optimal comfort, position the faucet about 28 inches above the floor for a tub, and about 48 inches for a shower. 

Step 1: Determine Faucet Placement

image

Most faucets come with a plastic cover that protects the faucet and serves as a guide for the depth at which it must be set. To determine where to place the braces, consider the total thickness of the finished wall—often 1/2-inch-thick backerboard plus 1/4-inch-thick tiles.

If you have other faucet setups, such as a three-handle faucet, it may require that supply pipes be spread farther apart than for a single-handle faucet. Threaded adapters screw in for the supplies, spout, or shower arm. A faucet with integral shutoffs comes with a large escutcheon (cover plate) so you can more easily reach the shutoff valves.

Step 2: Anchor and Brace

image

Determine how high you want to locate the spout (make sure it will clear the tub), faucet handles, and showerhead. Install a 2x6 brace for each. Anchor the braces with screws rather than nails so it's easier to move them if they need adjustment.

Step 3: Assemble Pipes

image

Assemble all the pipes in a dry run. Install 3/4-inch pipe up to the height of the faucet, add reducer couplings or elbows, and run short lengths of 1/2-inch pipe to the threaded adapters on the faucet. Add hammer arresters. Anchor the faucet according to manufacturer's directions.

Step 4: Sweat Fittings

image

Once you are sure of the connections, sweat all the fittings. Start at the faucet, then move on to the shower arm and spout connections. Run 1/2-inch pipe up to the shower arm and down to the spout; attach drop-ear elbows at both spots.

Step 5: Tighten and Install

image

Finger-tighten a threaded nipple—either brass or galvanized—into both drop-ear elbows. Once the wallcovering is in place, remove them and install the shower arm and tub spout.

Monday, December 18, 2017

How to Install a Bathtub Spout With a Diverter

Read article : How to Install a Bathtub Spout With a Diverter

Diverters in a bathtub spout direct the flow of water either to the spout or up to the shower head, depending on if you pull the diverter up or leave it down. Installing a spout that does not have a diverter will render the shower useless. If you are replacing an old spout, take it with you to the hardware or plumbing supply store when you buy the new one to make sure you get one that will fit in your space and work with your existing plumbing.

Things You'll Need

  • Thread tape

  • Faucet nipple

  • Caulk

Remove the old spout, if one is installed, by removing any retaining screws on the underside of the spout. If there is a retaining screw, cover the bathtub's drain with a cloth (so screws don't fall down it) and use an Allen wrench to remove the screw, then twist the spout back and forth as you pull it off the pipe. If there is no retaining screw on the spout, twist if off the pipe counterclockwise using an adjustable wrench. Use the old spout as a reference for the replacement spout, including the placement of the spout's threads where it screws into the pipe. Use an adjustable wrench to twist the old nipple -- a cylinder-shaped adapter piece that joins the spout to the water pipe --counterclockwise out of the pipe as well. Wrap thread tape around both ends of the new nipple, then twist it clockwise into the pipe. ', image: '', flash: '' }, google_image_size : '300x250' });

Fill in the gap between the new nipple and the wall with caulk. Screw or slide the new spout onto the pipe, depending on what type of spout you are installing.

Tighten the retaining screw in the underside of the spout, then remove the cloth covering the bathtub's drain. Open the house's main water valve.

\ \ \ {! } !}\ \
', image: '', flash: '' }, google_image_size : '336x280' });

Wednesday, November 29, 2017

How to Lay Tile: Install a Ceramic Tile Floor In the Bathroom

Read article : How to Lay Tile: Install a Ceramic Tile Floor In the Bathroom

Cover up an old floor

Whether you’re replacing an old shabby floor or installing a new one, you can’t beat ceramic or stone tile for durability and appearance. When laid properly, it’s virtually a forever floor that requires almost no care and maintenance. And you can select materials from a vast array of colors and textures. We’ll cover how to lay tile in a few steps.

What’s equally attractive is that you can lay a first-class tile floor yourself, often in one weekend, and save the $500 to $1,500 cost of hiring a pro.

The key to keeping the job simple is to cover the old vinyl or other flooring with a new thin underlayment that gives you a fresh, clean start. No messy tear-out and repair. In this article, we’ll demonstrate how to install a thin “backer board” over the old floor. Then we’ll cover tile-setting techniques, from layout and cutting to grout and cleanup.

This is a two-day project for most bathrooms, even if you don’t have any previous tile experience. If you’re comfortable using basic hand tools and have the patience to align tiles just right, you can handle this job. The entire cost of this project for a typical bath ranges from $300 to $600.

Estimating the Cost of a Tile Project

The tile itself will be your biggest cost, so start by measuring the square footage of the floor. Then add 10 percent for cutting waste. If you choose a more complex layout than the simple grid pattern we used, your waste will be greater. Most tile sells for $5 to $15 per square foot, but you can spend as little as $3 or more than $50. If you have to install backer board, add $2 per square foot to the cost of the tile. Other materials will cost about $90, regardless of bathroom size. The tile tools you’ll need (including a tile cutter) will total $60 to $80.

Assess your floor

The success of any tile job depends on a solid base, that is, a floor that flexes very little as you walk across it. If you have a concrete subfloor, this isn’t an issue. You can lay tile directly over the existing vinyl as long as it’s well adhered.

If possible, avoid tearing out vinyl flooring. Leaving it in place saves time, of course, but it also reduces asbestos hazard concerns. Asbestos was used in sheet vinyl and vinyl tile until the mid-1980s. By leaving the vinyl undisturbed, you won’t risk sending asbestos fibers into the air.

If you have a wood subfloor, there’s a good chance that you’ll have to install backer board over your vinyl to make the floor thicker and stiff enough for tile. The easiest way to see flooring thickness is to pull off a floor register. Otherwise look for plumbing passageways through the floor. As a last resort, drill through the floor with a 1-in. or larger spade bit (your new floor will cover the hole later). To prevent asbestos dust from becoming airborne, mist the bit with a spray bottle as you drill. In addition to floor thickness, you’ll need to determine joist spacing. If there’s an unfinished basement or crawlspace below the floor, simply measure the spacing. If there’s a ceiling, probe for joists with a drill bit.

If the joists are spaced 16 in. apart, the layers of structural flooring beneath the vinyl should add up to at least 1-1/8 in. With joists every 24 in., you need 1-1/2 in. If your floor is too thin for tile, add a thicker layer of tile backer board. Our floor required 1/4-in.-thick backer. Yours might need 1/2-in. backer to reach the minimum thickness. If your floor is already thick enough, you can simply prep the vinyl floor (Photos 1 – 4) and skip the backer installation (Photos 5 – 8). Then tile directly over the vinyl, following the same steps we used over backer board.

Regardless of the type of subfloor, there are two situations where you can’t leave vinyl in place: First, if large areas of the vinyl are loose, don’t set tile or backer over it. Small loose spots are acceptable and easy to deal with (Photo 4).

Second, “cushioned” sheet vinyl must be removed before you can set tile. Cushioned vinyl has a foam backing that makes it noticeably thicker and softer than standard vinyl flooring. It’s too spongy to support tile or backer board. Before removing it, call your local health department for instructions on how to check for asbestos and proper procedures if asbestos is present.

Gather Advice While You Shop

Home centers carry everything you need for this project, but begin shopping at a tile store, where you’re more likely to get expert advice. Make a quick sketch of your floor plan and jot down all the dimensions. Also take a photo of the floor at the doorway. This will help the tile store staff recommend a “transition” to neatly join the tile to the hallway flooring. Transitions come in different styles to suit any situation.

When you choose the tile itself, ask if it requires any special installation steps. Some tile, for example, should be coated with grout release before grouting. Also ask about cutting techniques for the tile. You’ll use sanded grout for the floor. Ask if sanded caulk is available in a color that matches your grout for the floor/tub and floor/wall tile joints.

Prepare the room

First, get the toilet out of your way. Stuff a rag in the hole to block sewer gases. If your home only has one toilet, you can leave it in place until you install the backer board. Keep a supply of wax rings on hand if you plan to reinstall the toilet at the end of each day.

If you expect to keep your vanity for many years to come, leave it in place and tile around it. But if you think you might replace it, remove it now. When the job’s done, you can reinstall the old vanity or put in a new one. Having the vanity out of the way gives you more workspace, and you won’t have to cut backer board and tiles to fit around it. This also eliminates the floor repair problem if you install a smaller vanity or pedestal sink in the future.

Pull off the baseboard or plan to add base shoe molding. This leads to a neater-looking job because the edges of the tile will be covered later—jagged cuts and slight measuring mistakes are hidden. If your baseboard has base shoe molding, remove only the base shoe. Backer board and tile will raise your floor 3/4 in. or more. So you’ll have to remove and undercut the door. To mark the door for cutting, stack backer board, tile and two layers of cardboard on the floor (see Photo 3). Mark the door 1/2 in. above the stack, remove the door and cut off the bottom.

Scrub, screw and patch the floor

Install a Ceramic Tile Floor in the Bathroom

Photo 1: Scrub the floor with stripper

Remove the baseboard and toilet. Using an abrasive pad, scrub the floor hard with water mixed with vinyl floor stripper.

Install a Ceramic Tile Floor in the Bathroom

Photo 2: Drive screws into the floor joists

Mark the floor joists with chalk lines and drive 2-1/2-in. screws every 8 in. Don’t leave any screw heads protruding.

Install a Ceramic Tile Floor in the Bathroom

Photo 3: Cut the door trim to accommodate tile

Undercut door trim using a jamb saw or handsaw. A piece of backer board, tile and two layers of cardboard raise the saw to the correct height above the floor.

Install a Ceramic Tile Floor in the Bathroom

Photo 4: Fill low spots with thin-set

Cut out any loose sections of vinyl with a utility knife. Fill the void with thin-set using the flat edge of a notched trowel.

Scrub the floor with a vinyl floor stripper following the manufacturer’s instructions. The stripper will dissolve wax and other residue. Scrub hard with an abrasive scouring pad (Photo 1). The tiny scratches left by scrubbing help the thin-set bond better.

Next, drive screws through the floor into the joists (Photo 2). This ensures that the subfloor and underlayment are securely fastened. If there’s an unfinished basement below the floor, locating the joists is easy: Go to the basement and drill a couple of 1/4-in. holes up through the floor next to a joist. If you can’t locate the joists from below, pick a spot near one wall and drill a hole. If the bit breaks through into hollow space, move over 1 in. and drill another hole. Keep going until you hit a joist. Then go to the opposite wall and find the other end of the joist. Measure at intervals of 16 or 24 in. from the first joist to locate the others.

While you’re driving screws, look for any spots where the vinyl has loosened from the floor. Cut out loose spots and fill them (Photo 4). If there are any copper pipes that pass through the floor, wrap them with duct tape at floor level. Cement-based thin-set and grout can corrode copper.

Install backer board

Install a Ceramic Tile Floor in the Bathroom

Photo 5: Install backer board over the floor

Cover the floor with backer board. Cut inside corners, circles and curves with a drywall saw. Space pieces 1/8 in. apart and hold each one in place with two temporary screws.

Install a Ceramic Tile Floor in the Bathroom

Drywall saw

Use a drywall saw to cut corners, circles and curves in backer board.

Install a Ceramic Tile Floor in the Bathroom

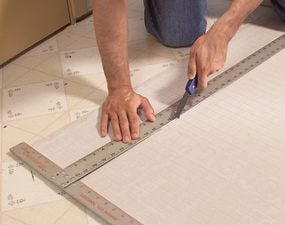
Photo 6: Score and snap the backer board

Make straight cuts with a scoring knife. Make three or four scoring passes, then snap the backer over a 2×4. When all the pieces have been laid out, label them and set them aside.

Install a Ceramic Tile Floor in the Bathroom

Scoring knife

Use a scoring knife to score the backer board.

Install a Ceramic Tile Floor in the Bathroom

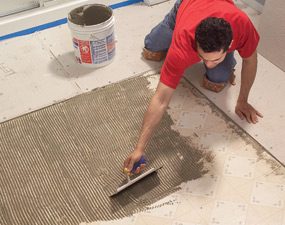
Photo 7: Trowel on the thin-set

Comb out a bed of thin-set just large enough for each piece of backer board using a 1/4-in. notched trowel held at a 45-degree angle. Screw the backer down before spreading thin-set for the next piece.

Install a Ceramic Tile Floor in the Bathroom

Notched trowel

Use a 1/4-in. notched trowel to spread the thin-set over the floor.

Install a Ceramic Tile Floor in the Bathroom

Photo 8: Cover the joints

Press adhesive-backed mesh tape over the joints and skim over the tape with thin-set. When the thin-set is firm but not fully hardened, scrape away any ridges with a putty knife.

The backer board is fastened with a combination of screws and thin-set adhesive. Cut and lay out all the pieces before you mix the thin-set (Photos 5 and 6). You can run the sheets in any direction, but be sure to stagger the joints so you never have four corners meeting at one point. Leave a 1/8-in. space between the sheets and along the vanity, tub or shower. The gap along walls must be at least 1/8 in. wide, but a wider gap (about 1/2 in.) makes the panels easier to set in place.

After cutting and fitting, label the location of each one and set them all aside. Vacuum the floor and have your drill and screws ready to go before you mix the thin-set. Read the thin-set’s label. Spread the thin-set with a 1/4-in. notched trowel. Comb in one direction so air can escape when you embed the backer (Photo 7). Drive screws every 6 in. around the perimeter of each piece and every 8 in. “in the field” (across the face of the panel). If the leftover thin-set is still workable, you can immediately embed mesh tape over the joints (Photo 8).

If the thin-set has become too stiff or chunky, mix a new batch. Use “alkali-resistant” tape that’s meant for backer board. While the tape coat of thin-set hardens, run a putty knife over all the screw heads to scrape off the “mushroom” bulges around screws. Drive in any protruding screw heads you come across.

CAUTION!

Cement products like thin-set and grout draw moisture from skin and can even cause burns that require medical attention. While most pros work bare-handed, wear gloves if you have any special sensitivity. Also wear eye protection while mixing thin-set and grout.

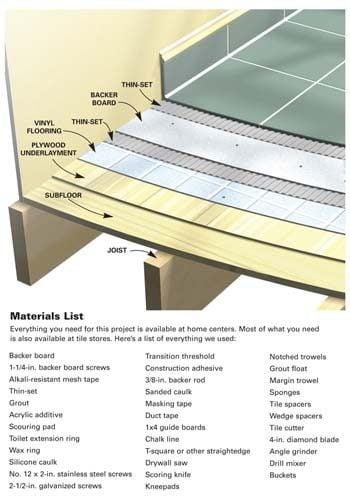
Figure A: Ceramic Tile Over Vinyl

Everything you need for this project is available at home centers. Most of what you need is also available at tile stores.

Cutaway of a tile floor over vinyl

Careful layout pays off

Install a Ceramic Tile Floor in the Bathroom

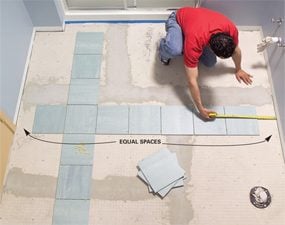
Photo 9: Test your layout to avoid small pieces along the walls

Dry-lay tile to determine the best layout. Start with centered rows, leaving equal spaces at walls. Then reposition rows until you find the optimal layout.

Install a Ceramic Tile Floor in the Bathroom

Photo 10: Attach guide boards to guide the layout

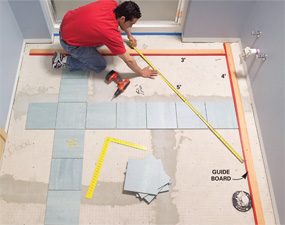
Screw guide boards to the floor following your chosen layout. Position the guides so you can lay all the field tiles without moving the guides. Make sure the guides are at right angles by measuring out a 3-4-5 triangle.

Too often, tile novices simply start setting tile in a corner and continue along two walls until the floor is covered. Sometimes they get lucky and the floor looks good. But more often this method leads to trouble:

They end up with awkward-looking, thin slivers of tile along a prominent wall or at the doorway. And the tile looks even worse when walls are badly out of square or crooked—a straight grout line running too close to a wall emphasizes the wall’s imperfections.

Whether you’re laying a simple grid pattern like we show here, or a diagonal pattern with a border, the best tile layout usually calls for centering full tiles between walls so the partial tiles along the edges will end up all the same size. Don’t rely on your tape measure and mental arithmetic. Rip open a carton of tile, grab a handful of spacers and experiment with your layout on the floor.

To begin, center rows of tile between walls so you have equal spaces along walls that face each other (Photo 9). Set the two rows parallel to the two most prominent walls. Then make adjustments, trying to achieve these three goals:

  • Use full tiles at doorways and along the bathtub or shower. These are usually the only places where the edges of the floor aren’t covered by baseboard. If you use full tiles in these exposed spots, you don’t have to worry about making smooth, perfect cuts.
  • Avoid narrow tiles along walls. Ideally, you’ll end up with tiles cut to half size or larger. Avoid cutting tile to widths less than 2 in.
  • Minimize cutting and try to avoid difficult cuts. For example: Cutting tile to an L-shape to fit around an outside corner is especially difficult when one arm of the “L” is less than 2 in. wide. The arm tends to break off as you cut.

Chances are, your layout won’t meet all these goals. Because the shower stall was the focal point in our bathroom, we made it our No. 1 layout priority. We chose to use full tiles in front of the shower. That left us with 3-in.-wide tiles along the opposite wall, which was less prominent. We also chose to center the tile rows on the shower; that meant we had to use cut tiles at the doorway.

Once you determine a layout, establish lines to guide your tile positioning. The usual method is to snap chalk lines on the floor. But chalk lines are hard to see after you’ve spread thin-set, and one row of tile may slip as you set the next row. Here’s a more reliable guide: Choose straight boards a foot shorter than the length and width of the room. Tape one edge of each board so thin-set won’t stick to them.

Then screw the boards to the floor at a right angle to form a guide that eliminates guesswork and shifting (Photo 10).

Video: Create Your Own Floor Tile Layout

Planning the layout for a tile project is usually the hardest and most time- consuming step. Watch this video to learn how a pro does it. You’ll see how to snap chalk lines and make sure they are perfectly square. Plus, you’ll learn how to avoid unsightly narrow, difficult-to-cut tiles along a wall. Don’t start a tile project until you’ve watch this video!

Set the tile (finally!)

Install a Ceramic Tile Floor in the Bathroom

Photo 11: Set the full tiles

Comb out a few square feet of thin-set and set tile against the guides. Continue until all the full tiles are in place. Tip: Watch for squeeze-out between tiles and rake it out with tile spacers.

Install a Ceramic Tile Floor in the Bathroom

Spacers detail

Keep the gaps between tiles even by using spacers

Install a Ceramic Tile Floor in the Bathroom

Photo 12: Spread thin-set and set the perimeter tiles.

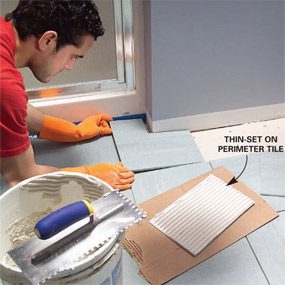
Cut and set the perimeter tiles after the thin-set beneath the full tiles has hardened. In spaces too narrow for your trowel, comb thin-set onto the backs of tiles.

It’s usually easiest—and most efficient—to set tile in two phases: First set all the full “field” tiles (Photo 11). Then, when the thin-set has hardened for several hours, cut all the perimeter tiles and set them (Photo 12). Here are some tips for both phases of the job:

  • The trowel you use for setting tile may be different from the one you used to embed the backer. The thin-set label tells you which notch size to use relative to tile size.
  • Dampen the backer with a sponge just before applying thin-set. This keeps the thin-set from drying out too quickly.
  • Comb the thin-set in one direction so air pockets won’t be trapped under tile.
  • Open three or four cartons and mix the tiles as you set them. Pattern and color vary slightly from one carton to the next.
  • Don’t just set each tile into place; press down on the tile and wiggle it to embed it firmly in the thin-set.
  • Watch for “tipped” corners. When you press a tile in place, it’s easy to tilt it slightly so that one corner stands higher or lower than neighboring tiles.
  • When you complete a section of tile, inspect it before moving on. Make sure the tiles line up correctly and spacers are in place. Wipe any thin-set off the face of tiles with a damp sponge.
  • When the thin-set becomes chunky or too stiff, throw it away and mix more. Never try to extend the life of thin-set or grout by adding water.
  • Cut perimeter tile so that caulked joints (at tub) are the same width as grouted joints.

Prepare the floor for grout

Install a Ceramic Tile Floor in the Bathroom

Photo 13: Install an extension ring over the toilet flange

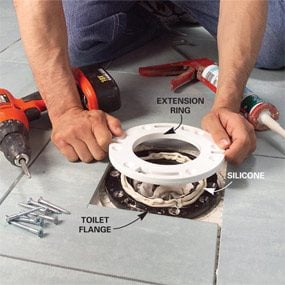
Remove the old screws from the toilet flange and apply a heavy bead of silicone caulk. Fasten the extension ring over the old flange with stainless steel or brass screws.

Install a Ceramic Tile Floor in the Bathroom

Photo 14: Install the transition strip

Glue the transition into place with construction adhesive. If carpet meets the transition, you may have to add a new tack strip.

Install a Ceramic Tile Floor in the Bathroom

Photo 15: Stuff backer rod along the wall

Push backer rod into joints that will be caulked later. The foam rod keeps grout out of joints. After grouting, pull out the rod and caulk the joints.

When all the tiles are in place and the thin-set has hardened, remove all the spacers. Next, raise the toilet flange by adding an extension ring or two (Photo 13). The extended flange should be flush with or higher than the surrounding tile.

When you grout, fill in between the flange and tile. That way, any future leak around the flange will show up on the bathroom floor instead of on the ceiling below. If you plan to use a glue-down transition as we did, this is the time to install it.

Here’s how we dealt with our transition: First, we removed the old metal strip that covered the carpet’s edge. Then we cut our transition strip to fit between the door jambs using a miter saw. Next, we added a tack strip to hold the carpet in place. Before we could glue the transition to the floor (Photo 14), we had to remove a thin strip of the old vinyl floor.

Grout is too brittle to handle the slight shifting movements that are normal in any room. Keep grout out of joints wherever the floor meets the tub, shower, vanity or walls (Photo 15).

Pack the joints with grout

Install a Ceramic Tile Floor in the Bathroom

Photo 16: Grout the joints

Work the grout back and forth across the floor, diagonal to the joints and holding the float at a 45-degree angle. Then scrape off the excess grout, holding the float almost upright.

The thin-set directions will tell you how soon you can grout the floor—usually 24 hours. Grouting isn’t complex. Just plop a couple of scoops of grout onto the floor in a corner, work the grout into joints (Photo 16) and scrape off the excess grout before moving to the next section. In addition:

  • Mix the grout to a mashed-potatoes consistency. Adding extra liquid makes grout easier to work with but weakens it.
  • Don’t just spread the grout over the joints; press hard to pack it into the joints. If you’re doing it right, your forearm will get a good workout.
  • Whether you’re filling joints or scraping off excess grout, always push the float diagonally across the tiles.
  • Scrape off the excess to leave tile as clean as you can. The less grout you leave on the tiles, the easier cleanup will be.
  • When you’re done, cover the grout bucket with a plastic bag and set it in a cool place to slow the hardening process. During cleanup, you may find spots that need a little extra.

Grout cleanup

Install a Ceramic Tile Floor in the Bathroom

Photo 17: Clean the tiles

Wipe grout off the tile surface with a damp sponge. Wipe gently on the first pass so you don’t pull grout out of the joints. Rinse the sponge often.

Clean the surface of the tile when the grout is stiff enough to stay put in the joints but still soft enough to wipe off the tile surface. During hot, dry weather, grout can become difficult to wipe away in just 10 minutes, so get ready for cleanup before you even mix the grout. You’ll need two buckets of clean water, two sponges, a synthetic scouring pad and a dry rag.

As soon as you’re done grouting, go to the first section you grouted and wipe across a joint with a damp sponge. If the sponge pulls grout out of the joint, wait five minutes and try again. In cool, damp weather, the grout may stay too soft for an hour. When the grout is hard enough, gently wipe the tile with a damp sponge.

Rinse the sponge frequently as you wipe the entire floor (Photo 17). If you come across tough spots, scrub them with the scouring pad. Be careful where you put your feet and knees—don’t mar your perfect grout joints.

Immediately after the first pass, grab the second bucket of clean water and the fresh sponge and make a second, more thorough pass. Then, as the tile surface dries, wipe it with a dry terry cloth. The dry haze should buff off easily. If not, go for fresh water and sponge the floor again. If you can’t get rid of the haze, don’t panic. Products that remove haze are available wherever tile is sold.

Let the grout cure overnight before you caulk joints, set the toilet or reinstall baseboard. Grout sealer is a good precaution against staining: Some products can be applied 24 hours after grouting; others require a two- to three-week wait. If you have leftover tile or grout, keep them in case you have to make repairs in the future. Be sure to write down the brand, color and retailer of the tile.

How NOT to Save Money on a Tile Project

I’m a devout cheapskate, but when it comes to buying thin-set and grout, I grab the most expensive products on the shelf. More expensive thin-sets and grouts generally contain a higher proportion of the polymers that improve adhesion, durability and stain resistance.

In most situations, cheaper products would perform just fine. But if I can reduce the risks of loose tiles or cracked grout by spending an extra $30 on a typical bathroom project, I consider that a bargain.

Liquid additive is another smart investment. If the thin-set or grout label says you can mix it with water or an additive, use additive. These liquids (labeled “latex, ” “polymer” or “acrylic”) are meant to improve adhesion and stain resistance. But as a bonus, they produce a slick, creamy consistency. Thin-set combs out more smoothly, grout flows easily into joints, and both remain workable longer.

Also buy a mixer for your drill. Mixers come in various styles and sizes. Go easy on the trigger. If you run the drill at full speed, you can create millions of tiny air bubbles, which will weaken the mix.

Tile cutting tools

Install a Ceramic Tile Floor in the Bathroom

Tile cutter

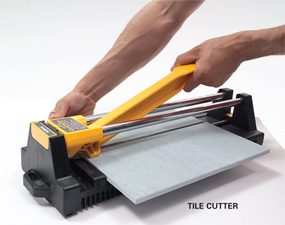
A tile cutter is the fastest way to cut tile. Just push the handle forward and a small wheel scores the tile. Then push the handle down and the tile snaps in two. You can’t beat a tile cutter for convenience. It makes no mess and you can drag it around the room as you work. But a tile cutter has zero versatility. It makes straight cuts across the entire tile—no curves or corner cuts. Cutting 1 in. or less off a tile can be difficult or impossible. You can rent one at rental centers and some tile shops.

Install a Ceramic Tile Floor in the Bathroom

Wet saw

A wet saw cuts with a diamond blade while water cools the blade and eliminates dust. You can cut notches, trim off tiny slivers of tile, cut miters and even make curves. You’ll get clean cuts in any type of tile. But wet saws are messy. They spit water and raise a cloud of gritty mist. If you use one indoors, contain the mist with curtains of plastic film and cover nearby surfaces. You can buy a small wet saw like the one shown here or rent a professional model from a tile store or home or rental center. If you only have a few cuts that require a wet saw, call a tile store. Many make cuts for a small fee.

Install a Ceramic Tile Floor in the Bathroom

Angle grinder

An angle grinder equipped with a diamond blade can make straight cuts, curves and notches in any type of tile. Since all your cuts are freehand, this isn’t a precision tool, but you can grind away imperfections with the tip of the blade. Use a grinder only outside. Wear a dust mask and eye protection.

Install a Ceramic Tile Floor in the Bathroom

Nippers

Nippers are useful for rough curves and notches. They don’t cut tile, but bite out small chunks, leaving jagged edges.

Install a Ceramic Tile Floor in the Bathroom

Contour gauge

A contour gauge is a great tool for marking troublesome shapes on tile. Just press it against any odd-shaped surface (like the curved corner of a bathtub) and transfer the profile to tile.

Here are the tools that can cut your tile. Buy or rent the ones that make the most sense for your project.

In addition to the tools shown here, a carbide abrasive blade that fits in a jigsaw cuts slowly but leaves fairly clean cuts in softer types of ceramic tile and natural stone. A carbide abrasive hole saw cuts perfect holes for plumbing pipes and fixtures.

A rubbing stone is simply an abrasive block, similar to the wheel in a bench grinder. Use it to smooth sharp or slightly chipped cuts that will be exposed.

Additional Information

Required Tools for this Project

Have the necessary tools for this DIY project lined up before you start—you’ll save time and frustration.

You’ll also need these specialty tools for working with tile and backer board:
Scoring knife, Margin trowel, Tile cutter, 4-in. diamond blade, Drill mixer, Offset saw, Tile cutter, Nippers, Wet saw
You can also use an angle grinder for cutting tile.

Friday, November 17, 2017

How do you install a shower in a half bath

Read article : How do you install a shower in a half bath

",i.addBidResponse(m.placementCode,v)}else{var w=o.createBid(2);w.bidderCode=e.bidderCode,i.addBidResponse(m.placementCode,w)}}var I=(new Date).getTime(),T=I-_,S=I-performance.timing.navigationStart,A=r.getEvents(),x=A.some(function(t){return t.args&&t.eventType===s.EVENTS.BID_TIMEOUT&&t.args.bidderCode===e.bidderCode}),E="https://an.facebook.com/placementbidlatency.json?";E+="bid_request_id="+u,E+="&latency_ms="+T.toString(),E+="&bid_returned_time_since_page_load_ms="+S.toString(),E+="&timeout="+x.toString();var j=!0,D=!1,O=void 0;try{for(var C,R=a[Symbol.iterator]();!(j=(C=R.next()).done);j=!0){var B=C.value;E+="&placement_ids[]="+B}}catch(N){D=!0,O=N}finally{try{!j&&R["return"]&&R["return"]()}finally{if(D)throw O}}var q=new XMLHttpRequest;q.open("GET",E,!0),q.withCredentials=!0,q.send(null)})}}var t=function(){this.get=function(e,t){var n=new XMLHttpRequest;n.onreadystatechange=function(){if(4===n.readyState&&200===n.status){var r=JSON.parse(n.responseText);a.logInfo("ANAdapter: "+e+" ==> "+JSON.stringify(r)),t(r)}},n.open("GET",e,!0),n.withCredentials=!0,n.send(null)}};return{callBids:e}};e.exports=d},function(e,t,n){"use strict";var r="function"==typeof Symbol&&"symbol"==typeof Symbol.iterator?function(e){return typeof e}:function(e){return e&&"function"==typeof Symbol&&e.constructor===Symbol&&e!==Symbol.prototype?"symbol":typeof e},i=n(2),o=n(12),a=n(13),s=n(19),d="INDEXEXCHANGE",u="indexExchange",c={INDEX_DEBUG_MODE:{queryParam:"pbjs_ix_debug",mode:{sandbox:{topFrameLimit:10,queryValue:"sandbox",siteID:"999990"}}}},l="IOM",f="IPM";window.cygnus_index_parse_res=function(e){try{if(e){if("object"!==("undefined"==typeof _IndexRequestData?"undefined":r(_IndexRequestData))||"object"!==r(_IndexRequestData.impIDToSlotID)||"undefined"==typeof _IndexRequestData.impIDToSlotID[e.id])return;var t,n=1;"object"===r(_IndexRequestData.reqOptions)&&"object"===r(_IndexRequestData.reqOptions[e.id])&&("function"==typeof _IndexRequestData.reqOptions[e.id].callback&&(t=_IndexRequestData.reqOptions[e.id].callback),"number"==typeof _IndexRequestData.reqOptions[e.id].targetMode&&(n=_IndexRequestData.reqOptions[e.id].targetMode)),_IndexRequestData.lastRequestID=e.id,_IndexRequestData.targetIDToBid={},_IndexRequestData.targetIDToResp={},_IndexRequestData.targetIDToCreative={};for(var i=[],o="undefined"==typeof e.seatbid?0:e.seatbid.length,a=0;o>a;a++)for(var s=0;se)throw"Invalid Site ID";if(n=Number(n),"number"==typeof n&&n%1===0&&n>=0&&(this.timeoutDelay=n),this.siteID=e,this.impressions=[],this._parseFnName=void 0,top===self?(this.sitePage=location.href,this.topframe=1):(this.sitePage=document.referrer,this.topframe=0),"undefined"!=typeof t){if("function"!=typeof t)throw"Invalid jsonp target function";this._parseFnName="cygnus_index_args.parseFn"}_IndexRequestData.requestCounter="undefined"==typeof _IndexRequestData.requestCounter?Math.floor(256*Math.random()):(_IndexRequestData.requestCounter+1)%256,this.requestID=String((new Date).getTime()%2592e3*256+_IndexRequestData.requestCounter+256),this.initialized=!0}window.cygnus_index_args.parseFn=cygnus_index_parse_res;var r=/[\\\"\x00-\x1f\x7f-\x9f\u00ad\u0600-\u0604\u070f\u17b4\u17b5\u200c-\u200f\u2028-\u202f\u2060-\u206f\ufeff\ufff0-\uffff]/g,o={"\b":"\\b"," ":"\\t","\n":"\\n","\f":"\\f","\r":"\\r",'"':'\\"',"\\":"\\\\"};n.prototype.serialize=function(){var e='{"id":"'+this.requestID+'","site":{"page":"'+t(this.sitePage)+'"';"string"==typeof document.referrer&&""!==document.referrer&&(e+=',"ref":"'+t(document.referrer)+'"'),e+='},"imp":[';for(var n=0;n0&&(e+=',"ext": {'+i.join()+"}"),e+=n+1===this.impressions.length?"}":"},"}return e+="]}"},n.prototype.setPageOverride=function(e){return"string"!=typeof e||e.match(/^\s*$/)?!1:(this.sitePage=e,!0)},n.prototype.addImpression=function(e,t,n,r,i,o){var a={id:String(this.impressions.length+1)};if("number"!=typeof e||1>=e)return null;if("number"!=typeof t||1>=t)return null;if(("string"==typeof i||"number"==typeof i)&&String(i).lengthn)return null;if(a.bidfloor=n,void 0!==r&&"string"!=typeof r)return null;a.bidfloorcur=r}if("undefined"!=typeof o){if(!("number"==typeof o&&o%1===0&&o>=0))return null;a.siteID=o}return this.impressions.push(a),a.id},n.prototype.buildRequest=function(){if(0!==this.impressions.length&&this.initialized===!0){var e,t=encodeURIComponent(this.serialize());g()==c.INDEX_DEBUG_MODE.mode.sandbox.queryValue.toUpperCase()?(this.siteID=c.INDEX_DEBUG_MODE.mode.sandbox.siteID,e="https:"===window.location.protocol?"https://sandbox.ht.indexexchange.com":"http://sandbox.ht.indexexchange.com",i.logMessage("IX DEBUG: Sandbox mode activated")):e="https:"===window.location.protocol?"https://as-sec.casalemedia.com":"http://as.casalemedia.com";var n=encodeURIComponent("0.19.0");return e+="/cygnus?v=7&fn=cygnus_index_parse_res&s="+this.siteID+"&r="+t+"&pid=pb"+n,"number"==typeof this.timeoutDelay&&this.timeoutDelay%1===0&&this.timeoutDelay>=0&&(e+="&t="+this.timeoutDelay),e}};try{if("undefined"==typeof cygnus_index_args||"undefined"==typeof cygnus_index_args.siteID||"undefined"==typeof cygnus_index_args.slots)return;var a=new n(cygnus_index_args.siteID,cygnus_index_args.parseFn,cygnus_index_args.timeout);cygnus_index_args.url&&"string"==typeof cygnus_index_args.url&&a.setPageOverride(cygnus_index_args.url),_IndexRequestData.impIDToSlotID[a.requestID]={},_IndexRequestData.reqOptions[a.requestID]={};for(var s,u,l=0;l=A)i.logMessage(d+" slot excluded from request due to invalid siteID");else if(A&&"undefined"==typeof cygnus_index_args.siteID&&(cygnus_index_args.siteID=A),i.hasValidBidRequest(y.params,f,d)){g=y.placementCode;var x=y.params[f[0]];if("string"!=typeof x&&"number"!=typeof x){i.logError(d+" bid contains invalid slot ID from "+y.placementCode+". Discarding slot");continue}w++;var E={width:y.sizes[_][0],height:y.sizes[_][1]},j=S?String(x):x+"_"+w;if(l[j]=y,cygnus_index_args.slots=t({id:j,width:E.width,height:E.height,siteID:A||cygnus_index_args.siteID},cygnus_index_args.slots),y.params.tier2SiteID){var D=Number(y.params.tier2SiteID);if("undefined"!=typeof D&&!D)continue;cygnus_index_args.slots=t({id:"T1_"+j,width:E.width,height:E.height,siteID:D},cygnus_index_args.slots)}if(y.params.tier3SiteID){var O=Number(y.params.tier3SiteID);if("undefined"!=typeof O&&!O)continue;cygnus_index_args.slots=t({id:"T2_"+j,width:E.width,height:E.height,siteID:O},cygnus_index_args.slots)}}}else i.logMessage(d+" slot excluded from request due to no valid sizes")}}cygnus_index_args.slots.length>20&&i.logError("Too many unique sizes on slots, will use the first 20.",d),s.loadScript(b());var C=!1;window.cygnus_index_ready_state=function(){if(!C){C=!0;try{var e=_IndexRequestData.targetIDToBid;for(var t in l){var s=l[t],f=s.placementCode,p=[];for(var g in e){var m=/^(T\d_)?(.+)_(\d+)$/.exec(g);if(m){var b=m[1]||"",v=m[2],h=m[3],y=n(cygnus_index_args,b+v);if(v===t){var w=o.createBid(1);w.cpm=h/100,w.ad=e[g][0],w.bidderCode=u,w.width=y.width,w.height=y.height,w.siteID=y.siteID,"object"===r(_IndexRequestData.targetIDToResp)&&"object"===r(_IndexRequestData.targetIDToResp[g])&&"undefined"!=typeof _IndexRequestData.targetIDToResp[g].dealID?("undefined"==typeof _IndexRequestData.targetAggregate["private"][f]&&(_IndexRequestData.targetAggregate["private"][f]=[]),w.dealId=_IndexRequestData.targetIDToResp[g].dealID,_IndexRequestData.targetAggregate["private"][f].push(v+"_"+_IndexRequestData.targetIDToResp[g].dealID)):("undefined"==typeof _IndexRequestData.targetAggregate.open[f]&&(_IndexRequestData.targetAggregate.open[f]=[]),_IndexRequestData.targetAggregate.open[f].push(v+"_"+h)),p.push(w)}}else i.logError("Unable to parse "+g+", skipping slot",d)}var _=void 0;if(p.length>0)for(var I=0;I

0?"&":"?",n=e+t+"rnd="+Math.floor(1e7*Math.random()),(new Image).src=n,n):(i.logMessage("Missing or invalid pixelUrl."),void 0)}},function(e,t,n){"use strict";var r=n(12),i=n(13),o=n(19),a=n(2),s=function(){function e(e){"undefined"==typeof window.pp?o.loadScript(c,function(){t(e)},!0):t(e)}function t(e){for(var t=e.bids,r=0;rd;d++){var u=n[d];if(String(u)===String(a)){i=!0;break}}return i}function l(e,t,n){if(s.isArray(e)){t.auid=s._map(e,function(e){return e.params.unit}).join("%2C"),t.aus=s._map(e,function(e){return s.parseSizesInput(e.sizes).join(",")}).join("|"),e.forEach(function(e){for(var n in e.params.customParams)e.params.customParams.hasOwnProperty(n)&&(t["c."+n]=e.params.customParams[n])}),t.callback="window.pbjs.oxARJResponse";var r=d(t);o.loadScript("//"+n+"/w/1.0/arj?"+r)}}function f(t){var n=void 0,r=t.bids||[],i=window.location.href&&encodeURIComponent(window.location.href);try{n=window.self!==window.top}catch(o){n=!1}if(0!==r.length){var a=r[0].params.delDomain;m=new Date(t.start),l(r,{ju:i,jr:i,ch:document.charSet||document.characterSet,res:screen.width+"x"+screen.height+"x"+screen.colorDepth,ifr:n,tz:m.getTimezoneOffset(),tws:e(n),ee:"api_sync_write",ef:"bt%2Cdb",be:1,bc:g},a)}}var p="openx",g="hb_pb",m=void 0,b=null;return pbjs.oxARJResponse=function(e){var r=e.ads.ad;e.ads&&e.ads.pixels&&t(e.ads.pixels),r||(r=[]);for(var i=pbjs._bidsRequested.find(function(e){return"openx"===e.bidderCode}).bids,o=0;o0&&Array.isArray(e.sizes[0])&&e.sizes[0].length>1))throw"Invalid Video Bid - No size provided";i=e.sizes[0]}var a={page_url:r.referrer?r.referrer:v.getTopWindowUrl(),resolution:t(),account_id:r.accountId,integration:o(),timeout:n.timeout-(Date.now()-n.auctionStart+T),stash_creatives:!0,ae_pass_through_parameters:r.video.aeParams,slots:[]},s={site_id:r.siteId,zone_id:r.zoneId,position:r.position||"btf",floor:.01,element_id:e.placementCode,name:e.placementCode,language:r.video.language,width:i[0],height:i[1]};if(!r.video.size_id)throw"Invalid Video Bid - Invalid Ad Type!";return s.size_id=r.video.size_id,r.inventory&&"object"===u(r.inventory)&&(s.inventory=r.inventory),r.keywords&&Array.isArray(r.keywords)&&(s.keywords=r.keywords),r.visitor&&"object"===u(r.visitor)&&(s.visitor=r.visitor),a.slots.push(s),JSON.stringify(a)}function r(e){e.startTime=(new Date).getTime();var n=e.params,r=n.accountId,i=n.siteId,s=n.zoneId,d=n.position,c=n.floor,l=n.keywords,f=n.visitor,p=n.inventory,g=n.userId,m=n.referrer;c=(c=parseFloat(c))>.01?c:.01,d=d||"btf";var b=a.masSizeOrdering(Array.isArray(e.params.sizes)?e.params.sizes.map(function(e){return(S[e]||"").split("x")}):e.sizes);if(b.length\ninDapIF=true;"+f+">\n\n\n\n"+e+""+f+">\n

\n\n

"};return s(l.createNew(w),{callBids:e,createNew:a.createNew})}var s=Object.assign||function(e){for(var t=1;t-1||i>-1?-1===r?1:-1===i?-1:r-i:e-n})},a.createNew=function(){return new a},e.exports=a},function(e,t,n){"use strict";var r=n(3),i=n(2),o=n(12),a=n(13),s=n(19),d=function(){function e(e){var n=e.bids||[];t(n)}function t(e){var t=window.location.host,n=window.location.pathname+location.search+location.hash,o=[];i._each(e,function(e){var t=i.getBidIdParameter("tagid",e.params),n=i.getBidIdParameter("bidfloor",e.params),r=0,a=0,s=Array.isArray(e.params.sizes)?e.params.sizes:e.sizes,d=s.length;2===d&&"number"==typeof s[0]&&"number"==typeof s[1]?(r=s[0],a=s[1]):(r=s[0][0],a=s[0][1]);var u={id:e.bidId,banner:{w:r,h:a},tagid:t,bidfloor:n};o.push(u)});var a={id:i.getUniqueIdentifierStr(),imp:o,site:{domain:t,page:n}},u="//"+d+"?callback=window.pbjs.sovrnResponse&src="+r.REPO_AND_VERSION+"&br="+encodeURIComponent(JSON.stringify(a));s.loadScript(u)}function n(e){var t=pbjs._bidsRequested.find(function(e){return"sovrn"===e.bidderCode});t=t?t.bids.filter(function(t){return e.indexOf(t.bidId)';d=o.createBid(1,u),d.creative_id=e.id,d.bidderCode="sovrn",d.cpm=n,d.ad=decodeURIComponent(c+l),d.width=parseInt(e.w),d.height=parseInt(e.h),a.addBidResponse(i,d),t.push(s)}}),n(t)}else n([]);else n([])},{callBids:e}};e.exports=d},function(e,t,n){"use strict";var r=n(2),i=n(19),o=n(13),a=n(12),s=function(){function e(e){for(var n=e.bids,r=n.length,o=0;r>o;o++){var a=n[o],s=a.bidId;i.loadScript(t(a,s))}}function t(e,t){var i=r.getBidIdParameter("inventoryCode",e.params),o=r.getBidIdParameter("floor",e.params),a="//tlx.3lift.com/header/auction?",s=document.location.protocol+a;s=r.tryAppendQueryString(s,"callback","pbjs.TLCB"),s=r.tryAppendQueryString(s,"lib","prebid"),s=r.tryAppendQueryString(s,"v","0.19.0"),s=r.tryAppendQueryString(s,"callback_id",t),s=r.tryAppendQueryString(s,"inv_code",i),s=r.tryAppendQueryString(s,"floor",o),s=r.tryAppendQueryString(s,"fe",n());var d=r.parseSizesInput(e.sizes);d&&(s+="size="+d+"&");var u=r.getTopWindowUrl();return s=r.tryAppendQueryString(s,"referrer",u),s.lastIndexOf("&")===s.length-1&&(s=s.substring(0,s.length-1)),r.logMessage("tlCall request built: "+s),e.startTime=(new Date).getTime(),s}function n(){var e=0;try{var t=new window.ActiveXObject("ShockwaveFlash.ShockwaveFlash");t&&(e=1)}catch(n){navigator.mimeTypes&&void 0!==navigator.mimeTypes["application/x-shockwave-flash"]&&navigator.mimeTypes["application/x-shockwave-flash"].enabledPlugin&&(e=1)}return e}return pbjs.TLCB=function(e){if(e&&e.callback_id){var t=r.getBidRequest(e.callback_id),n=t&&t.placementCode;t&&r.logMessage("JSONP callback function called for inventory code: "+t.params.inventoryCode);var i=[];e&&e.cpm&&0!==e.cpm?(i=a.createBid(1,t),i.bidderCode="triplelift",i.cpm=e.cpm,i.ad=e.ad,i.width=e.width,i.height=e.height,i.dealId=e.deal_id,o.addBidResponse(n,i)):(t&&r.logMessage("No prebid response from TripleLift for inventory code: "+t.params.inventoryCode),i=a.createBid(2,t),i.bidderCode="triplelift",o.addBidResponse(n,i))}else r.logMessage("No prebid response for placement %%PLACEMENT%%")},{callBids:e}};e.exports=s},function(e,t,n){"use strict";function r(e){return e&&e.__esModule?e:{"default":e}}var i=n(26),o=r(i),a=n(51),s=r(a);Array.prototype.find||o["default"](),Array.prototype.includes||s["default"](),Number.isInteger=Number.isInteger||function(e){return"number"==typeof e&&isFinite(e)&&Math.floor(e)===e}},function(e,t,n){"use strict";var r=n(27),i=n(31);e.exports=function(){var e=i();return r(Array.prototype,{find:e},{find:function(){return Array.prototype.find!==e}}),e}},function(e,t,n){"use strict";var r=n(28),i=n(30),o="function"==typeof Symbol&&"symbol"==typeof Symbol(),a=Object.prototype.toString,s=function(e){return"function"==typeof e&&"[object Function]"===a.call(e)},d=function(){var e={};try{Object.defineProperty(e,"x",{enumerable:!1,value:e});for(var t in e)return!1;return e.x===e}catch(n){return!1}},u=Object.defineProperty&&d(),c=function(e,t,n,r){(!(t in e)||s(r)&&r())&&(u?Object.defineProperty(e,t,{configurable:!0,enumerable:!1,value:n,writable:!0}):e[t]=n)},l=function(e,t){var n=arguments.length>2?arguments[2]:{},a=r(t);o&&(a=a.concat(Object.getOwnPropertySymbols(t))),i(a,function(r){c(e,r,t[r],n[r])})};l.supportsDescriptors=!!u,e.exports=l},function(e,t,n){"use strict";var r=Object.prototype.hasOwnProperty,i=Object.prototype.toString,o=Array.prototype.slice,a=n(29),s=Object.prototype.propertyIsEnumerable,d=!s.call({toString:null},"toString"),u=s.call(function(){},"prototype"),c=["toString","toLocaleString","valueOf","hasOwnProperty","isPrototypeOf","propertyIsEnumerable","constructor"],l=function(e){var t=e.constructor;return t&&t.prototype===e},f={$console:!0,$external:!0,$frame:!0,$frameElement:!0,$frames:!0,$innerHeight:!0,$innerWidth:!0,$outerHeight:!0,$outerWidth:!0,$pageXOffset:!0,$pageYOffset:!0,$parent:!0,$scrollLeft:!0,$scrollTop:!0,$scrollX:!0,$scrollY:!0,$self:!0,$webkitIndexedDB:!0,$webkitStorageInfo:!0,$window:!0},p=function(){if("undefined"==typeof window)return!1;for(var e in window)try{if(!f["$"+e]&&r.call(window,e)&&null!==window[e]&&"object"==typeof window[e])try{l(window[e])}catch(t){return!0}}catch(t){return!0}return!1}(),g=function(e){if("undefined"==typeof window||!p)return l(e);try{return l(e)}catch(t){return!1}},m=function(e){var t=null!==e&&"object"==typeof e,n="[object Function]"===i.call(e),o=a(e),s=t&&"[object String]"===i.call(e),l=[];if(!t&&!n&&!o)throw new TypeError("Object.keys called on a non-object");var f=u&&n;if(s&&e.length>0&&!r.call(e,0))for(var p=0;p0)for(var m=0;m=0&&"[object Function]"===t.call(e.callee)),r}},function(e){var t=Object.prototype.hasOwnProperty,n=Object.prototype.toString;e.exports=function(e,r,i){if("[object Function]"!==n.call(r))throw new TypeError("iterator must be a function");var o=e.length;if(o===+o)for(var a=0;o>a;a++)r.call(i,e[a],a,e);else for(var s in e)t.call(e,s)&&r.call(i,e[s],s,e)}},function(e,t,n){"use strict";e.exports=function(){var e=Array.prototype.find&&1!==[,1].find(function(){return!0});return e?Array.prototype.find:n(32)}},function(e,t,n){"use strict";var r=n(33);e.exports=function(e){var t=r.ToObject(this),n=r.ToInteger(r.ToLength(t.length));if(!r.IsCallable(e))throw new TypeError("Array#find: predicate must be a function");if(0===n)return void 0;for(var i,o=arguments[1],a=0;n>a;a++)if(i=t[a],r.Call(e,o,[i,a,t]))return i;return void 0}},function(e,t,n){"use strict";var r=Object.prototype.toString,i="function"==typeof Symbol&&"symbol"==typeof Symbol.iterator,o=i?Symbol.prototype.toString:r,a=n(34),s=n(35),d=Number.MAX_SAFE_INTEGER||Math.pow(2,53)-1,u=n(36),c=n(37),l=n(38),f=n(39),p=n(40),g=parseInt,m=n(45),b=m.call(Function.call,String.prototype.slice),v=m.call(Function.call,RegExp.prototype.test,/^0b[01]+$/i),h=m.call(Function.call,RegExp.prototype.test,/^0o[0-7]+$/i),y=["…","​",""].join(""),w=new RegExp("["+y+"]","g"),_=m.call(Function.call,RegExp.prototype.test,w),I=/^[-+]0x[0-9a-f]+$/i,T=m.call(Function.call,RegExp.prototype.test,I),S=[" \n\f\r   ᠎    ","          \u2028","\u2029"].join(""),A=new RegExp("(^["+S+"]+)|(["+S+"]+$)","g"),x=m.call(Function.call,String.prototype.replace),E=function(e){return x(e,A,"")},j=n(47),D=n(49),O=u(u({},j),{Call:function(e,t){var n=arguments.length>2?arguments[2]:[];if(!this.IsCallable(e))throw new TypeError(e+" is not a function");return e.apply(t,n)},ToPrimitive:p,ToNumber:function(e){var t=f(e)?e:p(e,"number");if("symbol"==typeof t)throw new TypeError("Cannot convert a Symbol value to a number");if("string"==typeof t){if(v(t))return this.ToNumber(g(b(t,2),2));if(h(t))return this.ToNumber(g(b(t,2),8));if(_(t)||T(t))return 0/0;var n=E(t);if(n!==t)return this.ToNumber(n)}return Number(t)},ToInt16:function(e){var t=this.ToUint16(e);return t>=32768?t-65536:t},ToInt8:function(e){var t=this.ToUint8(e);return t>=128?t-256:t},ToUint8:function(e){var t=this.ToNumber(e);if(a(t)||0===t||!s(t))return 0;var n=c(t)*Math.floor(Math.abs(t));return l(n,256)},ToUint8Clamp:function(e){var t=this.ToNumber(e);if(a(t)||0>=t)return 0;if(t>=255)return 255;var n=Math.floor(e);return t>n+.5?n+1:n+.5>t?n:n%2!==0?n+1:n},ToString:function(e){if("symbol"==typeof e)throw new TypeError("Cannot convert a Symbol value to a string");return String(e)},ToObject:function(e){return this.RequireObjectCoercible(e),Object(e)},ToPropertyKey:function(e){var t=this.ToPrimitive(e,String);return"symbol"==typeof t?o.call(t):this.ToString(t)},ToLength:function(e){var t=this.ToInteger(e);return 0>=t?0:t>d?d:t},CanonicalNumericIndexString:function(e){if("[object String]"!==r.call(e))throw new TypeError("must be a string");if("-0"===e)return-0;var t=this.ToNumber(e);return this.SameValue(this.ToString(t),e)?t:void 0},RequireObjectCoercible:j.CheckObjectCoercible,IsArray:Array.isArray||function(e){return"[object Array]"===r.call(e)},IsConstructor:function(e){return"function"==typeof e&&!!e.prototype},IsExtensible:function(e){return Object.preventExtensions?f(e)?!1:Object.isExtensible(e):!0},IsInteger:function(e){if("number"!=typeof e||a(e)||!s(e))return!1;var t=Math.abs(e);return Math.floor(t)===t},IsPropertyKey:function(e){return"string"==typeof e||"symbol"==typeof e},IsRegExp:function(e){if(!e||"object"!=typeof e)return!1;if(i){var t=e[Symbol.match];if("undefined"!=typeof t)return j.ToBoolean(t)}return D(e)},SameValueZero:function(e,t){return e===t||a(e)&&a(t)},GetV:function(e,t){if(!this.IsPropertyKey(t))throw new TypeError("Assertion failed: IsPropertyKey(P) is not true");var n=this.ToObject(e);return n[t]},GetMethod:function(e,t){if(!this.IsPropertyKey(t))throw new TypeError("Assertion failed: IsPropertyKey(P) is not true");var n=this.GetV(e,t);if(null==n)return void 0;if(!this.IsCallable(n))throw new TypeError(t+"is not a function");return n},Get:function(e,t){if("Object"!==this.Type(e))throw new TypeError("Assertion failed: Type(O) is not Object");if(!this.IsPropertyKey(t))throw new TypeError("Assertion failed: IsPropertyKey(P) is not true");return e[t]},Type:function(e){return"symbol"==typeof e?"Symbol":j.Type(e)},SpeciesConstructor:function(e,t){if("Object"!==this.Type(e))throw new TypeError("Assertion failed: Type(O) is not Object");var n=e.constructor;if("undefined"==typeof n)return t;if("Object"!==this.Type(n))throw new TypeError("O.constructor is not an Object");var r=i&&Symbol.species?n[Symbol.species]:void 0;if(null==r)return t;if(this.IsConstructor(r))return r;throw new TypeError("no constructor found")}});delete O.CheckObjectCoercible,e.exports=O},function(e){e.exports=Number.isNaN||function(e){return e!==e}},function(e){var t=Number.isNaN||function(e){return e!==e};e.exports=Number.isFinite||function(e){return"number"==typeof e&&!t(e)&&1/0!==e&&e!==-1/0}},function(e){var t=Object.prototype.hasOwnProperty;e.exports=Object.assign||function(e,n){for(var r in n)t.call(n,r)&&(e[r]=n[r]);return e}},function(e){e.exports=function(e){return e>=0?1:-1}},function(e){e.exports=function(e,t){var n=e%t;return Math.floor(n>=0?n:n+t)}},function(e){e.exports=function(e){return null===e||"function"!=typeof e&&"object"!=typeof e}},function(e,t,n){"use strict";var r="function"==typeof Symbol&&"symbol"==typeof Symbol.iterator,i=n(41),o=n(42),a=n(43),s=n(44),d=function(e,t){if("undefined"==typeof e||null===e)throw new TypeError("Cannot call method on "+e);if("string"!=typeof t||"number"!==t&&"string"!==t)throw new TypeError('hint must be "string" or "number"');var n,r,a,s="string"===t?["toString","valueOf"]:["valueOf","toString"];for(a=0;a1&&(t===String?n="string":t===Number&&(n="number"));var o;if(r&&(Symbol.toPrimitive?o=u(e,Symbol.toPrimitive):s(e)&&(o=Symbol.prototype.valueOf)),"undefined"!=typeof o){var c=o.call(e,n);if(i(c))return c;throw new TypeError("unable to convert exotic object to primitive")}return"default"===n&&(a(e)||s(e))&&(n="string"),d(e,"default"===n?"number":n)}},function(e){e.exports=function(e){return null===e||"function"!=typeof e&&"object"!=typeof e}},function(e){"use strict";var t=Function.prototype.toString,n=/^\s*class /,r=function(e){try{var r=t.call(e),i=r.replace(/\/\/.*\n/g,""),o=i.replace(/\/\*[.\s\S]*\*\//g,""),a=o.replace(/\n/gm," ").replace(/ {2}/g," ");return n.test(a)}catch(s){return!1}},i=function(e){try{return r(e)?!1:(t.call(e),!0)}catch(n){return!1}},o=Object.prototype.toString,a="[object Function]",s="[object GeneratorFunction]",d="function"==typeof Symbol&&"symbol"==typeof Symbol.toStringTag;e.exports=function(e){if(!e)return!1;if("function"!=typeof e&&"object"!=typeof e)return!1;if(d)return i(e);if(r(e))return!1;var t=o.call(e);return t===a||t===s}},function(e){"use strict";var t=Date.prototype.getDay,n=function(e){try{return t.call(e),!0}catch(n){return!1}},r=Object.prototype.toString,i="[object Date]",o="function"==typeof Symbol&&"symbol"==typeof Symbol.toStringTag;e.exports=function(e){return"object"!=typeof e||null===e?!1:o?n(e):r.call(e)===i}},function(e){"use strict";var t=Object.prototype.toString,n="function"==typeof Symbol&&"symbol"==typeof Symbol();if(n){var r=Symbol.prototype.toString,i=/^Symbol\(.*\)$/,o=function(e){return"symbol"!=typeof e.valueOf()?!1:i.test(r.call(e))};e.exports=function(e){if("symbol"==typeof e)return!0;if("[object Symbol]"!==t.call(e))return!1;try{return o(e)}catch(n){return!1}}}else e.exports=function(){return!1}},function(e,t,n){var r=n(46);e.exports=Function.prototype.bind||r},function(e){var t="Function.prototype.bind called on incompatible ",n=Array.prototype.slice,r=Object.prototype.toString,i="[object Function]";e.exports=function(e){var o=this;if("function"!=typeof o||r.call(o)!==i)throw new TypeError(t+o);for(var a,s=n.call(arguments,1),d=function(){if(this instanceof a){var t=o.apply(this,s.concat(n.call(arguments)));return Object(t)===t?t:this}return o.apply(e,s.concat(n.call(arguments)))},u=Math.max(0,o.length-s.length),c=[],l=0;u>l;l++)c.push("$"+l);if(a=Function("binder","return function ("+c.join(",")+"){ return binder.apply(this,arguments); }")(d),o.prototype){var f=function(){};f.prototype=o.prototype,a.prototype=new f,f.prototype=null}return a}},function(e,t,n){"use strict";var r=n(34),i=n(35),o=n(37),a=n(38),s=n(42),d=n(48),u={ToPrimitive:d,ToBoolean:function(e){return Boolean(e)},ToNumber:function(e){return Number(e)},ToInteger:function(e){var t=this.ToNumber(e);return r(t)?0:0!==t&&i(t)?o(t)*Math.floor(Math.abs(t)):t},ToInt32:function(e){return this.ToNumber(e)>>0},ToUint32:function(e){return this.ToNumber(e)>>>0},ToUint16:function(e){var t=this.ToNumber(e);if(r(t)||0===t||!i(t))return 0;var n=o(t)*Math.floor(Math.abs(t));return a(n,65536)},ToString:function(e){return String(e)},ToObject:function(e){return this.CheckObjectCoercible(e),Object(e)},CheckObjectCoercible:function(e,t){if(null==e)throw new TypeError(t||"Cannot call method on "+e);return e},IsCallable:s,SameValue:function(e,t){return e===t?0===e?1/e===1/t:!0:r(e)&&r(t)},Type:function(e){return null===e?"Null":"undefined"==typeof e?"Undefined":"function"==typeof e||"object"==typeof e?"Object":"number"==typeof e?"Number":"boolean"==typeof e?"Boolean":"string"==typeof e?"String":void 0}};e.exports=u},function(e,t,n){"use strict";var r=Object.prototype.toString,i=n(41),o=n(42),a={"[[DefaultValue]]":function(e,t){var n=t||("[object Date]"===r.call(e)?String:Number);if(n===String||n===Number){var a,s,d=n===String?["toString","valueOf"]:["valueOf","toString"];for(s=0;s1?r.ToInteger(arguments[1]):0;if(a&&!i(e)&&o(t)&&"undefined"!=typeof e)return a.apply(this,arguments)>-1;var n=r.ToObject(this),s=r.ToLength(n.length);if(0===s)return!1;for(var d=t>=0?t:Math.max(0,s+t);s>d;){if(r.SameValueZero(e,n[d]))return!0;d+=1}return!1}}).call(t,function(){return this}())},function(e,t,n){"use strict";function r(e){return e&&e.__esModule?e:{"default":e}}function i(){addEventListener("message",o,!1)}function o(e){var t=e.message?"message":"data",n={};try{n=JSON.parse(e[t])}catch(r){return}if(n.adId){var i=pbjs._bidsReceived.find(function(e){return e.adId===n.adId});"Prebid Request"===n.message&&(a(i,n.adServerDomain,e.source),u["default"].emit(l,i))}}function a(e,t,n){var r=e.adId,i=e.ad,o=e.adUrl,a=e.width,d=e.height;r&&(s(e),n.postMessage(JSON.stringify({message:"Prebid Response",ad:i,adUrl:o,adId:r,width:a,height:d}),t))}function s(e){var t=e.adUnitCode,n=e.width,r=e.height,i=document.getElementById(window.googletag.pubads().getSlots().find(function(e){return e.getAdUnitPath()===t||e.getSlotElementId()===t}).getSlotElementId()).querySelector("iframe");i.width=""+n,i.height=""+r}Object.defineProperty(t,"__esModule",{value:!0}),t.listenMessagesFromCreative=i;var d=n(8),u=r(d),c=n(3),l=c.EVENTS.BID_WON},function(e,t,n){"use strict";var r=n(11),i=function(e){this.name=e.adserver,this.code=e.code,this.getWinningBidByCode=function(){var e=this,t=pbjs._bidsReceived.find(function(t){return t.adUnitCode===e.code});return t}};t.dfpAdserver=function(e,t){var n=new i(e);n.urlComponents=t;var o={env:"vp",gdfp_req:"1",impl:"s",unviewed_position_start:"1"},a=["output","iu","sz","url","correlator","description_url","hl"],s=function(e){return encodeURIComponent(r.formatQS(e))};return n.appendQueryParams=function(){var e=n.getWinningBidByCode();this.urlComponents.search.description_url=encodeURIComponent(e.descriptionUrl),this.urlComponents.search.cust_params=s(e.adserverTargeting),this.urlComponents.search.correlator=Date.now()},n.verifyAdserverTag=function(){for(var e in o)if(!this.urlComponents.search.hasOwnProperty(e)||this.urlComponents.search[e]!==o[e])return!1; for(var t in a)if(!this.urlComponents.search.hasOwnProperty(a[t]))return!1;return!0},n}},function(e,t,n){"use strict";function r(e,t,n){return t in e?Object.defineProperty(e,t,{value:n,enumerable:!0,configurable:!0,writable:!0}):e[t]=n,e}function i(e){var t=e?"string"==typeof e?[e]:e:pbjs._adUnitCodes,n=p.getWinningBids(t),i=o();return n=n.map(function(e){return r({},e.adUnitCode,Object.keys(e.adserverTargeting).filter(function(t){return"undefined"==typeof e.sendStandardTargeting||e.sendStandardTargeting||-1===i.indexOf(t)}).map(function(t){return r({},t.substring(0,20),[e.adserverTargeting[t]])}))})}function o(){return c.getStandardBidderAdServerTargeting().map(function(e){return e.key}).concat(f.TARGETING_KEYS).filter(u.uniques)}function a(e){var t=o();return pbjs._bidsReceived.filter(u.adUnitsFilter.bind(this,e)).map(function(e){return e.alwaysUseBid?r({},e.adUnitCode,Object.keys(e.adserverTargeting).map(function(n){return t.indexOf(n)>-1?void 0:r({},n.substring(0,20),[e.adserverTargeting[n]])}).filter(function(e){return e})):void 0}).filter(function(e){return e})}function s(e){var t=f.TARGETING_KEYS;return pbjs._bidsReceived.filter(u.adUnitsFilter.bind(this,e)).map(function(e){return e.adserverTargeting?r({},e.adUnitCode,d(e,t.filter(function(t){return"undefined"!=typeof e.adserverTargeting[t]}))):void 0}).filter(function(e){return e})}function d(e,t){return t.map(function(t){return r({},(t+"_"+e.bidderCode).substring(0,20),[e.adserverTargeting[t]])})}var u=n(2),c=n(13),l=n(2),f=n(3),p=t,g=[];p.resetPresetTargeting=function(e){var t=e?"string"==typeof e?[e]:e:pbjs._adUnitCodes;u.isGptPubadsDefined()&&window.googletag.pubads().getSlots().forEach(function(e){g.forEach(function(n){(t.includes(e.getAdUnitPath())||t.includes(e.getSlotElementId()))&&e.setTargeting(n,null)})})},p.getAllTargeting=function(e){var t=e?"string"==typeof e?[e]:e:pbjs._adUnitCodes,n=i(t).concat(a(t)).concat(pbjs._sendAllBids?s(t):[]);return n.map(function(e){Object.keys(e).map(function(t){e[t].map(function(e){-1===g.indexOf(Object.keys(e)[0])&&(g=Object.keys(e).concat(g))})})}),n},p.setTargeting=function(e){window.googletag.pubads().getSlots().forEach(function(t){e.filter(function(e){return Object.keys(e)[0]===t.getAdUnitPath()||Object.keys(e)[0]===t.getSlotElementId()}).forEach(function(e){return e[Object.keys(e)[0]].forEach(function(e){e[Object.keys(e)[0]].map(function(n){return l.logMessage("Attempting to set key value for slot: "+t.getSlotElementId()+" key: "+Object.keys(e)[0]+" value: "+n),n}).forEach(function(n){t.setTargeting(Object.keys(e)[0],n)})})})})},p.getWinningBids=function(e){var t=e?"string"==typeof e?[e]:e:pbjs._adUnitCodes;return pbjs._bidsReceived.filter(function(e){return t.includes(e.adUnitCode)}).filter(function(e){return e.cpm>0}).map(function(e){return e.adUnitCode}).filter(u.uniques).map(function(e){return pbjs._bidsReceived.filter(function(t){return t.adUnitCode===e?t:null}).reduce(u.getHighestCpm,{adUnitCode:e,cpm:0,adserverTargeting:{},timeToRespond:0})})},p.setTargetingForAst=function(){var e=pbjs.getAdserverTargeting();Object.keys(e).forEach(function(t){return Object.keys(e[t]).forEach(function(n){if(l.logMessage("Attempting to set targeting for targetId: "+t+" key: "+n+" value: "+e[t][n]),l.isStr(e[t][n])||l.isArray(e[t][n])){var r={},i="hb_adid"===n?n.toUpperCase():n;r[i]=e[t][n],window.apntag.setKeywords(t,r)}})})},p.isApntagDefined=function(){return window.apntag&&l.isFn(window.apntag.setKeywords)?!0:void 0}}]); pbjs.version="0.19.0"; Did we answer your question?

Submit Text

Answer it!

Answer it!

Answer it!

Answer it!

Answer it!

Answer it!

Answered

Pretty much the same way as you would do for a full bath. The result may be a little bit claustrophobic as you will find it difficult to get your body further away from the ac (MORE)

Answered

I would cut the TIME of each one in half. it has the same effect.

Answered

A shower because you save more water. Also when you take a bath you sit there in your own wet dirt.

Thanks for the feedback!

Answered

Shower. In a bath you have all the dirt floating around you, whereas it goes down the drain in the shower.

Thanks for the feedback!

Answered

InUncategorized

if we don't have bath or shower everyday it isn't good for our health if we have shower everyday we become more heather and it we look good too

Answered

because people are to cheap to pay to turn on the heater. and so people will take faster showers and wont waste water

Thanks for the feedback!

Answered

InUncategorized

Shower bath is just washing yourself by standing upright under water sprayed from a nozzle. Where we dont bend again and again as we take bath from bucket of water

Thanks for the feedback!

Answered

No! Panels are strictly forbidden in bathrooms of any kind. In the NEC, a half bath is a bathroom just as much as a full bath.

Thanks for the feedback!

Answered

InUncategorized

Shower mixer taps can be found at stores like Lowes or The Home Depot. It would be found in the plumbing department in the store. You could also look for the product online if (MORE)

Saturday, July 1, 2017

How to Install a Curved Shower Rod in a Shower Stall

Read article : How to Install a Curved Shower Rod in a Shower Stall

<a href=Curved shower rods give you more space in the shower." title="" class="photo hide" longdesc="https://cpi.studiod.com/www_ehow_com/i.ehow.com/images/a07/1o/93/install-shower-rod-shower-stall-800x800.jpg" /> Jupiterimages/Photos.com/Getty Images

If your shower stall is a cramped, but you can't afford to remodel the entire bathroom, install a curved shower curtain instead. Curved shower curtains, frequently seen in hotel bathrooms, add a few extra inches of space to the shower. Curved shower rods are made to fit shower enclosures between 57 and 60 inches wide and easily accommodate standard 72-inch wide shower curtains.

Things You'll Need

  • Drill

  • Wall patch

  • Pencil

Remove your old shower rod and prep the area for a new shower rod by removing debris and patching any holes. Mark the area for the new brackets with a pencil. Hang the curved shower rod at the same height as the old rod, but 2 to 3 inches inside the previous marks to allow the curtain to drape inside the tub wall. Hold the bracket in place, and drill the screws through the bracket and into the wall. Repeat procedure for the second bracket. ', image: '', flash: '' }, google_image_size : '300x250' });

Snap the curved rod into place in the brackets.

Replace the shower rings and shower curtain.

\ \ \ {! } !}\ \
', image: '', flash: '' }, google_image_size : '336x280' });

Saturday, May 13, 2017

How to Install a Shower Stall in a Half Bath

Read article : How to Install a Shower Stall in a Half Bath

Half bathrooms can seem like great additions to a home and are frequently installed off foyers and kitchens. They add little to a house's resale value, however, because they can often seem underutilized in terms of space. Adding a shower stall to turn a half bath into a three-quarter bath can add to the resale value of the house. Before you begin a remodel, though, make sure that a shower stall will fit in a half bath or figure out what you need to do to get the extra space.

Tuesday, April 11, 2017

How to Lay Tile: Install a Ceramic Tile Floor In the Bathroom

Read article : How to Lay Tile: Install a Ceramic Tile Floor In the Bathroom

Cover up an old floor

Whether you’re replacing an old shabby floor or installing a new one, you can’t beat ceramic or stone tile for durability and appearance. When laid properly, it’s virtually a forever floor that requires almost no care and maintenance. And you can select materials from a vast array of colors and textures. We’ll cover how to lay tile in a few steps.

What’s equally attractive is that you can lay a first-class tile floor yourself, often in one weekend, and save the $500 to $1,500 cost of hiring a pro.

The key to keeping the job simple is to cover the old vinyl or other flooring with a new thin underlayment that gives you a fresh, clean start. No messy tear-out and repair. In this article, we’ll demonstrate how to install a thin “backer board” over the old floor. Then we’ll cover tile-setting techniques, from layout and cutting to grout and cleanup.

This is a two-day project for most bathrooms, even if you don’t have any previous tile experience. If you’re comfortable using basic hand tools and have the patience to align tiles just right, you can handle this job. The entire cost of this project for a typical bath ranges from $300 to $600.

Estimating the Cost of a Tile Project

The tile itself will be your biggest cost, so start by measuring the square footage of the floor. Then add 10 percent for cutting waste. If you choose a more complex layout than the simple grid pattern we used, your waste will be greater. Most tile sells for $5 to $15 per square foot, but you can spend as little as $3 or more than $50. If you have to install backer board, add $2 per square foot to the cost of the tile. Other materials will cost about $90, regardless of bathroom size. The tile tools you’ll need (including a tile cutter) will total $60 to $80.

Assess your floor

The success of any tile job depends on a solid base, that is, a floor that flexes very little as you walk across it. If you have a concrete subfloor, this isn’t an issue. You can lay tile directly over the existing vinyl as long as it’s well adhered.

If possible, avoid tearing out vinyl flooring. Leaving it in place saves time, of course, but it also reduces asbestos hazard concerns. Asbestos was used in sheet vinyl and vinyl tile until the mid-1980s. By leaving the vinyl undisturbed, you won’t risk sending asbestos fibers into the air.

If you have a wood subfloor, there’s a good chance that you’ll have to install backer board over your vinyl to make the floor thicker and stiff enough for tile. The easiest way to see flooring thickness is to pull off a floor register. Otherwise look for plumbing passageways through the floor. As a last resort, drill through the floor with a 1-in. or larger spade bit (your new floor will cover the hole later). To prevent asbestos dust from becoming airborne, mist the bit with a spray bottle as you drill. In addition to floor thickness, you’ll need to determine joist spacing. If there’s an unfinished basement or crawlspace below the floor, simply measure the spacing. If there’s a ceiling, probe for joists with a drill bit.

If the joists are spaced 16 in. apart, the layers of structural flooring beneath the vinyl should add up to at least 1-1/8 in. With joists every 24 in., you need 1-1/2 in. If your floor is too thin for tile, add a thicker layer of tile backer board. Our floor required 1/4-in.-thick backer. Yours might need 1/2-in. backer to reach the minimum thickness. If your floor is already thick enough, you can simply prep the vinyl floor (Photos 1 – 4) and skip the backer installation (Photos 5 – 8). Then tile directly over the vinyl, following the same steps we used over backer board.

Regardless of the type of subfloor, there are two situations where you can’t leave vinyl in place: First, if large areas of the vinyl are loose, don’t set tile or backer over it. Small loose spots are acceptable and easy to deal with (Photo 4).

Second, “cushioned” sheet vinyl must be removed before you can set tile. Cushioned vinyl has a foam backing that makes it noticeably thicker and softer than standard vinyl flooring. It’s too spongy to support tile or backer board. Before removing it, call your local health department for instructions on how to check for asbestos and proper procedures if asbestos is present.

Gather Advice While You Shop

Home centers carry everything you need for this project, but begin shopping at a tile store, where you’re more likely to get expert advice. Make a quick sketch of your floor plan and jot down all the dimensions. Also take a photo of the floor at the doorway. This will help the tile store staff recommend a “transition” to neatly join the tile to the hallway flooring. Transitions come in different styles to suit any situation.

When you choose the tile itself, ask if it requires any special installation steps. Some tile, for example, should be coated with grout release before grouting. Also ask about cutting techniques for the tile. You’ll use sanded grout for the floor. Ask if sanded caulk is available in a color that matches your grout for the floor/tub and floor/wall tile joints.

Prepare the room

First, get the toilet out of your way. Stuff a rag in the hole to block sewer gases. If your home only has one toilet, you can leave it in place until you install the backer board. Keep a supply of wax rings on hand if you plan to reinstall the toilet at the end of each day.

If you expect to keep your vanity for many years to come, leave it in place and tile around it. But if you think you might replace it, remove it now. When the job’s done, you can reinstall the old vanity or put in a new one. Having the vanity out of the way gives you more workspace, and you won’t have to cut backer board and tiles to fit around it. This also eliminates the floor repair problem if you install a smaller vanity or pedestal sink in the future.

Pull off the baseboard or plan to add base shoe molding. This leads to a neater-looking job because the edges of the tile will be covered later—jagged cuts and slight measuring mistakes are hidden. If your baseboard has base shoe molding, remove only the base shoe. Backer board and tile will raise your floor 3/4 in. or more. So you’ll have to remove and undercut the door. To mark the door for cutting, stack backer board, tile and two layers of cardboard on the floor (see Photo 3). Mark the door 1/2 in. above the stack, remove the door and cut off the bottom.

Scrub, screw and patch the floor

Install a Ceramic Tile Floor in the Bathroom

Photo 1: Scrub the floor with stripper

Remove the baseboard and toilet. Using an abrasive pad, scrub the floor hard with water mixed with vinyl floor stripper.

Install a Ceramic Tile Floor in the Bathroom

Photo 2: Drive screws into the floor joists

Mark the floor joists with chalk lines and drive 2-1/2-in. screws every 8 in. Don’t leave any screw heads protruding.

Install a Ceramic Tile Floor in the Bathroom

Photo 3: Cut the door trim to accommodate tile

Undercut door trim using a jamb saw or handsaw. A piece of backer board, tile and two layers of cardboard raise the saw to the correct height above the floor.

Install a Ceramic Tile Floor in the Bathroom

Photo 4: Fill low spots with thin-set

Cut out any loose sections of vinyl with a utility knife. Fill the void with thin-set using the flat edge of a notched trowel.

Scrub the floor with a vinyl floor stripper following the manufacturer’s instructions. The stripper will dissolve wax and other residue. Scrub hard with an abrasive scouring pad (Photo 1). The tiny scratches left by scrubbing help the thin-set bond better.

Next, drive screws through the floor into the joists (Photo 2). This ensures that the subfloor and underlayment are securely fastened. If there’s an unfinished basement below the floor, locating the joists is easy: Go to the basement and drill a couple of 1/4-in. holes up through the floor next to a joist. If you can’t locate the joists from below, pick a spot near one wall and drill a hole. If the bit breaks through into hollow space, move over 1 in. and drill another hole. Keep going until you hit a joist. Then go to the opposite wall and find the other end of the joist. Measure at intervals of 16 or 24 in. from the first joist to locate the others.

While you’re driving screws, look for any spots where the vinyl has loosened from the floor. Cut out loose spots and fill them (Photo 4). If there are any copper pipes that pass through the floor, wrap them with duct tape at floor level. Cement-based thin-set and grout can corrode copper.

Install backer board

Install a Ceramic Tile Floor in the Bathroom

Photo 5: Install backer board over the floor

Cover the floor with backer board. Cut inside corners, circles and curves with a drywall saw. Space pieces 1/8 in. apart and hold each one in place with two temporary screws.

Install a Ceramic Tile Floor in the Bathroom

Drywall saw

Use a drywall saw to cut corners, circles and curves in backer board.

Install a Ceramic Tile Floor in the Bathroom

Photo 6: Score and snap the backer board

Make straight cuts with a scoring knife. Make three or four scoring passes, then snap the backer over a 2×4. When all the pieces have been laid out, label them and set them aside.

Install a Ceramic Tile Floor in the Bathroom

Scoring knife

Use a scoring knife to score the backer board.

Install a Ceramic Tile Floor in the Bathroom

Photo 7: Trowel on the thin-set

Comb out a bed of thin-set just large enough for each piece of backer board using a 1/4-in. notched trowel held at a 45-degree angle. Screw the backer down before spreading thin-set for the next piece.

Install a Ceramic Tile Floor in the Bathroom

Notched trowel

Use a 1/4-in. notched trowel to spread the thin-set over the floor.

Install a Ceramic Tile Floor in the Bathroom

Photo 8: Cover the joints

Press adhesive-backed mesh tape over the joints and skim over the tape with thin-set. When the thin-set is firm but not fully hardened, scrape away any ridges with a putty knife.

The backer board is fastened with a combination of screws and thin-set adhesive. Cut and lay out all the pieces before you mix the thin-set (Photos 5 and 6). You can run the sheets in any direction, but be sure to stagger the joints so you never have four corners meeting at one point. Leave a 1/8-in. space between the sheets and along the vanity, tub or shower. The gap along walls must be at least 1/8 in. wide, but a wider gap (about 1/2 in.) makes the panels easier to set in place.

After cutting and fitting, label the location of each one and set them all aside. Vacuum the floor and have your drill and screws ready to go before you mix the thin-set. Read the thin-set’s label. Spread the thin-set with a 1/4-in. notched trowel. Comb in one direction so air can escape when you embed the backer (Photo 7). Drive screws every 6 in. around the perimeter of each piece and every 8 in. “in the field” (across the face of the panel). If the leftover thin-set is still workable, you can immediately embed mesh tape over the joints (Photo 8).

If the thin-set has become too stiff or chunky, mix a new batch. Use “alkali-resistant” tape that’s meant for backer board. While the tape coat of thin-set hardens, run a putty knife over all the screw heads to scrape off the “mushroom” bulges around screws. Drive in any protruding screw heads you come across.

CAUTION!

Cement products like thin-set and grout draw moisture from skin and can even cause burns that require medical attention. While most pros work bare-handed, wear gloves if you have any special sensitivity. Also wear eye protection while mixing thin-set and grout.

Figure A: Ceramic Tile Over Vinyl

Everything you need for this project is available at home centers. Most of what you need is also available at tile stores.

Cutaway of a tile floor over vinyl

Careful layout pays off

Install a Ceramic Tile Floor in the Bathroom

Photo 9: Test your layout to avoid small pieces along the walls

Dry-lay tile to determine the best layout. Start with centered rows, leaving equal spaces at walls. Then reposition rows until you find the optimal layout.

Install a Ceramic Tile Floor in the Bathroom

Photo 10: Attach guide boards to guide the layout

Screw guide boards to the floor following your chosen layout. Position the guides so you can lay all the field tiles without moving the guides. Make sure the guides are at right angles by measuring out a 3-4-5 triangle.

Too often, tile novices simply start setting tile in a corner and continue along two walls until the floor is covered. Sometimes they get lucky and the floor looks good. But more often this method leads to trouble:

They end up with awkward-looking, thin slivers of tile along a prominent wall or at the doorway. And the tile looks even worse when walls are badly out of square or crooked—a straight grout line running too close to a wall emphasizes the wall’s imperfections.

Whether you’re laying a simple grid pattern like we show here, or a diagonal pattern with a border, the best tile layout usually calls for centering full tiles between walls so the partial tiles along the edges will end up all the same size. Don’t rely on your tape measure and mental arithmetic. Rip open a carton of tile, grab a handful of spacers and experiment with your layout on the floor.

To begin, center rows of tile between walls so you have equal spaces along walls that face each other (Photo 9). Set the two rows parallel to the two most prominent walls. Then make adjustments, trying to achieve these three goals:

  • Use full tiles at doorways and along the bathtub or shower. These are usually the only places where the edges of the floor aren’t covered by baseboard. If you use full tiles in these exposed spots, you don’t have to worry about making smooth, perfect cuts.
  • Avoid narrow tiles along walls. Ideally, you’ll end up with tiles cut to half size or larger. Avoid cutting tile to widths less than 2 in.
  • Minimize cutting and try to avoid difficult cuts. For example: Cutting tile to an L-shape to fit around an outside corner is especially difficult when one arm of the “L” is less than 2 in. wide. The arm tends to break off as you cut.

Chances are, your layout won’t meet all these goals. Because the shower stall was the focal point in our bathroom, we made it our No. 1 layout priority. We chose to use full tiles in front of the shower. That left us with 3-in.-wide tiles along the opposite wall, which was less prominent. We also chose to center the tile rows on the shower; that meant we had to use cut tiles at the doorway.

Once you determine a layout, establish lines to guide your tile positioning. The usual method is to snap chalk lines on the floor. But chalk lines are hard to see after you’ve spread thin-set, and one row of tile may slip as you set the next row. Here’s a more reliable guide: Choose straight boards a foot shorter than the length and width of the room. Tape one edge of each board so thin-set won’t stick to them.

Then screw the boards to the floor at a right angle to form a guide that eliminates guesswork and shifting (Photo 10).

Video: Create Your Own Floor Tile Layout

Planning the layout for a tile project is usually the hardest and most time- consuming step. Watch this video to learn how a pro does it. You’ll see how to snap chalk lines and make sure they are perfectly square. Plus, you’ll learn how to avoid unsightly narrow, difficult-to-cut tiles along a wall. Don’t start a tile project until you’ve watch this video!

Set the tile (finally!)

Install a Ceramic Tile Floor in the Bathroom

Photo 11: Set the full tiles

Comb out a few square feet of thin-set and set tile against the guides. Continue until all the full tiles are in place. Tip: Watch for squeeze-out between tiles and rake it out with tile spacers.

Install a Ceramic Tile Floor in the Bathroom

Spacers detail

Keep the gaps between tiles even by using spacers

Install a Ceramic Tile Floor in the Bathroom

Photo 12: Spread thin-set and set the perimeter tiles.

Cut and set the perimeter tiles after the thin-set beneath the full tiles has hardened. In spaces too narrow for your trowel, comb thin-set onto the backs of tiles.

It’s usually easiest—and most efficient—to set tile in two phases: First set all the full “field” tiles (Photo 11). Then, when the thin-set has hardened for several hours, cut all the perimeter tiles and set them (Photo 12). Here are some tips for both phases of the job:

  • The trowel you use for setting tile may be different from the one you used to embed the backer. The thin-set label tells you which notch size to use relative to tile size.
  • Dampen the backer with a sponge just before applying thin-set. This keeps the thin-set from drying out too quickly.
  • Comb the thin-set in one direction so air pockets won’t be trapped under tile.
  • Open three or four cartons and mix the tiles as you set them. Pattern and color vary slightly from one carton to the next.
  • Don’t just set each tile into place; press down on the tile and wiggle it to embed it firmly in the thin-set.
  • Watch for “tipped” corners. When you press a tile in place, it’s easy to tilt it slightly so that one corner stands higher or lower than neighboring tiles.
  • When you complete a section of tile, inspect it before moving on. Make sure the tiles line up correctly and spacers are in place. Wipe any thin-set off the face of tiles with a damp sponge.
  • When the thin-set becomes chunky or too stiff, throw it away and mix more. Never try to extend the life of thin-set or grout by adding water.
  • Cut perimeter tile so that caulked joints (at tub) are the same width as grouted joints.

Prepare the floor for grout

Install a Ceramic Tile Floor in the Bathroom

Photo 13: Install an extension ring over the toilet flange

Remove the old screws from the toilet flange and apply a heavy bead of silicone caulk. Fasten the extension ring over the old flange with stainless steel or brass screws.

Install a Ceramic Tile Floor in the Bathroom

Photo 14: Install the transition strip

Glue the transition into place with construction adhesive. If carpet meets the transition, you may have to add a new tack strip.

Install a Ceramic Tile Floor in the Bathroom

Photo 15: Stuff backer rod along the wall

Push backer rod into joints that will be caulked later. The foam rod keeps grout out of joints. After grouting, pull out the rod and caulk the joints.

When all the tiles are in place and the thin-set has hardened, remove all the spacers. Next, raise the toilet flange by adding an extension ring or two (Photo 13). The extended flange should be flush with or higher than the surrounding tile.

When you grout, fill in between the flange and tile. That way, any future leak around the flange will show up on the bathroom floor instead of on the ceiling below. If you plan to use a glue-down transition as we did, this is the time to install it.

Here’s how we dealt with our transition: First, we removed the old metal strip that covered the carpet’s edge. Then we cut our transition strip to fit between the door jambs using a miter saw. Next, we added a tack strip to hold the carpet in place. Before we could glue the transition to the floor (Photo 14), we had to remove a thin strip of the old vinyl floor.

Grout is too brittle to handle the slight shifting movements that are normal in any room. Keep grout out of joints wherever the floor meets the tub, shower, vanity or walls (Photo 15).

Pack the joints with grout

Install a Ceramic Tile Floor in the Bathroom

Photo 16: Grout the joints

Work the grout back and forth across the floor, diagonal to the joints and holding the float at a 45-degree angle. Then scrape off the excess grout, holding the float almost upright.

The thin-set directions will tell you how soon you can grout the floor—usually 24 hours. Grouting isn’t complex. Just plop a couple of scoops of grout onto the floor in a corner, work the grout into joints (Photo 16) and scrape off the excess grout before moving to the next section. In addition:

  • Mix the grout to a mashed-potatoes consistency. Adding extra liquid makes grout easier to work with but weakens it.
  • Don’t just spread the grout over the joints; press hard to pack it into the joints. If you’re doing it right, your forearm will get a good workout.
  • Whether you’re filling joints or scraping off excess grout, always push the float diagonally across the tiles.
  • Scrape off the excess to leave tile as clean as you can. The less grout you leave on the tiles, the easier cleanup will be.
  • When you’re done, cover the grout bucket with a plastic bag and set it in a cool place to slow the hardening process. During cleanup, you may find spots that need a little extra.

Grout cleanup

Install a Ceramic Tile Floor in the Bathroom

Photo 17: Clean the tiles

Wipe grout off the tile surface with a damp sponge. Wipe gently on the first pass so you don’t pull grout out of the joints. Rinse the sponge often.

Clean the surface of the tile when the grout is stiff enough to stay put in the joints but still soft enough to wipe off the tile surface. During hot, dry weather, grout can become difficult to wipe away in just 10 minutes, so get ready for cleanup before you even mix the grout. You’ll need two buckets of clean water, two sponges, a synthetic scouring pad and a dry rag.

As soon as you’re done grouting, go to the first section you grouted and wipe across a joint with a damp sponge. If the sponge pulls grout out of the joint, wait five minutes and try again. In cool, damp weather, the grout may stay too soft for an hour. When the grout is hard enough, gently wipe the tile with a damp sponge.

Rinse the sponge frequently as you wipe the entire floor (Photo 17). If you come across tough spots, scrub them with the scouring pad. Be careful where you put your feet and knees—don’t mar your perfect grout joints.

Immediately after the first pass, grab the second bucket of clean water and the fresh sponge and make a second, more thorough pass. Then, as the tile surface dries, wipe it with a dry terry cloth. The dry haze should buff off easily. If not, go for fresh water and sponge the floor again. If you can’t get rid of the haze, don’t panic. Products that remove haze are available wherever tile is sold.

Let the grout cure overnight before you caulk joints, set the toilet or reinstall baseboard. Grout sealer is a good precaution against staining: Some products can be applied 24 hours after grouting; others require a two- to three-week wait. If you have leftover tile or grout, keep them in case you have to make repairs in the future. Be sure to write down the brand, color and retailer of the tile.

How NOT to Save Money on a Tile Project

I’m a devout cheapskate, but when it comes to buying thin-set and grout, I grab the most expensive products on the shelf. More expensive thin-sets and grouts generally contain a higher proportion of the polymers that improve adhesion, durability and stain resistance.

In most situations, cheaper products would perform just fine. But if I can reduce the risks of loose tiles or cracked grout by spending an extra $30 on a typical bathroom project, I consider that a bargain.

Liquid additive is another smart investment. If the thin-set or grout label says you can mix it with water or an additive, use additive. These liquids (labeled “latex, ” “polymer” or “acrylic”) are meant to improve adhesion and stain resistance. But as a bonus, they produce a slick, creamy consistency. Thin-set combs out more smoothly, grout flows easily into joints, and both remain workable longer.

Also buy a mixer for your drill. Mixers come in various styles and sizes. Go easy on the trigger. If you run the drill at full speed, you can create millions of tiny air bubbles, which will weaken the mix.

Tile cutting tools

Install a Ceramic Tile Floor in the Bathroom

Tile cutter

A tile cutter is the fastest way to cut tile. Just push the handle forward and a small wheel scores the tile. Then push the handle down and the tile snaps in two. You can’t beat a tile cutter for convenience. It makes no mess and you can drag it around the room as you work. But a tile cutter has zero versatility. It makes straight cuts across the entire tile—no curves or corner cuts. Cutting 1 in. or less off a tile can be difficult or impossible. You can rent one at rental centers and some tile shops.

Install a Ceramic Tile Floor in the Bathroom

Wet saw

A wet saw cuts with a diamond blade while water cools the blade and eliminates dust. You can cut notches, trim off tiny slivers of tile, cut miters and even make curves. You’ll get clean cuts in any type of tile. But wet saws are messy. They spit water and raise a cloud of gritty mist. If you use one indoors, contain the mist with curtains of plastic film and cover nearby surfaces. You can buy a small wet saw like the one shown here or rent a professional model from a tile store or home or rental center. If you only have a few cuts that require a wet saw, call a tile store. Many make cuts for a small fee.

Install a Ceramic Tile Floor in the Bathroom

Angle grinder

An angle grinder equipped with a diamond blade can make straight cuts, curves and notches in any type of tile. Since all your cuts are freehand, this isn’t a precision tool, but you can grind away imperfections with the tip of the blade. Use a grinder only outside. Wear a dust mask and eye protection.

Install a Ceramic Tile Floor in the Bathroom

Nippers

Nippers are useful for rough curves and notches. They don’t cut tile, but bite out small chunks, leaving jagged edges.

Install a Ceramic Tile Floor in the Bathroom

Contour gauge

A contour gauge is a great tool for marking troublesome shapes on tile. Just press it against any odd-shaped surface (like the curved corner of a bathtub) and transfer the profile to tile.

Here are the tools that can cut your tile. Buy or rent the ones that make the most sense for your project.

In addition to the tools shown here, a carbide abrasive blade that fits in a jigsaw cuts slowly but leaves fairly clean cuts in softer types of ceramic tile and natural stone. A carbide abrasive hole saw cuts perfect holes for plumbing pipes and fixtures.

A rubbing stone is simply an abrasive block, similar to the wheel in a bench grinder. Use it to smooth sharp or slightly chipped cuts that will be exposed.

Additional Information

Required Tools for this Project

Have the necessary tools for this DIY project lined up before you start—you’ll save time and frustration.

You’ll also need these specialty tools for working with tile and backer board:
Scoring knife, Margin trowel, Tile cutter, 4-in. diamond blade, Drill mixer, Offset saw, Tile cutter, Nippers, Wet saw
You can also use an angle grinder for cutting tile.