Showing posts sorted by date for query creamy consistency leaves. Sort by relevance Show all posts

Saturday, February 10, 2018

The Body Shop Almond Milk & Honey Soothing & Caring Shower Cream Review

Read article : The Body Shop Almond Milk & Honey Soothing & Caring Shower Cream Review

Skin tone: Medium to dusky

Skin type: Combination
Hello, pretty ladies!
The Body Shop has recently launched a whole new line, it is their ?Almond Milk & Honey? range. The name itself sounded tempting and promising, and so I picked up the ?Almond Milk & Honey Soothing & Caring Shower Cream?. Let?s see how this fared for me!

Price: 638 INR for 250ml

Product Description:

Soothe as you cleanse with this gentle, soap-free shower cream ? specially formulated to respect your skin?s natural moisture barrier and pH. This gentle formula won?t strip your skin of moisture. Enriched with organic almond milk from Spain and Community Trade honey from Ethiopia, Almond Milk & Honey is specially formulated for sensitive, dry skin.
? Soothing and caring shower cream

? Leaves skin feeling soft, clean and cared for

? Suitable for sensitive, dry skin

? Made with organic almond milk Enriched with Community Trade honey and organic almond oil

? Hypoallergenic fragrance

? Dermatologically tested
Ingredients:

Aqua, Cocamidopropyl Betaine, Glycerin, Helianthus Annuus Seed Oil, Coco-Glucoside, Sodium Chloride, Parfum, Acrylates/C10-30 Alkyl Acrylate Crosspolymer, Citric Acid, Sodium Benzoate, Sodium Hydroxide, Glyceryl Laurate, Mel, Prunus Amygdalus Dulcis Oil, Disodium EDTA, Tocopherol, Polysorbate 20, Glycolic Acid, Denatonium Benzoate, Prunus Amygdalus Dulcis Seed Extract, Xanthan Gum, Benzyl Alcohol, Dehydroacetic Acid.
My Experience with The Body Shop Almond Milk & Honey Soothing & Caring Shower Cream:


The Body Shop Almond Milk & Honey collection is designed exclusively for the sensitive and dry skin. The range consists of seven items from bath milk to body butter to hand cream, and with a sweet almond and honey scent.

This line is exclusively made from Community Trade almond oil from Spain, Community Trade honey from Ethiopia and a hit of organic almond milk. With sensitive skin in mind, The Body Shop opted for hypoallergenic fragrance and omitted colorants, mineral oil, petroleum and even silicones. The Almond Milk & Honey formula is also dermatologically tested.

The soothing and caring shower cream comes packaged in a beautiful white plastic bottle with a flip open cap with the product details on the top. The cream itself is white in color, just like milk, though it is a bit thick, it does have a pouring consistency.

Now, coming to the smell, I have one word for that ? HEAVEN. It is just phenomenal. It combines the wonderful fragrances of honey, almond, and milk. It is, by far, the best fragrance TBS has offered till date. I am in love with this product and its fragrance. The fragrance is soothing and calming and sweet, nothing overboard.

This is a lovely product. It?s a soap-free shower cream that fluffs up into a creamy lather when I use it with my loofah. It is very soothing and does not make my skin feel tight like many other body washes do. It is such a refreshing product and makes the shower time a mag...

Wednesday, January 24, 2018

Bath and Body Works Sweet Magnolia and Clementine Shower Gel Review

Read article : Bath and Body Works Sweet Magnolia and Clementine Shower Gel Review

Hello everyone!

Today’s product to review is, again, from a well known brand in fragrances and bath and body stuff. I have chosen Bath & Body Works Sweet Magnolia and Clementine Shower Gel for review today. My love for shower gels never comes to an end and might never will; let’s see how this fares for me.

Bath & <a href=Body Works Sweet Magnolia and Clementine Shower Gel Review1" width="700" height="525" />

Product Description:
Wash your way to softer, cleaner skin with a rich, bubbly lather bursting with fragrance. Moisturizing Aloe and Vitamin E combine with skin-loving Shea Butter in our most irresistible, beautifully fragranced formula!

Top Notes: Pear Blossom, Clementine, Sparkling Black Currant, Lush Greens
Mid Notes: Violet Leaves, Magnolia Blossom, Jasmine Petals, Lily of the Valley
Dry Notes: Vanilla, Driftwood, Heliotrope, Apricot Nectar, Skin Musk.

Price:
$5 for 88 ml. It cost me $11 with shipping & taxes. Also available in $12.5- 236 ml

Ingredients:

Bath & <a href=Body Works Sweet Magnolia and Clementine Shower Gel Review3" width="684" height="700" />

Key Fragrance Notes:
A charming blend of sweet magnolia, fresh clementine and spring sandalwood.

Usage:
Add a drop to wet sponge or cloth & wash with rich creamy lather.

My Experience with Bath & Body Works Sweet Magnolia and Clementine Shower Gel:

Actually I have picked up both – fine fragrance mist and shower, from the signature collection of Bath & Body Works Sweet Magnolia and Clementine range. By the time shipment reached me, the fragrance mist had already been reviewed. So, I will review the shower gel only.

Packaging: The packaging is heart stealer with fresh green colored bottle and floral imprints. This is a travel size and compact bottle, compatible in your got-to-go bag. It is sturdy and travel friendly.

Bath & <a href=Body Works Sweet Magnolia and Clementine Shower Gel Review" width="432" height="700" />

Notes:
Bath & Body Works Sweet Magnolia and Clementine Shower Gel is a signature collection shower gel, but impressed me to a medium extent. The top notes are compiled with fruity fragrances of Pear Blossom, Clementine, Sparkling Black Currant, Lush Greens. The heart notes are described by the brand as Pear Blossom, Clementine, Sparkling Black Currant, and Lush Greens; in which you can dominantly sniff the jasmine and I simply love it. The dry notes are formulated with Vanilla, Driftwood, Heliotrope, Apricot Nectar, and Skin Musk. The lasting notes are a complete mix and you can’t say which one leads – vanilla or musk.

Bath & <a href=Body Works Sweet Magnolia and Clementine Shower Gel Review2" width="416" height="700" />

Performance:
It is a light green colored shower gel with medium consistency. Yet, it is viscous and watery to some extent. The notes get an average ranking from me, but performance is thoroughly satisfying. Dime sized amount lathers rich in a loofah and cleanses the skin well. The lather formed gets rinsed without leaving any residual. The end results are soft and smooth skin, fragranced with a mixture of floral and vanilla-musk fragrance. But, the fragrance vanishes soon as you step out.

Bath & <a href=Body Works Sweet Magnolia and Clementine Shower Gel Review1" width="700" height="525" />

Pros of Bath & Body Works Sweet Magnolia and Clementine Shower Gel:

• Fresh, green, lovely, sturdy and travel friendly bottle
• A perfect blend of fruity, floral and vanilla-musk notes
• A decent treat for sharp noses
• Leaves skin clean, soft and supple
• Lathers rich with a dime sized amount
• No excessive drying of skin
• No residual feeling after rinsed off
• Often available on sale for the USA residents

Cons of Bath & Body Works Sweet Magnolia and Clementine Shower Gel:

• Costly when imported
• The fragrance is really short lived

IMBB Rating:
4/5

Would I Repurchase/Recommend Bath & Body Works Sweet Magnolia and Clementine Shower Gel?
I really like the shower gel and it is worth a try. Yet, with so many other options available, it’s not on my repurchase list; nor is Bath & Body Works Sweet Magnolia and Clementine Fine Fragrance Mist. Because when a fragrance is short lived, it is not useful in my opinion.

Have a nice day ahead.

Bath and Body Works Sweet Magnolia and Clementine Fragrance Mist
Bath and Body Works Sweet Magnolia and Clementine Body Lotion
Bath and Body Works Dark Kiss Shower Gel
Bath and Body Works Morocco Orchid and Pink Amber Shower Gel
Bath and Body Works London Tulips and Raspberry Tea Shower Gel
Bath and Body Works Wild Madagascar Vanilla Shower Gel
Bath & Body Works Warm Vanilla Sugar Shower Gel
Pond’s White Beauty Pearl Cleansing Gel
Aroma Magic Under Eye Gel
Lakme Absolute Gel Addict Gel Eyeliner

madam gupshup forums

Wednesday, November 29, 2017

How to Lay Tile: Install a Ceramic Tile Floor In the Bathroom

Read article : How to Lay Tile: Install a Ceramic Tile Floor In the Bathroom

Cover up an old floor

Whether you’re replacing an old shabby floor or installing a new one, you can’t beat ceramic or stone tile for durability and appearance. When laid properly, it’s virtually a forever floor that requires almost no care and maintenance. And you can select materials from a vast array of colors and textures. We’ll cover how to lay tile in a few steps.

What’s equally attractive is that you can lay a first-class tile floor yourself, often in one weekend, and save the $500 to $1,500 cost of hiring a pro.

The key to keeping the job simple is to cover the old vinyl or other flooring with a new thin underlayment that gives you a fresh, clean start. No messy tear-out and repair. In this article, we’ll demonstrate how to install a thin “backer board” over the old floor. Then we’ll cover tile-setting techniques, from layout and cutting to grout and cleanup.

This is a two-day project for most bathrooms, even if you don’t have any previous tile experience. If you’re comfortable using basic hand tools and have the patience to align tiles just right, you can handle this job. The entire cost of this project for a typical bath ranges from $300 to $600.

Estimating the Cost of a Tile Project

The tile itself will be your biggest cost, so start by measuring the square footage of the floor. Then add 10 percent for cutting waste. If you choose a more complex layout than the simple grid pattern we used, your waste will be greater. Most tile sells for $5 to $15 per square foot, but you can spend as little as $3 or more than $50. If you have to install backer board, add $2 per square foot to the cost of the tile. Other materials will cost about $90, regardless of bathroom size. The tile tools you’ll need (including a tile cutter) will total $60 to $80.

Assess your floor

The success of any tile job depends on a solid base, that is, a floor that flexes very little as you walk across it. If you have a concrete subfloor, this isn’t an issue. You can lay tile directly over the existing vinyl as long as it’s well adhered.

If possible, avoid tearing out vinyl flooring. Leaving it in place saves time, of course, but it also reduces asbestos hazard concerns. Asbestos was used in sheet vinyl and vinyl tile until the mid-1980s. By leaving the vinyl undisturbed, you won’t risk sending asbestos fibers into the air.

If you have a wood subfloor, there’s a good chance that you’ll have to install backer board over your vinyl to make the floor thicker and stiff enough for tile. The easiest way to see flooring thickness is to pull off a floor register. Otherwise look for plumbing passageways through the floor. As a last resort, drill through the floor with a 1-in. or larger spade bit (your new floor will cover the hole later). To prevent asbestos dust from becoming airborne, mist the bit with a spray bottle as you drill. In addition to floor thickness, you’ll need to determine joist spacing. If there’s an unfinished basement or crawlspace below the floor, simply measure the spacing. If there’s a ceiling, probe for joists with a drill bit.

If the joists are spaced 16 in. apart, the layers of structural flooring beneath the vinyl should add up to at least 1-1/8 in. With joists every 24 in., you need 1-1/2 in. If your floor is too thin for tile, add a thicker layer of tile backer board. Our floor required 1/4-in.-thick backer. Yours might need 1/2-in. backer to reach the minimum thickness. If your floor is already thick enough, you can simply prep the vinyl floor (Photos 1 – 4) and skip the backer installation (Photos 5 – 8). Then tile directly over the vinyl, following the same steps we used over backer board.

Regardless of the type of subfloor, there are two situations where you can’t leave vinyl in place: First, if large areas of the vinyl are loose, don’t set tile or backer over it. Small loose spots are acceptable and easy to deal with (Photo 4).

Second, “cushioned” sheet vinyl must be removed before you can set tile. Cushioned vinyl has a foam backing that makes it noticeably thicker and softer than standard vinyl flooring. It’s too spongy to support tile or backer board. Before removing it, call your local health department for instructions on how to check for asbestos and proper procedures if asbestos is present.

Gather Advice While You Shop

Home centers carry everything you need for this project, but begin shopping at a tile store, where you’re more likely to get expert advice. Make a quick sketch of your floor plan and jot down all the dimensions. Also take a photo of the floor at the doorway. This will help the tile store staff recommend a “transition” to neatly join the tile to the hallway flooring. Transitions come in different styles to suit any situation.

When you choose the tile itself, ask if it requires any special installation steps. Some tile, for example, should be coated with grout release before grouting. Also ask about cutting techniques for the tile. You’ll use sanded grout for the floor. Ask if sanded caulk is available in a color that matches your grout for the floor/tub and floor/wall tile joints.

Prepare the room

First, get the toilet out of your way. Stuff a rag in the hole to block sewer gases. If your home only has one toilet, you can leave it in place until you install the backer board. Keep a supply of wax rings on hand if you plan to reinstall the toilet at the end of each day.

If you expect to keep your vanity for many years to come, leave it in place and tile around it. But if you think you might replace it, remove it now. When the job’s done, you can reinstall the old vanity or put in a new one. Having the vanity out of the way gives you more workspace, and you won’t have to cut backer board and tiles to fit around it. This also eliminates the floor repair problem if you install a smaller vanity or pedestal sink in the future.

Pull off the baseboard or plan to add base shoe molding. This leads to a neater-looking job because the edges of the tile will be covered later—jagged cuts and slight measuring mistakes are hidden. If your baseboard has base shoe molding, remove only the base shoe. Backer board and tile will raise your floor 3/4 in. or more. So you’ll have to remove and undercut the door. To mark the door for cutting, stack backer board, tile and two layers of cardboard on the floor (see Photo 3). Mark the door 1/2 in. above the stack, remove the door and cut off the bottom.

Scrub, screw and patch the floor

Install a Ceramic Tile Floor in the Bathroom

Photo 1: Scrub the floor with stripper

Remove the baseboard and toilet. Using an abrasive pad, scrub the floor hard with water mixed with vinyl floor stripper.

Install a Ceramic Tile Floor in the Bathroom

Photo 2: Drive screws into the floor joists

Mark the floor joists with chalk lines and drive 2-1/2-in. screws every 8 in. Don’t leave any screw heads protruding.

Install a Ceramic Tile Floor in the Bathroom

Photo 3: Cut the door trim to accommodate tile

Undercut door trim using a jamb saw or handsaw. A piece of backer board, tile and two layers of cardboard raise the saw to the correct height above the floor.

Install a Ceramic Tile Floor in the Bathroom

Photo 4: Fill low spots with thin-set

Cut out any loose sections of vinyl with a utility knife. Fill the void with thin-set using the flat edge of a notched trowel.

Scrub the floor with a vinyl floor stripper following the manufacturer’s instructions. The stripper will dissolve wax and other residue. Scrub hard with an abrasive scouring pad (Photo 1). The tiny scratches left by scrubbing help the thin-set bond better.

Next, drive screws through the floor into the joists (Photo 2). This ensures that the subfloor and underlayment are securely fastened. If there’s an unfinished basement below the floor, locating the joists is easy: Go to the basement and drill a couple of 1/4-in. holes up through the floor next to a joist. If you can’t locate the joists from below, pick a spot near one wall and drill a hole. If the bit breaks through into hollow space, move over 1 in. and drill another hole. Keep going until you hit a joist. Then go to the opposite wall and find the other end of the joist. Measure at intervals of 16 or 24 in. from the first joist to locate the others.

While you’re driving screws, look for any spots where the vinyl has loosened from the floor. Cut out loose spots and fill them (Photo 4). If there are any copper pipes that pass through the floor, wrap them with duct tape at floor level. Cement-based thin-set and grout can corrode copper.

Install backer board

Install a Ceramic Tile Floor in the Bathroom

Photo 5: Install backer board over the floor

Cover the floor with backer board. Cut inside corners, circles and curves with a drywall saw. Space pieces 1/8 in. apart and hold each one in place with two temporary screws.

Install a Ceramic Tile Floor in the Bathroom

Drywall saw

Use a drywall saw to cut corners, circles and curves in backer board.

Install a Ceramic Tile Floor in the Bathroom

Photo 6: Score and snap the backer board

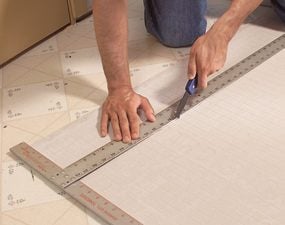
Make straight cuts with a scoring knife. Make three or four scoring passes, then snap the backer over a 2×4. When all the pieces have been laid out, label them and set them aside.

Install a Ceramic Tile Floor in the Bathroom

Scoring knife

Use a scoring knife to score the backer board.

Install a Ceramic Tile Floor in the Bathroom

Photo 7: Trowel on the thin-set

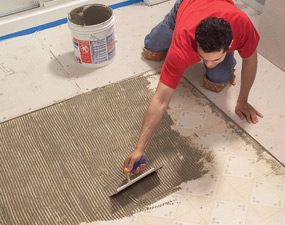
Comb out a bed of thin-set just large enough for each piece of backer board using a 1/4-in. notched trowel held at a 45-degree angle. Screw the backer down before spreading thin-set for the next piece.

Install a Ceramic Tile Floor in the Bathroom

Notched trowel

Use a 1/4-in. notched trowel to spread the thin-set over the floor.

Install a Ceramic Tile Floor in the Bathroom

Photo 8: Cover the joints

Press adhesive-backed mesh tape over the joints and skim over the tape with thin-set. When the thin-set is firm but not fully hardened, scrape away any ridges with a putty knife.

The backer board is fastened with a combination of screws and thin-set adhesive. Cut and lay out all the pieces before you mix the thin-set (Photos 5 and 6). You can run the sheets in any direction, but be sure to stagger the joints so you never have four corners meeting at one point. Leave a 1/8-in. space between the sheets and along the vanity, tub or shower. The gap along walls must be at least 1/8 in. wide, but a wider gap (about 1/2 in.) makes the panels easier to set in place.

After cutting and fitting, label the location of each one and set them all aside. Vacuum the floor and have your drill and screws ready to go before you mix the thin-set. Read the thin-set’s label. Spread the thin-set with a 1/4-in. notched trowel. Comb in one direction so air can escape when you embed the backer (Photo 7). Drive screws every 6 in. around the perimeter of each piece and every 8 in. “in the field” (across the face of the panel). If the leftover thin-set is still workable, you can immediately embed mesh tape over the joints (Photo 8).

If the thin-set has become too stiff or chunky, mix a new batch. Use “alkali-resistant” tape that’s meant for backer board. While the tape coat of thin-set hardens, run a putty knife over all the screw heads to scrape off the “mushroom” bulges around screws. Drive in any protruding screw heads you come across.

CAUTION!

Cement products like thin-set and grout draw moisture from skin and can even cause burns that require medical attention. While most pros work bare-handed, wear gloves if you have any special sensitivity. Also wear eye protection while mixing thin-set and grout.

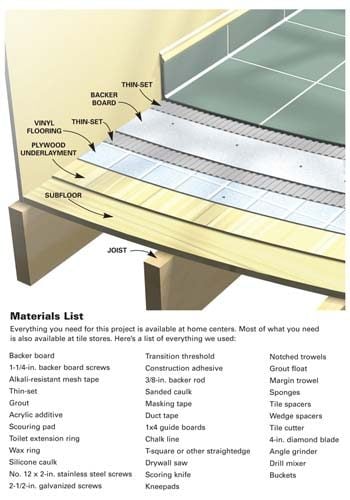
Figure A: Ceramic Tile Over Vinyl

Everything you need for this project is available at home centers. Most of what you need is also available at tile stores.

Cutaway of a tile floor over vinyl

Careful layout pays off

Install a Ceramic Tile Floor in the Bathroom

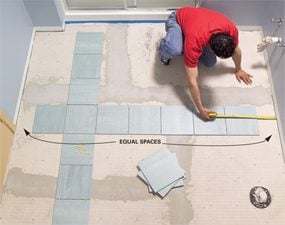
Photo 9: Test your layout to avoid small pieces along the walls

Dry-lay tile to determine the best layout. Start with centered rows, leaving equal spaces at walls. Then reposition rows until you find the optimal layout.

Install a Ceramic Tile Floor in the Bathroom

Photo 10: Attach guide boards to guide the layout

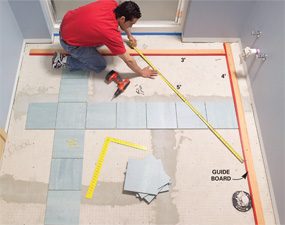
Screw guide boards to the floor following your chosen layout. Position the guides so you can lay all the field tiles without moving the guides. Make sure the guides are at right angles by measuring out a 3-4-5 triangle.

Too often, tile novices simply start setting tile in a corner and continue along two walls until the floor is covered. Sometimes they get lucky and the floor looks good. But more often this method leads to trouble:

They end up with awkward-looking, thin slivers of tile along a prominent wall or at the doorway. And the tile looks even worse when walls are badly out of square or crooked—a straight grout line running too close to a wall emphasizes the wall’s imperfections.

Whether you’re laying a simple grid pattern like we show here, or a diagonal pattern with a border, the best tile layout usually calls for centering full tiles between walls so the partial tiles along the edges will end up all the same size. Don’t rely on your tape measure and mental arithmetic. Rip open a carton of tile, grab a handful of spacers and experiment with your layout on the floor.

To begin, center rows of tile between walls so you have equal spaces along walls that face each other (Photo 9). Set the two rows parallel to the two most prominent walls. Then make adjustments, trying to achieve these three goals:

  • Use full tiles at doorways and along the bathtub or shower. These are usually the only places where the edges of the floor aren’t covered by baseboard. If you use full tiles in these exposed spots, you don’t have to worry about making smooth, perfect cuts.
  • Avoid narrow tiles along walls. Ideally, you’ll end up with tiles cut to half size or larger. Avoid cutting tile to widths less than 2 in.
  • Minimize cutting and try to avoid difficult cuts. For example: Cutting tile to an L-shape to fit around an outside corner is especially difficult when one arm of the “L” is less than 2 in. wide. The arm tends to break off as you cut.

Chances are, your layout won’t meet all these goals. Because the shower stall was the focal point in our bathroom, we made it our No. 1 layout priority. We chose to use full tiles in front of the shower. That left us with 3-in.-wide tiles along the opposite wall, which was less prominent. We also chose to center the tile rows on the shower; that meant we had to use cut tiles at the doorway.

Once you determine a layout, establish lines to guide your tile positioning. The usual method is to snap chalk lines on the floor. But chalk lines are hard to see after you’ve spread thin-set, and one row of tile may slip as you set the next row. Here’s a more reliable guide: Choose straight boards a foot shorter than the length and width of the room. Tape one edge of each board so thin-set won’t stick to them.

Then screw the boards to the floor at a right angle to form a guide that eliminates guesswork and shifting (Photo 10).

Video: Create Your Own Floor Tile Layout

Planning the layout for a tile project is usually the hardest and most time- consuming step. Watch this video to learn how a pro does it. You’ll see how to snap chalk lines and make sure they are perfectly square. Plus, you’ll learn how to avoid unsightly narrow, difficult-to-cut tiles along a wall. Don’t start a tile project until you’ve watch this video!

Set the tile (finally!)

Install a Ceramic Tile Floor in the Bathroom

Photo 11: Set the full tiles

Comb out a few square feet of thin-set and set tile against the guides. Continue until all the full tiles are in place. Tip: Watch for squeeze-out between tiles and rake it out with tile spacers.

Install a Ceramic Tile Floor in the Bathroom

Spacers detail

Keep the gaps between tiles even by using spacers

Install a Ceramic Tile Floor in the Bathroom

Photo 12: Spread thin-set and set the perimeter tiles.

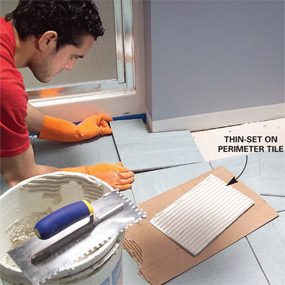
Cut and set the perimeter tiles after the thin-set beneath the full tiles has hardened. In spaces too narrow for your trowel, comb thin-set onto the backs of tiles.

It’s usually easiest—and most efficient—to set tile in two phases: First set all the full “field” tiles (Photo 11). Then, when the thin-set has hardened for several hours, cut all the perimeter tiles and set them (Photo 12). Here are some tips for both phases of the job:

  • The trowel you use for setting tile may be different from the one you used to embed the backer. The thin-set label tells you which notch size to use relative to tile size.
  • Dampen the backer with a sponge just before applying thin-set. This keeps the thin-set from drying out too quickly.
  • Comb the thin-set in one direction so air pockets won’t be trapped under tile.
  • Open three or four cartons and mix the tiles as you set them. Pattern and color vary slightly from one carton to the next.
  • Don’t just set each tile into place; press down on the tile and wiggle it to embed it firmly in the thin-set.
  • Watch for “tipped” corners. When you press a tile in place, it’s easy to tilt it slightly so that one corner stands higher or lower than neighboring tiles.
  • When you complete a section of tile, inspect it before moving on. Make sure the tiles line up correctly and spacers are in place. Wipe any thin-set off the face of tiles with a damp sponge.
  • When the thin-set becomes chunky or too stiff, throw it away and mix more. Never try to extend the life of thin-set or grout by adding water.
  • Cut perimeter tile so that caulked joints (at tub) are the same width as grouted joints.

Prepare the floor for grout

Install a Ceramic Tile Floor in the Bathroom

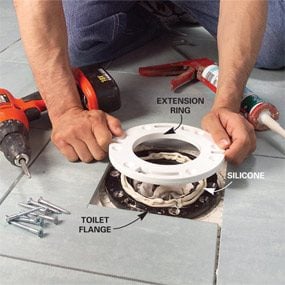
Photo 13: Install an extension ring over the toilet flange

Remove the old screws from the toilet flange and apply a heavy bead of silicone caulk. Fasten the extension ring over the old flange with stainless steel or brass screws.

Install a Ceramic Tile Floor in the Bathroom

Photo 14: Install the transition strip

Glue the transition into place with construction adhesive. If carpet meets the transition, you may have to add a new tack strip.

Install a Ceramic Tile Floor in the Bathroom

Photo 15: Stuff backer rod along the wall

Push backer rod into joints that will be caulked later. The foam rod keeps grout out of joints. After grouting, pull out the rod and caulk the joints.

When all the tiles are in place and the thin-set has hardened, remove all the spacers. Next, raise the toilet flange by adding an extension ring or two (Photo 13). The extended flange should be flush with or higher than the surrounding tile.

When you grout, fill in between the flange and tile. That way, any future leak around the flange will show up on the bathroom floor instead of on the ceiling below. If you plan to use a glue-down transition as we did, this is the time to install it.

Here’s how we dealt with our transition: First, we removed the old metal strip that covered the carpet’s edge. Then we cut our transition strip to fit between the door jambs using a miter saw. Next, we added a tack strip to hold the carpet in place. Before we could glue the transition to the floor (Photo 14), we had to remove a thin strip of the old vinyl floor.

Grout is too brittle to handle the slight shifting movements that are normal in any room. Keep grout out of joints wherever the floor meets the tub, shower, vanity or walls (Photo 15).

Pack the joints with grout

Install a Ceramic Tile Floor in the Bathroom

Photo 16: Grout the joints

Work the grout back and forth across the floor, diagonal to the joints and holding the float at a 45-degree angle. Then scrape off the excess grout, holding the float almost upright.

The thin-set directions will tell you how soon you can grout the floor—usually 24 hours. Grouting isn’t complex. Just plop a couple of scoops of grout onto the floor in a corner, work the grout into joints (Photo 16) and scrape off the excess grout before moving to the next section. In addition:

  • Mix the grout to a mashed-potatoes consistency. Adding extra liquid makes grout easier to work with but weakens it.
  • Don’t just spread the grout over the joints; press hard to pack it into the joints. If you’re doing it right, your forearm will get a good workout.
  • Whether you’re filling joints or scraping off excess grout, always push the float diagonally across the tiles.
  • Scrape off the excess to leave tile as clean as you can. The less grout you leave on the tiles, the easier cleanup will be.
  • When you’re done, cover the grout bucket with a plastic bag and set it in a cool place to slow the hardening process. During cleanup, you may find spots that need a little extra.

Grout cleanup

Install a Ceramic Tile Floor in the Bathroom

Photo 17: Clean the tiles

Wipe grout off the tile surface with a damp sponge. Wipe gently on the first pass so you don’t pull grout out of the joints. Rinse the sponge often.

Clean the surface of the tile when the grout is stiff enough to stay put in the joints but still soft enough to wipe off the tile surface. During hot, dry weather, grout can become difficult to wipe away in just 10 minutes, so get ready for cleanup before you even mix the grout. You’ll need two buckets of clean water, two sponges, a synthetic scouring pad and a dry rag.

As soon as you’re done grouting, go to the first section you grouted and wipe across a joint with a damp sponge. If the sponge pulls grout out of the joint, wait five minutes and try again. In cool, damp weather, the grout may stay too soft for an hour. When the grout is hard enough, gently wipe the tile with a damp sponge.

Rinse the sponge frequently as you wipe the entire floor (Photo 17). If you come across tough spots, scrub them with the scouring pad. Be careful where you put your feet and knees—don’t mar your perfect grout joints.

Immediately after the first pass, grab the second bucket of clean water and the fresh sponge and make a second, more thorough pass. Then, as the tile surface dries, wipe it with a dry terry cloth. The dry haze should buff off easily. If not, go for fresh water and sponge the floor again. If you can’t get rid of the haze, don’t panic. Products that remove haze are available wherever tile is sold.

Let the grout cure overnight before you caulk joints, set the toilet or reinstall baseboard. Grout sealer is a good precaution against staining: Some products can be applied 24 hours after grouting; others require a two- to three-week wait. If you have leftover tile or grout, keep them in case you have to make repairs in the future. Be sure to write down the brand, color and retailer of the tile.

How NOT to Save Money on a Tile Project

I’m a devout cheapskate, but when it comes to buying thin-set and grout, I grab the most expensive products on the shelf. More expensive thin-sets and grouts generally contain a higher proportion of the polymers that improve adhesion, durability and stain resistance.

In most situations, cheaper products would perform just fine. But if I can reduce the risks of loose tiles or cracked grout by spending an extra $30 on a typical bathroom project, I consider that a bargain.

Liquid additive is another smart investment. If the thin-set or grout label says you can mix it with water or an additive, use additive. These liquids (labeled “latex, ” “polymer” or “acrylic”) are meant to improve adhesion and stain resistance. But as a bonus, they produce a slick, creamy consistency. Thin-set combs out more smoothly, grout flows easily into joints, and both remain workable longer.

Also buy a mixer for your drill. Mixers come in various styles and sizes. Go easy on the trigger. If you run the drill at full speed, you can create millions of tiny air bubbles, which will weaken the mix.

Tile cutting tools

Install a Ceramic Tile Floor in the Bathroom

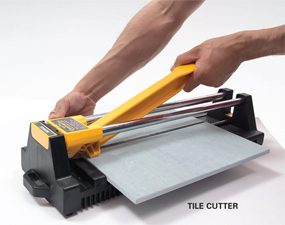
Tile cutter

A tile cutter is the fastest way to cut tile. Just push the handle forward and a small wheel scores the tile. Then push the handle down and the tile snaps in two. You can’t beat a tile cutter for convenience. It makes no mess and you can drag it around the room as you work. But a tile cutter has zero versatility. It makes straight cuts across the entire tile—no curves or corner cuts. Cutting 1 in. or less off a tile can be difficult or impossible. You can rent one at rental centers and some tile shops.

Install a Ceramic Tile Floor in the Bathroom

Wet saw

A wet saw cuts with a diamond blade while water cools the blade and eliminates dust. You can cut notches, trim off tiny slivers of tile, cut miters and even make curves. You’ll get clean cuts in any type of tile. But wet saws are messy. They spit water and raise a cloud of gritty mist. If you use one indoors, contain the mist with curtains of plastic film and cover nearby surfaces. You can buy a small wet saw like the one shown here or rent a professional model from a tile store or home or rental center. If you only have a few cuts that require a wet saw, call a tile store. Many make cuts for a small fee.

Install a Ceramic Tile Floor in the Bathroom

Angle grinder

An angle grinder equipped with a diamond blade can make straight cuts, curves and notches in any type of tile. Since all your cuts are freehand, this isn’t a precision tool, but you can grind away imperfections with the tip of the blade. Use a grinder only outside. Wear a dust mask and eye protection.

Install a Ceramic Tile Floor in the Bathroom

Nippers

Nippers are useful for rough curves and notches. They don’t cut tile, but bite out small chunks, leaving jagged edges.

Install a Ceramic Tile Floor in the Bathroom

Contour gauge

A contour gauge is a great tool for marking troublesome shapes on tile. Just press it against any odd-shaped surface (like the curved corner of a bathtub) and transfer the profile to tile.

Here are the tools that can cut your tile. Buy or rent the ones that make the most sense for your project.

In addition to the tools shown here, a carbide abrasive blade that fits in a jigsaw cuts slowly but leaves fairly clean cuts in softer types of ceramic tile and natural stone. A carbide abrasive hole saw cuts perfect holes for plumbing pipes and fixtures.

A rubbing stone is simply an abrasive block, similar to the wheel in a bench grinder. Use it to smooth sharp or slightly chipped cuts that will be exposed.

Additional Information

Required Tools for this Project

Have the necessary tools for this DIY project lined up before you start—you’ll save time and frustration.

You’ll also need these specialty tools for working with tile and backer board:
Scoring knife, Margin trowel, Tile cutter, 4-in. diamond blade, Drill mixer, Offset saw, Tile cutter, Nippers, Wet saw
You can also use an angle grinder for cutting tile.

Thursday, October 26, 2017

Frugal Friday – Champneys Spa Indulgence Bath & Body

Read article : Frugal Friday – Champneys Spa Indulgence Bath & Body

Earlier this spring, Champneys, the world-class U.K. spa favored by Princess Diana, Daniel Craig, David Beckham & Kate Moss launched their luxurious products in the US! Now you can be pampered like a royal for the price of a pauper! Champneys Spa Indulgence bath and body line, delivers the holistic benefits of visiting a Champneys spa in the comfort of your own home. The price conscious line includes body lotions, hand and nail creams, shower gels and various moisturizers that range from $7.99 to $12.99 and are available at Target, Target.com and ShopBootsUSA.com.

There are four delicious scents:

  •  Mediterranean Bliss – white heart floral, coconut and olive leaf
  • Oriental Opulence -exotic patchouli, honey and coconut
  • Exotic Retreat – olive leaf, mango and coconut
  • Citrus Blush – an uplifting aroma of  lemon, orange peel and cardamom

I have a small huge addiction to body scrubs and the Mediterranean Bliss Body Glow was the first product in the line that I tried–read my review on A Girls’ Gotta Spa. After loving the body scrub, I couldn’t get enough of the scent and then tried the Mediterranean Bliss Shower Crème and Body Hydrator.

Champneys describes the fragrance like this:

An opulent fragrance with a white floral of tuberose, jasmine, lily of the valley and white rose petals with spicy exotic ylang ylang and petunia on a warm combination of sugar cane, vanilla, fresh ginger and pink pepper. Fruity twists of cassis and apple entwined with a Mediterranean citrus accord of bergamot, mandarin and neroli oil create a vibrant top note while precious woods, patchouli, sandalwood and vetiver add richness to a base of amber, moss and musk. 

 Mediterranean Bliss Shower Crème is a thick, rich cream that lathers like laundry detergent in a water foundation. Unlike detergents though, its creamy consistency leaves your skin silky smooth and soft to the touch. Your skin feels so moisturized after using this shower crème. Shower crème is a very good description for this product, it is not your run-of-the-mill shower gel—it’s much richer and more luxurious than that. I use this after the body scrub for an indulgent treat for my skin. I adore it!

Key ingredients:

  • Olive Leaf – contains flavonoids which are effective antioxidants
  • Fig Milk – known for its restorative properties
  • Green Tomato – supports the cells for strong blood circulation, also an effective antioxidant
  • Mango Butter – an effective high foaming cleanser that leaves skin soft

The Mediterranean Bliss Body Hydrator is equally amazing and I love it just as much! I like to use it just before bed and breathe in the light fragrance as I’m drifting off. This has a lightweight texture, is non-oily and absorbs quickly leaving no greasy residue. There is also a body cream that is much thicker, but I think I actually prefer the lighter weight hydrator.

Key Ingredients:

  •  Olive Leaf – contains flavonoids which are effective antioxidants
  • Fig Milk – known for its restorative properties

Packaging is as stylish and classy as you can get with plastic. The gold accented jars and tubes look expensive and make a nice addition to any bathroom.

I have a few other products to try from the line in the Exotic Retreat scent (a favorite of Kelly Osbourne, I’m told) but I am SO smitten with the Mediterranean Bliss scent I can’t imagine switching. It lingers on the skin without being overpowering. The scent really does invoke images of white washed domed buildings with gauzy curtains billowing in the breeze overlooking seaside cliffs. Someday! The Mediterranean,  Greece especially, is on my bucket list!

I can express enough how impressed I am with the Champneys Spa Indulgence Bath and Body line. If you’re looking for a luxurious and yes, even a little decadent treat at a budget price, the Champneys Spa Indulgence line may be just right for you as well as YOUR royal family!

Overall: The moisture-rich formulas, effective ingredients and the lovely scents are outstanding. This world class collection of extravagant bath and body products is worth much more than the pauper’s price!

Prime Beauty Grade: A

Champneys Spa Indulgence line is available at Target, Target.com and ShopBootsUSA.com.

image

Thursday, September 7, 2017

RSVP'S Beauty Awards 2016 - RSVP Magazine

Read article : RSVP'S Beauty Awards 2016 - RSVP Magazine

Welcome to your essential beauty bible. Alex Hatton, together with Ireland’s leading beauty experts, brings you the definitive collection of the most effective skincare, body and make-up products on the market.

beautyawards2016winner

MEET THE JUDGES
Alex Hatton,  Maura Derrane and Sarah Keary

Our columnist Alex Hatton brings you a collection of the most effective buys in skin and body care. These gems are a must for every beauty buff.

BEST VALUE CLEANSER

Simple, Micellar Water, €4.99 A star budget buy. An express, easy and efficient no-rinse cleanser and make-up remover solution.

BEST TONER

Urban Veda, Purifying Hydrating Toner, €18.99 www.urbanveda.co.uk A simple spritz of this light facial toner hydrates, refreshes and soothes skin.

BEST DAILY EXFOLIATOR

Dermalogica, Daily Microfoliant, €53 An RSVP favourite. This hard working rice-based powder exfoliates dead cells, leaving skin smoother and clearer.

BEST FACE MASK

SkinCeuticals, Hydrating B5 Masque, €58 Beauty editors stock up on this gem because it’s packed with deeply hydrating vitamin B5 to help restore the skin’s natural moisturising factor. Skin genuinely becomes softer and more radiant.

BEST DAYTIME MOISTURISER REFORM

Everyday Moisturiser, €39.99 Everything you need in one jar: it reduces moisture loss, restores the skin barrier function and protects the epidermis against free radicals.

BEST SPF FACE

Eucerin, Sun Protection Sun Fluid Mattifying Face SPF 30, €18.50 A matte melting formula that delivers UVA-UVB protection. Specially formulated for the visage and ideal under foundation.

BEST NECK CREAM

NeoStrata, Skin Active Triple Firming Neck Cream, €63.95 This cream is your only answer to directly targeting the appearance of wrinkles and creases on the neck and décolletage.

BEST FOR RADIANCE

Murad, Intensive-C Radiance Peel, €65 This at-home peel treatment is packed with a powerful cocktail of glycolic acid, vitamin C and indian fig to brighten, smooth and hydrate.

BEST SERUM

Emma Hardie, The Midas Touch Face Serum, €80 This treatment serum is packed with powerful antioxidants – it’s also super hydrating – and skin feels more subtle, toned and radiant after application.

BEST EYE CREAM

Kinvara, Eye Wow Eye Serum, €29.95 Perk up your peepers with this newbie juice that contains a powerful blend of 11 plant extracts targeting dark circles, fine lines and puffiness.

kinvaraskincare.com

kinvaraskincare.com

BEST ANTI-AGEING PRODUCT

Eau Thermale Avène, PhysioLift Precision Wrinkle Filler, €39 Completely fuss-free, just one simple click helps to visibly correct deep wrinkles and furrows around the mouth and nose, the eye area and forehead in just three weeks.

BEST LIP BALM

Nuxe, Rêve De Miel Lip Balm, €12 It soothes, softens and helps rejuvenate your pucker with intensive moisture and a kiss of honey.

BEST VALUE LIP BALM LIDL

Cien Bodycare Lip Balm, €1.59 (for a pack of three) A purse-friendly buy that instantly hydrates parched pouts.

BEST BEAUTY SUPPLEMENT

Viviscal, Maximum Strength tablets, 30 capsules, €49.95 The daily cosmetic supplement that nourishes hair from within to give you the luscious locks you’ve always wanted.

BEST DETOX TEA

Miss Fit Skinny Tea, 14-Day Teatox, €24.99 The #1 natural, laxative free teatox programme that allows you to lose up to five pounds in five days. You just sip your way to a slimmer you.

BEST FACE OIL

Kiehl’s, Midnight Recovery Concentrate, €44 A Hall of Fame beauty buy! Just a few drop of this elixir and you’ll wake up to a fresher more radiant face: fact!

Kiehl's.com

Kiehl’s.com

BEST NIGHT CREAM

Lancôme, Visionnaire Nuit, Beauty Sleep Perfector, €74 The skincare launch of the year: this nightly number transforms the quality of the skin while you slumber. it is smoother, more elasticated and radiant upon waking.

lancome.com

lancome.com

BEST PRODUCT INNOVATION

Elizabeth Arden, Superstart, Skin Renewal Booster, €59 Meet the next gen in skincare: the beauty booster! Used just before serum or moisturiser this booster works on the surface layer of the skin to increases its natural defenses and ability to renew.

elizabetharden.com

elizabetharden.com

BEST CLEANSER

Liz Earle, Cleanse & Polish, €21.87 A beauty icon. This hot cloth cleanser leaves skin clean, soft and radiant. Ideal for your morning or evening cleanse.

lizearle.com

lizearle.com

BEST MOISTURISER

Crème de la Mer, The Moisturizing Cream, €138 Experience the comforting richness of the famed “miracle broth” in a rich, lux cream. Expect an immediate improvement in moisture levels and radiance. It’s worth every single cent!

cremedelamer.co.uk

cremedelamer.co.uk

BEST BUDGET BODY MOISTURISER

Vaseline, Spray Moisturiser, €7.49 This is the business: a snazzy spray system, that dispenses a moisture rich lotion quickly and evenly for an all over coverage in seconds. Just spray and go!

vaseline.us

vaseline.us

BEST BODY MOISTURISER

L’Occitane, Almond Milk Concentrate, €44 A cult classic. Enriched with powerful almond extracts, this milk melts into the skin to help it look firmer and smoother while delivering a 48-hour hydration hit!

uk.loccitane.com

uk.loccitane.com

BEST VALUE BATH WASH

Radox, Muscle Soak with Sage & Sea Minerals, €4.44 This bubble bath leaves skin refreshed, soft and squeaky clean. It’s the beauty equivalent of a hug.

BEST BATH OIL

Neom, Tranquility Bath & Shower Oil, €48 This elixir is packed with 19 essential oils including lavender, sweet basil and jasmine. A real beauty treat.

BEST VALUE BODY SERUM

Dove Derma Spa, Uplifted+ Massaging Body Roll-On, €11.99 A nifty roller-ball serum that moisturises and massages as it rolls to improve firmness and elasticity. It also smells divine!

BEST BODY BUTTER

The Body Shop, Spa Of The World, Hawaiian Kukui Cream, €39 The bodycare product of the year: this deeply nourishing emollient is packed with famed kukui oil to restore the skin’s natural suppleness.

BEST DAYTIME BODY OIL

Waxperts, Beautiful Body Oil, €9.99 This multi-usage dry oil contains a cocktail of star active ingredients to nourish, repair and soften skin.

BEST EVENING BODY OIL

Holos Skincare, Good Night Body Oil, €16.90 This Irish holistic hero is all you need for night-time skin moisturising and is made up of a calming trio of essential oils: lavender, chamomile and rose.

BEST BODY SHAPER

Thalgo, Stomach and Waist Sculptor, €44 We love this: it helps to firm the deeper layers of the skin for a tighter and firmer looking waist. Just in time for summer!

BEST BUST TREATMENT

Palmers, Cocoa Butter Formula Bust Cream, €9 A must-have beauty weapon for a perkier pair; specially formulated with pure cocoa butter cream and vitamin E that smoothes on like gel.

BEST HAND WASH

The Handmade Soap Company, Lemongrass & Cedarwood Hand Wash, €12.95 Nourish and revive your paws with this zingy and refreshing hand wash. Buy Irish!

BEST HAND CREAM

Green Angel, Seaweed & Lavender Hand Cream, €20 We’re dedicated fans of this luscious cream packed with minerals and essential oils to nourish your mitts.

BEST VALUE HAND CREAM

Ziaja, Goat’s Milk Hand & Nail Cream, €3.49 A brilliant budget buy: this intensive hydrating formula keeps your paws soft and supple.

BEST FOOT CREAM

Aveda, Foot Relief, €26 For happy hoofs, slather on this deeply nourishing cream designed to sooth the roughest and toughest feet!

BEST NAIL TREATMENT

Sally Hansen, Complete Care 7-in-1 Nail Treatment, €10.99 Whatever your nail dilemma this is the solution: after just three days, nails look shinier, stronger and brighter.

BEST DEODORANT

Sure, Max Pro, €7.35 A summer essential. Simply use before you hop into bed, wash off in the morning and rock off knowing this number will keep you dry all day.

BEST BODY SCULPTING TREATMENT

CoolSculpting, River Medical Group, from €840 A great non-invasive way to reduce fat by up to 40% after one treatment. Results can be seen within 4-6 weeks but as your body ‘gets rid’ of the fat cells you will continue to see results for up to 3 months.

BEST NAIL VARNISH RANGE

SoSu, Nail Polish Collection, €7.99 A digit game changer: gives the look of a gel finish without the need to visit the salon.

sosueme.ie

sosueme.ie

BEST HAIR REMOVAL PRODUCT

Waxperts Wonder Pads, €9.99 for 40 discs These little wonder pots are a bathroom must-have. Use daily in between waxing, or after shaving to avoid ingrown hairs.

waxperts.bigcartel.com

waxperts.bigcartel.com

BEST BODY EXFOLIATOR

Organic Surge, Tropical Bergamot Skin Perfecting Body Scrub, €16.99 This uplifting wonder pot is packed with natural pumice, sweet orange and bergamot essential oils to gently polish and smooth your skin.

organicsurge.com

organicsurge.com

BEST SHOWER FOAM

Molton Brown, Dewy Lily of the Valley and Star Anise, Bath & Shower Gel, €22 This scrumptious, sudsy shower gel is blended with delicious Lily of the Valley: it leaves a light floral scent while deeply cleansing the skin.

moltonbrowne.co.uk

moltonbrowne.co.uk

Sarah Keary is one of Ireland’s most established make-up artists with a background in fashion, television and bridal. Her celebrity clients include Pippa O’Connor Ormond, Kathryn Thomas and Sharon Corr.

BEST VALUE PRIMER

Flormar, Illuminating Primer Make-Up Base, €9.95 Prep and prime to selfie ready skin with this brilliant illuminating base.

BEST EYE PRIMER

Smashbox, Photo Finish 24-Hour Shadow Primer, €23 An eyelid primer that instantly makes your shadow look more vibrant and locks on color for a full 24 hours – no fading, creasing or smudging!

BEST VALUE FOUNDATION

L’Oréal Paris, True Match Foundation, €14.99 This lightweight and silky texture glides on seamlessly for an all-day, buildable coverage.

BEST POWDER

Giorgio Armani, Luminous Silk Compact, €45 We covet this chic compact; it delivers a flawless finish with a gorgeous touch of the famed Armani illumination.

BEST FACE CONCEALER

NARS, Radiant Creamy Concealer, €28 Partied a bit too late last night? Mum’s the word with this lightweight concealer!

BEST UNDER EYE CONCEALER

Clarins, Instant Concealer, €26 This buy just might be your new best friend. It instantly brightens dark shadows so you look refreshed and revived.

BEST EYESHADOW

M∙A∙C, Eyeshadow, €16.50 A highly pigmented powder that applies evenly and blends seamlessly. Available in a host of hues.

maccosmetics.com

maccosmetics.com

BEST GEL LINER

Inglot, AMC Gel Liner No.77, €15 This black glam gel eyeliner glides on like a dream, making it ideal for creating the perfect feline flick.

BEST VALUE LIQUID LINER

Essence, Easy 2 Use Jumbo Eyeliner, €2.89 One of the thickest eye marker pen on the market; accurate lines are super easy to achieve, even if you’re an eyeliner newbie!

BEST VALUE MASCARA

Catrice, Glam & Doll False Lashes Mascara, €4.50 This number scores extra points with its curved brush, which reaches each individual lash in one swift swipe.

BEST BROW FILL

Benefit, Brow Zings, €34 Put your best brows forward with this mini brow salon, it’s complete with all the tools you need for perfect brows!

BEST VALUE BROW FILL

WetnWild, Colour Icon Pencil, €2.49 Give the brows in your life the special attention they deserve with this versatile dual-ended pencil.

BEST VALUE POWDER BLUSH

Sleek, Blush in Rose Gold, €5.49 A brilliant beauty dupe! This longlasting and highly pigmented blush glides on smoothly and packs a great colour punch.

BEST LIPLINER

Maybelline, Colour Sensational Lip Liner, €5.99 Mirror like colour with reflective shine formula. This literally does not budge!

BEST RED LIPSTICK

Max Factor, Marilyn Monroe Lipstick Collection, €10.99 each This is so special: a beautiful edit of four lux lippies inspired by Marilyn Monroe’s signature rouge pout.

BEST LIP GLOSS

Rimmel, Oh My Gloss, €6.99 Perfect glam on the go! Your lips are instantly drenched with a seriously sexy shine.

BEST FALSE LASHES

Fuschia Make-Up, Faux Mink Lashes, €15 The most glam false lashes a girl can get – and they’re so lightweight, you’ll forget you’re wearing them too!

BEST CELEBRITY COLLABORATION

UD | Gwen Stefani Blush Palette, €42 Such a chic cheek collection developed and designed by the iconic Gwen Stefani for Urban Decay. You need this in your beauty wardrobe!

BEST POWDER BLUSH

Charlotte Tilbury, Cheek to Chic Swish & Pop Blusher, €39 This delivers a flattering flush of colour in two easy steps. Blend it on the apples of your cheeks for a just-pinched look. We love it!

charlottetilbury.com

charlottetilbury.com

BEST HIGHLIGHTER

Rosie for Autograph, Marks & Spencer, Highlighter Powder, €20 This gorgeous creamy highlighter boosts skin radiance in seconds. A highlight for the highlife!

marksandspencer.com

marksandspencer.com

BEST FACE SCULPTOR

IsaDora, Face Sculptor, €25.95 This wheel of wonder contains a richly pigmented bronzing powder and highlighter, and blush. A musthave for your bag of tricks.

isadora.com

isadora.com

BEST PRIMER

Yves Saint Laurent, Touche Éclat Blur Primer, €38.00 This glitzy gel-based formula creates the perfect canvas for flawless, longer lasting make-up – simply apply and glow!

yslbeautyus.com

yslbeautyus.com

BEST MASCARA

Lancôme, Hypnôse Volume à Porter, €27.50 Let your eyelashes take centre stage with this wonder wand that gives lashes length, lift and va-va voom.

lancome.co.uk

lancome.co.uk

BEST LIPSTICK

Shiseido, Veiled Rouge Lipstick, €25 Pucker up with this creamy, satin lippy that locks on to lips in one swipe, delivering an intense colour payoff.

shiseido.com

shiseido.com

BEST FOUNDATION

Clinique, Beyond Perfecting Foundation + Concealer, €32 This new formula provides a medium coverage, yet it’s so light in texture it almost feels like you’re not wearing foundation.

clinique.com

clinique.com

BEST PALETTE

Pippa for Blank Canvas, €34.99 This is the business: it’s packed with five matte nude toned shadows, a highlighter, peachy toned blusher and contouring powder.

blankcosmetics.com

blankcosmetics.com

BEST TAN TREATMENT

Guinot, Huile Mirific, Gold Nourishing Dry Oil, €39.25 A luxurious dry oil that delivers a stunningly sexy shimmer to the skin. A real tanning treat and officially our favourite find of the awards!

Guinot.com

Guinot.com

BEST GRADUAL TAN

Karora, Gradual Tan Face & Body, €14.99 Get glowing with a daily dose of natural colour and a burst of hydration. Layer it up for a richer honey-dipped tan.

karoracosmetics.com

karoracosmetics.com

BEST BRONZER

Bobbi Brown, Face & Body Bronzer in Medium, €46 A beach bag essential, we adore this light-weight bronzing powder that highlights, colour and contours.

BobbiBrown.com

BobbiBrown.com

BEST INSTANT TAN

Cocoa Brown, Instant Tan Bronzing Gel in Shimmer & Matte, €6.99 each This delivers an instant, faux flawless tan and comes in a matte and shimmer finish. Every girl should try this!

cocoabrown.ie

cocoabrown.ie

TAN FOR FACE

Garnier, Ambre Solaire, No Streaks Bronzer, Dry Face Mist, €12.20 An ultra fine mist which dries instantly to give a streak free, gorgous golden hue to the face and neck area.

BEST TANNING SUPPLEMENT

Pharma Nord, TanCare, €18.95 (for a twomonth supply) Packed with beta-carotene, these clever capsules enhance the appearance of your skin and will give you a gorgeous golden tan with less sun exposure.

Maura Derrane believes that a spritz of perfume can lift your mood, make you feel confident and indeed evoke happy memories of times past. Maura is also mum to Cal who is nearly two years old. Maura places a lot of emphasis on what skincare products she use on Cal and herself: here are some of her all time favourites.

Perfume –

BEST DAYTIME

Shiseido, Ever Bloom, EDP, 50ml, €76 Modern and feminine, this musky white floral scent is a timeless addition to any perfume collection. It’s a very intimate and smooth scent – and is guaranteed to turn heads wherever you go.

BEST FRESH

Tom Ford, Neroli, Portofino Acqua, 50ml, €120 This is Tom Ford’s original Neroli scent with additions of citrus notes like orange and lime. It is the Italian coastline in a bottle and conjures images of orange groves and warm sea breezes.

BEST CELEBRITY

Britney Spears, Fantasy, EDP, 30ml, €27.50 If you like really sweet and chocolaty fragrances this one is for you. With notes of sweet fruits – lychee and kiwi –and gourmande notes of white chocolate, this is a really girly perfume.

BEST SCENTED BODY WASH

Viktor & Rolf, Flowerbomb Perfumed Shower Gel, €45 If you love to start your day with your favorite scent, then a shower gel is the way to go, especially this one with its uplifting notes of bergamot and rose.

BEST SCENTED BODY LOTION

Jo Malone London, Pomegranate Noir Body & Hand Lotion, €50 No need for any perfume when you wear this body lotion. It has a brilliant silky consistency that totally envelopes your body with powerful notes which include clove, raspberry and pomegranate.

BEST SCENTED BODY CREAM

Roger & Gallet, Fleur d’Osmanthus Precious Revitalising Balm, €23 This is one the most revitalising scents, with the beautiful fleur d’Osmanthus at its heart, which has a peachy and orangey smell. The balm itself is enriched with precious oils like almond and shea butter, and literally melts into the skin.

BEST REED DIFFUSER

Max Benjamin, Tea Diffuser, €24.95 We adore this reed diffuser; it’s warm, comforting and the on-trend tea notes coupled with the fresh zest of lemon provide a delicious scent for your home.

BEST LUXURY CANDLE

L’Occitane, Lavender Candle, €25 Enriched with relaxing lavender essential oil, this scented candle fills your home with a soothing, aromatic atmosphere for up to 23 hours.

myloccitane.com

myloccitane.com

BEST NEW FRAGRANCE

Brooke & Shoals, Lemon Leaves, Grapefruit and Green Tea, EDT, 50ml, €60 A totally uplifting and invigorating scent. The lemon and grapefruit are to the fore when this is first sprayed, but it settles on the skin as a soft cologne.

brookeandshoals.ie

brookeandshoals.ie

BEST ROSE

Juicy Couture, Viva La Juicy Rosé, EDP, 100ml, €85 This is a zesty mix of fruit and jasmine with powdery rose and woody notes at its base. It is a modern and youthful take on a rose scent.

juicycouture.com

juicycouture.com

BEST FLORAL

Lancôme, La Vie Est Belle Florale, EDT, 50ml, €63 A totally different compilation to the original fragrance. It has more of a zingy scent thanks to the additions of osmanthus and bergamot. A stunning scent.

lancome.co.uk

lancome.co.uk

BEST EVENING

Marc Jacobs, Decadence, EDP, 30ml, €62 A sweet deep perfume with top notes of plum and iris with a woody and amber base. The sweetness still comes through when it settles on the skin. This is a good night time choice and the bottle is a perfume collector’s dream.

marcjacobs.com

marcjacobs.com

Mother and Baby –

BEST BABY WIPES

Water Wipes, Baby Wipes, €2.99 These Irish wipes are perfect for newborn babies as they contain 99.9% water and the only other ingredient is grapefruit seed extract. They don’t have any scent and are very moist, which is exactly what you need for the little ones.

BEST BABY BODY WASH

Mothercare, Little Softie, Top to Toe Wash, €2.50 A paraben-free, no-tears wash that is gentle on both baby and mum’s skin. Suitable to use from birth.

BEST BABY MOISTURISER

La Roche-Posay, Cicaplast Baume B5, 40ml, €7.50 This is a multi-tasking hero product. Mum can use it as a body cream and as a nappy cream for their little one. It can also be used on dry or irritated skin. It contains vitamin B5, shea butter and thermal water to soothe the skin. We love it!

laroche-posay.com

laroche-posay.com

BEST SUPPLEMENT FOR MUM

Cleanmarine, Krill Oil for Women, €47 (one month supply) Each capsule is packed with essential Omega 3 Phospholipids combined with vitamin D3, B1, B2 and B6. They help regulate hormonal activity and reduce tiredness. Ideal for women of all ages.

BEST CHILD MULTI-VITAMIN SUPPLEMENT

Vivioptal Junior, €9.95 It is hard to get all the right vitamins into your kids if they are fussy eaters. Vivioptal has a good broad section of vitamins and minerals to help growth and bone development.

BEST BALM FOR MUM & BABY

Nía, Just Balm, €12.95 This balm is a real find: it’s a 100% natural healing moisturiser and is suitable for use on all itchy, dry skin conditions and rashes. Suitable for babies, children and adults.

BEST SPF FOR CHILDREN WITH SENSITATIVE SKIN

Bioderma, Photoderm Kid SPF 50+, €20.50 This not only contains a high protection sun screen but also protects sun sensitive and intolerant skin. Visible when applied, it is also water resistant and fragrance free.

BEST BABY OIL

NAIF, Soothing Baby Oil, 100ml, €14.95 Baby oils are great to use after a bath when baby’s skin is still a little damp. This one by NAIF is perfume and preservative free, and is really gentle with ingredients like cottonseed oil, which is easily absorbed into baby’s skin.

naifcare.com

naifcare.com

BEST SPF FOR CHILDREN

Vichy, Idéal Soleil for Children, SPF 50, €21.50 This milk gives vulnerable skin high protection from the sun with mineral ingredients. It can be used on face and body and is very easy to apply.

Vichy.ie

Vichy.ie

BEST SLEEP AID FOR MUM

This Works, Deep Sleep Pillow Spray, €19.50 This is a great product to help you get some valuable shut eye. It contains essentials oils of lavender, vetivert and wild chamomile to relax both body and mind.

thisworks.com

thisworks.com

BEST FOR STRETCH MARKS

Clarins, Tonic Body Treatment Oil, €47 This oil is amazing. It is full of pure plant extracts like rosemary and hazel to protect the skin’s barrier. It also smells really therapeutic and is really soft and silky.

clarins.co.uk

clarins.co.uk

Gadgets –

BEST MAKE-UP BRUSH

Cailyn, O! Wow Brush, €29.99 This brush is incredible: it feels like velvet yet it is densely packed with ultra fine fibers that facilitate an airbrushed foundation application.

cailyncosmetics.com

cailyncosmetics.com

BEST PRO MAKE-UP BRUSH SET

Blank Canvas, 12-piece “My Face and Eye” Professional Set, €89.99 This brush set has every tool you need for painting the perfect face. From blending and contouring to lips and eyes, your make-up application will be a joy.

BEST BRUSH TRAVEL SET

Nima Brush, “Girls on Tour” Travel Set Collection, €55 This is the best travel size pro brush kit on the market. A gorgeous edit of seven must-have brushes for on-the-go application.

BEST SONIC SKINCARE KIT

Clarisonic, The Smart Profile Kit, €249 The original and still the best. The oscillating head cleanses six times better than hands alone and is so effective that skin on the face and body is more receptive to creams, serums and moisturisers.

BEST NEW SKINCARE BEAUTY GADGET

Darphin, L’Institut Facial Sonic Cleansing and Massaging Expert, €149 This sonic cleanser and massaging expert works on two levels. Firstly, the brush cleanses the skin. Now for the magic: the kit contains a smooth steel massaging head that deeply delivers moisturiser to boost microcirculation and relax the facial muscles. Genius.

BEST HOME PEDICURE

Emjoi Micro Pedi Nano, €39.95 It exfoliates and removes dry, rough skin while being gentle on your feet; leaving your heels and soles soft and so summer-ready.

BEST WONDER WAND

M2 Beauté, M2Brows, €130, from The Derma Clinic, Dublin A precisely engineered brush with a rich serum that you apply to those places where you would like to optimize your eyebrow growth. Expect supermodel bushy brows in just four to six weeks!