Showing posts sorted by date for query slip resistant floor. Sort by relevance Show all posts

Friday, February 23, 2018

Shower solutions for hotels – High-quality shower trays for all...

Read article : Shower solutions for hotels – High-quality shower trays for all...

Modern shower solutions are integral components of contemporary hotel bathrooms and feature in every bathroom. In private residential buildings, the aesthetics and spatial aspects of the shower area define its design. But in the commercial sector, technical factors such as the anti-slip class, sound insulation or accessibility have to be considered additionally.

Villeroy & Boch, as a partner for the property business, provides a large selection of high-quality shower trays made of acrylic, Quaryl® and ceramic, which are available in a wide selection of standard as well as customised sizes. The Infinity shower trays, awarded the iF DESIGN AWARD 2016, can be cut into individual customised sizes and special factors such as protrusions or corners can also be taken into account. Villeroy & Boch has classic shower trays in white and in other colours, which incorporate the latest trends in trays, as well as ceramic shower trays with selected tile designs.

Walk-in shower areas – flush-fitting, on tiles or a base

When sophisticated hotels are built nowadays, the shower areas are designed as spacious walk-in spa showers with flat, rimless shower trays. Guests are able to enjoy a spacious shower room, which can also be designed as an accessible room so that guests with disabilities or limited mobility can easily use them.

Experts use materials such as ceramic, Quaryl® or acrylic as they provide significant benefits compared to tiled floors. In wet areas with tiled floors, the joints can still become leaky even if the tiles were laid by a professional, resulting in extensive renovation in the shower area. Moisture can also cause damage to the walls and floors, which often leads to costly refurbishments. Walk-in shower trays are also ideal for a more hygienic environment. Thanks to the smooth, closed surface, dirt particles and bacteria cannot grip onto anything – in marked contrast to porous joints where germs and mould can build up, posing a health risk to hotel guests. Hoteliers, therefore, are confronted with comparatively high costs for thoroughly cleaning and taking care of shower areas with tiles and joints. However, walk-in showers only need water and a neutral cleaning agent to get them hygienically clean, and it takes a lot less time to do so, too. The results: fewer cleaning costs in total and, therefore, a lower environmental impact because significantly fewer non-aggressive cleaning agents are used. Another advantage of shower trays is the flexible installation. When a floor-level shower is neither desired nor possible, for example when it is being renovated, then there are functional and attractive shower solutions, which allow shower trays to be installed on the existing tiles or on a base in the shower area. To ensure builders, hoteliers and planners of hotel bathrooms have as many planning options for shower areas as possible, Villeroy & Boch's collections have high-quality shower trays with many different designs, e.g. Squaro Infinity made of Quaryl®, Subway Infinity made of ceramic and Architectura MetalRim made of acrylic.

Squaro Infinity

The Squaro Infinity shower trays made of Quaryl®, the patented material made of acrylic resin and quartz, have very exact edges for flush-fit installation thanks to the integrated ribbed technology and special casting process. The easy-to-clean, durable surface is warm underfoot and has the highest anti-slip class C. It has also been certified by the Fraunhofer Institute for Building Physics according to DIN 4109, the technical guidelines for sound insulation. This ensures that they are safe to use and noise is reduced, as is required in hotels.

The Squaro Infinity shower trays are available in nearly 50 standard sizes and can also be custom-cut with millimetre precision upon request. The shower trays can be cut to size on site with the proper tools and the instructions manual. A special installation system is used that has a steel beam and a frame that can be cut to fit all shower sizes.

To ensure it is integrated harmoniously into the existing interior, Squaro Infinity is available in the five solid matt colours of Edelweiss, Anthracite, Grey, Brown and Crème.

Subway Infinity

The Subway Infinite ceramic shower trays are also available in a wide variety of models. They come in 26 sizes, ranging from 80 x 75 cm to the XXL format of 160 x 100 cm, as well as in customised sizes and shapes. The flush outlet in the shower tray creates a clear and harmonious look. Subway Infinity is available in the three standard anti-slip colours in class B (PN18) - White Alpin, Ardoise and Taupe.

There are also Subway Infinity shower trays with Villeroy & Boch tile designs. By implementing ViPrint, an innovative, digital printing technology for ceramic shower trays, the patterns of selected floor tiles can be printed on 19 different sizes of trays. There are currently eight designs of successful tile series available, from a beige natural stone look through contemporary wood shades to a minimalist modern concrete effect in grey and anthracite. The shower bases are cut after glazing, printing and firing, ensuring the pattern extends all the way to the edges. Precise cutting allows flush integration in tiled floors, resulting in a consistent and seamless surface. The ViPrint versions are available in the anti-slip class A (PN12).

Architectura MetalRim

The Architectura MetalRim shower trays in the professional Architectura collection are the ideal choice for hotel bathrooms that require very robust floor-level showers. The four corners of the ultra-flat, rimless acrylic shower trays have been reinforced with galvanised steel, making them extremely stable and durable. They are cast from 4 mm solid-coloured sanitary acrylic that has been tested according to EN 249 and is extremely resilient, shock- and impact-proof and completely colour-fast. The easy-to-clean surface is UV-resistant and can be repaired easily even after it has been installed. The shower trays are, therefore, extremely sustainable. Villeroy & Boch gives ten years' warranty on these high-quality material properties.

Thanks to the special technology with steel-reinforced edging, Architectura MetalRim provides a high level of stability and has a load-bearing capacity of up to 1,000 kg. For more safety, customers can opt for a Vilbogrip anti-slip class C finish.

The design features a minimalistic, ultra-flat, rimless tray with a flush outlet cover. The white outlet cover is included in the delivery and is available upon request in Chrome Matt and chrome-plated. The outflow capacity of 51 litres of water per minute makes it highly efficient.

31 different designs are available, each with 15-mm or 48-mm rims and in two finishes, making 124 versions in total. Both 15-mm versions are wheelchair accessible; the 48-mm version is only wheelchair accessible when installed in the screed.

To see the photos, please visit:
http://pro.villeroy-boch.com/mdp/sk/64235044f4/DuschenHotelbad

Thursday, February 8, 2018

Small Bathroom Solution : Walk-in BathTub by MAXX Professional

Read article : Small Bathroom Solution : Walk-in BathTub by MAXX Professional

This walk-in bathtub by MAXX Professional is a really interesting idea especially if you have a small bathroom. It features a safety grab rails, slip resistant floor, and chrome waste with chrome overflow. A contoured seat with an elevated back rest could make your bathing very comfortable and relaxing even in such small bathtub. Besides, the bathtub could be complemented with a whirlpool heater, a chromotherapy light system, and a water heater. With all these features, the walk-in bathtub is a very cool 1.4 m (55-inch) long solution for small bathrooms. Finally maybe most of you focused on how this small wal-in bathtub looks, but you’ve noticed that interesting tile design from the background ?

Collect this idea

Collect this idea
Collect this idea
Collect this idea

Wednesday, November 29, 2017

How to Lay Tile: Install a Ceramic Tile Floor In the Bathroom

Read article : How to Lay Tile: Install a Ceramic Tile Floor In the Bathroom

Cover up an old floor

Whether you’re replacing an old shabby floor or installing a new one, you can’t beat ceramic or stone tile for durability and appearance. When laid properly, it’s virtually a forever floor that requires almost no care and maintenance. And you can select materials from a vast array of colors and textures. We’ll cover how to lay tile in a few steps.

What’s equally attractive is that you can lay a first-class tile floor yourself, often in one weekend, and save the $500 to $1,500 cost of hiring a pro.

The key to keeping the job simple is to cover the old vinyl or other flooring with a new thin underlayment that gives you a fresh, clean start. No messy tear-out and repair. In this article, we’ll demonstrate how to install a thin “backer board” over the old floor. Then we’ll cover tile-setting techniques, from layout and cutting to grout and cleanup.

This is a two-day project for most bathrooms, even if you don’t have any previous tile experience. If you’re comfortable using basic hand tools and have the patience to align tiles just right, you can handle this job. The entire cost of this project for a typical bath ranges from $300 to $600.

Estimating the Cost of a Tile Project

The tile itself will be your biggest cost, so start by measuring the square footage of the floor. Then add 10 percent for cutting waste. If you choose a more complex layout than the simple grid pattern we used, your waste will be greater. Most tile sells for $5 to $15 per square foot, but you can spend as little as $3 or more than $50. If you have to install backer board, add $2 per square foot to the cost of the tile. Other materials will cost about $90, regardless of bathroom size. The tile tools you’ll need (including a tile cutter) will total $60 to $80.

Assess your floor

The success of any tile job depends on a solid base, that is, a floor that flexes very little as you walk across it. If you have a concrete subfloor, this isn’t an issue. You can lay tile directly over the existing vinyl as long as it’s well adhered.

If possible, avoid tearing out vinyl flooring. Leaving it in place saves time, of course, but it also reduces asbestos hazard concerns. Asbestos was used in sheet vinyl and vinyl tile until the mid-1980s. By leaving the vinyl undisturbed, you won’t risk sending asbestos fibers into the air.

If you have a wood subfloor, there’s a good chance that you’ll have to install backer board over your vinyl to make the floor thicker and stiff enough for tile. The easiest way to see flooring thickness is to pull off a floor register. Otherwise look for plumbing passageways through the floor. As a last resort, drill through the floor with a 1-in. or larger spade bit (your new floor will cover the hole later). To prevent asbestos dust from becoming airborne, mist the bit with a spray bottle as you drill. In addition to floor thickness, you’ll need to determine joist spacing. If there’s an unfinished basement or crawlspace below the floor, simply measure the spacing. If there’s a ceiling, probe for joists with a drill bit.

If the joists are spaced 16 in. apart, the layers of structural flooring beneath the vinyl should add up to at least 1-1/8 in. With joists every 24 in., you need 1-1/2 in. If your floor is too thin for tile, add a thicker layer of tile backer board. Our floor required 1/4-in.-thick backer. Yours might need 1/2-in. backer to reach the minimum thickness. If your floor is already thick enough, you can simply prep the vinyl floor (Photos 1 – 4) and skip the backer installation (Photos 5 – 8). Then tile directly over the vinyl, following the same steps we used over backer board.

Regardless of the type of subfloor, there are two situations where you can’t leave vinyl in place: First, if large areas of the vinyl are loose, don’t set tile or backer over it. Small loose spots are acceptable and easy to deal with (Photo 4).

Second, “cushioned” sheet vinyl must be removed before you can set tile. Cushioned vinyl has a foam backing that makes it noticeably thicker and softer than standard vinyl flooring. It’s too spongy to support tile or backer board. Before removing it, call your local health department for instructions on how to check for asbestos and proper procedures if asbestos is present.

Gather Advice While You Shop

Home centers carry everything you need for this project, but begin shopping at a tile store, where you’re more likely to get expert advice. Make a quick sketch of your floor plan and jot down all the dimensions. Also take a photo of the floor at the doorway. This will help the tile store staff recommend a “transition” to neatly join the tile to the hallway flooring. Transitions come in different styles to suit any situation.

When you choose the tile itself, ask if it requires any special installation steps. Some tile, for example, should be coated with grout release before grouting. Also ask about cutting techniques for the tile. You’ll use sanded grout for the floor. Ask if sanded caulk is available in a color that matches your grout for the floor/tub and floor/wall tile joints.

Prepare the room

First, get the toilet out of your way. Stuff a rag in the hole to block sewer gases. If your home only has one toilet, you can leave it in place until you install the backer board. Keep a supply of wax rings on hand if you plan to reinstall the toilet at the end of each day.

If you expect to keep your vanity for many years to come, leave it in place and tile around it. But if you think you might replace it, remove it now. When the job’s done, you can reinstall the old vanity or put in a new one. Having the vanity out of the way gives you more workspace, and you won’t have to cut backer board and tiles to fit around it. This also eliminates the floor repair problem if you install a smaller vanity or pedestal sink in the future.

Pull off the baseboard or plan to add base shoe molding. This leads to a neater-looking job because the edges of the tile will be covered later—jagged cuts and slight measuring mistakes are hidden. If your baseboard has base shoe molding, remove only the base shoe. Backer board and tile will raise your floor 3/4 in. or more. So you’ll have to remove and undercut the door. To mark the door for cutting, stack backer board, tile and two layers of cardboard on the floor (see Photo 3). Mark the door 1/2 in. above the stack, remove the door and cut off the bottom.

Scrub, screw and patch the floor

Install a Ceramic Tile Floor in the Bathroom

Photo 1: Scrub the floor with stripper

Remove the baseboard and toilet. Using an abrasive pad, scrub the floor hard with water mixed with vinyl floor stripper.

Install a Ceramic Tile Floor in the Bathroom

Photo 2: Drive screws into the floor joists

Mark the floor joists with chalk lines and drive 2-1/2-in. screws every 8 in. Don’t leave any screw heads protruding.

Install a Ceramic Tile Floor in the Bathroom

Photo 3: Cut the door trim to accommodate tile

Undercut door trim using a jamb saw or handsaw. A piece of backer board, tile and two layers of cardboard raise the saw to the correct height above the floor.

Install a Ceramic Tile Floor in the Bathroom

Photo 4: Fill low spots with thin-set

Cut out any loose sections of vinyl with a utility knife. Fill the void with thin-set using the flat edge of a notched trowel.

Scrub the floor with a vinyl floor stripper following the manufacturer’s instructions. The stripper will dissolve wax and other residue. Scrub hard with an abrasive scouring pad (Photo 1). The tiny scratches left by scrubbing help the thin-set bond better.

Next, drive screws through the floor into the joists (Photo 2). This ensures that the subfloor and underlayment are securely fastened. If there’s an unfinished basement below the floor, locating the joists is easy: Go to the basement and drill a couple of 1/4-in. holes up through the floor next to a joist. If you can’t locate the joists from below, pick a spot near one wall and drill a hole. If the bit breaks through into hollow space, move over 1 in. and drill another hole. Keep going until you hit a joist. Then go to the opposite wall and find the other end of the joist. Measure at intervals of 16 or 24 in. from the first joist to locate the others.

While you’re driving screws, look for any spots where the vinyl has loosened from the floor. Cut out loose spots and fill them (Photo 4). If there are any copper pipes that pass through the floor, wrap them with duct tape at floor level. Cement-based thin-set and grout can corrode copper.

Install backer board

Install a Ceramic Tile Floor in the Bathroom

Photo 5: Install backer board over the floor

Cover the floor with backer board. Cut inside corners, circles and curves with a drywall saw. Space pieces 1/8 in. apart and hold each one in place with two temporary screws.

Install a Ceramic Tile Floor in the Bathroom

Drywall saw

Use a drywall saw to cut corners, circles and curves in backer board.
Install a Ceramic Tile Floor in the Bathroom

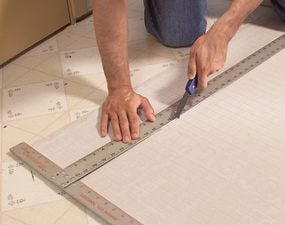
Photo 6: Score and snap the backer board

Make straight cuts with a scoring knife. Make three or four scoring passes, then snap the backer over a 2×4. When all the pieces have been laid out, label them and set them aside.

Install a Ceramic Tile Floor in the Bathroom

Scoring knife

Use a scoring knife to score the backer board.

Install a Ceramic Tile Floor in the Bathroom

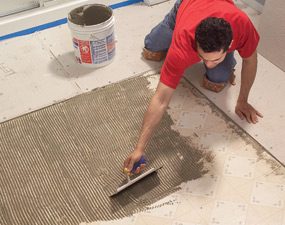
Photo 7: Trowel on the thin-set

Comb out a bed of thin-set just large enough for each piece of backer board using a 1/4-in. notched trowel held at a 45-degree angle. Screw the backer down before spreading thin-set for the next piece.

Install a Ceramic Tile Floor in the Bathroom

Notched trowel

Use a 1/4-in. notched trowel to spread the thin-set over the floor.

Install a Ceramic Tile Floor in the Bathroom

Photo 8: Cover the joints

Press adhesive-backed mesh tape over the joints and skim over the tape with thin-set. When the thin-set is firm but not fully hardened, scrape away any ridges with a putty knife.

The backer board is fastened with a combination of screws and thin-set adhesive. Cut and lay out all the pieces before you mix the thin-set (Photos 5 and 6). You can run the sheets in any direction, but be sure to stagger the joints so you never have four corners meeting at one point. Leave a 1/8-in. space between the sheets and along the vanity, tub or shower. The gap along walls must be at least 1/8 in. wide, but a wider gap (about 1/2 in.) makes the panels easier to set in place.

After cutting and fitting, label the location of each one and set them all aside. Vacuum the floor and have your drill and screws ready to go before you mix the thin-set. Read the thin-set’s label. Spread the thin-set with a 1/4-in. notched trowel. Comb in one direction so air can escape when you embed the backer (Photo 7). Drive screws every 6 in. around the perimeter of each piece and every 8 in. “in the field” (across the face of the panel). If the leftover thin-set is still workable, you can immediately embed mesh tape over the joints (Photo 8).

If the thin-set has become too stiff or chunky, mix a new batch. Use “alkali-resistant” tape that’s meant for backer board. While the tape coat of thin-set hardens, run a putty knife over all the screw heads to scrape off the “mushroom” bulges around screws. Drive in any protruding screw heads you come across.

CAUTION!

Cement products like thin-set and grout draw moisture from skin and can even cause burns that require medical attention. While most pros work bare-handed, wear gloves if you have any special sensitivity. Also wear eye protection while mixing thin-set and grout.

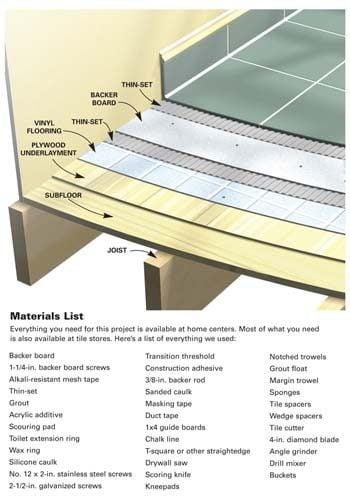
Figure A: Ceramic Tile Over Vinyl

Everything you need for this project is available at home centers. Most of what you need is also available at tile stores.

Cutaway of a tile floor over vinyl

Careful layout pays off

Install a Ceramic Tile Floor in the Bathroom

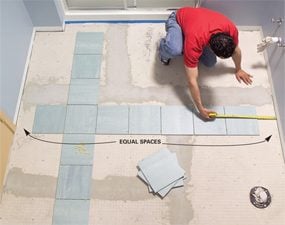
Photo 9: Test your layout to avoid small pieces along the walls

Dry-lay tile to determine the best layout. Start with centered rows, leaving equal spaces at walls. Then reposition rows until you find the optimal layout.

Install a Ceramic Tile Floor in the Bathroom

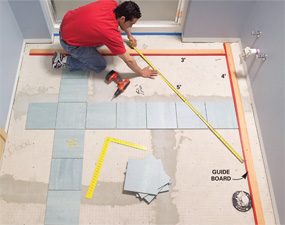
Photo 10: Attach guide boards to guide the layout

Screw guide boards to the floor following your chosen layout. Position the guides so you can lay all the field tiles without moving the guides. Make sure the guides are at right angles by measuring out a 3-4-5 triangle.

Too often, tile novices simply start setting tile in a corner and continue along two walls until the floor is covered. Sometimes they get lucky and the floor looks good. But more often this method leads to trouble:

They end up with awkward-looking, thin slivers of tile along a prominent wall or at the doorway. And the tile looks even worse when walls are badly out of square or crooked—a straight grout line running too close to a wall emphasizes the wall’s imperfections.

Whether you’re laying a simple grid pattern like we show here, or a diagonal pattern with a border, the best tile layout usually calls for centering full tiles between walls so the partial tiles along the edges will end up all the same size. Don’t rely on your tape measure and mental arithmetic. Rip open a carton of tile, grab a handful of spacers and experiment with your layout on the floor.

To begin, center rows of tile between walls so you have equal spaces along walls that face each other (Photo 9). Set the two rows parallel to the two most prominent walls. Then make adjustments, trying to achieve these three goals:

  • Use full tiles at doorways and along the bathtub or shower. These are usually the only places where the edges of the floor aren’t covered by baseboard. If you use full tiles in these exposed spots, you don’t have to worry about making smooth, perfect cuts.
  • Avoid narrow tiles along walls. Ideally, you’ll end up with tiles cut to half size or larger. Avoid cutting tile to widths less than 2 in.
  • Minimize cutting and try to avoid difficult cuts. For example: Cutting tile to an L-shape to fit around an outside corner is especially difficult when one arm of the “L” is less than 2 in. wide. The arm tends to break off as you cut.

Chances are, your layout won’t meet all these goals. Because the shower stall was the focal point in our bathroom, we made it our No. 1 layout priority. We chose to use full tiles in front of the shower. That left us with 3-in.-wide tiles along the opposite wall, which was less prominent. We also chose to center the tile rows on the shower; that meant we had to use cut tiles at the doorway.

Once you determine a layout, establish lines to guide your tile positioning. The usual method is to snap chalk lines on the floor. But chalk lines are hard to see after you’ve spread thin-set, and one row of tile may slip as you set the next row. Here’s a more reliable guide: Choose straight boards a foot shorter than the length and width of the room. Tape one edge of each board so thin-set won’t stick to them.

Then screw the boards to the floor at a right angle to form a guide that eliminates guesswork and shifting (Photo 10).

Video: Create Your Own Floor Tile Layout

Planning the layout for a tile project is usually the hardest and most time- consuming step. Watch this video to learn how a pro does it. You’ll see how to snap chalk lines and make sure they are perfectly square. Plus, you’ll learn how to avoid unsightly narrow, difficult-to-cut tiles along a wall. Don’t start a tile project until you’ve watch this video!

Set the tile (finally!)

Install a Ceramic Tile Floor in the Bathroom

Photo 11: Set the full tiles

Comb out a few square feet of thin-set and set tile against the guides. Continue until all the full tiles are in place. Tip: Watch for squeeze-out between tiles and rake it out with tile spacers.

Install a Ceramic Tile Floor in the Bathroom

Spacers detail

Keep the gaps between tiles even by using spacers

Install a Ceramic Tile Floor in the Bathroom

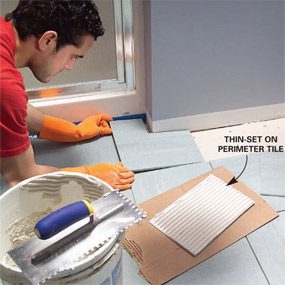
Photo 12: Spread thin-set and set the perimeter tiles.

Cut and set the perimeter tiles after the thin-set beneath the full tiles has hardened. In spaces too narrow for your trowel, comb thin-set onto the backs of tiles.

It’s usually easiest—and most efficient—to set tile in two phases: First set all the full “field” tiles (Photo 11). Then, when the thin-set has hardened for several hours, cut all the perimeter tiles and set them (Photo 12). Here are some tips for both phases of the job:

  • The trowel you use for setting tile may be different from the one you used to embed the backer. The thin-set label tells you which notch size to use relative to tile size.
  • Dampen the backer with a sponge just before applying thin-set. This keeps the thin-set from drying out too quickly.
  • Comb the thin-set in one direction so air pockets won’t be trapped under tile.
  • Open three or four cartons and mix the tiles as you set them. Pattern and color vary slightly from one carton to the next.
  • Don’t just set each tile into place; press down on the tile and wiggle it to embed it firmly in the thin-set.
  • Watch for “tipped” corners. When you press a tile in place, it’s easy to tilt it slightly so that one corner stands higher or lower than neighboring tiles.
  • When you complete a section of tile, inspect it before moving on. Make sure the tiles line up correctly and spacers are in place. Wipe any thin-set off the face of tiles with a damp sponge.
  • When the thin-set becomes chunky or too stiff, throw it away and mix more. Never try to extend the life of thin-set or grout by adding water.
  • Cut perimeter tile so that caulked joints (at tub) are the same width as grouted joints.

Prepare the floor for grout

Install a Ceramic Tile Floor in the Bathroom

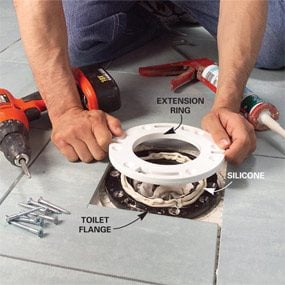
Photo 13: Install an extension ring over the toilet flange

Remove the old screws from the toilet flange and apply a heavy bead of silicone caulk. Fasten the extension ring over the old flange with stainless steel or brass screws.

Install a Ceramic Tile Floor in the Bathroom

Photo 14: Install the transition strip

Glue the transition into place with construction adhesive. If carpet meets the transition, you may have to add a new tack strip.

Install a Ceramic Tile Floor in the Bathroom

Photo 15: Stuff backer rod along the wall

Push backer rod into joints that will be caulked later. The foam rod keeps grout out of joints. After grouting, pull out the rod and caulk the joints.

When all the tiles are in place and the thin-set has hardened, remove all the spacers. Next, raise the toilet flange by adding an extension ring or two (Photo 13). The extended flange should be flush with or higher than the surrounding tile.

When you grout, fill in between the flange and tile. That way, any future leak around the flange will show up on the bathroom floor instead of on the ceiling below. If you plan to use a glue-down transition as we did, this is the time to install it.

Here’s how we dealt with our transition: First, we removed the old metal strip that covered the carpet’s edge. Then we cut our transition strip to fit between the door jambs using a miter saw. Next, we added a tack strip to hold the carpet in place. Before we could glue the transition to the floor (Photo 14), we had to remove a thin strip of the old vinyl floor.

Grout is too brittle to handle the slight shifting movements that are normal in any room. Keep grout out of joints wherever the floor meets the tub, shower, vanity or walls (Photo 15).

Pack the joints with grout

Install a Ceramic Tile Floor in the Bathroom

Photo 16: Grout the joints

Work the grout back and forth across the floor, diagonal to the joints and holding the float at a 45-degree angle. Then scrape off the excess grout, holding the float almost upright.

The thin-set directions will tell you how soon you can grout the floor—usually 24 hours. Grouting isn’t complex. Just plop a couple of scoops of grout onto the floor in a corner, work the grout into joints (Photo 16) and scrape off the excess grout before moving to the next section. In addition:

  • Mix the grout to a mashed-potatoes consistency. Adding extra liquid makes grout easier to work with but weakens it.
  • Don’t just spread the grout over the joints; press hard to pack it into the joints. If you’re doing it right, your forearm will get a good workout.
  • Whether you’re filling joints or scraping off excess grout, always push the float diagonally across the tiles.
  • Scrape off the excess to leave tile as clean as you can. The less grout you leave on the tiles, the easier cleanup will be.
  • When you’re done, cover the grout bucket with a plastic bag and set it in a cool place to slow the hardening process. During cleanup, you may find spots that need a little extra.

Grout cleanup

Install a Ceramic Tile Floor in the Bathroom

Photo 17: Clean the tiles

Wipe grout off the tile surface with a damp sponge. Wipe gently on the first pass so you don’t pull grout out of the joints. Rinse the sponge often.

Clean the surface of the tile when the grout is stiff enough to stay put in the joints but still soft enough to wipe off the tile surface. During hot, dry weather, grout can become difficult to wipe away in just 10 minutes, so get ready for cleanup before you even mix the grout. You’ll need two buckets of clean water, two sponges, a synthetic scouring pad and a dry rag.

As soon as you’re done grouting, go to the first section you grouted and wipe across a joint with a damp sponge. If the sponge pulls grout out of the joint, wait five minutes and try again. In cool, damp weather, the grout may stay too soft for an hour. When the grout is hard enough, gently wipe the tile with a damp sponge.

Rinse the sponge frequently as you wipe the entire floor (Photo 17). If you come across tough spots, scrub them with the scouring pad. Be careful where you put your feet and knees—don’t mar your perfect grout joints.

Immediately after the first pass, grab the second bucket of clean water and the fresh sponge and make a second, more thorough pass. Then, as the tile surface dries, wipe it with a dry terry cloth. The dry haze should buff off easily. If not, go for fresh water and sponge the floor again. If you can’t get rid of the haze, don’t panic. Products that remove haze are available wherever tile is sold.

Let the grout cure overnight before you caulk joints, set the toilet or reinstall baseboard. Grout sealer is a good precaution against staining: Some products can be applied 24 hours after grouting; others require a two- to three-week wait. If you have leftover tile or grout, keep them in case you have to make repairs in the future. Be sure to write down the brand, color and retailer of the tile.

How NOT to Save Money on a Tile Project

I’m a devout cheapskate, but when it comes to buying thin-set and grout, I grab the most expensive products on the shelf. More expensive thin-sets and grouts generally contain a higher proportion of the polymers that improve adhesion, durability and stain resistance.

In most situations, cheaper products would perform just fine. But if I can reduce the risks of loose tiles or cracked grout by spending an extra $30 on a typical bathroom project, I consider that a bargain.

Liquid additive is another smart investment. If the thin-set or grout label says you can mix it with water or an additive, use additive. These liquids (labeled “latex, ” “polymer” or “acrylic”) are meant to improve adhesion and stain resistance. But as a bonus, they produce a slick, creamy consistency. Thin-set combs out more smoothly, grout flows easily into joints, and both remain workable longer.

Also buy a mixer for your drill. Mixers come in various styles and sizes. Go easy on the trigger. If you run the drill at full speed, you can create millions of tiny air bubbles, which will weaken the mix.

Tile cutting tools
Install a Ceramic Tile Floor in the Bathroom

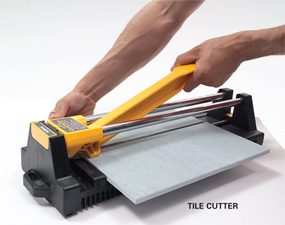
Tile cutter

A tile cutter is the fastest way to cut tile. Just push the handle forward and a small wheel scores the tile. Then push the handle down and the tile snaps in two. You can’t beat a tile cutter for convenience. It makes no mess and you can drag it around the room as you work. But a tile cutter has zero versatility. It makes straight cuts across the entire tile—no curves or corner cuts. Cutting 1 in. or less off a tile can be difficult or impossible. You can rent one at rental centers and some tile shops.

Install a Ceramic Tile Floor in the Bathroom

Wet saw

A wet saw cuts with a diamond blade while water cools the blade and eliminates dust. You can cut notches, trim off tiny slivers of tile, cut miters and even make curves. You’ll get clean cuts in any type of tile. But wet saws are messy. They spit water and raise a cloud of gritty mist. If you use one indoors, contain the mist with curtains of plastic film and cover nearby surfaces. You can buy a small wet saw like the one shown here or rent a professional model from a tile store or home or rental center. If you only have a few cuts that require a wet saw, call a tile store. Many make cuts for a small fee.

Install a Ceramic Tile Floor in the Bathroom

Angle grinder

An angle grinder equipped with a diamond blade can make straight cuts, curves and notches in any type of tile. Since all your cuts are freehand, this isn’t a precision tool, but you can grind away imperfections with the tip of the blade. Use a grinder only outside. Wear a dust mask and eye protection.

Install a Ceramic Tile Floor in the Bathroom

Nippers

Nippers are useful for rough curves and notches. They don’t cut tile, but bite out small chunks, leaving jagged edges.

Install a Ceramic Tile Floor in the Bathroom

Contour gauge

A contour gauge is a great tool for marking troublesome shapes on tile. Just press it against any odd-shaped surface (like the curved corner of a bathtub) and transfer the profile to tile.

Here are the tools that can cut your tile. Buy or rent the ones that make the most sense for your project.

In addition to the tools shown here, a carbide abrasive blade that fits in a jigsaw cuts slowly but leaves fairly clean cuts in softer types of ceramic tile and natural stone. A carbide abrasive hole saw cuts perfect holes for plumbing pipes and fixtures.

A rubbing stone is simply an abrasive block, similar to the wheel in a bench grinder. Use it to smooth sharp or slightly chipped cuts that will be exposed.

Additional Information

Required Tools for this Project

Have the necessary tools for this DIY project lined up before you start—you’ll save time and frustration.

You’ll also need these specialty tools for working with tile and backer board:
Scoring knife, Margin trowel, Tile cutter, 4-in. diamond blade, Drill mixer, Offset saw, Tile cutter, Nippers, Wet saw
You can also use an angle grinder for cutting tile.

Friday, November 17, 2017

Wet Room Design Considerations | Kitchen Bath Design

Read article : Wet Room Design Considerations | Kitchen Bath Design
<a href=Wet Room Design Considerations" src="http://s3-us-west-2.amazonaws.com/sola-images/wp-content/uploads/2017/02/24155731/MaryJoPeterson-Web2017.jpg" class="img-responsive primary" />

Expert Advice Aug 6, 2017

A wet room can expand the space in a small bathroom, or create the sense of a luxury spa experience in any size bathroom.

authorsMary Jo Peterson 

The wet room is expanding in purpose, in definition and in its incorporation into residential bath design. Current wet room trends are likely driven by our love affair with free standing tubs and the space they require, as well as by European designs and our interest in the clean lines of minimalist design.

A wet room can expand the space in a small bathroom, or create the sense of a luxury spa experience in any size bathroom. As designers, we will be guided by a number of pros and cons, and design considerations relating to the integration of a wet room in a particular space, and this column will examine some of them.

WET ROOM BASICS

So, what is a wet room and where did it come from anyway?

The formal definition of a wet room is “a bathroom in which the shower is open or set behind a single wall, its floor area being flush with the floor of the rest of the room and the water draining away through an outlet set into the floor.”

Many wet rooms today include the shower and a tub, usually free standing, behind a wall or divider, often glass, separating the wet area from the rest of the room. Typically, the floor will be pitched slightly to a flush linear drain, with open passage or a door and doorway.

Today’s wet room is frequently part of a spa experience in a luxury and larger bath, but you might be surprised to know that this was once a concept used mainly in lower budget and institutional settings to improve access.

All bath designers have experienced the ubiquitous post-WWII 5’x8′ bath, and when square footage cannot be increased, the first step toward improving access and opening the clear floor space has been to eliminate the tub and make the entire space a wet room.

If you’ve traveled through Europe, you will likely have experienced traditional bathrooms that have evolved through the addition of a hand-held spray and a floor drain to include showers where historically, the tub was the main focus for bathing and personal hygiene. This, in essence, becomes a wet room by definition – and, depending on the care given to the design details and water control, a success. As in any bath or shower space, a prime consideration must be containing the water.

BENEFITS & CHALLENGES

Having defined what a wet room is, let’s look at the benefits, challenges and key design considerations relating to these spaces.

The foremost benefit of a wet room is that it opens the space, both visually and functionally, and usually improves access for a variety of bathers. In a small full bath, removing the tub and making the entire room waterproof reduces the amount of floor space given up strictly for passage. Another benefit of this concept is that it reduces the amount of space needed to convert a powder room to a full bath in a tight space.

The main challenge when the entire room is the waterproof or wet area is keeping desired items and areas dry. Towels and the lavatory can be planned out of the water’s path. Sometimes when designing for access in a 5’x8′ bath conversion, the toilet is planned on the wet side of the curtain or screen, so that it can do double duty as a shower seat – with a hand spray, it can support personal hygiene.

Of course this means extra challenges in keeping the toilet and its paper dry. To help resolve this, there are paper holders with covers, and because they’re flexible, shower curtains can be useful.

Another challenge in this scenario is the containing of water at the threshold of the room. Although a level entry is preferred, in limited space, one solution can be to raise the threshold not more than 1/2″; planning a second drain near the entry can also help.

When there is more space available, wet room design can include a generous shower, often planned to emphasize the tub, free standing or otherwise, and to bolster the sense of a luxury spa. Depending on the design, the tub may double as a seat for showering. A disadvantage for some would be the wetting of the tub every time the shower is used. This can be resolved with a pivoting glass screen between the two or, when the shower is large enough, the user can simply direct water flow away from the tub. When the space can be planned with no threshold, the expansion of clear floor space further increases safety, flexibility and visual impact.

Whatever the size, the waterproofing for a wet room is different than the traditional installation in that it covers more area and should be continuous. One approach is to use liquid or viscous membrane and to spread it over the entire area and up the walls of the wet room. As in any wet area, non-porous and slip resistant water-friendly materials must be specified throughout. Finish materials are typically run floor to ceiling – an added expense, but another enhancement of the luxury spa feeling.

Determining whether or not a level or flush threshold is possible requires consideration of the construction of the floor and whether the slope is possible, as well as the direction of the water flow and the distance from the water sources to the wet room’s entrance. Client preferences and intended uses also contribute, especially in the related consideration as to whether the entrance will be open or have a door, and what type of door. An open passage can be a beautiful design statement, enhanced by continuous use of the same flooring throughout, but it offers no assurance that the water or heat will be retained in the wet area. Adding a door will help resolve this, and the most effective option will be a hinged door with a gasket. In addition, incorporating radiant heat can help resolve the issues relating to warmth in the space.

Incorporating a wet room into a bath plan offers wonderful design options, but it clearly requires careful consideration and installation. It’s a huge opportunity for us as designers, and hopefully this conversation has whet your appetite to dive into the possibilities. ▪

Mary Jo Peterson is an award-winning designer whose work has earned national recognition, including induction into the National Kitchen & Bath Association’s Hall of Fame and recognition as the NAHB CAPS Educator of the year for 2014. Author ofUniversal Kitchen and Bathroom Planning (McGraw Hill) andGracious Spaces (McGraw Hill), Peterson is certified in kitchen, bath, aging-in-place and active adult housing design. She has over 25 years of experience, and is president of her own CT-based design firm, Mary Jo Peterson, Inc.

Monday, September 11, 2017

2016 Bestevaer 45ST Pure Sail Boat For Sale

Read article : 2016 Bestevaer 45ST Pure Sail Boat For Sale

" } ; var triggerClick = function(){ jQuery('#boatPoints > div.detailsCallToAction > button.contactSellerLightboxOpen.contactSellerLightboxOpen_2976888').trigger('click'); }; (function($) { var isTouch = function () { try{ document.createEvent("TouchEvent"); return true; } catch(e){ return false; } } galleriaImages_2976888.push(galleriaCTA_2976888); var galleriaLength = galleriaImages_2976888.length; Galleria.configure({ idleMode: false }); if ( 0 !== $('#galleria_2976888').length) { var counter = 0; Galleria.loadTheme('//newimagesgz.yachtworld.com/includes/js/galleria/themes/classic-white/galleria.classic-white.min.js'); Galleria.ready(function() { var self = this; function genThumbFn(n) { return function() { self.lazyLoad( [n]); }; } for ( k = 0 ; k

Additional Specs, Equipment and Information:


Dimensions
Beam: 4.05 m
Maximum Draft: 2.15 m

Hull and deck

Aluminium hull, round bilge

Aluminium superstructure and pilot house

Above CWL 5-6mm, seawater resistant aluminium H321 5083

Below CWL 6-12mm, seawater resistant aluminium H321 5083

2x watertight bulkheads at bow and aft (= 3 compartments)

6x zinc annode (2x hull, 2x keel, 1x rudder, 1x propellor)

Fold down manually operated swimming platform

Welded chain plates, single bollards (6x), through hull fittings

Integrated diesel tanks (2x) and water (2x) tanks

Hull sanded for smooth finish


Keel and Rudder

Fixed keel with bulb

Bulb filled with lead ballast

Emergency steering in the cockpit

Single aluminium spade rudder

Rudder stock from aluminium

Rack and pinion steering system, JEFA


Paint and Decking

All horizontal (walking) areas painted with non-slip paint

Colour paint Grip Oyster White or Grey

Cockpit seats and coaming covered with cork

Anti-fouling, choice of red or black


Exterior Storage space

2x cockpit accessed lazarette lockers

1x storage locker beneath cockpit coaming, aft to starboard

1x foredeck storage locker

4x open storage in the cockpit seating backrests

1x gas locker, aft to port, for 4x 5kg (1x 5kg provided)


Sailing hardware

Manual winches in cockpit 2x 50 + 2x 46, Harken

Manual winch at mast 1x 46, Harken

2x winch handles, Harken

Deck hardware, Selden

Stoppers, Spinlock

Stainless steel stanchions, with double wired guardrail

Stainless steel push and pulpit

Stainless steel side boarding gates to port and starboard


Hatches and Windows

Pilot house 9x windows single glazed

Pilot house 2x opening Lewmar hatches, size 30

Superstructure 3x opening Lewmar hatches, size 60

Superstructure 2x opening Lewmar hatches, size 30

Superstructure 8x opening Lewmar hatches, size 3 portlight

Aft cabins 2x opening Lewmar hatches, size 5 portlight

Vertical and horizontal plexi glass entrance hatches


Deck openings

2x deck fillers for diesel and 2x deck fillers for water

1x deck discharge for black water tank

2x cockpit drain, 4x deck drain


Anchoring/Mooring

Anchor Delta 25 kg with anchor winch, Lewmar V3

Anchor chain 8 mm x 70m, galvanized, in chain box

Anchor locker forward, self draining

Anchor bow fitting with 2 anchor rollers

6x tube fenders with lines, black

4x 15m mooring lines, 16mm, black


Mast

Seldén aluminium mast, 2 spreader, deck stepped, anodised

Seldén aluminium boom, slab reefing, anodised

Seldén mast hardware

3 colour mast head light, steam, anchor and deck lights (LED)

Sloop rigged (9/10)


Standing and Running Rigging

Seldén standing rigging of 1 x 19mm wire

Furlex fixed genoa stay with manual furling genoa

1x main halyard, 1x genoa halyard, 1x spi halyard

1x outhaul, 3x reef lines, topping lift

1x main sheet, 2x genoa sheets


Sails (Doyle)

Mainsail Dacron triple stiched, 3 reefs, 6 full-batten, tell-tales

and crosscut design 60m2

Furling genoa Dacron, 45m2

Mainsail cover marked ‘Bestevaer 45ST’


Safety

Self draining cockpit

Deep and sheltered cockpit

Cockpit enclosed on all sides

2x aluminium handrails on top of pilot house (welded)

2x aluminium grabrails on aft of pilot house (welded)

3x watertight compartment

2x watertight bulkhead

Engine is placed in watertight aft compartment

Aluminium spade rudder

Aluminium escape ladder at the stern

1x automatic bilge pump and 1x manual bilge pump

Raised bulwark/footrail for grip under heel

Handholds throughout interior

U-shaped galley for safe cooking whilst underway

Liferaft in bag, 6 person

3x foam extinguishers

1x extinguisher opening for engine room


Engine

Yanmar 54hp, 4JH5E

Yanmar saildrive SD60

Dieselfilter

Acoustic insulation

Twin pole electric installation

Cooling water system

3-blade fixed propellor

Engine throttle in cockpit

Engine service panel in pilot house

Engine access from port and starboard lazarette lockers


Electric systems

Twin pole 12V DC installation with hull leak meter

230V AC shore power with 25 m cable, 3 groups fused

1x 12V instrument panel at chart table

1x 12VDC switch panel in saloon

2x 100A-12V service battery, gel

1x 66Ah-12V engine battery, AMG

Battery charger 12V 30 Amp


Bilge pumps

1x electric pump in bilge in salon, 35 L/min

1x manual pump in lazarette/engine compartment


Fresh water

Presurised fresh water system

40L calorifier supplied from engine or shore power

Hot/cold water in galley

Hot/cold water in bathroom

Hot/cold water at deck shower


Waste water

Water from shower and shower sink pumped overboard

Waste from toilet direct to holding tank

Grey water from galley with gravity fall overboard


Interior

I. Styling

Floor in American Black Walnut

Woodwork of cabinets and furniture in light Bamboo

Floor to be screwed down shut

Off-white walls, bulkheads and ceiling

Fittings in matte chroom, design look

Doorhandles matte chroom, design look

Damixa, mixer tap fittings in galley and head

Ventilated lockers and storage spaces

Rounded corners on furniture below 120cm

II. Pilot house

Port and starboard seating, 1400mm long each

Starboard has flat worktop for charts, etc.

Open into galley to port

Footrest on port and starboard

2 steps from cockpit into pilot house

1 steps from pilot house to salon

Storage boxes beneath all steps

Large hatch in floor for storage

Small storage space behind back rests for pens, sunglasses.

1x white/red chart light

2x reading lights on aft bulkhead

2x ceiling lights white/red

III. Galley

One and a half stainless steel sinks

Corian or equal marble work top

Force 10 Oven with 3 burners

4x storage lockers above worktop

2x storage lockers besides oven

1x storage drawer besides oven

1x storage locker underneath oven

1x utensil drawer opening toward salon table

2x lockers opening toward salon table

1x rubbish bin under sink

1x storage locker under sink

1x storage drawer above refridgerator

1x frontloading refridgerator 100L

1x storage space for bottles behind worktop/oven

1x aluminium anodised vertical handgrip on worktop

1x double socket 220V

IV. Salon

Starboard and port salon seating 2000mm long

Storage behind and under the salon seating

2x lockers above couch to port

2x lockers above couch to starboard

1x book shelf at bulkhead, white with wooden trim

Port bulkhead storage box for bottles

Starboard bulkhead storage box for bottles

Mast support at bulkhead

Dining table 120x140cm

Both sides of dining table fold down

3x LED reading lights

2x LED ceiling lights white/red

1x double socket 220V

V. Aft cabins

Large shelf at foot of bed, white with wooden trim

Small shelf at bed head, white with wooden trim

1x mattress 120mm foam core

2x ventilated bunk tops

Storage space beneath mattress

Starboard cabin 1x drawer under bed, front access

Starboard cabin has 1x hanging locker

Starboard cabin has 1x shelf locker

Starboard cabin has floor space and door for privacy

Starboard cabin has 2x LED reading lights

Starboard cabin has 1x LED ceiling light white/red

Starboard cabin has 1x single socket 220V

Port cabin alternative use as storage room

Port cabin 1x drawer under bed, front access

Port cabin has the entrance from the galley, with no

seperate floor space for standing

Port cabin has 1x LED reading lights + 1x LED ceiling light

Port cabin has 1x single socket 220V

VI. Owner cabin

Large bookshelf at foot of bed, white with wooden trim

Small shelf at port, white with wooden trim

1x mattress 120mm foam core

2x ventilated bunk tops

Storage space beneath mattress

3x lockers under bed, side access

1x hanging locker at bulkhead

1x shelf locker to starboard

1x vanity unit between lockers with fiddle

2x storage locker sat vanity unit, top access

2x LED reading lights head of berth

2x LED ceiling light white/red

1x single socket 220V

VII. Toilet compartment

1x manual Jabsco toilet

1x wall mounted full shower, thermostatic mixer tap,

Damixa

1x shower curtain on roller

Floor of customized aluminium grid

1x shower drain pump with manual switch

Walls of waterresistant off-white laminate

1x stainless steel sink with mixer tap, Damixa

1x washbasin with storage under sink + storage locker,

white, from water resistant material

1x Lewmar hatch in ceiling for ventilation and light

1x Lewmar hatch in coaming for ventilation and light

1x blackwater tank ca. 60L with 3/4 full indicator light

1x ceiling LED white/red

1x single 220V socket


Options

HULL & DECK

Upgrade from tiller to wheel steering (change of cockpit) €6.250

Centreboard (1,40 - 2,95m) with twin aluminium rudders €28.450

Round portholes in the hull, with reinforced glass (per piece) €2.500

Radar support pole, anodised aluminium, at stern (excl radar) €2.250

Solid railing from stainless steel at stern, to the side gates €3.480

Fixed davits at stern, max load 150 kg, stainless steel €2.650

Painted hull from waterline upto freeboards €28.000

Paint on the sides of the inside cockpit area €2.450

Esthec on walking areas deck + cockpit floor/seats €21.450

Replace cork with Esthec in the cockpit €5.525

Teak on walking areas deck + cockpit floor/seats €17.450

Upgrade to thermopane layered windows in pilot house (9x) €5.500

Deck wash pump in foredeck compartment €1.250

ELECTRICAL & ELECTRONICS

Upgrade engine from 54 hp to 75 hp Yanmar 4JHE HTE €5.775

Extra diesel tank (only possible with fixed keel) €2.850

Automatic fire extinguishing system in engine room €720

Water generator Watt&Sea 300W (8 amp @ 9kn) €6.400

Wind generator Superwind €5.450

Solar panels total 250W from 3 pieces €3.275

Lithium-Ion 12V/5kW battery pack €2.850

Bow thruster fixed tunnel, Sidepower 185 mm 6kw €6.400

Mastervolt Cruising Package: MASS GI 3,5 kW + MV combi

100A 2500W including Masterview easy panel €4.290

120 Amp second alternator €2.650

Flex-O-Fold folding propeller 22” €3.785

B&G Nav/Comm package as below:

VHF+ sp/wd/dpt meter + autopilot + radar + plotter + AIS €14.595

INTERIOR

Upgrade to French bed (centered) in front (owner) cabin €4.950

Heating Webasto air heater 5kW, 3 exits €3.480

Heating Webasto air heater 5kW, 5 exits €5.980

Dickinson diesel oven heater 4kw €5.790

Oceanair sky screens and musquito screens (at 7 hatches) €4.200

Upgrade to electric toilet Planus €1.400

Fusion radio + DVD player (iPhone/iPod compatible) €675

Manual pump for fresh water in galley €480

Freezer/fridge combo Isotherm 40L top loader (auto-pumping) €1.945

RIGGING

Aluminium mast painted white €5.950

Carbon mast, Selden €42.500

‘Lazy Rack’ system mounted on boom, unpainted aluminium €2.950

Gybe preventer €1.400

Cutter rig with manual Furlex 200S (excl. sails) €7.195

Upgrade to removable cutter stay, with wichard tensioners €2.450

(excl furler, sail and deckgear)

Removable furling Selden unit to fit inner jib, code-O and

gennaker, including sails, make Doyle €16.500

Spinnaker equipment w/jib boom, stored at mast €2.850

Upgrade to 2 electrical winches, size 50, Harken €2.130

Windvane self steering: Windpilot Pacific €4.465

SAIL PACKAGES DOYLE

Cruising Laminate radial cut package €9.225

  • Mainsail
  • Furling Genoa 125%
  • Cutter jib 23,5m2

Hydranet Radial High performace package €13.975

  • Mainsail
  • Furling Genoa 110%
  • Cutter jib 23,5m2


Disclaimer

The Company offers the details of this vessel in good faith but cannot guarantee or warrant the accuracy of this information nor warrant the condition of the vessel. A buyer should instruct his agents, or his surveyors, to investigate such details as the buyer desires validated. This vessel is offered subject to prior sale, price change, or withdrawal without notice.


Thursday, August 24, 2017

How to Remodel Your Bathroom for Now and the Future

Read article : How to Remodel Your Bathroom for Now and the Future

You’re planning a bathroom remodel. Exciting! It’s time to talk about flooring and finishes, light fixtures and storage space. Oh, yeah, and walkers, slips and broken hips! Wait. What?!

We know, we know, that’s not you. It may never be you. But the truth is: Thinking about some of the challenges of aging as you remodel will actually make your house more accessible to everyone in your life, whether it’s your adult daughter trying to take a shower while her baby is conked out in the stroller, a toddling grandchild who won’t sit still in the tub, a spouse recovering from knee surgery or an elderly parent with failing vision.

Planning ahead and anticipating the changing needs of your family will prevent your bathroom from looking institutional down the road.

— Amy Levner, AARP

“Most of us find it difficult to plan ahead,” says gerontologist Jodi Olshevski, executive director for the Hartford Center for Mature Market Excellence. “And some of us have a certain aversion to growing older.”

But planning ahead and anticipating the changing needs of your family is the key to preventing your bathroom from looking institutional down the road, says Amy Levner, manager of Housing and Livable Communities for AARP. “Universal design done well is invisible, and it looks a lot better than a quick fix,”  she adds.(To see what Levner’s talking about, check out the video at aarp.org/homefit.)

If, for example, you or a family member suddenly suffers an injury or illness, Levner says, you can’t instantly install a sleek grab bar that doubles as a towel rack. Or a backlit faucet. Or fold-down teak seats in the shower. Instead, you’ll be forced to make accommodations of the nursing-home-chic variety. Often in white or beige plastic. Not pretty.

On the other hand, if you approach your remodel thoughtfully using the principles of universal design now, you’ll have all the accommodations you or a loved one might need one day already in place — in a style that suits your taste. In the meantime, activities like shaving in the shower and bathing a baby will be easier.

“There’s really no downside,” Olshevski says. You just need to think a little differently as you turn your bathroom into the universally accessible oasis of your dreams.

What to Think About

Flooring. Look for flooring that is slip-resistant, even-surfaced, low-glare, durable and easy to maintain. “The bathroom is a really dangerous room because it’s slippery when wet,” Levner says, “but you can select tiles that are naturally slip-proof.”

Hallways and doorways.To accommodate walkers, strollers or a wheelchair, widen hallways and doorways to at least 32 inches — 36 inches is ideal, says Olshevski. And eliminate thresholds, which are an unnecessary obstacle.

Doorknobs. Replace knobs with levered handles, which are easier for both little hands and arthritic ones to manipulate.

Lighting. Most people don’t think much about lighting in the bathroom, Olshevski says, but good lighting is crucial not only for good design but also for preventing slips and scalds. In addition to letting in as much natural light as possible, she suggests multiple sources of lighting and points out the importance of lighting over the bathtub and shower. Of course, don’t forget a nightlight for those midnight bathroom trips.

Light switches. Install backlit rocker switches instead of standard switches. They are easier to find in the dark, and you can flip them with your elbow or shoulder if your hands are full.

Faucets.Choose single-lever faucets — or touchless sensor faucets — which are easier to manipulate and provide better water-temperature control.

Toilet.Comfort-height toilets are 17 to 19 inches high compared to the standard 14 to 16 inches. You’ll just need to provide a stepping stool for little ones.

Vanity and medicine cabinet.Not only are pedestal sinks in fashion, they are more accessible to those with wheelchairs and walkers than enclosed vanities, Olshevski says, because they provide clearance under the sink. And a well-lit medicine cabinet makes reading prescription bottles and finding toiletries easier.

Shower and tub.“We would suggest a walk-in shower with a hand-held shower hose,” Olshevski says. “They are designed so the water doesn’t get on the floor, and you can install a seat, which is very practical if you’re shaving.” Walk-in bathtubs, which are accessible through a door and have built-in seating, are another option.

Grab bars.Perhaps the most important feature for an accessible, safe bathroom is a grab bar. When you’re remodeling, be sure to have the walls reinforced so you can install a grab bar in the tub or shower whenever you’re ready without having to rip up the walls again, Levner says. But really there’s no need to delay, since so many grab bars double as stylish towel racks.

The Fun Part: Shopping Around

Once you’ve decided to embrace universal design in the bathroom, the next step is finding products that match your style. Architects, contractors and designers familiar with universal design can lead you to products that are right for you.

Most architects are up to speed on universal design, Levner says. Locating designers and contractors might take a little sleuthing. She recommends looking for certified Aging in Place contractors and contacting your local chapter of the American Society of Interior Designers (ASID) for designer recommendations.

Half the fun is doing research on your own. And maybe creating a Pinterest board of your favorite things.

Melinda Avila-Torio, a designer with THW, an architecture firm that specializes in building senior living facilities, recommends checking out the following for inspiration:

“We know from research that most people want to stay in their home as they age,” Olshevski says. Universal design makes that possible. And if you do the remodel right, your guests won’t want to leave either.

By Heidi Raschke
Heidi Raschke is a longtime journalist and editor who previously was the Executive Editor of Mpls-St. Paul Magazine and Living and Learning Editor at Next Avenue. Currently, she runs her own content strategy and development consultancy.@heidiraschke

Next Avenue Editors Also Recommend:

Next Avenue is bringing you stories that are not only motivating and inspiring but are also changing lives. We know that because we hear it from our readers every single day. One reader says,

"Every time I read a post, I feel like I'm able to take a single, clear lesson away from it, which is why I think it's so great."

Your generous donation will help us continue to bring you the information you care about. What story will you help make possible?

Sponsored Links

Monday, August 7, 2017

7 stunning bathroom trends for 2017 revealed

Read article : 7 stunning bathroom trends for 2017 revealed

The bathroom is first and foremost a functional space, but it is also a space that can be beautifully designed to make it a standout feature visually as well.

Aside from the usual practical aspects of this space, Kyle Turner from Luximo, the local distributor for the luxurious ROCA sanitaryware brand, offers some insights into the main trends influencing bathroom design going forward:

1. Organic is back

imageKyle says organic elements can add warmth, uniqueness, and a rich tactile sensation to the overall composition. As such, materials such as wood, stone, metal and ceramics remain popular.
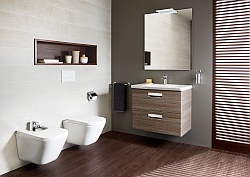
It is understandable why designers and homeowners alike admire Mother Nature as the ultimate source of design inspiration - organic elements can add warmth, uniqueness, and a rich tactile sensation to the overall composition. As such, materials such as wood, stone, metal and ceramics remain popular.

“Natural materials are being used to great effect to bring nature back into our homes. To stay within budgets, and to ensure easy maintenance and longevity, lots of indistinguishable imitative products are gaining popularity,” says Kyle.

“These warm organically-inspired or natural materials are used to great effect when juxtaposed with modern materials and super clean, streamlined design lines that offer practical and simple arrangement of spaces.”

2. Leading colourways

Darker more moody tones are making a huge comeback throughout the home, as well as in the bathroom.

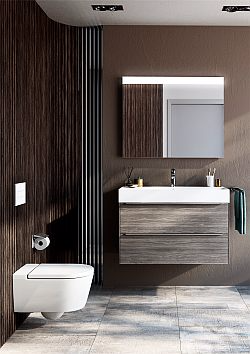
“Darker tones, especially the rich palette of grey hues, are proving to be enormously popular. In the bathroom, they can be used on the walls and floor, and juxtaposed against brilliant white sanitaryware for maximum visual impact,” says Kyle.

He says can also integrate other popular colours.

“Matte, nude and neutral colours offer the perfect combination when paired with darker greys and blacks, and offer a great way of introducing some contrast to the overall colour palette,” says Kyle.

“Combinations of pastel tonalities in blue, green, salmon and ash are also on the rise, but only when used as accent tones. And of course, the classic all-white monochromatic bathroom never seems to go out of fashion.”

3. Metal and marble mania

image“These warm organically-inspired or natural materials are used to great effect when juxtaposed with modern materials and super clean, streamlined design lines that offer practical and simple arrangement of spaces,” says Kyle.
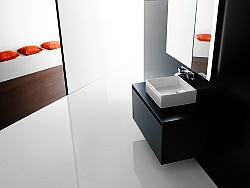
“Marble cladding on the walls and metal accessories in gold or copper are bang on trend,” says Kyle.

“There has been a stylish revival of this 70s aesthetic - brass has really become that most fashionable metal for the bathroom, and when paired with the nobility of marble, it makes a truly irresistible combination.”

4. Play with geometry

A variation of geometric shapes inspired by the strong lines of architectural and structural elements has really come to the fore with regards to tiling and ceramic cladding.

“Hints of the Orient and the Mediterranean are being introduced in a modern and dynamic way in new trendy bathroom tile ranges,” says Kyle.

“An example of this is the rising popularity of the hexagonal tiles used for wall and floor coverings - it is proving to be a very popular design combination with multiple variations that can interpreted in many ways.”

5. Water efficiency rules

Water has always been a very precious commodity, but it is becoming a very high priority, especially in light of the severe water shortages we have been living through of late.

Kyle says awareness of water shortages has made choosing sanitaryware that is water efficient a must.

“You use more water in the bathroom than every other room in your home combined. Choosing water-efficient options is the right thing to do, and it can save thousands of litres and lots of money in the long run,” he says.

image“Matte, nude and neutral colours offer the perfect combination when paired with darker greys and blacks, and offer a great way of introducing some contrast to the overall colour palette,” says Kyle.
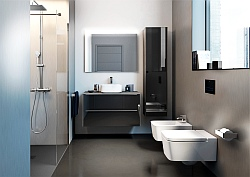
“Water-efficient taps, double-flush cisterns, and low-flow showerheads all make a big impact on reducing your water consumption in the bathroom. However, there are other really clever and innovative products - one of them being the exclusive ROCA W+W, which reuses the water from the basin to fill the cistern after filtering it, further reducing water consumption by up to 25%.”

6. Smart storage

Adequate storage is essential in any bathroom space, and today, it takes on the role of being both functional and visually pleasing.

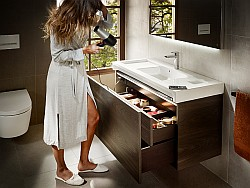
“Bathroom storage needs to provide you with easy access to all your items - it prevents the items from getting lost inside the furniture unit. ROCA’s range of bathroom furniture, for example, boasts drawers with full extraction systems that display all their contents so that you may access even the farthest corner,” says Kyle.

“Some models also include a concealed drawer to facilitate the tidiness of?the smaller objects.”

However, he says that modern bathroom furniture has also become smart.

“ROCA’s Statum-N Base Unit, for example, allows you to connect your smartphone to the Bluetooth speakers of the furniture unit and enjoy your music while you shower or get ready to go out. It also offers a built-in socket in its drawer so that you can use to plug your hairdryer, electric shaver, or straightening iron in.”

image“Combinations of pastel tonalities in blue, green, salmon and ash are also on the rise, but only when used as accent tones," says Kyle.

7. Deluxe showers

The bath has always taken centre stage in bathroom design, however, there is a trend to replace the bath with a super-luxurious and grand shower instead.

“Showering is water efficient, it is quick and easy, and it provides one of the few occasions in which we are relaxed, calm and away from the stress caused by our everyday lifestyle,” says Kyle.

“It is no wonder that it is really starting to take centre stage in modern bathroom design. From the shower walls, shower heads and faucets, you can customise your shower according to your budget and needs.”

He says another important element to consider is the shower floor or tray.

“Gone are the days when acrylic shower floors were your only option, as ROCA now also provides shower trays in STONEX, steel and vitreous china. Shower trays manufactured in STONEX, a resistant and long-lasting material, may be installed levelled to the floor, and thanks to their textured surface, offer a high anti-slip feature,” says Kyle.

“They are also available?in different natural finishes to meet the needs of all kinds of bathroom environments, providing a very modern look - Helios, wooden texture, Terran, stone texture.”

imageAdequate storage is essential in any bathroom space, and today, it takes on the role of being both functional and visually pleasing, says Kyle.

Kyle says steel shower trays are functional, long lasting and extra slim so that they are perfectly integrated in the shower space, and it is only necessary to clean them with a wet cloth and soap.

“For greater comfort, ROCA’s In-Floor or Blues XL collections include an anti-slip base,” says Kyle.

“If you are searching for an economic shower tray that is easy to clean and resistant to chemical agents, those manufactured in vitreous china - such as ROCA’s Malta shower tray for example - are a good option.”

All ROCA products are currently available at Bathroom Bizarre outlets countrywide.


Tuesday, April 11, 2017

How to Lay Tile: Install a Ceramic Tile Floor In the Bathroom

Read article : How to Lay Tile: Install a Ceramic Tile Floor In the Bathroom

Cover up an old floor

Whether you’re replacing an old shabby floor or installing a new one, you can’t beat ceramic or stone tile for durability and appearance. When laid properly, it’s virtually a forever floor that requires almost no care and maintenance. And you can select materials from a vast array of colors and textures. We’ll cover how to lay tile in a few steps.

What’s equally attractive is that you can lay a first-class tile floor yourself, often in one weekend, and save the $500 to $1,500 cost of hiring a pro.

The key to keeping the job simple is to cover the old vinyl or other flooring with a new thin underlayment that gives you a fresh, clean start. No messy tear-out and repair. In this article, we’ll demonstrate how to install a thin “backer board” over the old floor. Then we’ll cover tile-setting techniques, from layout and cutting to grout and cleanup.

This is a two-day project for most bathrooms, even if you don’t have any previous tile experience. If you’re comfortable using basic hand tools and have the patience to align tiles just right, you can handle this job. The entire cost of this project for a typical bath ranges from $300 to $600.

Estimating the Cost of a Tile Project

The tile itself will be your biggest cost, so start by measuring the square footage of the floor. Then add 10 percent for cutting waste. If you choose a more complex layout than the simple grid pattern we used, your waste will be greater. Most tile sells for $5 to $15 per square foot, but you can spend as little as $3 or more than $50. If you have to install backer board, add $2 per square foot to the cost of the tile. Other materials will cost about $90, regardless of bathroom size. The tile tools you’ll need (including a tile cutter) will total $60 to $80.

Assess your floor

The success of any tile job depends on a solid base, that is, a floor that flexes very little as you walk across it. If you have a concrete subfloor, this isn’t an issue. You can lay tile directly over the existing vinyl as long as it’s well adhered.

If possible, avoid tearing out vinyl flooring. Leaving it in place saves time, of course, but it also reduces asbestos hazard concerns. Asbestos was used in sheet vinyl and vinyl tile until the mid-1980s. By leaving the vinyl undisturbed, you won’t risk sending asbestos fibers into the air.

If you have a wood subfloor, there’s a good chance that you’ll have to install backer board over your vinyl to make the floor thicker and stiff enough for tile. The easiest way to see flooring thickness is to pull off a floor register. Otherwise look for plumbing passageways through the floor. As a last resort, drill through the floor with a 1-in. or larger spade bit (your new floor will cover the hole later). To prevent asbestos dust from becoming airborne, mist the bit with a spray bottle as you drill. In addition to floor thickness, you’ll need to determine joist spacing. If there’s an unfinished basement or crawlspace below the floor, simply measure the spacing. If there’s a ceiling, probe for joists with a drill bit.

If the joists are spaced 16 in. apart, the layers of structural flooring beneath the vinyl should add up to at least 1-1/8 in. With joists every 24 in., you need 1-1/2 in. If your floor is too thin for tile, add a thicker layer of tile backer board. Our floor required 1/4-in.-thick backer. Yours might need 1/2-in. backer to reach the minimum thickness. If your floor is already thick enough, you can simply prep the vinyl floor (Photos 1 – 4) and skip the backer installation (Photos 5 – 8). Then tile directly over the vinyl, following the same steps we used over backer board.

Regardless of the type of subfloor, there are two situations where you can’t leave vinyl in place: First, if large areas of the vinyl are loose, don’t set tile or backer over it. Small loose spots are acceptable and easy to deal with (Photo 4).

Second, “cushioned” sheet vinyl must be removed before you can set tile. Cushioned vinyl has a foam backing that makes it noticeably thicker and softer than standard vinyl flooring. It’s too spongy to support tile or backer board. Before removing it, call your local health department for instructions on how to check for asbestos and proper procedures if asbestos is present.

Gather Advice While You Shop

Home centers carry everything you need for this project, but begin shopping at a tile store, where you’re more likely to get expert advice. Make a quick sketch of your floor plan and jot down all the dimensions. Also take a photo of the floor at the doorway. This will help the tile store staff recommend a “transition” to neatly join the tile to the hallway flooring. Transitions come in different styles to suit any situation.

When you choose the tile itself, ask if it requires any special installation steps. Some tile, for example, should be coated with grout release before grouting. Also ask about cutting techniques for the tile. You’ll use sanded grout for the floor. Ask if sanded caulk is available in a color that matches your grout for the floor/tub and floor/wall tile joints.

Prepare the room

First, get the toilet out of your way. Stuff a rag in the hole to block sewer gases. If your home only has one toilet, you can leave it in place until you install the backer board. Keep a supply of wax rings on hand if you plan to reinstall the toilet at the end of each day.

If you expect to keep your vanity for many years to come, leave it in place and tile around it. But if you think you might replace it, remove it now. When the job’s done, you can reinstall the old vanity or put in a new one. Having the vanity out of the way gives you more workspace, and you won’t have to cut backer board and tiles to fit around it. This also eliminates the floor repair problem if you install a smaller vanity or pedestal sink in the future.

Pull off the baseboard or plan to add base shoe molding. This leads to a neater-looking job because the edges of the tile will be covered later—jagged cuts and slight measuring mistakes are hidden. If your baseboard has base shoe molding, remove only the base shoe. Backer board and tile will raise your floor 3/4 in. or more. So you’ll have to remove and undercut the door. To mark the door for cutting, stack backer board, tile and two layers of cardboard on the floor (see Photo 3). Mark the door 1/2 in. above the stack, remove the door and cut off the bottom.

Scrub, screw and patch the floor

Install a Ceramic Tile Floor in the Bathroom

Photo 1: Scrub the floor with stripper

Remove the baseboard and toilet. Using an abrasive pad, scrub the floor hard with water mixed with vinyl floor stripper.

Install a Ceramic Tile Floor in the Bathroom

Photo 2: Drive screws into the floor joists

Mark the floor joists with chalk lines and drive 2-1/2-in. screws every 8 in. Don’t leave any screw heads protruding.

Install a Ceramic Tile Floor in the Bathroom

Photo 3: Cut the door trim to accommodate tile

Undercut door trim using a jamb saw or handsaw. A piece of backer board, tile and two layers of cardboard raise the saw to the correct height above the floor.

Install a Ceramic Tile Floor in the Bathroom

Photo 4: Fill low spots with thin-set

Cut out any loose sections of vinyl with a utility knife. Fill the void with thin-set using the flat edge of a notched trowel.

Scrub the floor with a vinyl floor stripper following the manufacturer’s instructions. The stripper will dissolve wax and other residue. Scrub hard with an abrasive scouring pad (Photo 1). The tiny scratches left by scrubbing help the thin-set bond better.

Next, drive screws through the floor into the joists (Photo 2). This ensures that the subfloor and underlayment are securely fastened. If there’s an unfinished basement below the floor, locating the joists is easy: Go to the basement and drill a couple of 1/4-in. holes up through the floor next to a joist. If you can’t locate the joists from below, pick a spot near one wall and drill a hole. If the bit breaks through into hollow space, move over 1 in. and drill another hole. Keep going until you hit a joist. Then go to the opposite wall and find the other end of the joist. Measure at intervals of 16 or 24 in. from the first joist to locate the others.

While you’re driving screws, look for any spots where the vinyl has loosened from the floor. Cut out loose spots and fill them (Photo 4). If there are any copper pipes that pass through the floor, wrap them with duct tape at floor level. Cement-based thin-set and grout can corrode copper.

Install backer board

Install a Ceramic Tile Floor in the Bathroom

Photo 5: Install backer board over the floor

Cover the floor with backer board. Cut inside corners, circles and curves with a drywall saw. Space pieces 1/8 in. apart and hold each one in place with two temporary screws.

Install a Ceramic Tile Floor in the Bathroom

Drywall saw

Use a drywall saw to cut corners, circles and curves in backer board.

Install a Ceramic Tile Floor in the Bathroom

Photo 6: Score and snap the backer board

Make straight cuts with a scoring knife. Make three or four scoring passes, then snap the backer over a 2×4. When all the pieces have been laid out, label them and set them aside.

Install a Ceramic Tile Floor in the Bathroom

Scoring knife

Use a scoring knife to score the backer board.

Install a Ceramic Tile Floor in the Bathroom

Photo 7: Trowel on the thin-set

Comb out a bed of thin-set just large enough for each piece of backer board using a 1/4-in. notched trowel held at a 45-degree angle. Screw the backer down before spreading thin-set for the next piece.

Install a Ceramic Tile Floor in the Bathroom

Notched trowel

Use a 1/4-in. notched trowel to spread the thin-set over the floor.

Install a Ceramic Tile Floor in the Bathroom

Photo 8: Cover the joints

Press adhesive-backed mesh tape over the joints and skim over the tape with thin-set. When the thin-set is firm but not fully hardened, scrape away any ridges with a putty knife.

The backer board is fastened with a combination of screws and thin-set adhesive. Cut and lay out all the pieces before you mix the thin-set (Photos 5 and 6). You can run the sheets in any direction, but be sure to stagger the joints so you never have four corners meeting at one point. Leave a 1/8-in. space between the sheets and along the vanity, tub or shower. The gap along walls must be at least 1/8 in. wide, but a wider gap (about 1/2 in.) makes the panels easier to set in place.

After cutting and fitting, label the location of each one and set them all aside. Vacuum the floor and have your drill and screws ready to go before you mix the thin-set. Read the thin-set’s label. Spread the thin-set with a 1/4-in. notched trowel. Comb in one direction so air can escape when you embed the backer (Photo 7). Drive screws every 6 in. around the perimeter of each piece and every 8 in. “in the field” (across the face of the panel). If the leftover thin-set is still workable, you can immediately embed mesh tape over the joints (Photo 8).

If the thin-set has become too stiff or chunky, mix a new batch. Use “alkali-resistant” tape that’s meant for backer board. While the tape coat of thin-set hardens, run a putty knife over all the screw heads to scrape off the “mushroom” bulges around screws. Drive in any protruding screw heads you come across.

CAUTION!

Cement products like thin-set and grout draw moisture from skin and can even cause burns that require medical attention. While most pros work bare-handed, wear gloves if you have any special sensitivity. Also wear eye protection while mixing thin-set and grout.

Figure A: Ceramic Tile Over Vinyl

Everything you need for this project is available at home centers. Most of what you need is also available at tile stores.

Cutaway of a tile floor over vinyl

Careful layout pays off

Install a Ceramic Tile Floor in the Bathroom

Photo 9: Test your layout to avoid small pieces along the walls

Dry-lay tile to determine the best layout. Start with centered rows, leaving equal spaces at walls. Then reposition rows until you find the optimal layout.

Install a Ceramic Tile Floor in the Bathroom

Photo 10: Attach guide boards to guide the layout

Screw guide boards to the floor following your chosen layout. Position the guides so you can lay all the field tiles without moving the guides. Make sure the guides are at right angles by measuring out a 3-4-5 triangle.

Too often, tile novices simply start setting tile in a corner and continue along two walls until the floor is covered. Sometimes they get lucky and the floor looks good. But more often this method leads to trouble:

They end up with awkward-looking, thin slivers of tile along a prominent wall or at the doorway. And the tile looks even worse when walls are badly out of square or crooked—a straight grout line running too close to a wall emphasizes the wall’s imperfections.

Whether you’re laying a simple grid pattern like we show here, or a diagonal pattern with a border, the best tile layout usually calls for centering full tiles between walls so the partial tiles along the edges will end up all the same size. Don’t rely on your tape measure and mental arithmetic. Rip open a carton of tile, grab a handful of spacers and experiment with your layout on the floor.

To begin, center rows of tile between walls so you have equal spaces along walls that face each other (Photo 9). Set the two rows parallel to the two most prominent walls. Then make adjustments, trying to achieve these three goals:

  • Use full tiles at doorways and along the bathtub or shower. These are usually the only places where the edges of the floor aren’t covered by baseboard. If you use full tiles in these exposed spots, you don’t have to worry about making smooth, perfect cuts.
  • Avoid narrow tiles along walls. Ideally, you’ll end up with tiles cut to half size or larger. Avoid cutting tile to widths less than 2 in.
  • Minimize cutting and try to avoid difficult cuts. For example: Cutting tile to an L-shape to fit around an outside corner is especially difficult when one arm of the “L” is less than 2 in. wide. The arm tends to break off as you cut.

Chances are, your layout won’t meet all these goals. Because the shower stall was the focal point in our bathroom, we made it our No. 1 layout priority. We chose to use full tiles in front of the shower. That left us with 3-in.-wide tiles along the opposite wall, which was less prominent. We also chose to center the tile rows on the shower; that meant we had to use cut tiles at the doorway.

Once you determine a layout, establish lines to guide your tile positioning. The usual method is to snap chalk lines on the floor. But chalk lines are hard to see after you’ve spread thin-set, and one row of tile may slip as you set the next row. Here’s a more reliable guide: Choose straight boards a foot shorter than the length and width of the room. Tape one edge of each board so thin-set won’t stick to them.

Then screw the boards to the floor at a right angle to form a guide that eliminates guesswork and shifting (Photo 10).

Video: Create Your Own Floor Tile Layout

Planning the layout for a tile project is usually the hardest and most time- consuming step. Watch this video to learn how a pro does it. You’ll see how to snap chalk lines and make sure they are perfectly square. Plus, you’ll learn how to avoid unsightly narrow, difficult-to-cut tiles along a wall. Don’t start a tile project until you’ve watch this video!

Set the tile (finally!)

Install a Ceramic Tile Floor in the Bathroom

Photo 11: Set the full tiles

Comb out a few square feet of thin-set and set tile against the guides. Continue until all the full tiles are in place. Tip: Watch for squeeze-out between tiles and rake it out with tile spacers.

Install a Ceramic Tile Floor in the Bathroom

Spacers detail

Keep the gaps between tiles even by using spacers

Install a Ceramic Tile Floor in the Bathroom

Photo 12: Spread thin-set and set the perimeter tiles.

Cut and set the perimeter tiles after the thin-set beneath the full tiles has hardened. In spaces too narrow for your trowel, comb thin-set onto the backs of tiles.

It’s usually easiest—and most efficient—to set tile in two phases: First set all the full “field” tiles (Photo 11). Then, when the thin-set has hardened for several hours, cut all the perimeter tiles and set them (Photo 12). Here are some tips for both phases of the job:

  • The trowel you use for setting tile may be different from the one you used to embed the backer. The thin-set label tells you which notch size to use relative to tile size.
  • Dampen the backer with a sponge just before applying thin-set. This keeps the thin-set from drying out too quickly.
  • Comb the thin-set in one direction so air pockets won’t be trapped under tile.
  • Open three or four cartons and mix the tiles as you set them. Pattern and color vary slightly from one carton to the next.
  • Don’t just set each tile into place; press down on the tile and wiggle it to embed it firmly in the thin-set.
  • Watch for “tipped” corners. When you press a tile in place, it’s easy to tilt it slightly so that one corner stands higher or lower than neighboring tiles.
  • When you complete a section of tile, inspect it before moving on. Make sure the tiles line up correctly and spacers are in place. Wipe any thin-set off the face of tiles with a damp sponge.
  • When the thin-set becomes chunky or too stiff, throw it away and mix more. Never try to extend the life of thin-set or grout by adding water.
  • Cut perimeter tile so that caulked joints (at tub) are the same width as grouted joints.

Prepare the floor for grout

Install a Ceramic Tile Floor in the Bathroom

Photo 13: Install an extension ring over the toilet flange

Remove the old screws from the toilet flange and apply a heavy bead of silicone caulk. Fasten the extension ring over the old flange with stainless steel or brass screws.

Install a Ceramic Tile Floor in the Bathroom

Photo 14: Install the transition strip

Glue the transition into place with construction adhesive. If carpet meets the transition, you may have to add a new tack strip.

Install a Ceramic Tile Floor in the Bathroom

Photo 15: Stuff backer rod along the wall

Push backer rod into joints that will be caulked later. The foam rod keeps grout out of joints. After grouting, pull out the rod and caulk the joints.

When all the tiles are in place and the thin-set has hardened, remove all the spacers. Next, raise the toilet flange by adding an extension ring or two (Photo 13). The extended flange should be flush with or higher than the surrounding tile.

When you grout, fill in between the flange and tile. That way, any future leak around the flange will show up on the bathroom floor instead of on the ceiling below. If you plan to use a glue-down transition as we did, this is the time to install it.

Here’s how we dealt with our transition: First, we removed the old metal strip that covered the carpet’s edge. Then we cut our transition strip to fit between the door jambs using a miter saw. Next, we added a tack strip to hold the carpet in place. Before we could glue the transition to the floor (Photo 14), we had to remove a thin strip of the old vinyl floor.

Grout is too brittle to handle the slight shifting movements that are normal in any room. Keep grout out of joints wherever the floor meets the tub, shower, vanity or walls (Photo 15).

Pack the joints with grout

Install a Ceramic Tile Floor in the Bathroom

Photo 16: Grout the joints

Work the grout back and forth across the floor, diagonal to the joints and holding the float at a 45-degree angle. Then scrape off the excess grout, holding the float almost upright.

The thin-set directions will tell you how soon you can grout the floor—usually 24 hours. Grouting isn’t complex. Just plop a couple of scoops of grout onto the floor in a corner, work the grout into joints (Photo 16) and scrape off the excess grout before moving to the next section. In addition:

  • Mix the grout to a mashed-potatoes consistency. Adding extra liquid makes grout easier to work with but weakens it.
  • Don’t just spread the grout over the joints; press hard to pack it into the joints. If you’re doing it right, your forearm will get a good workout.
  • Whether you’re filling joints or scraping off excess grout, always push the float diagonally across the tiles.
  • Scrape off the excess to leave tile as clean as you can. The less grout you leave on the tiles, the easier cleanup will be.
  • When you’re done, cover the grout bucket with a plastic bag and set it in a cool place to slow the hardening process. During cleanup, you may find spots that need a little extra.

Grout cleanup

Install a Ceramic Tile Floor in the Bathroom

Photo 17: Clean the tiles

Wipe grout off the tile surface with a damp sponge. Wipe gently on the first pass so you don’t pull grout out of the joints. Rinse the sponge often.

Clean the surface of the tile when the grout is stiff enough to stay put in the joints but still soft enough to wipe off the tile surface. During hot, dry weather, grout can become difficult to wipe away in just 10 minutes, so get ready for cleanup before you even mix the grout. You’ll need two buckets of clean water, two sponges, a synthetic scouring pad and a dry rag.

As soon as you’re done grouting, go to the first section you grouted and wipe across a joint with a damp sponge. If the sponge pulls grout out of the joint, wait five minutes and try again. In cool, damp weather, the grout may stay too soft for an hour. When the grout is hard enough, gently wipe the tile with a damp sponge.

Rinse the sponge frequently as you wipe the entire floor (Photo 17). If you come across tough spots, scrub them with the scouring pad. Be careful where you put your feet and knees—don’t mar your perfect grout joints.

Immediately after the first pass, grab the second bucket of clean water and the fresh sponge and make a second, more thorough pass. Then, as the tile surface dries, wipe it with a dry terry cloth. The dry haze should buff off easily. If not, go for fresh water and sponge the floor again. If you can’t get rid of the haze, don’t panic. Products that remove haze are available wherever tile is sold.

Let the grout cure overnight before you caulk joints, set the toilet or reinstall baseboard. Grout sealer is a good precaution against staining: Some products can be applied 24 hours after grouting; others require a two- to three-week wait. If you have leftover tile or grout, keep them in case you have to make repairs in the future. Be sure to write down the brand, color and retailer of the tile.

How NOT to Save Money on a Tile Project

I’m a devout cheapskate, but when it comes to buying thin-set and grout, I grab the most expensive products on the shelf. More expensive thin-sets and grouts generally contain a higher proportion of the polymers that improve adhesion, durability and stain resistance.

In most situations, cheaper products would perform just fine. But if I can reduce the risks of loose tiles or cracked grout by spending an extra $30 on a typical bathroom project, I consider that a bargain.

Liquid additive is another smart investment. If the thin-set or grout label says you can mix it with water or an additive, use additive. These liquids (labeled “latex, ” “polymer” or “acrylic”) are meant to improve adhesion and stain resistance. But as a bonus, they produce a slick, creamy consistency. Thin-set combs out more smoothly, grout flows easily into joints, and both remain workable longer.

Also buy a mixer for your drill. Mixers come in various styles and sizes. Go easy on the trigger. If you run the drill at full speed, you can create millions of tiny air bubbles, which will weaken the mix.

Tile cutting tools

Install a Ceramic Tile Floor in the Bathroom

Tile cutter

A tile cutter is the fastest way to cut tile. Just push the handle forward and a small wheel scores the tile. Then push the handle down and the tile snaps in two. You can’t beat a tile cutter for convenience. It makes no mess and you can drag it around the room as you work. But a tile cutter has zero versatility. It makes straight cuts across the entire tile—no curves or corner cuts. Cutting 1 in. or less off a tile can be difficult or impossible. You can rent one at rental centers and some tile shops.

Install a Ceramic Tile Floor in the Bathroom

Wet saw

A wet saw cuts with a diamond blade while water cools the blade and eliminates dust. You can cut notches, trim off tiny slivers of tile, cut miters and even make curves. You’ll get clean cuts in any type of tile. But wet saws are messy. They spit water and raise a cloud of gritty mist. If you use one indoors, contain the mist with curtains of plastic film and cover nearby surfaces. You can buy a small wet saw like the one shown here or rent a professional model from a tile store or home or rental center. If you only have a few cuts that require a wet saw, call a tile store. Many make cuts for a small fee.

Install a Ceramic Tile Floor in the Bathroom

Angle grinder

An angle grinder equipped with a diamond blade can make straight cuts, curves and notches in any type of tile. Since all your cuts are freehand, this isn’t a precision tool, but you can grind away imperfections with the tip of the blade. Use a grinder only outside. Wear a dust mask and eye protection.

Install a Ceramic Tile Floor in the Bathroom

Nippers

Nippers are useful for rough curves and notches. They don’t cut tile, but bite out small chunks, leaving jagged edges.

Install a Ceramic Tile Floor in the Bathroom

Contour gauge

A contour gauge is a great tool for marking troublesome shapes on tile. Just press it against any odd-shaped surface (like the curved corner of a bathtub) and transfer the profile to tile.

Here are the tools that can cut your tile. Buy or rent the ones that make the most sense for your project.

In addition to the tools shown here, a carbide abrasive blade that fits in a jigsaw cuts slowly but leaves fairly clean cuts in softer types of ceramic tile and natural stone. A carbide abrasive hole saw cuts perfect holes for plumbing pipes and fixtures.

A rubbing stone is simply an abrasive block, similar to the wheel in a bench grinder. Use it to smooth sharp or slightly chipped cuts that will be exposed.

Additional Information

Required Tools for this Project

Have the necessary tools for this DIY project lined up before you start—you’ll save time and frustration.

You’ll also need these specialty tools for working with tile and backer board:
Scoring knife, Margin trowel, Tile cutter, 4-in. diamond blade, Drill mixer, Offset saw, Tile cutter, Nippers, Wet saw
You can also use an angle grinder for cutting tile.