Showing posts sorted by relevance for query Solid brass construction. Sort by date Show all posts

Sunday, January 21, 2018

Rain Shower Heads - A New Shower Head for Your Master Bath

Read article : Rain Shower Heads - A New Shower Head for Your Master Bath
<?xml encoding="UTF-8"???><?xml encoding="UTF-8"???>

Nothing is more invigorating than a nice hot shower. To have a wonderful experience in the shower go get a new showerhead for your master bath. Rain Shower Heads are one of the top shower heads on the market. They have so many different styles to chose from that you will wonder how you ever lived without one. Their mission is to create quality craftsmanship with exquisite designs coupled with aesthetically pleasing products. That is exactly what they deliver, I know because I own one myself.

Rain Shower Heads: Traditional Design

The first type of Rain Shower Head is the traditional design. The traditional shower head comes in four different sizes and finishes. You can buy this type of shower head in 10″, 8,″ 6″, and 5 1/2″ diameters. The first in the design series is call "Classic." It comes in a 10″, 8″, and 5 1/2″ diameter. All three sizes are designed with superior craftsmanship and are built with solid brass construction. The Rain Shower Head also is constructed with cast brass nozzles that direct precise stream control and allow better pressure during your spa-like experience. The smaller Rain Shower Head works as well as the other two except it has a smaller number of cast brass nozzles. Rain Shower Arms are sold separately from all three, however, the smaller version can be fitted to your regular shower arm or fitting. They come in Chrome, Polished Brass, and Brushed Satin Nickel. This Rain Shower Head would make an excellent new shower head for your master bath.

Next, the "Porcelain" 6″ Rain Shower Head combined beautiful with functionality. This shower head is made of solid porcelain and chrome-plated brass. It also comes in chrome or polished brass. For an extremely elegant look try combining the shower head with a matching Opus shower arm.

Then, they offer the 10″ and 8″ diameter "Legacy" Design. This is more of an economical designed shower head featuring the dimpled face construction. Even though it has not been constructed with the same cast brass nozzles, it still offers an amazing shower experience in comparison to standard shower heads. It is a full size shower head with same identical body style as the "Classic" series, but without the hefty price tag.

Lastly, there is the 6″ two-toned "Chrome and Brass" Rain Shower Head. This one is my favorite because this is the one that I own. It is absolutely beautiful with a chrome body flat plate design and a polished brass nozzle base. The brass tips are covered with soft rubber ends designed for more effective cleaning in mind for hard water stains. If you are a person that likes to soak in the tub, this shower head will give you a whole new perspective on relaxation.

Rain Shower Heads: Exotic Design

If you have a contemporary master bath then you will absolutely love this concept.. These shower heads are very unique in detailing and creative expression. They are designed to offer superior water pressure. The Rain Exotic line come in chrome, polished brass, and a satin nickel finishes. There is the 9″ "Ultra" shower head that is next to the largest size they make. It has a contemporary curved spoke-like body that delivers exceptional water pressure. The 6″ "Luna" shower head is the most exotic style in this series with a similar design, but with individual heads on the ends of each arm. The 10″ "Oasis" shower head has a much bolder look and would probably be better suited to the males in the house. Then there is the 6″ "Oasis" shower head that delivers the same experience with slightly fewer nozzles in place. Any of these styles will definitely make a statement and take your shower experience to a whole new level. A new shower head in your master bath like this one will make you feel as if you have crossed over into the future.

Rain Shower Heads: The Future Handheld

The last in the line has yet to be revealed, however, I can't hardly wait to see what they come up with after experiencing some of their other products. Rain Shower Heads are top quality and give you a wonderful spa-like escape. These type of shower heads are great for relaxing tired and aching muscles. I think that if you are going to get a new shower head for your master bath, you should consider any of these products.

Sunday, November 5, 2017

Buy LED Kitchen Mixer Basin Tap Faucet Sink w/Extend

Read article : Buy LED Kitchen Mixer Basin Tap Faucet Sink w/Extend

Another fantastic product from DELLA FRANCESCA comes this fully Australian Certified Quality Product - at a fraction of the price of heavily overpriced retailers! No matter the design of your bathroom, kitchen, laundry .. this unit will add a touch of sophistication and elegance that you will adore time and time again.

This is one of the most advanced piece of tapware on the market with a special LED temperature indicator. When turned, the LED will light up BLUE (cold) or RED (hot) depending on the water temperature. Even better - it is powered by nothing more than the water passing within the tap and does not require any power.

Ready for a kitchen upgrade? Ready for convenience, affordability, and quality? You can have it all courtesy of Della Francesca with the Pull-Out Kitchen Mixer. As you'd expect from a leader in quality plumbing products, Della Francesca has manufactured this kitchen mixer with heavy-duty solid brass along with a long-lasting polished chrome finish. But this mixer is not just about great looks. Courtesy of a flexible neck, the faucet head can be pulled out and held in the hand for more convenience and flexibility while washing dishes and doing other chores. Reverting back to a traditional mixer is just as easy.

Your purchase of the mixer also comes with peace of mind. The mixer is Australian Certified and Watermark approved, complying with AS/NZS 3718:2005 which ensures consumers of quality plumbing products. This product is also WELS-approved with a 5-star water efficiency rating of 6 Litres per minute. That's smart for your water bill and smart for the environment.

Everything you need for a straightforward installation is included, so why wait? Instantly upgrade your kitchen today with the Pull-Out Kitchen Mixer.

Features of the Della Francesca Pull-Out Kitchen Mixer:

*Pull-out handheld head for convenience and flexibility

*Solid brass construction

*Polished chrome finish

*Watermark approved; complies with AS/NZS 3718:2005

*5-star WELS rating; water efficiency of 6 Litres per minute

*35mm cartridge included *Mounting bolt, O-Ring washer, and other necessary hardware included

*Easy-to-follow installation instructions included

*Height of mixer: 638mm *Length of mixer (base to tip): 205mm *Height of mixer head (from base): 186mm

Package Inclusions : * Mixer Tap Body * 2 Flexible Hoses (blue & red) * pull-out shower head * pull-out hose * Mounting bolt * O Ring Washer * Horseshoe Washer * Horseshoe Plate * Installation Instructions

GST Note: GST is included in the price of this item. GST is included in the freight.

Wednesday, August 9, 2017

2-in-1 Massage Hand Shower & Head Tap Bathroom Mixer

Read article : 2-in-1 Massage Hand Shower & Head Tap Bathroom Mixer
Our guarantee
Share this product with a friends and earn $10 when they make their first purchase

Description

Forget expensive plumbers and bathroom installers, why not update your fixtures with a little easy DIY with this sleek 2 in 1 Massage Hand Shower and Head Tap Bathroom Mixer? This high-quality mixer is a simple way to add a touch of elegance to your kitchen or laundry. Its solid brass construction features a polished chrome finish with an ultra modern streamlined design. Comes with easy to follow instructions for DIY installation, this mixer is a must for your stylish upgrade.

Estimated delivery time frame: 1st Jun - 8th Jun

More Details

Colour:Chrome Finish
Manufacturer Warranty:12 Months supplier warranty
Materials:Brass w/ Chrome Finish

Shipping Info

Fee:Free Shipping Nation Wide
Return Policy:30 days from receipt. For more details, please see our return policy

Saturday, July 29, 2017

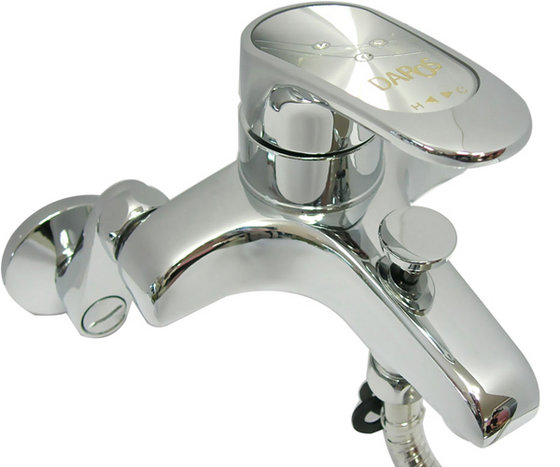
Bathtub Shower Faucet Set Single Lever From DAROS(id:7598193). Buy Korea faucet, shower mixer, bathtub mixer

Read article : Bathtub Shower Faucet Set Single Lever From DAROS(id:7598193). Buy Korea faucet, shower mixer, bathtub mixer

Price
US $ 1
Min Order Quantity100pcs / 10~30
PortBusan
Delivery Lead Time30 days (depends on nation.)
  • Share to :
  • Pinterest

Quick Information

  • Brand Name :DAROS
  • Model Number :CV-600C
  • Place of Origin :Korea
  • Function :Induction
  • Installing Mode :Single lever
  • Material :Brass
  • Usage :Bathtub
  • Water Pressure :1.72MPa/min

Description


DAROS™ Single Lever Bathtub Shower Faucet Set  


Model No. CV-600C
Proudly displaying modern European style, DAROS is right at home in contemporary bathrooms. This DAROS faucet simplifies your grooming routine with a unique single lever handle, which offers easy control of water temperature and pressure.

1. Model No. : CV-600C
2. Product name : Single lever, Bathtub Shower Faucet Set  
3. Certification : KS B 2331
4. Surface : Polishing, Chrome plating
5. MOQ : 100 set
6. Price term : FOB Busan 
7. Payment term : L/C, T/T
8. Production capacity : 5,000 set / month
9. Delivery time : 30 days (depends on nation.)
10. Price : Negotiation


- Solid brass construction for durability and reliability.
- DAROS's high quality ceramic disc valves exceed industry longevity standards    
  over two times for a lifetime of durable performance.
- 5 year guarantee
- Contains shower hose, shower head.

Price

  • Price Condition : FOB
  • Price : USD 1 / 10~30
  • Delivery Port : Busan

Packaging & Delivery

  • Packing : 10 pieces per box
  • Delivery Lead Time : 30 days (depends on nation.)
  • Minimum Order : 100pcs

Product Image

Sunday, April 2, 2017

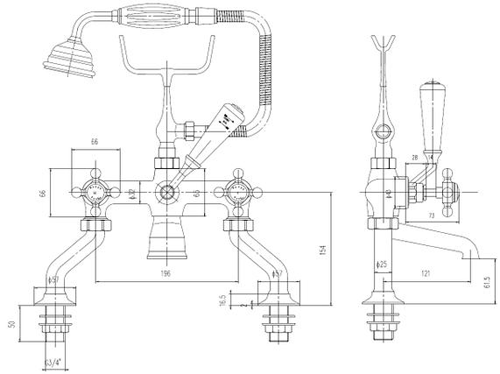
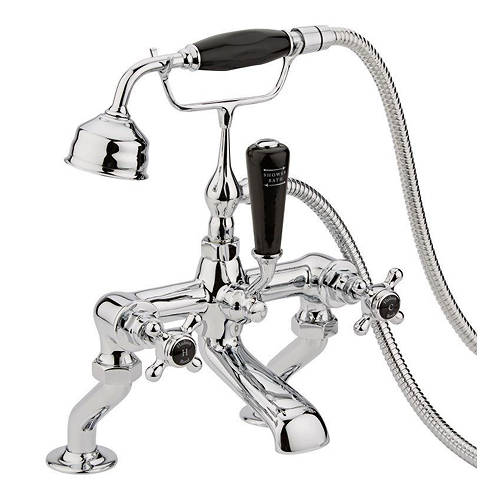
Bath Shower Mixer Tap With X-Heads (Black & Chrome). Hudson Reed Topaz U-BC404HX-D

Read article : Bath Shower Mixer Tap With X-Heads (Black & Chrome). Hudson Reed Topaz U-BC404HX-D

Product Details

Hudson Reed Topaz bath shower mixer tap with shower kit, crosshead handles, black ceramic Indices and handle.

£249.99 inc VAT & Delivery
£208.32 excluding VAT
RRP: £424.00  Save: £174.01
BUY NOW

Product Code: U-BC404HX-D


The Hudson Reed Topaz Edwardian style traditional bathroom taps and mixers offer the perfect upgrade for any traditional bathroom. Coordinating shower options are available.

All Hudson Reed Topaz brassware is guaranteed for 20 years.


Additional image for <a href=Bath Shower Mixer Tap With X-Heads (Black & Chrome)." />

Additional image for <a href=Bath Shower Mixer Tap With X-Heads (Black & Chrome)." />


What customers are saying about Taps4Less.comEasy and clear website, Excellent communication and very prompt delivery. Goods in excellent condition. Very pleased. - K Underwood quick and efficient. good website, efficient service and the product arrived 3 days after order was processed. you can't ask for much more than that. would definately use taps4less again. - Neil Isles Read more reviews Tell us what you think

Prices: At Taps4Less.com, the price shown includes VAT. The full VAT details are shown in the shopping cart. There are no extra charges.

Free Delivery: All orders include free delivery to any mainland UK address. Phone for rates to islands & Northern Ireland.

Secure Shopping: Buy safely at Taps4Less.com. Our ordering system is certified by Verisign and audited by Visa and MasterCard.

Bulk Orders: Please contact us for details of discounts on bulk purchases.

Ceramic Valve Technology:All Taps4Less.com modern bathroom taps use ceramic disc valves instead of traditional washers, except where noted in the full product description. Ceramic valves give you extra smooth operation and longer life.

Tuesday, June 27, 2017

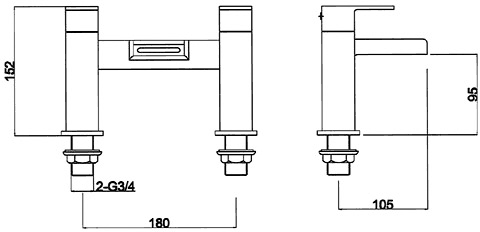
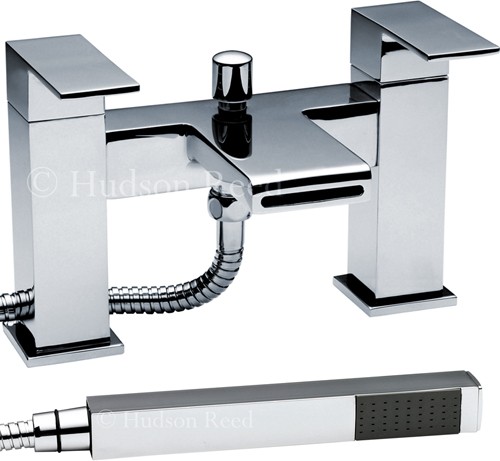
Waterfall Bath Shower Mixer Tap With Shower Kit. Hudson Reed Strike U-STR314

Read article : Waterfall Bath Shower Mixer Tap With Shower Kit. Hudson Reed Strike U-STR314

Product Details

Waterfall bath shower mixer tap in chrome with shower kit.

£124.99 inc VAT & Delivery
£104.16 excluding VAT
RRP: £207.00  Save: £82.01
BUY NOW

Product Code: U-STR314
Barcode: 5055369009572


Hudson Reed's Strike range of bathroom taps, with square bodies, sturdy lever handles and waterfall spouts will give a fresh, modern feeling to your bathroom.

20 Year guarantee: Ultra guarantee their Strike range for 20 years.


Additional image for <a href=Waterfall Bath Shower Mixer Tap With Shower Kit." />

Additional image for <a href=Waterfall Bath Shower Mixer Tap With Shower Kit." />


Prices: At Taps4Less.com, the price shown includes VAT. The full VAT details are shown in the shopping cart. There are no extra charges.

Free Delivery: All orders include free delivery to any mainland UK address. Phone for rates to islands & Northern Ireland.

Secure Shopping: Buy safely at Taps4Less.com. Our ordering system is certified by Verisign and audited by Visa and MasterCard.

Bulk Orders: Please contact us for details of discounts on bulk purchases.

Ceramic Valve Technology:All Taps4Less.com modern bathroom taps use ceramic disc valves instead of traditional washers, except where noted in the full product description. Ceramic valves give you extra smooth operation and longer life.

Thursday, April 6, 2017

Wall Mounted Bath Mixer with Rain Shower Head

Read article : Wall Mounted Bath Mixer with Rain Shower Head
- Model: F1411003101 Wall Mounted Rain Shower and Bath Spout Combination

- Brilliant 3-In-1 Shower Set Comes with Overhead Rain Shower, Bath Spout and Shower Mixer

- Solid Brass Construction, Polished Chrome Finished

- Ceramic Cartridge

- ABS Engineering Plastic Rain Shower Head

- Suitable for All Pressure

- Shower Head Size: 210mm Diametre, Wall Mounted Arm Length: 368mm (Please see pictures on the right for details)

- 360° Swivel Ball Joint, Adjustable Angle

- Complete with one Round Overhead Shower, one Single Lever Mixer, one Bath Spout, one Round Backplate and one Wall Mounted Arm

- 5 Years Warranty

- Constant Bright Technology
Skillful polishing process, bright lasting treatment for brilliant chrome surface to ensure products are long-lasting looks as new.

- Smooth Technology
The unique valve core is made by advanced ceramic alloy in the closed environment, and coated with a special lubricant coating. This feature can ensure products are smooth for use as the new one for many years.

- Constant Hydrodynamic Technology
Equipped with constant hydrodynamic device to have good water stream effects, showing the environmental science and technology.

If you request a refund or return, please contact us within 15 days since the date you receive the products.

Five-year warranty only applies to any problem of cartridge. Please click here to ask a question

Your question and answer privileges have been disabled.

You must log in to view questions and answers on this listing. We recommend reading questions before you make any purchases.
You must log in to ask or answer questions posted. We recommend reading questions before you make any purchases.Available only to approved bidders. You must be an authenticated member to ask questions Find out more about becoming authenticated. Your account is in debt Your current account balance is You must credit your account to use this feature.

Wednesday, February 21, 2018

Master Bathroom Remodeling Ideas | Master Bath Remodel

Read article : Master Bathroom Remodeling Ideas | Master Bath Remodel
Luxury <a href=Master Bathroom Remodeling Ideas" class="pin" width="620" height="620" />

Put yourself in this picture. Finally at home after a long day at work, you head directly for your spacious master bathroom. First, a workout on the stationary cycle. Next, a quick shower before you slip into the whirlpool for a soothing soak. But not before you've dimmed the lights, switched off the evening news and dropped a favorite CD into the entertainment unit. After you've soaked, wrap yourself in a heated towel. Or skip the soak and take a few minutes to relax in a steam shower.

Get up to 4 Free Quotes!

Sound like an impossible dream? Like something from a movie set? This sybaritic fantasy can be a reality if you're willing to add or borrow enough space to create an at-home haven in a master bathroom.

In the not-so-distant past, builders put little emphasis on bathroom space. The result: Full baths in many houses more than a decade old measure a minimal 5 x 7 ft. and contain a utilitarian and uninspired collection of the three necessary fixtures—bathtub, toilet and washbasin. Lighting consists of a lone fixture in the center of the ceiling. There's a single tiny window and, in rare cases, a fan for ventilation.

But, times have changed. Today's new homes offer bigger, more luxurious bathrooms—often called power bathrooms—with all kinds of comfort and convenience features that add value to the home when the time comes to sell. As a result, the owners of older homes can feel a bit more confident about jumping on the remodeling bandwagon. If you own an older home and add or expand a bathroom with the aim of creating a master suite, not only do you get to enjoy the space, but you also help your house become just as desirable to buyers as newer homes.

A new bathroom takes second place in the list of the most popular remodeling projects. A well-designed and well-executed master suite can be expected to return a nationwide average of 87 percent of the construction costs if you sell your home within a year or so. And that figure rises in hot real estate markets to as much as 135 percent in Denver, 117 percent in New Haven, Conn., and 125 percent in San Francisco.

Where to Start

Bathrooms are not only costly, they are complex to remodel. They demand lots of function packed into a small space. And there are myriad details to consider, ranging from door-swing clearances to building code requirements. Bathroom remodels demand the skills of all the major crafts. And while you might be able to take your sweet time about remodeling the family room or even the kitchen, no family can exist comfortably without at least one fully functional bathroom for even a day or two.

A safe way to minimize some of the potential problems of a bath remodel is to hire a bathroom designer. There are several ways to go about this. Look in the Yellow Pages or ask friends and neighbors to recommend an independent bathroom designer. They'll charge you a fee, ranging anywhere from a few hundred to a few thousand dollars depending on the complexity of your job. In return, they will meet with you, discuss your needs and wishes and then draw elevations and plans that you can execute yourself or take to a contractor to have built. You can also find many bath designers at kitchen and/or bath dealerships or home centers that offer design services, products and installation. The fee for their design time is generally rolled into the purchase price of the bathroom. 

A design fee is often money well spent if it helps to maximize the space you have and avoid even one glitch in the project. But keep in mind that all bath designers are not created equal. Ask about their training and experience, and check references. 

What to Include

Everyone's idea of luxury is different. To some, it's opulent materials. For others, it's an extra bit of storage space or privacy or the space to work out at home. Begin your bath remodel by defining what luxury means to you. Make a list of everything your "ultimate bath" would include—you can eliminate some of the frills later if the cost becomes prohibitive.

Get up to 4 Free Quotes!

"Today's master suites are luxurious in terms of comfort rather than glitz," says kitchen and bath expert B. Leslie Hart. Instead of acres of marble and gold faucets, bath remodels today focus on space. "You won't find too many telephone booth showers in today's remodeled baths," says Hart. But you might note an effort to incorporate outdoor space into the bath via a small patio or garden shower or just a large window that takes advantage of a great view. Tumbled marble, nickel, pewter and antique brass hardware finishes are most popular. 

As a rule of thumb, the components of the luxury bath suite consist of some combination of plenty of space, a soaking or whirlpool tub, a sauna or steam generator, a large shower (with multiple massage jets and a seat) and a toilet and possibly a bidet that are separated from the rest of the bath in a private compartment. In addition, the room will have good lighting from a variety of sources (perhaps a skylight or greenhouse window), sufficient, well-planned storage so that all you need for personal pampering is right at your fingertips, and good ventilation. If space allows, designers may include a dressing room, laundry facilities, perhaps a small refrigerator, microwave oven and coffee maker, and enough space for some type of exercise equipment. And don't forget the entertainment system—with telephone, television and sound.

What You Will Spend

What will it cost to have luxury like this? The exact price is hard to pin down because you can put in an $80 faucet or $2,000 faucet, a $400 or $4,000 tub. But it's not unusual to spend $20,000, $30,000 or even $50,000 depending on materials and the scope of structural work necessary. As a rule of thumb, plan to spend about 2 1/2 times the cost of the products you choose on construction. According to Remodeling magazine, upgrading an existing 5 x 9-ft. bath with new fixtures, lighting, and ceramic tile floor and walls will set you back about $8,563. A 6 x 8-ft. full bath addition that includes a standard tub and shower, lighting, linen storage and a ceramic tile floor and walls within an existing floor plan carries an average price tag of $11,721. The average cost of adding a 24 x 16-ft. master suite that includes a separate bath with whirlpool and separate ceramic tile shower, ceramic tile floor and a double-bowl vanity over an existing crawlspace is $37,388.

Finding the Space

Obviously you can't fit all the components of a luxury bath into the typical 35 to 65 sq. ft. allotted for a bathroom in many homes. So you'll need to be creative and look elsewhere for the space. Or add the space for the new bath along with a new master bedroom.

Because so much has to do with the configuration of the other rooms near it, there is no ideal size for a bathroom. But, if you aim to include anything more than the three necessities, allot at least 90 to 100 sq. ft. of space.

If an existing bath backs into a garage it's relatively easy to steal space for a larger shower or tub. If there are neighboring hall closets you can live without, consider eliminating them. Take over all or part of an adjacent bedroom. But don't do this if it means you convert your three-bedroom house to a two-bedroom house.

What to do if this sounds wonderful, but your home doesn't have any spare space? Not to worry. Even a 5 x 8-ft. bath can offer some luxury if it's well-planned. Many of the features mentioned here, such as innovative lighting, proper ventilation and a combination steam room/shower, require very little, if any, additional space.

Use a combination whirlpool/ steam tub/shower unit. If there's just enough space for a 5-ft.-long tub, get a deeper one instead. Several manufacturers offer uniquely shaped shower enclosures made of tempered clear or tinted safety glass. For high-end function as well as appealing looks, opt for a number of pulsating showerheads that provide an all-over body massage. Storage space should be well-organized. Maximize storage potential with clever vanity design, rollout trash bins and shallow drawers, instead of just leaving a cavernous space behind two doors. Plan shallow shelves recessed between the studs and an oversize vanity top that extends over the toilet to create a bit more countertop space.

In the case of a small bath, create luxury with materials, not volume of space. Think about using marble and mirrors, decorative moldings, ceramic tile and/or glass block. Consider a skylight, or roof windows, to ensure the bathroom is bright, even on dark, dreary days. And be sure to plan for more than a single electrical ceiling fixture. Consider specifying low-voltage lighting in the vanity toe kick to provide drama and to function as a nightlight. And plan adequate lighting around both sides and along the top of the mirror so you can see what you're doing when shaving or applying makeup. A tight budget doesn't mean you can't create a power bathroom. Careful choices can keep the budget in line and still produce a luxurious personal retreat.

If cost is your primary consideration, choose laminate over more expensive solid surfacing materials, wood paneling over marble. If you decide to use ceramic tile—one of the most popular, cost-effective and easy-to-maintain options for the bath—select carefully. Tile prices start at a reasonable $2.50 to $3 per square foot, uninstalled. Or you can spend 10 times that. Other suggestions: Forgo high-fashion or custom-color fixtures or hand-painted washbasins, and choose white, which is usually less expensive. And stay away from precious metals for faucets, towel bars and other fittings.

Get Ready

Spend some time in your existing bath and see what's lacking. Notice how you use the space for things like dressing, applying makeup and drying hair. What would you add if you could? Before you order components or begin construction, check local code requirements.

For example, a whirlpool for two will require a 3/4-in. waterline instead of the typical 1/2-in. supply line so that the tub can be filled in a timely fashion. And you must plan ahead for how you'll access a whirlpool tub motor, or the steam shower generator. If you choose multiple showerheads, the contractor needs to know that before planning the configuration of the rough plumbing that will service the shower. Where is the water supply coming in? Is the line large enough? What is the water pressure like in the area?

Careful planning will help you create a bath that adds convenience and luxury to your life as well as value to your home. 

Tub Tip

A whirlpool or soaking tub is a substantial investment, costing anywhere from $200 for a basic model up to more than $20,000. Most fall in the $1,000-to-$5,000 range. Shop for one just as you would any other consumer good. Examine size, material, price, style, safety, color and optional features.

If you decide to include a whirlpool in your new bath suite (not a must, according to bath designers and real estate agents, as long as at least one other bath in the home has a tub), your first consideration is size. Do you want a unit that is large enough for two? Would your needs be better served by a smaller tub and a separate shower? Is your choice limited by available space? And remember, the larger the tub, the larger the water heater, the water bill and the cost.

A word of caution to those who enjoy an occasional soak: You wouldn't dream of buying a suit or pair of shoes without first trying them on for size. Likewise, you shouldn't buy a tub without sitting in it first. If they won't let you climb into the tub where you're shopping, shop someplace else.

Keep in mind that the slant of the backrest as well as length and depth of tubs vary. Make sure the tub fits you. Some whirlpools let you choose the number of jets, usually ranging from four to eight. If your prime interest is in therapeutic massage action, opt for a tub with at least four jets located so they reach the major muscle groups and joints of your body. Some tubs offer jets that are directionally adjustable while others allow you to adjust the air-and-water mix.

The size of the motor determines how powerful the flow of the water is. Motor size also affects how much noise the whirlpool generates. If you find the prospect of motor noise unpleasant, be sure to discuss tub and motor placement, as well as extra insulation, with your contractor or bath designer.

Because a whirlpool is both a plumbing fixture and an electrical product, both service requirements must be taken into account. Most tubs require a 15-amp, 115-volt electrical service that should be placed on a separate electrical circuit. And if you opt for a heater to maintain the water temperature (don't expect it to heat up cold water) you'll need an additional heating circuit.

Consider the faucet to fill your new tub, too. Manufacturers recommend a faucet that flows at 20 gal. to 30 gal. per minute for a standard size whirlpool. If you opt for a larger tub, consider a faucet that flows at a rate of 55 gal. to 120 gal. per minute.

If you do purchase a tub, be sure that it will fit through existing doorways and that there's sufficient maneuvering space to get it into the bathroom. Measure any tricky or tight turns in hallways and stairwells that could sabotage your plans. If you must remove walls to get the tub in, installation costs will soar.

Copyright © Popular Mechanics 2001. Reprinted by permission.

Tuesday, November 28, 2017

Taps very solid brass bath shower taps with thermostatic mixing valve rrp £185.99 Appraisal: New/

Read article : Taps very solid brass bath shower taps with thermostatic mixing valve rrp £185.99 Appraisal: New/

GENERAL CONDITIONS OF SALE

1. Interpretation

1.1. In these General Conditions the following words and expressions shall have the meanings set opposite:

“Auction” any auction (whether a Live Auction or an Online Auction and whether conducted independently or simultaneously) conducted pursuant to these General Conditions and the Special Conditions;

“Auctioneer” the person conducting the Auction or to whom the conduct of the Auction is delegated under General Condition 4.9 below;

“Bidder” any person who offers to purchase any Lot whether by bidding at Auction or offering to purchase by private treaty or tender;

“Bid” an offer to purchase any Lot whether by bidding at Auction or offering to purchase by private treaty or tender, and “Bids” and “Bidding” shall be construed accordingly;

“Buyer” any person who agrees to purchase any Lot whether at Auction or by private treaty or tender and as determined under General condition 4.12 below;

"Buyer`s Premium" a commission payable by the Buyer on the completion of a Sale the amount of which is set out in the Special Conditions; The Auctioneer, when acting as Agent for the Seller, may also receive commission from the Seller.

“Catalogue” the catalogue incorporating these General Conditions and the Special Conditions;

"Clearance Date and Time" the date and time on which all Lots must be removed by the Buyer from the Location as specified in the Special Conditions;

“The Company” Boulton Vehicles Ltd T/A Bpi Associates Auctioneers & Valuers (company number 07279488 ) whose registered office is at Ripley House, Ripley Drive, Normanton Industrial Estate, Wakefield;

"Deposit" the sum payable by the Buyer to the Company as set out in the Special Conditions;

"Live Auction" any auction conducted at the Location or at such other location(s) as shall be notified by the Company in the Special Conditions or in the Catalogue;

“Location” the premises at which the Lots are located, details of which are set out in the Special Conditions;

“Lot” any Lot described in the Catalogue, on the Website or on the Company’s invoice;

"Online Auction" any auction conducted over the internet via the Website pursuant to these General Conditions and the Special Conditions;

"Sale" the sale of any Lot by Auction, private treaty or tender and as determined under General Condition 4.11 below;

“Seller” the person upon whose instructions the Company is conducting the Sale, details of whom are set out in the Special Conditions;

“Special Conditions” any additions to these General Conditions set out or referred to in the Catalogue, announced at Auction or otherwise specified by the Company;

"Website" the website at: www.bidspotter.co.uk;

"VAT" value added tax chargeable under English Law for the time being and any similar additional tax.

2. Application of these General Conditions

2.1. These General Conditions apply to every Sale of plant and machinery, chattels and trade stocks conducted by the Company.

2.2. These General Conditions, the Special Conditions and any terms set out in the Catalogue shall together comprise the "Conditions of Sale".

2.3. To the extent that these General Conditions are inconsistent with any Special Conditions, the General Conditions shall prevail.

2.4. Bidding for any Lot shall be deemed to be an acceptance by the Bidder of these General Conditions and the Special Conditions.

2.5. These General Conditions shall be governed construed and enforced in accordance with the laws of England and Wales unless the Location is in:-

2.5.1 Scotland in which case the laws of Scotland shall apply; or

2.5.2 Northern Ireland in which case the laws of Northern Ireland shall apply.

2.6. A reference to writing or written shall include e-mail.

2.7. Any word or phrase having a meaning defined in these General Conditions shall have the same meaning when used in the Special Conditions.

3. Identity of the Parties

3.1. The Company offers each Lot as agent of the Seller and not as principal unless otherwise indicated in the Catalogue.

3.2. The identity of the Seller is set out in the Special Conditions.

3.3. Unless the Company has previously acknowledged in writing that the Bidder Bids as agent on behalf of a named principal, every Bidder shall be taken to Bid on his own behalf as principal.

3.4. Any Bidder acting as agent on behalf of a named principal shall remain liable to the Seller and the Company for all obligations and liabilities of his principal jointly and severally with the principal. The Bidder warrants that he has the authority of his principal to make each Bid made.

3.5. Every Bidder is required to give his name and address and provide satisfactory proof of identity and such other information and documentation as is required to the Company before making any Bid and in the case of:

3.5.1. a Live Auction by the completion of a registration form;

3.5.2 an Online Auction by online registration at the Website; and

3.5.3 a private treaty or tender by prior registration or notification of details, as and when requested by the Company.

3.6 The Company reserves the right at any time to reject the registration of any persons and refuse access to the Auction at its sole discretion.

3.7 On registration for an Online Auction Bidders will be added to the Company`s mailing list for the purposes of notification of future sales by email. If a Bidder wishes to stop receiving such notifications they can unsubscribe at any time by clicking on the link provided at the bottom of each email.

3.8 On registration in accordance with General condition 3.5 the Bidder acknowledges that only adults aged 18 years and over are entitled to enter into a legally binding contract and as a result they are the only people entitled to register for the Auction. By registering the Bidder warrants that he is aged 18 years or older and is capable of forming a legally binding contract.

4. Conduct of Auctions

4.1 Any Lot may be subject to a minimum bid or reserve price. The Seller is entitled to change these at any time before the conclusion of the Sale.

4.2 The Seller, Auctioneer or any representative, agent or person acting on behalf of the Seller may Bid for any Lot. Persons entitled to Bid pursuant to this condition 4.2 shall be entitled to place Bids on any Lot up to the reserve price including by placing Bids in response to other Bidders.

4.3 Lot descriptions will be amended as appropriate as and when information becomes available to the Company. Prospective Bidders must read Lot descriptions before making a Bid so that they are fully aware of any amendments to the description appearing in the Special Conditions and/or on the Website or in the Catalogue in relation to a particular Lot.

4.4 The Auctioneer may at any time before the conclusion of the Sale withdraw or divide any Lot or combine any Lots.

4.5 The Company may sell any Lot by private treaty or tender before or after the Auction. The Auctioneer may reject any Bid at his sole discretion and without being required to give a reason.

4.6 No Bid shall be retracted without the consent of the Auctioneer.

4.7 The Auctioneer may where there is a dispute between Bidders, summarily determine the dispute or immediately again offer the Lot for sale, in each case without being required to give a reason.

4.8 The Auctioneer shall in every other respect decide how the Auction is to be conducted and without being required to give a reason.

4.9 The Auctioneer may in his sole discretion delegate to a person whom he believes to be competent the conduct of the Auction in accordance with these General Conditions.

4.10 The Auctioneer may from time to time act jointly with an associated Auctioneer who will be named in the Catalogue and/or in the Special Conditions.

4.11 A Sale is concluded (constituting acceptance of the Bidder`s offer, subject to General Condition 4.12 below) when:

4.11.1 in the case of a Live Auction, on the fall of the Auctioneer`s hammer; and/or,

4.11.2 in the case of an Online Auction, at the close of the timed Online Auction Sale as specified on the Website and as defined by General Condition 4.17.3 below or;

4.11.3 in the case of a private treaty or tender, when the Bidders Bid is accepted by the Company, such acceptance to be communicated to the Bidder in writing by way of receipt of the Company’s invoice.

4.12 The Buyer shall be the person who made the highest Bid before the conclusion of the Sale pursuant to General Condition 4.11 above subject to approval and acceptance by the Company, the Auctioneers and the Seller or such other Bidder as the Auctioneer and/ or the Company may declare to be the Buyer without being required to give a reason. The Auctioneer and/ or the Company and/ or the Seller is not bound to accept the highest Bid or any other Bid placed in the course of the Auction.

4.13 In the case of an Online Auction the Buyer, as determined under General Condition 4.12 above, shall within a reasonable time after the conclusion of the Sale receive by email an invoice in respect of the monies due for the Lot(s) purchased.

4.14 In the event that the reserve price is not met, the Company may consider the Bids received below the reserve price with the Seller who at its sole discretion may accept, reject or place a counteroffer.

4.15 On conclusion of the Sale and acceptance of the Bidders Bid pursuant to General Conditions 4.11 and 4.12 above, the Buyer acknowledges and agrees that he has entered into a contract with the Seller to buy the Lot and the Buyer must complete the transaction to purchase the Lot.

4.16 The Buyer may not remove any Lot he has bought until after the end of the Auction.

4.17 In relation to an Online Auction:

4.17.1 the Company cannot guarantee that the internet services will operate continuously or without interruptions and this could affect the conduct of the Online Auction and the Bidders ability to Bid online. The Company shall not be liable in any respect in the event of any dispute due to errors, omissions or disruptions to internet services or power failures or any other unforeseen circumstances which may occur during the Online Auction;

4.17.2 the Auctioneer may at any time, without notice, postpone or cancel an Online Auction or extend an Online Auction beyond the published closing time (including extension of the timed Online Auction in accordance with General Condition 4.17.3 below);

4.17.3 the timed Online Auction Sale is auto bid extension enabled meaning that where a Bid is placed within ten minutes of the original scheduled close of the timed Online Auction the scheduled close of the timed Online Auction will automatically be extended by an additional ten minutes. This continues with a new scheduled close time each time a Bid is placed until no-one places a Bid before the last scheduled close of the timed Online Auction. Every time a Bid is placed within ten minutes or less left in the Online Auction an additional ten minutes Bidding time is added until there are no more Bids. Such time shall then be deemed to be the close of the timed Online Auction.

4.18 In the event that the Auctioneer unknowingly sells a Lot that was not eligible for Sale (i.e. there is a third party interest that comes to light) then the Auctioneer shall be entitled to immediately rescind that Sale without any further liability to the Auctioneer and/or Company or the Seller.

4.19 Copies of the Auctions (Bidding Agreements) Act 1927 and 1969 are held at the Company’s and/or the Auctioneer’s principal place of business.

5. Sale and Payment

5.1 The Buyer shall pay the following sums to the Company in full and without set off:-

5.1.1 immediately upon the Sale of any Lot the Deposit, if requested by the Company; and

5.1.2 the balance of the price of the Lot purchased, together with the Buyer’s Premium by no later than 48 hours after conclusion of the Sale or, in the case of an Online Auction, after receipt of an invoice in respect of the purchased Lot(s) pursuant to General Condition 4.13 above, or such other time and date as may be specified in the Special Conditions; and

5.1.3 any other payment or amount due to the Seller and/or the Company pursuant to these General Conditions or the Special Conditions on demand.

5.2 In every case time for payment shall be of the essence.

5.3 In view of Money Laundering Regulations the Company reserves the right to refuse payment in cash. Payments in cash of more than £7,500 will not, in any circumstances, be accepted.

5.4 If the Buyer fails to make any payment on the due date for payment then, without limiting any other right or remedy available to the Seller, the Buyer shall pay to the Company interest (both before and after any judgment) on the amount unpaid at the rate of 1.5% above the bank base rate of Barclays Bank Plc per month or any part thereof until payment in full is made.

5.5 Until the Buyer has fully complied with its obligations in this General Condition 5:-

5.5.1 title to any Lot bought shall not pass to the Buyer;

5.5.2 the Seller shall have a lien over any Lot bought by the Buyer in the Auction;

5.5.3 if the Buyer effects or purports to effect a resale or any other disposition of all or part of the Lot, the Buyer shall hold the proceeds of resale or other disposition on trust for the Seller.

5.6 All sums payable under these General Conditions and the Special Conditions are exclusive of any applicable VAT for which the Buyer shall be additionally liable to pay to the Company. On written request by the Buyer the Company will provide a VAT invoice.

5.7 The Company will only accept payment under this General Condition 5 from the Buyer or its authorised agents.

6. Removal of Lots

6.1 Risk of damage to or loss of the Lot shall pass to the Buyer immediately upon the conclusion of the Sale.

6.2 The removal of Lots from the Location shall be undertaken by the Buyer entirely at its own risk and without any liability whatsoever to the Company.

6.3 Buyers are responsible for any and all costs and expenses incurred in relation to the removal of Lots and any other applicable charges, taxes and insurance costs.

6.4 The Buyer may not remove any Lot until the Buyer has:-

6.4.1 paid by cleared funds all amounts payable pursuant to General Condition 5 above in full; and

6.4.2 if requested by the Company produced satisfactory evidence to the Company that the Buyer has adequate public liability insurance in respect of the indemnity set out in General Condition 6.11 below and/or deposited with the Company, by way of security for the costs of making good any damage likely to occur, such sum as the Company may stipulate.

6.5 The Company will only permit the removal of Lots purchased by the Buyer or its authorised agents.

6.6 The Buyer must remove each Lot purchased by the Clearance Date and Time for which time shall be of the essence. Lots may only be removed during normal working hours or such hours as are specified in the Special Conditions. No clearance on Bank or Public Holidays.

6.7 Buyers should co-operate regarding order of removal of Lots in order to comply with the Clearance Date and Time. If it transpires that a Buyer makes no effort to commence dismantling and the particular Lot is preventing other buyers from removing purchased Lots, then the Auctioneer reserves the right to insist that removal take place immediately notwithstanding the specified Clearance Date and Time. In the event the Buyer does not comply with its obligations under this General Condition 6.7, then the Auctioneer reserves the right to arrange for the removal and/or storage of the Lot and charge any attendant costs to the Buyer.

6.8 If any Lot is unsold and has to be dismantled & lowered to allow the removal of any other lot, then such dismantling & lowering shall be the responsibility of the Buyer of the relevant Lot(s).

6.9 Title to computer software sold pursuant to the Sale of a Lot is not transferred under any Sale to the Buyer and use is subject to any licence or copyright restrictions and user conditions. The Sellers, Company and/or Auctioneers reserve the right to erase any private or sensitive information prior to the Sale or at any later date.

6.10 The Buyer and/or his removal contractor must liaise with the Company`s site representative prior to commencing dismantling/removal of a Lot from the Location and must at all times comply with its obligations under clause 6.11 below.

6.11 When removing any Lot from the Location the Buyer shall, or shall procure that its removal contractors shall:

6.11.1 carry out a full assessment of Lot, the Location and the land or buildings to which the Lot is fixed to assess the risks associated with detaching/removing the Lot and shall fully satisfy themselves that they can detach/remove the Lot in compliance with the Buyers obligations under this General Condition 6.11 prior to handling and/or commencing removal of a Lot;

6.11.2 obtain all relevant planning permissions (where required) in relation to the removal of building structures and plant housings;

6.11.3 buyers of Lots will be required to make good holes or voids exposed by the removal of Lots. Cladding taken off buildings for removal of plant & equipment will have to be replaced, unless otherwise specified by the Company;

6.11.4 when detaching any Lot fixed to land or buildings, do so safely and lawfully and must not use flame cutters, explosives or any other dangerous equipment or process without first obtaining written consent of the Company;

6.11.5 remove the Lot in compliance with all relevant legislation, regulations, codes of practice, guidance, orders, rules and other requirements of any relevant government or governmental agency or authority whether Parliamentary, statutory, parochial or local including (without limitation) in compliance with the Health and Safety at Work etc Act 1974, the Environmental Protection Act 1990, The Construction (Design and Management) Regulations 2007, Control of Substances Hazardous to Health Regulations 2002 (COSHH), and the Road Vehicle (Construction and Use) Regulations 1986 and any subsequent amendments thereof and all other health and safety and environmental legislation in existence at the time of the Sale. To the extent that such regulations are advisory rather than mandatory, the standard of compliance to be achieved by the Buyer shall be to the best industry practice;

In all cases arising under this General Condition 6.11 the costs of compliance shall be borne by the Buyer and the Buyer hereby indemnifies the Company and the Seller against all losses, costs, expenses, damages, liabilities, demands, claims, actions and proceedings which the Company and/or the Seller may incur arising directly or indirectly out of any breach by the Buyer to the provisions of this General Condition 6.11 and the Buyer shall make good any damage caused to (without limitation) other lots, the Location or to any property belonging to third parties, in removing any Lot under this General Condition 6.11.

6.12 The Company shall be entitled to halt the clearance of any Lot if in its absolute discretion the removal of a Lot is being carried out in an unsatisfactory manner. Where the clearance is halted by the Company, the Buyer must liaise with the Company`s site representative as to how the Lot should be removed from the Location provided that the Buyer shall at all times ensure that it complies with its obligations under General Condition 6.11 above and the Company shall have no liability in this regard.

6.13 The Buyer shall provide evidence as and when requested by the Company of the Buyer`s insurance policies in respect of the following insurances and at a minimum level of:

6.13.1. Public Liability Cover - limit Two Million Pounds (£ 2,000,000); and

6.13.2. Employers Liability Cover - limit Ten Million Pounds (£10,000,000);

the Company reserves the right to vary the level of insurance cover stated above at any time, as and when required.

6.14 The Buyer shall provide to the Company a Risk Assessment & Method Statement complying with The Construction (Design & Management) Regulations 2007, COSHH or with any subsequent amendments thereof or such other legislation as shall from time to time be in force.

6.15 Electric, gas, water, steam and waste disconnections are the responsibility of the Buyer and MUST be carried out by an approved contractor following consultation with the site representative.

6.16 It is expressly brought to the Buyer’s attention that certain Lots could contain blue or white asbestos, dangerous chemicals etc. which if not handled correctly during their removal could result in breach of Health & Safety at Work legislation and/or Control of Substances Hazardous to Health Regulations or other statutory requirements.

6.17 Any fluids, gases and/ or waste remaining in plant and machinery are the responsibility of the Buyer and MUST be removed from the Location strictly in accordance with any applicable statutory requirements.

6.18 The Buyer must use safe and lawful means of removing the Lot, must comply with all current statutory requirements and regulations including those relating to the disposal and removal if waste, and if required, satisfy the Company in relation to their removal procedures; in particular, the removal of waste materials must be undertaken by an approved and licensed contractor to an approved waste management site.

6.19 It is the purchaser’s or their removal contractors responsibility (i.e. Police, Ministry of Transport, Local Authority) to transport off site long/ wide loads, within sufficient time prior to the commencement of clearance period as stated in the Special Notes & Conditions.

6.20 The Buyer shall indemnify the Company and the Seller against any loss, damages, expenses, claims or liabilities arising directly or indirectly from the possession or use of the Lot after title to the Lot has passed to the Buyer but before it is removed from the Location.

6.21 All Lots are sold on the understanding that the Seller does not represent them as being in a condition which makes them suitable for domestic use. If any Lots are intended for domestic use the Buyer must ensure that they comply with the requirements of the Furniture & Furnishings (Fire) (Safety) Regulations 1988 and any subsequent amendments thereof or such other relevant statutory requirements or regulations as shall from time to time be in force.

6.22 The Buyer undertakes to comply with the provisions of the Data Protection Act 1998 in processing data held by them in connection with any Lot.

7. Default by the Buyer

7.1 If at any time the Buyer has failed to pay the sums specified in General Condition 5 above in full by the due date for payment, or to remove any Lot purchased by the Clearance Date and Time specified in the Special Conditions the Seller may rescind the Sale of that Lot, in which case any Deposit shall be forfeit, and that Lot may be resold.

7.2 If the Seller has rescinded the Sale but the Buyer has removed the Lot purchased, the Seller shall be entitled without previous notice to enter upon any premises where he believes the Lot to be and remove it.

7.3 If the Seller has rescinded the Sale and the Lot has been resold by the Auctioneer and/or the Company or by the Seller, the Buyer shall reimburse the Seller with any shortfall where:-

7.3.1 the resale price less the Sale price; and

7.3.2 the costs incurred by the Seller incidental to the resale.

7.4 If the Buyer fails to remove any Lot by the Clearance Date and Time specified:-

7.4.1 the Seller may remove the Lot from the Location and leave it outside at the Buyer’s risk in all respects;

7.4.2 the Seller may charge the Buyer for the reasonable costs of storage;

7.4.3 the Seller may charge the Buyer rent, taxes, men`s wages and expenses incurred as a result of the Lot(s) remaining at the Location; and

7.4.4 the Buyer shall indemnify the Seller against any loss, damages, expenses, claims or liabilities incurred by the Seller arising from the Buyer’s failure to remove the Lot from the Location.

8. Acknowledgements and Exclusion of Warranties

8.1 The Buyer acknowledges that in agreeing to purchase any Lot he is not relying on any warranties or representations made by the Seller or the Company or any of their employee’s agents or representatives. All representations, warranties and conditions, express or implied, statutory or otherwise in respect of all and any of the Lots are expressly excluded and without limitation any warranties and conditions as to title, quiet possession, satisfactory quality, fitness for purpose and description are excluded to the fullest extent as permitted by law.

8.2 The Buyer further acknowledges that neither the Sellers nor the Company shall in any circumstances be liable to or to compensate the Buyer nor shall the Buyer be entitled to rescind the Sale or reject any Lot for an error omission or misstatement contained in the Catalogue and/or in the Special Conditions.

8.3 The Buyer also acknowledges that:-

8.3.1 all the Lots are purchased on the basis that risk of good title to all or any of them passing to the Buyer is at the Buyer’s risk and without limitation the Lots are sold subject to any claims, liens, distraint and execution and subject to all leasing, hire or hire purchase agreements and reservation of title claims (if any) in respect of them;

8.3.2 if it shall be found that the Seller does not have title to all or any of the Lots the Buyer shall have no right to rescind, avoid or vary this agreement or to claim damages or a reduction in the price paid or payable;

8.3.3 anything found in, under, near or in any Lot which is not specifically included in the description of the Lot remains the property of the Seller;

8.3.4 any intellectual property rights or software subsisting in a Lot may be third party property and as such the Seller and/or the Company may be unable to effect transfer. The Buyer will not be authorised to use intellectual property rights or software and any such use or transfer shall be at the Buyers sole risk.

8.4 The Buyer undertakes that it shall ensure that any vehicle comprised in any Lot is in a roadworthy condition in accordance with the Road Vehicle (Construction and Use) Regulations 1986 and any subsequent amendments thereof or such other relevant regulations as shall from time to time be in force before using it on a public road. It is the Buyer’s responsibility to remove Company logos and lettering from vehicles. Odometer readings are not warranted.

8.5 The Buyer acknowledges that any item of plant, machinery or equipment contained in the Lot(s) may not necessarily comply with any statutory requirements or regulations governing the use of that plant, machinery or equipment in their working environment. Neither the Seller nor the Company shall incur any liability to the Buyer because of any default or defect in all or any of the Lots. Buyers are entirely responsible for ensuring that the use of any item of plant, machinery or equipment does not contravene any health and safety and environmental legislation in existence at the time of the Sale.

8.6 The Buyer acknowledges and agrees that the Company is acting only as agent of the Seller and it is expressly agreed and declared that no personal liability in connection with the Sale of any Lot or otherwise shall fall on the Company and the Buyer shall indemnify the Company against all and any liabilities arising under or in connection with the Sale of any Lot. Insolvency Practitioner(s), including Administrative Receiver(s), Administrator(s) and Liquidator(s) act as agent(s) for the Seller without personal liability and shall incur no personal liability whatsoever in relation to a Sale or pursuant to any document relating thereto.

8.7 The Buyer agrees that the General Conditions and the exclusions which they contain are fair and reasonable bearing in mind that:-

8.7.1 the Buyer must rely absolutely on the Buyer’s own opinion and/or professional advice concerning the quality, state, condition, performance and functionality of the Lots any right, title or interest which is sold under the terms of these General Conditions, their fitness and suitability for any particular or any purpose, the possibility that some or all of them may have defects not apparent on inspection and examination including, without limitation, the presence of contamination and the possibility that the Buyer may not acquire title and the fact that the Buyer would have no remedy under this Agreement should that happen;

8.7.2 the Buyer has available to it skilled professional advice and on that basis agrees to purchase a Lot for a consideration calculated to take into account amongst other things the risk to it represented by the fact that the parties believe that all the exclusions and limitations set out in these General Conditions would be recognised as being fully effective by the Courts and the Seller making it clear that it would not have agreed to sell any Lot on any other basis except for a higher consideration;

8.7.3 the Buyer has been given every opportunity which might reasonably be expected to examine and inspect the Lots.

8.8 Notwithstanding anything else in these General Conditions, the Seller’s and the Company’s total liability under or in connection with the Sale of any Lot, whether in respect of breach of contract, tort (including negligence), breach of statutory duty or otherwise, including consequential loss, shall be limited in aggregate to the price paid for the Lot or if no price has been paid then the higher of the market value or reserve price for the Lot. This General Condition 8.8 does not apply to liability for death or personal injury.

8.9 The Buyer acknowledges that a Sale by Auction is not a consumer sale for the purposes of the Sale of Goods Act 1979 (as amended by the Sale and Supply of Goods Act 1994) and the Unfair Contract Terms Act 1977 and the Buyer shall not seek to rely upon and conditions or warranties implied thereby or by any other legislation.

SPECIAL CONDITIONS OF SALE

Seller: As displayed on www.bidspotter.co.uk sale details page or in the catalogue

Location: As displayed on www.bidspotter.co.uk sale details page or in the catalogue

Directions: As displayed in the catalogue

Viewing: As displayed on www.bidspotter.co.uk sale details page or in the catalogue

Access to the Location is allowed on the understanding that all persons attend the Location entirely at their own risk and are responsible for and will indemnify the Seller and the Company against any losses damage or claims occasioned by their presence at the Location.

Children under the age of 16 will not be allowed access to the Location.

Registration:

All bidders must register their details with the Company and provide identification where required. In the case of Live Auctions by way of the registration form provided at the Live Auction or in the Catalogue and in the case of Online Auctions, online at the Website (www.bidspotter.co.uk).

Bidding:

The General Conditions and the Special Conditions apply to all Sales by way of Auction, private treaty and tender and in the case of any Bids placed by way of an Online Auction stress that all Bidders must read and understand Bidspotter’s terms and conditions of registration at www.bidspotter.co.uk.

At the close of the timed Online Auction Sale final Bid figures will be submitted to the Seller for its approval and any Bid shall be subject to approval and acceptance by the Company and/or the Seller. No Bid may be withdrawn and the Company/Seller does not bind himself to accept the highest Bid or any other Bid placed in the course of the Online Auction Sale.

Buyer`s Premium:

Buyers will pay a Buyer`s premium of 10% or 15% (as displayed on www.bidspotter.co.uk sale details page or in the catalogue) (plus VAT) of the purchase price for each Lot purchased whether by Auction or, private treaty or tender. The Buyer`s Premium is payable by the Buyer to the Company in accordance with the General Conditions and, for the avoidance of doubt is payable in addition to the purchase price for the Lot. The Buyer`s Premium is not negotiable and is payable by all Buyers.

Deposit:

Buyers shall pay a deposit of 25% (plus VAT) of the purchase price for each Lot purchased as requested by the Company pursuant to the General Conditions and these Special Conditions. The company reserve the right to take a deposit by way of a credit/ debit card payment from the card presented for registration if the payment terms below are not complied with.

Payment:

All Lots shall be paid for in full within 48 hours of the conclusion of the Sale and shall be at the Buyer`s risk immediately upon the conclusion of the sale.

Cash - In view of Money Laundering Regulations the Company reserves the right to refuse payment in cash. Payments in cash of more than £7,500 will not, in any circumstances, be accepted.

Bankers Draft/ Cheques: (made payable to Bpi & Associates Auctioneers & Valuers ) will only be accepted on the basis that any Lots are not removed until cleared funds are in the Company`s client account.

Debit Cards: The Company accepts debit cards for payment of invoices (subject to a surcharge of 2.5% - £5 minimum fee). Credit cards will only be accepted for deposit payments referred to under the ‘Deposit’ section above.

All sums payable under the General Conditions and these Special Conditions are exclusive of any applicable VAT for which the Buyer shall be additionally liable to pay to the Company.

Clearance:

All lots must be cleared without fail by the date as displayed on www.bidspotter.co.uk sale details page or in the catalogue, such date and time being the Clearance Date and Time as referred to in the General Conditions, REMOVAL OF ALL LOTS WILL BE STRICTLY BY APPOINTMENT, please see the Company`s invoice for contact details.

Collection from site is the Buyer’s responsibility, the Company/ Seller do not provide a packing/ delivery service.

Reserve Removal:

Lots sold subject to a reserve removal will either be indicated in the Catalogue with the date of availability or will be identified by the Auctioneer at the point of Sale. A Deposit will be payable as with other lots but in this instance payment in full can be left until five (5) working days prior to availability. Unless specified to the contrary such Lots must be removed from the Location not later than the Clearance Date and Time specified for final removal in these Special Conditions.

Fire Alarm:

In case of a fire alarm all visitors and contractors are to exit buildings and report to the Muster Point.

Smoking:

No smoking on site. Food and Drink is only to be consumed in designated areas.

Safety:

All persons including Buyers, their employees, agents, representatives and contractors are reminded that they are responsible for their own safety on site and enter at their own risk and should take the precaution of wearing protective clothing as appropriate.

Finance:

If Buyers wish to purchase Lots with the help of a finance company they should make arrangements well in advance of the Sale to ensure that they are able to make payment in accordance with the General Conditions.

Overseas Buyers:

Overseas Buyers should ensure that the country to which the items are destined:-

• holds no import restrictions on the goods to be purchased;

• has no import licence restrictions or a restriction on currency allocation;

• has no prolonged inspection procedure which might cause excess delay or refusal in allowing your goods to be imported.

Overseas Buyers will receive a fully descriptive invoice in order that they may arrange payment as soon as possible with the Company`s bank.

Overseas Buyers should employ a suitable freight forwarding organisation. Please note that many of the machinery removal companies in the United Kingdom are not necessarily freight forwarders. The [Seller and/or Company] will be pleased to advise accordingly.

The Company makes no representation and accepts no liability whatsoever to any Buyer in respect of the issuance or validity of any exportation or importation permits or the existence and exercise of exportation or importation regulations or any compulsory purchasing regimes.

VAT Payments and Returns:

All overseas Buyers (EU and non EU) will be charged VAT at the current rate on each Lot purchased. This will be refunded to the overseas Buyer as soon as the Seller receives a copy of the bill of lading as proof of export, providing this documentation is received within 3 months of the sale date. The Seller is unable to refund the VAT on the Buyer’s Premium to non EU countries.

Misrepresentation:

Whilst every effort has been made to provide reliable information, Bpi & Associates do not warrant the information contained herein and prospective purchasers must satisfy themselves by inspection as to its correctness.

Wednesday, November 29, 2017

How to Lay Tile: Install a Ceramic Tile Floor In the Bathroom

Read article : How to Lay Tile: Install a Ceramic Tile Floor In the Bathroom

Cover up an old floor

Whether you’re replacing an old shabby floor or installing a new one, you can’t beat ceramic or stone tile for durability and appearance. When laid properly, it’s virtually a forever floor that requires almost no care and maintenance. And you can select materials from a vast array of colors and textures. We’ll cover how to lay tile in a few steps.

What’s equally attractive is that you can lay a first-class tile floor yourself, often in one weekend, and save the $500 to $1,500 cost of hiring a pro.

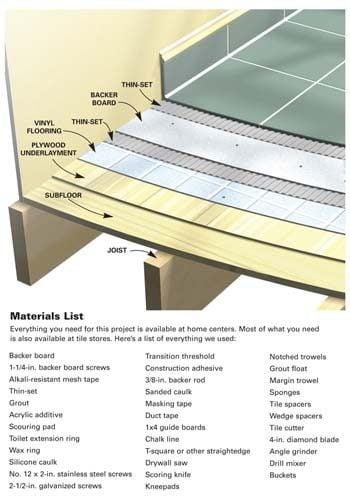
The key to keeping the job simple is to cover the old vinyl or other flooring with a new thin underlayment that gives you a fresh, clean start. No messy tear-out and repair. In this article, we’ll demonstrate how to install a thin “backer board” over the old floor. Then we’ll cover tile-setting techniques, from layout and cutting to grout and cleanup.

This is a two-day project for most bathrooms, even if you don’t have any previous tile experience. If you’re comfortable using basic hand tools and have the patience to align tiles just right, you can handle this job. The entire cost of this project for a typical bath ranges from $300 to $600.

Estimating the Cost of a Tile Project

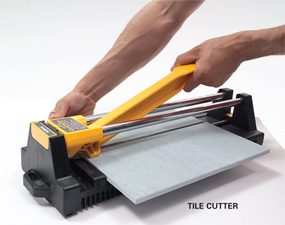
The tile itself will be your biggest cost, so start by measuring the square footage of the floor. Then add 10 percent for cutting waste. If you choose a more complex layout than the simple grid pattern we used, your waste will be greater. Most tile sells for $5 to $15 per square foot, but you can spend as little as $3 or more than $50. If you have to install backer board, add $2 per square foot to the cost of the tile. Other materials will cost about $90, regardless of bathroom size. The tile tools you’ll need (including a tile cutter) will total $60 to $80.

Assess your floor

The success of any tile job depends on a solid base, that is, a floor that flexes very little as you walk across it. If you have a concrete subfloor, this isn’t an issue. You can lay tile directly over the existing vinyl as long as it’s well adhered.

If possible, avoid tearing out vinyl flooring. Leaving it in place saves time, of course, but it also reduces asbestos hazard concerns. Asbestos was used in sheet vinyl and vinyl tile until the mid-1980s. By leaving the vinyl undisturbed, you won’t risk sending asbestos fibers into the air.

If you have a wood subfloor, there’s a good chance that you’ll have to install backer board over your vinyl to make the floor thicker and stiff enough for tile. The easiest way to see flooring thickness is to pull off a floor register. Otherwise look for plumbing passageways through the floor. As a last resort, drill through the floor with a 1-in. or larger spade bit (your new floor will cover the hole later). To prevent asbestos dust from becoming airborne, mist the bit with a spray bottle as you drill. In addition to floor thickness, you’ll need to determine joist spacing. If there’s an unfinished basement or crawlspace below the floor, simply measure the spacing. If there’s a ceiling, probe for joists with a drill bit.

If the joists are spaced 16 in. apart, the layers of structural flooring beneath the vinyl should add up to at least 1-1/8 in. With joists every 24 in., you need 1-1/2 in. If your floor is too thin for tile, add a thicker layer of tile backer board. Our floor required 1/4-in.-thick backer. Yours might need 1/2-in. backer to reach the minimum thickness. If your floor is already thick enough, you can simply prep the vinyl floor (Photos 1 – 4) and skip the backer installation (Photos 5 – 8). Then tile directly over the vinyl, following the same steps we used over backer board.

Regardless of the type of subfloor, there are two situations where you can’t leave vinyl in place: First, if large areas of the vinyl are loose, don’t set tile or backer over it. Small loose spots are acceptable and easy to deal with (Photo 4).

Second, “cushioned” sheet vinyl must be removed before you can set tile. Cushioned vinyl has a foam backing that makes it noticeably thicker and softer than standard vinyl flooring. It’s too spongy to support tile or backer board. Before removing it, call your local health department for instructions on how to check for asbestos and proper procedures if asbestos is present.

Gather Advice While You Shop

Home centers carry everything you need for this project, but begin shopping at a tile store, where you’re more likely to get expert advice. Make a quick sketch of your floor plan and jot down all the dimensions. Also take a photo of the floor at the doorway. This will help the tile store staff recommend a “transition” to neatly join the tile to the hallway flooring. Transitions come in different styles to suit any situation.

When you choose the tile itself, ask if it requires any special installation steps. Some tile, for example, should be coated with grout release before grouting. Also ask about cutting techniques for the tile. You’ll use sanded grout for the floor. Ask if sanded caulk is available in a color that matches your grout for the floor/tub and floor/wall tile joints.

Prepare the room

First, get the toilet out of your way. Stuff a rag in the hole to block sewer gases. If your home only has one toilet, you can leave it in place until you install the backer board. Keep a supply of wax rings on hand if you plan to reinstall the toilet at the end of each day.

If you expect to keep your vanity for many years to come, leave it in place and tile around it. But if you think you might replace it, remove it now. When the job’s done, you can reinstall the old vanity or put in a new one. Having the vanity out of the way gives you more workspace, and you won’t have to cut backer board and tiles to fit around it. This also eliminates the floor repair problem if you install a smaller vanity or pedestal sink in the future.

Pull off the baseboard or plan to add base shoe molding. This leads to a neater-looking job because the edges of the tile will be covered later—jagged cuts and slight measuring mistakes are hidden. If your baseboard has base shoe molding, remove only the base shoe. Backer board and tile will raise your floor 3/4 in. or more. So you’ll have to remove and undercut the door. To mark the door for cutting, stack backer board, tile and two layers of cardboard on the floor (see Photo 3). Mark the door 1/2 in. above the stack, remove the door and cut off the bottom.

Scrub, screw and patch the floor

Install a Ceramic Tile Floor in the Bathroom

Photo 1: Scrub the floor with stripper

Remove the baseboard and toilet. Using an abrasive pad, scrub the floor hard with water mixed with vinyl floor stripper.

Install a Ceramic Tile Floor in the Bathroom

Photo 2: Drive screws into the floor joists

Mark the floor joists with chalk lines and drive 2-1/2-in. screws every 8 in. Don’t leave any screw heads protruding.

Install a Ceramic Tile Floor in the Bathroom

Photo 3: Cut the door trim to accommodate tile

Undercut door trim using a jamb saw or handsaw. A piece of backer board, tile and two layers of cardboard raise the saw to the correct height above the floor.

Install a Ceramic Tile Floor in the Bathroom

Photo 4: Fill low spots with thin-set

Cut out any loose sections of vinyl with a utility knife. Fill the void with thin-set using the flat edge of a notched trowel.

Scrub the floor with a vinyl floor stripper following the manufacturer’s instructions. The stripper will dissolve wax and other residue. Scrub hard with an abrasive scouring pad (Photo 1). The tiny scratches left by scrubbing help the thin-set bond better.

Next, drive screws through the floor into the joists (Photo 2). This ensures that the subfloor and underlayment are securely fastened. If there’s an unfinished basement below the floor, locating the joists is easy: Go to the basement and drill a couple of 1/4-in. holes up through the floor next to a joist. If you can’t locate the joists from below, pick a spot near one wall and drill a hole. If the bit breaks through into hollow space, move over 1 in. and drill another hole. Keep going until you hit a joist. Then go to the opposite wall and find the other end of the joist. Measure at intervals of 16 or 24 in. from the first joist to locate the others.

While you’re driving screws, look for any spots where the vinyl has loosened from the floor. Cut out loose spots and fill them (Photo 4). If there are any copper pipes that pass through the floor, wrap them with duct tape at floor level. Cement-based thin-set and grout can corrode copper.

Install backer board

Install a Ceramic Tile Floor in the Bathroom

Photo 5: Install backer board over the floor

Cover the floor with backer board. Cut inside corners, circles and curves with a drywall saw. Space pieces 1/8 in. apart and hold each one in place with two temporary screws.

Install a Ceramic Tile Floor in the Bathroom

Drywall saw

Use a drywall saw to cut corners, circles and curves in backer board.

Install a Ceramic Tile Floor in the Bathroom

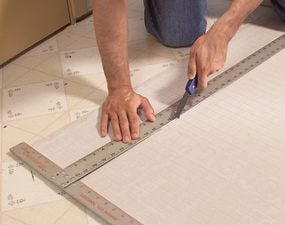
Photo 6: Score and snap the backer board

Make straight cuts with a scoring knife. Make three or four scoring passes, then snap the backer over a 2×4. When all the pieces have been laid out, label them and set them aside.

Install a Ceramic Tile Floor in the Bathroom

Scoring knife

Use a scoring knife to score the backer board.

Install a Ceramic Tile Floor in the Bathroom

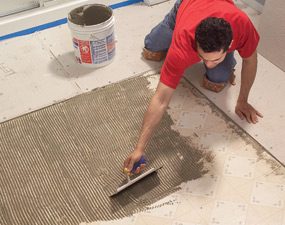
Photo 7: Trowel on the thin-set

Comb out a bed of thin-set just large enough for each piece of backer board using a 1/4-in. notched trowel held at a 45-degree angle. Screw the backer down before spreading thin-set for the next piece.

Install a Ceramic Tile Floor in the Bathroom

Notched trowel

Use a 1/4-in. notched trowel to spread the thin-set over the floor.

Install a Ceramic Tile Floor in the Bathroom

Photo 8: Cover the joints

Press adhesive-backed mesh tape over the joints and skim over the tape with thin-set. When the thin-set is firm but not fully hardened, scrape away any ridges with a putty knife.

The backer board is fastened with a combination of screws and thin-set adhesive. Cut and lay out all the pieces before you mix the thin-set (Photos 5 and 6). You can run the sheets in any direction, but be sure to stagger the joints so you never have four corners meeting at one point. Leave a 1/8-in. space between the sheets and along the vanity, tub or shower. The gap along walls must be at least 1/8 in. wide, but a wider gap (about 1/2 in.) makes the panels easier to set in place.

After cutting and fitting, label the location of each one and set them all aside. Vacuum the floor and have your drill and screws ready to go before you mix the thin-set. Read the thin-set’s label. Spread the thin-set with a 1/4-in. notched trowel. Comb in one direction so air can escape when you embed the backer (Photo 7). Drive screws every 6 in. around the perimeter of each piece and every 8 in. “in the field” (across the face of the panel). If the leftover thin-set is still workable, you can immediately embed mesh tape over the joints (Photo 8).

If the thin-set has become too stiff or chunky, mix a new batch. Use “alkali-resistant” tape that’s meant for backer board. While the tape coat of thin-set hardens, run a putty knife over all the screw heads to scrape off the “mushroom” bulges around screws. Drive in any protruding screw heads you come across.

CAUTION!

Cement products like thin-set and grout draw moisture from skin and can even cause burns that require medical attention. While most pros work bare-handed, wear gloves if you have any special sensitivity. Also wear eye protection while mixing thin-set and grout.

Figure A: Ceramic Tile Over Vinyl

Everything you need for this project is available at home centers. Most of what you need is also available at tile stores.

Cutaway of a tile floor over vinyl

Careful layout pays off

Install a Ceramic Tile Floor in the Bathroom

Photo 9: Test your layout to avoid small pieces along the walls

Dry-lay tile to determine the best layout. Start with centered rows, leaving equal spaces at walls. Then reposition rows until you find the optimal layout.

Install a Ceramic Tile Floor in the Bathroom

Photo 10: Attach guide boards to guide the layout

Screw guide boards to the floor following your chosen layout. Position the guides so you can lay all the field tiles without moving the guides. Make sure the guides are at right angles by measuring out a 3-4-5 triangle.

Too often, tile novices simply start setting tile in a corner and continue along two walls until the floor is covered. Sometimes they get lucky and the floor looks good. But more often this method leads to trouble:

They end up with awkward-looking, thin slivers of tile along a prominent wall or at the doorway. And the tile looks even worse when walls are badly out of square or crooked—a straight grout line running too close to a wall emphasizes the wall’s imperfections.

Whether you’re laying a simple grid pattern like we show here, or a diagonal pattern with a border, the best tile layout usually calls for centering full tiles between walls so the partial tiles along the edges will end up all the same size. Don’t rely on your tape measure and mental arithmetic. Rip open a carton of tile, grab a handful of spacers and experiment with your layout on the floor.

To begin, center rows of tile between walls so you have equal spaces along walls that face each other (Photo 9). Set the two rows parallel to the two most prominent walls. Then make adjustments, trying to achieve these three goals:

  • Use full tiles at doorways and along the bathtub or shower. These are usually the only places where the edges of the floor aren’t covered by baseboard. If you use full tiles in these exposed spots, you don’t have to worry about making smooth, perfect cuts.
  • Avoid narrow tiles along walls. Ideally, you’ll end up with tiles cut to half size or larger. Avoid cutting tile to widths less than 2 in.
  • Minimize cutting and try to avoid difficult cuts. For example: Cutting tile to an L-shape to fit around an outside corner is especially difficult when one arm of the “L” is less than 2 in. wide. The arm tends to break off as you cut.

Chances are, your layout won’t meet all these goals. Because the shower stall was the focal point in our bathroom, we made it our No. 1 layout priority. We chose to use full tiles in front of the shower. That left us with 3-in.-wide tiles along the opposite wall, which was less prominent. We also chose to center the tile rows on the shower; that meant we had to use cut tiles at the doorway.

Once you determine a layout, establish lines to guide your tile positioning. The usual method is to snap chalk lines on the floor. But chalk lines are hard to see after you’ve spread thin-set, and one row of tile may slip as you set the next row. Here’s a more reliable guide: Choose straight boards a foot shorter than the length and width of the room. Tape one edge of each board so thin-set won’t stick to them.

Then screw the boards to the floor at a right angle to form a guide that eliminates guesswork and shifting (Photo 10).

Video: Create Your Own Floor Tile Layout

Planning the layout for a tile project is usually the hardest and most time- consuming step. Watch this video to learn how a pro does it. You’ll see how to snap chalk lines and make sure they are perfectly square. Plus, you’ll learn how to avoid unsightly narrow, difficult-to-cut tiles along a wall. Don’t start a tile project until you’ve watch this video!

Set the tile (finally!)

Install a Ceramic Tile Floor in the Bathroom

Photo 11: Set the full tiles

Comb out a few square feet of thin-set and set tile against the guides. Continue until all the full tiles are in place. Tip: Watch for squeeze-out between tiles and rake it out with tile spacers.

Install a Ceramic Tile Floor in the Bathroom

Spacers detail

Keep the gaps between tiles even by using spacers

Install a Ceramic Tile Floor in the Bathroom

Photo 12: Spread thin-set and set the perimeter tiles.

Cut and set the perimeter tiles after the thin-set beneath the full tiles has hardened. In spaces too narrow for your trowel, comb thin-set onto the backs of tiles.

It’s usually easiest—and most efficient—to set tile in two phases: First set all the full “field” tiles (Photo 11). Then, when the thin-set has hardened for several hours, cut all the perimeter tiles and set them (Photo 12). Here are some tips for both phases of the job:

  • The trowel you use for setting tile may be different from the one you used to embed the backer. The thin-set label tells you which notch size to use relative to tile size.
  • Dampen the backer with a sponge just before applying thin-set. This keeps the thin-set from drying out too quickly.
  • Comb the thin-set in one direction so air pockets won’t be trapped under tile.
  • Open three or four cartons and mix the tiles as you set them. Pattern and color vary slightly from one carton to the next.
  • Don’t just set each tile into place; press down on the tile and wiggle it to embed it firmly in the thin-set.
  • Watch for “tipped” corners. When you press a tile in place, it’s easy to tilt it slightly so that one corner stands higher or lower than neighboring tiles.
  • When you complete a section of tile, inspect it before moving on. Make sure the tiles line up correctly and spacers are in place. Wipe any thin-set off the face of tiles with a damp sponge.
  • When the thin-set becomes chunky or too stiff, throw it away and mix more. Never try to extend the life of thin-set or grout by adding water.
  • Cut perimeter tile so that caulked joints (at tub) are the same width as grouted joints.

Prepare the floor for grout

Install a Ceramic Tile Floor in the Bathroom

Photo 13: Install an extension ring over the toilet flange

Remove the old screws from the toilet flange and apply a heavy bead of silicone caulk. Fasten the extension ring over the old flange with stainless steel or brass screws.

Install a Ceramic Tile Floor in the Bathroom

Photo 14: Install the transition strip

Glue the transition into place with construction adhesive. If carpet meets the transition, you may have to add a new tack strip.

Install a Ceramic Tile Floor in the Bathroom

Photo 15: Stuff backer rod along the wall

Push backer rod into joints that will be caulked later. The foam rod keeps grout out of joints. After grouting, pull out the rod and caulk the joints.

When all the tiles are in place and the thin-set has hardened, remove all the spacers. Next, raise the toilet flange by adding an extension ring or two (Photo 13). The extended flange should be flush with or higher than the surrounding tile.

When you grout, fill in between the flange and tile. That way, any future leak around the flange will show up on the bathroom floor instead of on the ceiling below. If you plan to use a glue-down transition as we did, this is the time to install it.

Here’s how we dealt with our transition: First, we removed the old metal strip that covered the carpet’s edge. Then we cut our transition strip to fit between the door jambs using a miter saw. Next, we added a tack strip to hold the carpet in place. Before we could glue the transition to the floor (Photo 14), we had to remove a thin strip of the old vinyl floor.

Grout is too brittle to handle the slight shifting movements that are normal in any room. Keep grout out of joints wherever the floor meets the tub, shower, vanity or walls (Photo 15).

Pack the joints with grout

Install a Ceramic Tile Floor in the Bathroom

Photo 16: Grout the joints

Work the grout back and forth across the floor, diagonal to the joints and holding the float at a 45-degree angle. Then scrape off the excess grout, holding the float almost upright.

The thin-set directions will tell you how soon you can grout the floor—usually 24 hours. Grouting isn’t complex. Just plop a couple of scoops of grout onto the floor in a corner, work the grout into joints (Photo 16) and scrape off the excess grout before moving to the next section. In addition:

  • Mix the grout to a mashed-potatoes consistency. Adding extra liquid makes grout easier to work with but weakens it.
  • Don’t just spread the grout over the joints; press hard to pack it into the joints. If you’re doing it right, your forearm will get a good workout.
  • Whether you’re filling joints or scraping off excess grout, always push the float diagonally across the tiles.
  • Scrape off the excess to leave tile as clean as you can. The less grout you leave on the tiles, the easier cleanup will be.
  • When you’re done, cover the grout bucket with a plastic bag and set it in a cool place to slow the hardening process. During cleanup, you may find spots that need a little extra.

Grout cleanup

Install a Ceramic Tile Floor in the Bathroom

Photo 17: Clean the tiles

Wipe grout off the tile surface with a damp sponge. Wipe gently on the first pass so you don’t pull grout out of the joints. Rinse the sponge often.

Clean the surface of the tile when the grout is stiff enough to stay put in the joints but still soft enough to wipe off the tile surface. During hot, dry weather, grout can become difficult to wipe away in just 10 minutes, so get ready for cleanup before you even mix the grout. You’ll need two buckets of clean water, two sponges, a synthetic scouring pad and a dry rag.

As soon as you’re done grouting, go to the first section you grouted and wipe across a joint with a damp sponge. If the sponge pulls grout out of the joint, wait five minutes and try again. In cool, damp weather, the grout may stay too soft for an hour. When the grout is hard enough, gently wipe the tile with a damp sponge.

Rinse the sponge frequently as you wipe the entire floor (Photo 17). If you come across tough spots, scrub them with the scouring pad. Be careful where you put your feet and knees—don’t mar your perfect grout joints.

Immediately after the first pass, grab the second bucket of clean water and the fresh sponge and make a second, more thorough pass. Then, as the tile surface dries, wipe it with a dry terry cloth. The dry haze should buff off easily. If not, go for fresh water and sponge the floor again. If you can’t get rid of the haze, don’t panic. Products that remove haze are available wherever tile is sold.

Let the grout cure overnight before you caulk joints, set the toilet or reinstall baseboard. Grout sealer is a good precaution against staining: Some products can be applied 24 hours after grouting; others require a two- to three-week wait. If you have leftover tile or grout, keep them in case you have to make repairs in the future. Be sure to write down the brand, color and retailer of the tile.

How NOT to Save Money on a Tile Project

I’m a devout cheapskate, but when it comes to buying thin-set and grout, I grab the most expensive products on the shelf. More expensive thin-sets and grouts generally contain a higher proportion of the polymers that improve adhesion, durability and stain resistance.

In most situations, cheaper products would perform just fine. But if I can reduce the risks of loose tiles or cracked grout by spending an extra $30 on a typical bathroom project, I consider that a bargain.

Liquid additive is another smart investment. If the thin-set or grout label says you can mix it with water or an additive, use additive. These liquids (labeled “latex, ” “polymer” or “acrylic”) are meant to improve adhesion and stain resistance. But as a bonus, they produce a slick, creamy consistency. Thin-set combs out more smoothly, grout flows easily into joints, and both remain workable longer.

Also buy a mixer for your drill. Mixers come in various styles and sizes. Go easy on the trigger. If you run the drill at full speed, you can create millions of tiny air bubbles, which will weaken the mix.

Tile cutting tools

Install a Ceramic Tile Floor in the Bathroom

Tile cutter

A tile cutter is the fastest way to cut tile. Just push the handle forward and a small wheel scores the tile. Then push the handle down and the tile snaps in two. You can’t beat a tile cutter for convenience. It makes no mess and you can drag it around the room as you work. But a tile cutter has zero versatility. It makes straight cuts across the entire tile—no curves or corner cuts. Cutting 1 in. or less off a tile can be difficult or impossible. You can rent one at rental centers and some tile shops.

Install a Ceramic Tile Floor in the Bathroom

Wet saw

A wet saw cuts with a diamond blade while water cools the blade and eliminates dust. You can cut notches, trim off tiny slivers of tile, cut miters and even make curves. You’ll get clean cuts in any type of tile. But wet saws are messy. They spit water and raise a cloud of gritty mist. If you use one indoors, contain the mist with curtains of plastic film and cover nearby surfaces. You can buy a small wet saw like the one shown here or rent a professional model from a tile store or home or rental center. If you only have a few cuts that require a wet saw, call a tile store. Many make cuts for a small fee.

Install a Ceramic Tile Floor in the Bathroom

Angle grinder

An angle grinder equipped with a diamond blade can make straight cuts, curves and notches in any type of tile. Since all your cuts are freehand, this isn’t a precision tool, but you can grind away imperfections with the tip of the blade. Use a grinder only outside. Wear a dust mask and eye protection.

Install a Ceramic Tile Floor in the Bathroom

Nippers

Nippers are useful for rough curves and notches. They don’t cut tile, but bite out small chunks, leaving jagged edges.

Install a Ceramic Tile Floor in the Bathroom

Contour gauge

A contour gauge is a great tool for marking troublesome shapes on tile. Just press it against any odd-shaped surface (like the curved corner of a bathtub) and transfer the profile to tile.

Here are the tools that can cut your tile. Buy or rent the ones that make the most sense for your project.

In addition to the tools shown here, a carbide abrasive blade that fits in a jigsaw cuts slowly but leaves fairly clean cuts in softer types of ceramic tile and natural stone. A carbide abrasive hole saw cuts perfect holes for plumbing pipes and fixtures.

A rubbing stone is simply an abrasive block, similar to the wheel in a bench grinder. Use it to smooth sharp or slightly chipped cuts that will be exposed.

Additional Information

Required Tools for this Project

Have the necessary tools for this DIY project lined up before you start—you’ll save time and frustration.

You’ll also need these specialty tools for working with tile and backer board:
Scoring knife, Margin trowel, Tile cutter, 4-in. diamond blade, Drill mixer, Offset saw, Tile cutter, Nippers, Wet saw
You can also use an angle grinder for cutting tile.