Showing posts sorted by relevance for query small stainless steel support stay. Sort by date Show all posts

Saturday, November 18, 2017

2014 The Italian Sea Group Admiral Sail - Silent 76, Carrara Italy

Read article : 2014 The Italian Sea Group Admiral Sail - Silent 76, Carrara Italy

Features:

1. Construction

Hull Construction:

The hull is moulded in GRP from female moulds; it uses a high properties gelcoat and the internal side of the hull is vacuum infused with isoftalic polyester resin while the skincoat features a further application of vi-nylester resin in order to avoid and limit osmosis. Additional reinforce-ments are included to the keel area, the keel longitudinal, mast bulkhead, structural P-brackets, engine room basement, forestay and hull stringers. Limber holes which penetrate structural areas and/or tubes are installed at appropriate points on stringers, bulkhead – landings and floors.

Hull Finishes:

Grey metal hull and with light grey superstructure; red waterline and black antifouling;

Deck Construction:

Moulded in GRP with a PVC foam cored structure for strength and insula-tion. In load bearing areas the core is replaced with plywood for additional strength, and all load bearing fittings have backing plates.

The hull to deck connection is achieved by bonding the deck onto the return flange of the hull and using the glue approved by Class rules in or-der to create a structural junction.

Deck Finishes:

The weather deck, cockpit seats, sole areas and part of the coachroof area are finished with teak planking (10mm). This is laid using epoxy ad-hesive, with no visible fastenings.

The areas either side of the main companionway are finished with teak planking, with open stowage areas and stainless steel rails.

All lockers drain outside and their hinges and catches are recessed or hid-den into Teak planking, as appropriate.

Keel System:

The keel is a high performance bulb design.

The ballast keel is made of lead casting bolted to the GRP hull with stain-less steel bolts. Ballast weight is approximately 14,800 kgs. .

The keel is designed to combine moderate draft with good sailing perfor-mance due to its efficient shape and side winglets. The centre of gravity is very low due to the fact that the centerboard is made of cast iron while the actual keel is made of lead.

Mast and Boom:

Max Spar conventional alloy mast (made of two parts) with Ronstan track for in-boom furling mainsail with top tapered (last 3 meters). Triple spread-er rig with tapered aerofoil spreaders (21° angle).

Custom carbon boom – deep and trapezoidal section incorporating Bamar furling system and electric motor for in-boom furling mainsail.

Mast & Boom and Mast & Vang connections are custom made in alumi-num and feature a special, custom made concealing cover, made of car-bon, which gives a unique design. Also the vang itself feature a custom made concealing cover, made of two carbon conical blocks.

Deck Fittings:

Stainless steel opening pulpit;

Port and starboard navigational lights;

Stainless steel pushpit with gate for boarding;

Custom stainless steel and teak made engine bracket;

650mm stainless steel custom stanchions and bases with double stainless steel rod guardrails;

Pair of gateway stanchions for side access;

Stainless steel telescopic and retractile steamhead fitting with single roller designed to stow a 63kg Delta anchor. The chain flows into the steamhead arm itself, without the need of having an external chainplate;

Pair of custom stainless steel, leather upholstered backrest seats fitted at the helm positions;
6 x pairs of 400mm stainless steel “pop-up” mooring cleats with chafe strips to deck edges;
4 x pairs of aft “pop-up” fairleads and cleats in proximity of the transom bulwark;
Deck fillers – 2 x fuel, 2 x water and 1 x waste;
1000W Sanguinetti Chiavari retractile capstan for mooring lines at bow;

Cockpit:

The cockpit is split into separate guest and steering/crew areas, although they are both on the same level.
The main companionway features a double large horizontal sliding hatchway with stainless steel frames and grab rail. The sliding mechanism is manually powered.
The guest cockpit is over 3m long and self-draining as it’s on the same level of the main deck. There are also cockpit drains which ease the water to drain away while at sea and going upwind. There is a clear walkway giving excellent access from the companionway to the helm positions and side decks, all on the same level.
The cockpit features two teak-topped opening, sliding and telescopic tables.
The tables are permanently installed and have seats on three sides due to the cockpit design. The table is provided with a cover. Under one of the cockpit seats a top opening fridge finds place.
Three pairs of flush mounted waterproof loud speakers are mounted in the guest cockpit with their own cockpit mounted remote control unit for the dedicated ‘cockpit’ CD/Tuner head unit (head unit installed below decks).
Two of those speakers are used by the vhf system, as external loud speakers.
The helm position has twin custom GRP and aluminium steering pedestals
incorporating all the standard controls and instruments with plenty of room for additional equipment, if required. Each pedestal has a flush-mounted compass with internal lighting. There is a double lever engine control fitted at the starboard pedestal. The wheels are fitted in a reverse position, giving easy and safe access to the instruments mounted on both pedestals.
At the helm position an aluminium roll-bar finds place. This is the base where the two fixed points for the mainsheet system are fitted.
Aft the helm positions is a clear flat deck area, which can be filled with cushions, creating a sunbathing area. This area also includes two big lockers with flush-to-deck lids, teak covered; they are designed to host two liferafts or alternatively one can be dedicated to a liferaft and the other one to store lines. A custom flush hatch is fitted with twin gas struts, drain channels, rubber seal and against the wind closing to give access to the large dinghy garage.

Garage & Bathing Platform:

The yacht is built with a flap-down full beam transom, raised and lowered hydraulically, which also gives the main access to the toys garage. The garage can host a good number of toys and actually it fitted to host 3 seabobs.
The bathing platform created by the transom once it’s open it is provided with a demountable stainless steel bathing ladder and it’s covered by teak planking.
A removable ladder also connects the main deck to the transom when open. Alternatively also the gangway can be used for this purpose.
There is a hot and cold freshwater deck shower located in the dinghy garage which can be used on the bathing platform thanks to a flexible hose.
The garage door is also provided with an emergency system for opening the garage, which is placed close to the waterline, protected by a stainless steel screwed in cap and which can be operated by a person in the water.

Hard Top:

The yacht features a custom cockpit hard top, which gives a very good protection to the all cockpit and helm positions. This feature is unique on yachts of this size and contributes to the overall design of the yacht.

The hard has an aluminium structure, attached to the aluminium roll-bar which is placed aft. The practical functions of this will be both sprayhood and bimini.
The hard top has a glass cover and an opening area which is covered with acrylic material (Sunbrella), with battens.
The hard top also features side glasses which deliver complete protection to the forward end of the cockpit seats.


Anchoring:

A Quick 3000w electric anchor windlass is installed below deck and within the anchor chain locker. The windlass, which is two-way and operated by adjacent foot switch controls is well over specified for the size of the vessel.
The 63kg (approximately) Delta anchor stows into the retractable stemhead fitting.
120 metres of 12mm calibrated, galvanized chain is fitted to match the
windlass. The chain is fastened at its 'bitter end' to a through-bolted stainless
steel attachment with substantial lanyard.

Haatches, Windows and Portholes:

1 x Lewmar over forward crew cabin;
1 x Lewmar over forward VIP cabin;
1 x Lewmar over main saloon;
1 x Lewmar over garage (with teak planked lid);
Custom main companionway with double sliding and balanced hatch system,
stainless frames and grab rails (by SeaSmart);
1 x custom GRP hatch to cover anchor steamhead locker;
Custom direct bonded, curved and flat, non-opening frameless deck saloon
windows, smoked glass made (by Viraver);
8 x custom direct bonded non-opening frameless hull windows, smoked glass made (by Viraver);


Whinches:

2 x Harken 1000.3 ST three speed, electric drive, self-tailing primary
winches;
2 x Harken 74.2 ST two speed electric drive, self-tailing halyard winches;


4. Rigging and Sails


Standing Rigging:

The vessel is fitted with discontinuous Maxspar rod rigging for the 3- spreader rig. The standing rigging includes a split backstay which is made of high performance steel and Dynema for the backstay legs, with plates below deck;
Discontinuous rod rigging for tip-cups;
Enclosed rod rigging for tip-cups;
Stainless steel rod, which incorporates high strength, low stretch and high corrosion resistance;
Stemball spreader links and stemball tang fittings used throughout;
Total weight of standing rigging is: 340kg;


Running Rigging:

1 x 16mm dyneema main halyard;
2 x 16/14mm dyneema/dynaone headsail/blade halyard;
1 x 14mm dyneema storm/jib halyard;
1 x 16mm dyneema boom topping lift;

2 x 16mm dyneema asymmetric halyard;
1 x 16mm dyneema mainsheet;
2 x 16mm dyneema blade jib sheets;
2 x 14mm dyneema storm jib sheets;
2 x 16mm dyneema reef lines;
2 x 18mm dyneema checkstay runner tails;

Backstay and Vang Hydraulics:

1 x Cariboni hydraulic backstay tensioners with mechanical lock-off;
1 x Cariboni hydraulic vang with carbon cover;
Operation of these rig hydraulics is powered via a push button console fitted
on pedestal and with a manual backup control unit close to port pedestal;


Blocks:

Spinlock;
2 x stand up single block on bulwark;
2 x pad eyes;


Mainsheet System:

The system is managed by a magic trim system which is installed below deck at mast level. This allows to have a double point mainsheet on the rollbar and therefore the cockpit and deck remain as clear as possible;

Headsail System:

The system uses an auto/tacking jib with single track and single car;

The car can be also used for the removable staysail;

There is a single jib sheet, going from the traveller up to the mast and then down concealed under the coachroof and back to one of the aft winches;


Headsail System:

Bamar electric headsail furling which gives push-button reefing and furling
of the jib;
Unit finished in black anodizing and stainless steel and concealed below
deck to create a flushed bow area;
Manual backup;
Dual controls are provided for each headsail furling function, so the sail may be furled from either side of the cockpit;


Storm Staysail System:

Removable storm jib stay;
Storm jib halyard;
Cariboni hydraulic tensioner;

Rigging Hardware:

Fittings, tip-cups, etc., for discontinuous rod rigging;
Deck ring fabricated in spartite (composite) x 2 kits;
Conduit for masthead instrument wiring;
Spinlock ZS rope jammers for storm jib and blade jib halyards;
Spinlock ZS rope jammers for mainsail halyard and topping lift;
Mast jacking system;
SAILS (by North Sails) Mainsail – SRP 105 – 5 x full-length carbon battens, loose foot, two rows
of reefing points each with custom leech reef block;
Mainsail boom cover in acrylic;
Furling and Selftacking Jib – SRP 105, including a foam luff pad and UV
stripes;
All sails feature a custom graphic design;


5. Electronic Systems

Navigation Instruments:

2 x Raymarine i70, supported data views include: Wind, Speed, Depth,
Tri-data and navigation integrated with the Chart Plotter. The instruments
are installed on each pedestal;
Raymarine SPX-30 SmartPilot autopilot with T3 hydraulic linear drive unit;
2 x Raymarine p70 autopilot remote control located at pedestal and chart
table;
2 x Raymarine e125 Chart Plotter at both pedestals with integrated Digital
Radar and built-in 50 Channel Global Positioning System (GPS), interfaced
with the autopilot;
Raymarine 4kW Radome radar antenna mounted on mast;
Raymarine Ray 240E, Class D-DSC VHF radio-telephone with antenna at
masthead and second station at pedestal;
Magnetic compass;

Entertainment:

Stereo FM Radio/CD Player with iPod and iPhone connectivity. One is fitted with four loudspeakers in the cockpit and has a remote control with twin loudspeakers to the foredeck. Inside the yacht every cabin has a separate stereo system while the master suite and main saloon feature a proper home theatre system which includes stereo and iPod connection.
The stereo system can be also controlled via wifi by an iPad;
8 x OX-Home mirror TV’s are fitted throughout the yacht including bathrooms;

6. Engine Room Equipment

General:

The engine room surfaces are faced with white painted sound absorbing aluminium panels. The engine room access is below the ladder which connects the main saloon to the forward cabin, all other access panels are extra ordinary service panels into the salon floor. The engine room has 24v lighting and is fitted with extractor fans ducted to the exterior through concealed into coachroof grids. An automatic fire extinguisher is fitted with remote indicator light;

Propulsion:

2 x Yanmar Common Rail 4BY2-150 diesel engines, 150hp @ 4,000rpm
ZF reduction gear, which gives a reduction of 2.45:1;
2 x 22” 3 fixed pitch and blades propellers;
2 x 40mm stainless steel shafts lines;
2 x Bronze P-bracket and a PSS water-lubricated lip seal stern gland system;
1 x 15kW SP240 TCi Side Power electric bowthruster with speed control PPC 800;


7. Electrical System


12/24 Volt:

Domestic bank batteries are 24V AGM type, deep cycle series, with a total capacity of 2000 Ah @ 20Ah rate. This battery bank also serves the bowthruster load;
Engine starting batteries are 12V AGM type, heavy duty type (one battery for each engine);
Generator starting battery 12V AGM type, heavy duty type;
2 x 24V/100 Ah alternators (one for each engine);
24V/12V converter, used to charge the engine batteries bank through the alternators;
100A/24V Skylla-TG battery charger;
24V/5000W Phoenix inverter;
12V/30A Phoenix Charger for engines and generator;
24V/12V Blue Power IP20 battery charger for emergency battery bank;
Circuit breaker system;
Victron Easy Control Panel acting as a voltmeter and ammeter for monitoring the vessel’s batteries status;
Batteries isolators;

220 Volt:

1 x 20kW (50Hz) Kohler 4-cylinder diesel generator running @ 1,500rpm installed within manufacturer’s sound shield, located into the fully – insulated engine room. An exhaust water separator and waterlock are installed.

The unit has a remote Start/Stop and instruments mounted on the AC electrical panel at chart table.
220V AC circuit with outlet sockets located as appropriate within the layout;
1 x 63Amp dockside power cable, 3-core double insulated PVC; socket
located on the aft deck;
1 x 100A/24V Victron Battery Chargers;


9. Bilge System


General:

8 x Rule electric bilge pumps;
High level bilge alarm with double level sensor;
Manual bilge pump operated from the side of the cockpit and fitted with a metal deck plate;
Emergency electric bilge pump by Gianneschi, with manual clutch, rated to pump approx. 125lt/min;


10. Fuel System

General:

2 x aluminium tanks providing a total capacity of 1,900 litres, including the
return tank;
Tank inspection cover, one for each;
Tank deck fillers;
Tank gauge system;
Duplex Racor fuel filter and water separator unit is installed with warning lights at the electrical panel. With this system each filter can be isolated whilst maintaining the all machinery up and running, allowing in-use filter replacement and cleaning;

11. Water System


Fresh Water System:

2 x structural tanks totalling 1,360 litres. The GRP tanks are treated with inert gelcoat, fitted with baffles and provided with multiple inspection covers;
1 x 80lt Quick B3 80 water heater; the water is heated by the engine’s heat exchanger or by a thermostatically-controlled 220V, 1.2kW immersion heater element;
180lt/h Idromar MSK 18 watermaker;
Tank deck fillers;
Tank gauge system;

Grey Water:

3 x Sanisplit pressure lines which serve two grey-water aluminium tanks (totalling 220lt) located in the engine room, fitted with a float switch and a Gulper pump, giving automatic evacuation of all showers, washbasins and galley sinks;


Black Water:

5 x Tecma macerator toilets;
1 x 110lt aluminium black water holding tank;
Tank gauge system;
The tank is configured for discharge below water with additional ability to be pumped out from deck via flush-mounted deck fittings.


12. Other Options


General:

60,000 BTU Condaria reverse cycle 220V air conditioning, 8 units;
Barazza Microwave;
Miele electric oven;
Miele Dishwasher;
Miele Washing machine;
Bora 4-plates electric hob;
Bora extractor fan;
Waeco Coolmatic HDC 150 liter 24V fridge, front opening, fitted into the
galley;
Waeco Coolmatic CB 40 Liter 24V fridge, top opening, fitted into the galley;
Third fridge, top opening, fitted into the cockpit, below the seats;
2 x LED underwater lights;
Lopolight tri-wihite light at masthead;
Windex type Wind indicator at masthead with dedicated light;

2 x boom lights over cockpit;
Pair of down and up spreader courtesy lights;
Master gaiter cover in waterproof fabric;

13. Accomodation


General:

The layout allows for a maximum of eight guest berths and two crew, in five cabins, with five heads and separate shower compartments. Owners', guests' and skipper's cabins will have hanging lockers with auto light. All cabins have a mirror fitted.


Deck Saloon:

Access to the Saloon from the cockpit is via a set of teak covered steps, backlighted on the bottom side, with stainless steel handrails on side. The ladder structure is made of aluminium. A custom double sliding, smoked glazed access system is installed at the companionway. This system has a mechanically balanced and assisted operation. The access ladder continues aft, in order to give access to the guest area, and features a Plexiglas divider between the steps going outside and the ones which give access
to the guest area. Below the ladder, in the foyer, a little settee or alternatively a little storage or oilskin locker find place, while below the steps going down into the foyer, which can be removed, there is an access to the main electric switch panel.
Going into the saloon there is a large table to starboard which serves an ‘L’ shape large settee, leather upholstered. The table has a veneered top panel with stainless steel details and it features a sliding mechanism.
There may be also additional stools in order to create more sitting area.
Alternative custom tables are available on request.
To the aft side of the sitting areas, on the bulkhead, a good size mirror TV finds place. A custom drinks locker is fitted forward, surrounding the mast area.
To port side there is a bar area which also works as a kitchen island and which can be provided with tall stools. The island is covered with ‘slatelite onice classico’ on the saloon side which is also backlighted. On the port side, the galley and the chart table find place.
The material used within the saloon are ‘Eucalypt fumé’ for the joinery, white leather and stainless steel strips for the floors and white leather and sand nabuk leather for the headlining. The hull sides, hullports and hatches recesses are upholstered with brown leather, while the venetian blinds are made of wood and leather. The sofa is white leather upholstered.

The Deck Saloon is extremely light and airy, with four bonded to coachroof windows and two opening deck hatches. There are also two long nonopening hullports, one per each side. These hullports contribute to the great feeling of light and space, giving a panoramic view whilst at anchor.

Galley:

The galley has a single, long surface taking the most of the length of the deck saloon. The worktop is covered with ‘Callisto slatelite’ stone with all the appliances being flushed to worktop. The same slatelite material is also used on the floor.
The appliances include a double electric hob for a total of four hot plates by Bora which also feature a particular extractor fan in the middle, again by Bora, fitted on the worktop and assuring a good smoke and odour extraction with the minimum noise. Beside the hob is a sub-counter top mounted ceramic and custom made single sink, which is served by a retractile tap by Barazza. The galley also features an electric oven by Miele
and a microwave by Barazza, together with a front-opening fridge and a top-opening one, better described in the refrigeration chapter. The galley also has a front-opening slim line dishwasher by Miele, for up to nine covers.
Both the refrigerator and freezer have an automatic door light fitted and are provided with their own compressors.


Nav Station:

On this yacht the chart table area is located in order to be a natural continuation of the galley worktop, forward of the galley, and it’s provided with two front-facing panels which accommodate the all electronics, a substantial chart table and a stool which can be removed when not in use.
A small stainless steel support stay is fitted on the chart table lid. There is provision for the stowage of charts. Stowage will be provided also for navigational books, almanacs, etc.


Master Cabin:

The aft cabin is configured with a double berth which is centerlined, one pouf which serves a dressing table and an office desk, plus two large hanging lockers, with drawer and locker space. There is access to the ensuite aft bathroom which is split in two parts, located forward to both sides, one for the shower and the other one for wc, both served by a washbasin.
This cabin is also provided with a safe, flush fitted with digital keypad.

Master Head:

This bathroom is split in two separate areas, on port and starboard side.
The starboard side one includes a separate shower by Bianchi e Fontana and a washbasin; the shower walls and floor as well as the bathroom floor, walls and washbasin counter top are all covered with San Laurant marble with part of the shower corners to be backlighted. Also the washbasin is hollow into the same material and has taps by Fantini and plumbing by Paffoni.
The port side bathroom features a washbasin and a Tecma electric wc (black colour) and the same material as per the starboard one but has Alpilignum joinery instead of marble which is fitted on the floor and on washbasin counter top and stowage doors only. This bathroom also has a mirror TV’ which is hidden behind the mirror.
Headlining for both bathrooms are made of white LED backlighted panels.
Quality large type mixer taps, thermostatic shower controls and fittings are by Fantini and Inda.
Lockers for wash bags, cleaning materials and linen stowage are provided.

Guest Cabins (STB and PRT):

Forward of the master cabin are a pair of guest double cabins, one either side of the corridor.
One of those cabins is configured to be an upper/lower berthed cabin, while the other is a double berth one. Each has en-suite WCs and showers and a hanging locker. The beds also feature a big storage space under the slats net which can be lifted up.


Guest Head:

The two aft guest’s bathrooms serve the two aft cabins and are almost specular. They are both fitted with a separate shower by Bianchi e Fontana and they feature walls, floors and washbasin counter top in “Slatelite Selene”. The headlining is made of “Dani Boxland” leather and of varnished panels. The wc’s are Tecma electric (colour black). Both the bathrooms feature quality mixer taps and thermostatic shower control by Fantini
and fittings by Inda. In particular the taps are fizzed to floor and have a cylinder design.
The washbasins are mounted on the slatelite counter top and are by “Glassdesign” (colour black); the port side one is a gum type (flexible).
In both bathroom there are rollaway stainless steel wirings fitted in the shower which can be used to hang wet clothes; in this way the shower cubicle can be used as an oilskin locker.


VIP Cabin:

Forward from the saloon, which also include the galley on the port side, there is a VIP double berth cabin which uses the all beam of the yacht and has an en-suite good size bathroom on the starboard side. This cabin is also provided with a safe, flush fitted with digital keypad.

VIP Head:

The VIP bathroom takes the all length of the VIP cabin and is placed on starboard side. The shower walls and washbasin top are made of “Slatelite Elios”, while the other walls feature an “Alpilignum” joinery. The floors are made of “Calacatta Oro” marble which is also backlighted into the shower.
The headlining are made of “Dani Boxland” leather. Hidden behind the mirror, a TV finds place too.
The wc is an electric Tecma (Black colour) and the quality mixer taps and thermostatic shower control are by Fantini, while the bathroom’s fitting are by Inda. The washbasin is a ceramic type, squared, over counter top mounted, by “GSG Ceramica” (glossy white colour).


Crew Cabin:

Forward of this cabin is a double crew cabin with en-suite head and integral shower. This cabin is also fitted with a laundry corner which includes a washer-dryer; the access to this cabin is through a generous size deck hatch only.

Crew Head:

The Crew head which is accessible from the crew cabin only, features a Corian type floor with integrated grate for shower drain. The bathroom has an integrated shower and for this reason all the wall, lockers and other surfaces are made of easy to clean material. The bathroom has taps and shower fittings by Paffoni and a Tecma electric toilet (white colour).
In the bathroom as well as in the cabin itself there are rollaway stainless steel wirings fitted which can be used to hang wet clothes; in this way the bathroom can be used as an oilskin locker, while the cabin area can be used as a drying area.

Disclaimer

This offering is subject, but not limited to, errors, omissions, price fluctuation, and prior
sale or withdrawal without notice. All details disclosed are without guarantee and solely
based on the information received by the seller, intended as a general guide to the Yacht.
Engel & Völkers cannot be held liable for any lack of completeness, inaccuracy, or ambiguities
and/or errors contained in the information disclosed. It is the buyer’s responsibility
to disclose the details of any concern(s) to the seller, by the request of a survey, inspection and/or enquiry. The buyer must ensure that the purchase contract properly reflects his
concern(s) and that it sets out any representations and/or details on upon which he may
rely. Engel & Völkers always advises the buyer to conduct an independent survey
prior to the purchase. We are at your disposal for any further information about the
Yacht. Upon receipt of notice, the Yacht is available for viewing at any time, accompanied
by our Yacht Broker. The Seller is responsible for the payment of Commission

Monday, September 11, 2017

2016 Bestevaer 45ST Pure Sail Boat For Sale

Read article : 2016 Bestevaer 45ST Pure Sail Boat For Sale

" } ; var triggerClick = function(){ jQuery('#boatPoints > div.detailsCallToAction > button.contactSellerLightboxOpen.contactSellerLightboxOpen_2976888').trigger('click'); }; (function($) { var isTouch = function () { try{ document.createEvent("TouchEvent"); return true; } catch(e){ return false; } } galleriaImages_2976888.push(galleriaCTA_2976888); var galleriaLength = galleriaImages_2976888.length; Galleria.configure({ idleMode: false }); if ( 0 !== $('#galleria_2976888').length) { var counter = 0; Galleria.loadTheme('//newimagesgz.yachtworld.com/includes/js/galleria/themes/classic-white/galleria.classic-white.min.js'); Galleria.ready(function() { var self = this; function genThumbFn(n) { return function() { self.lazyLoad( [n]); }; } for ( k = 0 ; k

Additional Specs, Equipment and Information:


Dimensions
Beam: 4.05 m
Maximum Draft: 2.15 m

Hull and deck

Aluminium hull, round bilge

Aluminium superstructure and pilot house

Above CWL 5-6mm, seawater resistant aluminium H321 5083

Below CWL 6-12mm, seawater resistant aluminium H321 5083

2x watertight bulkheads at bow and aft (= 3 compartments)

6x zinc annode (2x hull, 2x keel, 1x rudder, 1x propellor)

Fold down manually operated swimming platform

Welded chain plates, single bollards (6x), through hull fittings

Integrated diesel tanks (2x) and water (2x) tanks

Hull sanded for smooth finish


Keel and Rudder

Fixed keel with bulb

Bulb filled with lead ballast

Emergency steering in the cockpit

Single aluminium spade rudder

Rudder stock from aluminium

Rack and pinion steering system, JEFA


Paint and Decking

All horizontal (walking) areas painted with non-slip paint

Colour paint Grip Oyster White or Grey

Cockpit seats and coaming covered with cork

Anti-fouling, choice of red or black


Exterior Storage space

2x cockpit accessed lazarette lockers

1x storage locker beneath cockpit coaming, aft to starboard

1x foredeck storage locker

4x open storage in the cockpit seating backrests

1x gas locker, aft to port, for 4x 5kg (1x 5kg provided)


Sailing hardware

Manual winches in cockpit 2x 50 + 2x 46, Harken

Manual winch at mast 1x 46, Harken

2x winch handles, Harken

Deck hardware, Selden

Stoppers, Spinlock

Stainless steel stanchions, with double wired guardrail

Stainless steel push and pulpit

Stainless steel side boarding gates to port and starboard


Hatches and Windows

Pilot house 9x windows single glazed

Pilot house 2x opening Lewmar hatches, size 30

Superstructure 3x opening Lewmar hatches, size 60

Superstructure 2x opening Lewmar hatches, size 30

Superstructure 8x opening Lewmar hatches, size 3 portlight

Aft cabins 2x opening Lewmar hatches, size 5 portlight

Vertical and horizontal plexi glass entrance hatches


Deck openings

2x deck fillers for diesel and 2x deck fillers for water

1x deck discharge for black water tank

2x cockpit drain, 4x deck drain


Anchoring/Mooring

Anchor Delta 25 kg with anchor winch, Lewmar V3

Anchor chain 8 mm x 70m, galvanized, in chain box

Anchor locker forward, self draining

Anchor bow fitting with 2 anchor rollers

6x tube fenders with lines, black

4x 15m mooring lines, 16mm, black


Mast

Seldén aluminium mast, 2 spreader, deck stepped, anodised

Seldén aluminium boom, slab reefing, anodised

Seldén mast hardware

3 colour mast head light, steam, anchor and deck lights (LED)

Sloop rigged (9/10)


Standing and Running Rigging

Seldén standing rigging of 1 x 19mm wire

Furlex fixed genoa stay with manual furling genoa

1x main halyard, 1x genoa halyard, 1x spi halyard

1x outhaul, 3x reef lines, topping lift

1x main sheet, 2x genoa sheets


Sails (Doyle)

Mainsail Dacron triple stiched, 3 reefs, 6 full-batten, tell-tales

and crosscut design 60m2

Furling genoa Dacron, 45m2

Mainsail cover marked ‘Bestevaer 45ST’


Safety

Self draining cockpit

Deep and sheltered cockpit

Cockpit enclosed on all sides

2x aluminium handrails on top of pilot house (welded)

2x aluminium grabrails on aft of pilot house (welded)

3x watertight compartment

2x watertight bulkhead

Engine is placed in watertight aft compartment

Aluminium spade rudder

Aluminium escape ladder at the stern

1x automatic bilge pump and 1x manual bilge pump

Raised bulwark/footrail for grip under heel

Handholds throughout interior

U-shaped galley for safe cooking whilst underway

Liferaft in bag, 6 person

3x foam extinguishers

1x extinguisher opening for engine room


Engine

Yanmar 54hp, 4JH5E

Yanmar saildrive SD60

Dieselfilter

Acoustic insulation

Twin pole electric installation

Cooling water system

3-blade fixed propellor

Engine throttle in cockpit

Engine service panel in pilot house

Engine access from port and starboard lazarette lockers


Electric systems

Twin pole 12V DC installation with hull leak meter

230V AC shore power with 25 m cable, 3 groups fused

1x 12V instrument panel at chart table

1x 12VDC switch panel in saloon

2x 100A-12V service battery, gel

1x 66Ah-12V engine battery, AMG

Battery charger 12V 30 Amp


Bilge pumps

1x electric pump in bilge in salon, 35 L/min

1x manual pump in lazarette/engine compartment


Fresh water

Presurised fresh water system

40L calorifier supplied from engine or shore power

Hot/cold water in galley

Hot/cold water in bathroom

Hot/cold water at deck shower


Waste water

Water from shower and shower sink pumped overboard

Waste from toilet direct to holding tank

Grey water from galley with gravity fall overboard


Interior

I. Styling

Floor in American Black Walnut

Woodwork of cabinets and furniture in light Bamboo

Floor to be screwed down shut

Off-white walls, bulkheads and ceiling

Fittings in matte chroom, design look

Doorhandles matte chroom, design look

Damixa, mixer tap fittings in galley and head

Ventilated lockers and storage spaces

Rounded corners on furniture below 120cm

II. Pilot house

Port and starboard seating, 1400mm long each

Starboard has flat worktop for charts, etc.

Open into galley to port

Footrest on port and starboard

2 steps from cockpit into pilot house

1 steps from pilot house to salon

Storage boxes beneath all steps

Large hatch in floor for storage

Small storage space behind back rests for pens, sunglasses.

1x white/red chart light

2x reading lights on aft bulkhead

2x ceiling lights white/red

III. Galley

One and a half stainless steel sinks

Corian or equal marble work top

Force 10 Oven with 3 burners

4x storage lockers above worktop

2x storage lockers besides oven

1x storage drawer besides oven

1x storage locker underneath oven

1x utensil drawer opening toward salon table

2x lockers opening toward salon table

1x rubbish bin under sink

1x storage locker under sink

1x storage drawer above refridgerator

1x frontloading refridgerator 100L

1x storage space for bottles behind worktop/oven

1x aluminium anodised vertical handgrip on worktop

1x double socket 220V

IV. Salon

Starboard and port salon seating 2000mm long

Storage behind and under the salon seating

2x lockers above couch to port

2x lockers above couch to starboard

1x book shelf at bulkhead, white with wooden trim

Port bulkhead storage box for bottles

Starboard bulkhead storage box for bottles

Mast support at bulkhead

Dining table 120x140cm

Both sides of dining table fold down

3x LED reading lights

2x LED ceiling lights white/red

1x double socket 220V

V. Aft cabins

Large shelf at foot of bed, white with wooden trim

Small shelf at bed head, white with wooden trim

1x mattress 120mm foam core

2x ventilated bunk tops

Storage space beneath mattress

Starboard cabin 1x drawer under bed, front access

Starboard cabin has 1x hanging locker

Starboard cabin has 1x shelf locker

Starboard cabin has floor space and door for privacy

Starboard cabin has 2x LED reading lights

Starboard cabin has 1x LED ceiling light white/red

Starboard cabin has 1x single socket 220V

Port cabin alternative use as storage room

Port cabin 1x drawer under bed, front access

Port cabin has the entrance from the galley, with no

seperate floor space for standing

Port cabin has 1x LED reading lights + 1x LED ceiling light

Port cabin has 1x single socket 220V

VI. Owner cabin

Large bookshelf at foot of bed, white with wooden trim

Small shelf at port, white with wooden trim

1x mattress 120mm foam core

2x ventilated bunk tops

Storage space beneath mattress

3x lockers under bed, side access

1x hanging locker at bulkhead

1x shelf locker to starboard

1x vanity unit between lockers with fiddle

2x storage locker sat vanity unit, top access

2x LED reading lights head of berth

2x LED ceiling light white/red

1x single socket 220V

VII. Toilet compartment

1x manual Jabsco toilet

1x wall mounted full shower, thermostatic mixer tap,

Damixa

1x shower curtain on roller

Floor of customized aluminium grid

1x shower drain pump with manual switch

Walls of waterresistant off-white laminate

1x stainless steel sink with mixer tap, Damixa

1x washbasin with storage under sink + storage locker,

white, from water resistant material

1x Lewmar hatch in ceiling for ventilation and light

1x Lewmar hatch in coaming for ventilation and light

1x blackwater tank ca. 60L with 3/4 full indicator light

1x ceiling LED white/red

1x single 220V socket


Options

HULL & DECK

Upgrade from tiller to wheel steering (change of cockpit) €6.250

Centreboard (1,40 - 2,95m) with twin aluminium rudders €28.450

Round portholes in the hull, with reinforced glass (per piece) €2.500

Radar support pole, anodised aluminium, at stern (excl radar) €2.250

Solid railing from stainless steel at stern, to the side gates €3.480

Fixed davits at stern, max load 150 kg, stainless steel €2.650

Painted hull from waterline upto freeboards €28.000

Paint on the sides of the inside cockpit area €2.450

Esthec on walking areas deck + cockpit floor/seats €21.450

Replace cork with Esthec in the cockpit €5.525

Teak on walking areas deck + cockpit floor/seats €17.450

Upgrade to thermopane layered windows in pilot house (9x) €5.500

Deck wash pump in foredeck compartment €1.250

ELECTRICAL & ELECTRONICS

Upgrade engine from 54 hp to 75 hp Yanmar 4JHE HTE €5.775

Extra diesel tank (only possible with fixed keel) €2.850

Automatic fire extinguishing system in engine room €720

Water generator Watt&Sea 300W (8 amp @ 9kn) €6.400

Wind generator Superwind €5.450

Solar panels total 250W from 3 pieces €3.275

Lithium-Ion 12V/5kW battery pack €2.850

Bow thruster fixed tunnel, Sidepower 185 mm 6kw €6.400

Mastervolt Cruising Package: MASS GI 3,5 kW + MV combi

100A 2500W including Masterview easy panel €4.290

120 Amp second alternator €2.650

Flex-O-Fold folding propeller 22” €3.785

B&G Nav/Comm package as below:

VHF+ sp/wd/dpt meter + autopilot + radar + plotter + AIS €14.595

INTERIOR

Upgrade to French bed (centered) in front (owner) cabin €4.950

Heating Webasto air heater 5kW, 3 exits €3.480

Heating Webasto air heater 5kW, 5 exits €5.980

Dickinson diesel oven heater 4kw €5.790

Oceanair sky screens and musquito screens (at 7 hatches) €4.200

Upgrade to electric toilet Planus €1.400

Fusion radio + DVD player (iPhone/iPod compatible) €675

Manual pump for fresh water in galley €480

Freezer/fridge combo Isotherm 40L top loader (auto-pumping) €1.945

RIGGING

Aluminium mast painted white €5.950

Carbon mast, Selden €42.500

‘Lazy Rack’ system mounted on boom, unpainted aluminium €2.950

Gybe preventer €1.400

Cutter rig with manual Furlex 200S (excl. sails) €7.195

Upgrade to removable cutter stay, with wichard tensioners €2.450

(excl furler, sail and deckgear)

Removable furling Selden unit to fit inner jib, code-O and

gennaker, including sails, make Doyle €16.500

Spinnaker equipment w/jib boom, stored at mast €2.850

Upgrade to 2 electrical winches, size 50, Harken €2.130

Windvane self steering: Windpilot Pacific €4.465

SAIL PACKAGES DOYLE

Cruising Laminate radial cut package €9.225

  • Mainsail
  • Furling Genoa 125%
  • Cutter jib 23,5m2

Hydranet Radial High performace package €13.975

  • Mainsail
  • Furling Genoa 110%
  • Cutter jib 23,5m2


Disclaimer

The Company offers the details of this vessel in good faith but cannot guarantee or warrant the accuracy of this information nor warrant the condition of the vessel. A buyer should instruct his agents, or his surveyors, to investigate such details as the buyer desires validated. This vessel is offered subject to prior sale, price change, or withdrawal without notice.


Sunday, June 18, 2017

Some Assembly Required

Read article : Some Assembly Required

TL-test

The Open Range 3X349RLS by Highland Ridge RV takes longer to set up than most fifth-wheels, but the extra effort is worth the time

When we were kids, the best gifts underneath the Christmas tree always required some sort of assembly, be they bicycles, wagons or dollhouses. The anticipation of the finished product, patiently assembled by Mom or Dad, bordered on excruciating. And though we were always delighted when the moment of completion arrived and we could finally enjoy our special gift, there seemed to be just a tinge of disappointment when we realized that moment was now over, not to be relived again until next year, if we were lucky. Happily, the Open Range 3X349RLS by Highland Ridge RV recaptures some of that Christmas morning excitement, and the good news is, you can reassemble this toy again and again.

The living area is well laid out with a large flat-screen television, electric fireplace and audio system. Space between the dinette  and sliding door is a bit tight but manageable.The living area is well laid out with a large flat-screen television, electric fireplace and audio system. Space between the dinette
and sliding door is a bit tight but manageable.

Certainly, all fifth-wheels require some setup, which most of us look forward to as a sort of ceremony leading up to a weekend, or several weeks, of relaxation with friends and family. But this particular floorplan offers an optional exterior deck that folds down from the curbside slideout, which not only adds to the entertainment space but provides a feeling of openness few RVs can match.

The idea of an outdoor deck is not a new one, but as with all RV components, the success of a feature depends on its overall execution, how well it complements the floorplan as a whole, and in general, if it is truly useful or just a gimmick. In the case of the 3X349RLS, the concept works whether you’re enjoying it in the summer or winter months. The residential-style sliding-glass door admits welcome light from the outdoors, which prevents feelings of claustrophobia on rainy or snowy days. And in the summer, the door can be opened and the screen left shut to bring the fresh breeze inside. Of course, the deck itself would be essentially worthless if it couldn’t support the weight of a few guests, so Highland Ridge built it to hold up to 1,500 pounds — more than enough capacity for a few revelers.

A residential-size shower and <a href=handsome vessel sink highlight the roomy bathroom." width="200" height="300" />A residential-size shower and handsome vessel sink highlight the roomy bathroom.

As you might expect, a trailer as unique as this one requires some consideration when planning trips. The Open Range 3X349RLS starts out with a wide, 102-inch exterior, then adds two giant opposing slides. This alone makes the 3X349RLS big enough to fill most RV park sites, but add the deck, and the width roughly equals one-and-a-half fifth-wheels. For our test, we reached out to our friends at Pechanga RV Resort and Casino in Temecula, California, who set us up with a large deluxe site bordered by a grassy area featuring a picnic table. By moving the table and folding down the deck, we had just enough space to fully deploy the slides and deck but not much more. So, make sure wherever you plan to stay has adequate space. If there isn’t enough room, you can still enjoy this floorplan, but you’ll have a windowless curbside slideout, as the deck floor will cover the glass slider.

Once we leveled the fifth-wheel with the automatic jack system and deployed the slides, the extra work began. The deck floor unlatches easily from the side and lowers without much effort, thanks to spring assist. Once down, the integrated stab jacks are lowered and adjusted; it takes some practice to guess how long the jacks need to be to provide a level deck surface, not to mention crawling under the deck a few times to make sure the jacks are properly placed. This could become messy if the ground is wet or muddy, so you may consider carrying a plastic tarp with you to crawl onto if necessary. If the ground is dry and comfortable, it’s just a matter of a few adjustments that shouldn’t be a problem for those with a good back and knees.

The kitchen features a movable island with a matching solid-surface countertop. Stainless-steel appliances, a dual-bowl sink with pull-out sprayer and a <a href=decorative backsplash add upscale flair." width="375" height="250" />The kitchen features a movable island with a matching solid-surface countertop. Stainless-steel appliances, a dual-bowl sink with pull-out sprayer and a decorative backsplash add upscale flair.

Once this step is completed, it’s time to put up the railing. Open Range cleverly provides an extra bin underneath the forward storage compartment in which to store the railing sections and pins. It slides out like a large utility drawer and is secured during transit with a pin. Made of black plastic, the drawer is not the prettiest thing, but it’s a far better solution than having the railings tangled with your other belongings in the main storage area. The railings are marked so you know which side they go on, but even then it takes a bit of time to organize, install and secure them. We recommend you complete this step before the sun goes down.

Once set up, this fifth-wheel is quite a spectacle and drew more than its fair share of interested RVers at the park. The white, gray and blue exterior graphic scheme with frameless windows is handsome, and both power awnings feature LED lighting, which makes for a cool-looking party pad in the evenings. The unit seemed well-constructed and offered nice features, such as a heated and enclosed underbelly, a Trailair pin box and landing jacks featuring JT’s Strong Arm jack stabilizers for a solid, shake-free foundation. We also appreciated the small details, like TV prep on the exterior wall adjacent to the deck area, which allows you to mount a small TV once the deck is deployed.

Highland-Ridge_floorplanStepping inside, the living area feels massive and is a treat for the eyes with Stone decor (one of three available) featuring light wood cabinetry and faux wood-plank Beauflor vinyl flooring that seemed durable and was easy to clean. Providing visual contrast were the rear couch and streetside theater seating, which were finished in embossed black upholstery with white stitching. Both were very comfortable and perfectly placed for watching the flat-screen television, mounted in an entertainment hutch in the corner of the curbside slideout. The hutch also offers an electric fireplace, making for a cozy environment ideal for kicking back and relaxing during the evening.

Highland-Ridge_specsThe forward kitchen is somewhat unorthodox, in that it offers an optional island with casters that can be located wherever it’s convenient for you, although overhead pendant lighting suggests it should be placed in the center of the floor space. The island features a dark brown finish, complemented by a solid-surface countertop, and cabinets and drawers with brushed-nickel pulls. During travel, the island stows on the backside of the dinette and is secured with straps (there are anchors in the floor), and the dinette chairs reside upside down on the theater seats so they don’t interfere with slideout operation. It’s a little extra work, but once you get used to it, setup goes pretty quickly.

A 12-cubic-foot RV refrigerator with wood-panel fronts is located in the streetside slideout, and next to it is a stainless-steel three-burner stove with an oven and a residential-size microwave mounted overhead. We found that the corner-mounted stove was rather confining when cooking meals, but the reality is that cooking is only a small portion of meal prep. The bulk of your time is spent chopping and slicing, and the forward wall, with its large solid-surface countertop and dual-bowl stainless-steel sink provide plenty of space. There’s also an abundance of cabinet and drawer space, and a nice-size pantry on the curbside slideout, next to the entertainment hutch. Moreover, we found little to complain about, though everyone who walked through the Open Range had negative comments about the floor register located dead center in the living area floor. This is something Highland Ridge should consider locating in a less conspicuous area.

Next to the forward cabinets are a small coat closet and angled stairs that lead up to the bath and bedroom. The entry door has an obscured glass treatment that makes the area feel more open and is just more pleasing to look at than a solid door. The bath area is well executed with plenty of space where you need it most. There’s lots of elbowroom around the toilet, and the opposing vanity, with its glass-vessel sink, is an elegant touch. We particularly enjoyed the residential-size 48-inch x 30-inch shower with molded seat and appreciated the drawer space between the shower and bedroom entry. Above the drawers are a mirror and a pull-out counter for extra space, which allows two people to get ready for a night out at the same time.

he bedroom has plenty of walk-around space, and the <a href=mirrored wardrobe features large drawers beneath to store folded items." width="400" height="266" />he bedroom has plenty of walk-around space, and the mirrored wardrobe features large drawers beneath to store folded items.

The bedroom features a 72-inch x 80-inch bed, bordered by shelves that are perfectly sized for books, water glasses, etc. There is plenty of walk-around room and enough space near the headboard on either side, so making the bed in the morning is not a struggle. A mirrored wardrobe up front easily accommodated our travel essentials, and a cabinet on the curb side offered washer/dryerprep. At the foot of the bed are a chest of drawers for more folded items and space for an optional TV.

Make no mistake about it — the Open Range 3X349RLS isn’t for everyone, particularly those who just want to press a few buttons and kick back once they get to their campsite. But for those willing to do a little extra work, this fifth-wheel rewards with a lot of entertaining space and a fun factor that will make you the talk of any RV park.

Highland Ridge RV Open Range
260-768-7771 | www.openrangerv.com


Wednesday, November 29, 2017

How to Lay Tile: Install a Ceramic Tile Floor In the Bathroom

Read article : How to Lay Tile: Install a Ceramic Tile Floor In the Bathroom

Cover up an old floor

Whether you’re replacing an old shabby floor or installing a new one, you can’t beat ceramic or stone tile for durability and appearance. When laid properly, it’s virtually a forever floor that requires almost no care and maintenance. And you can select materials from a vast array of colors and textures. We’ll cover how to lay tile in a few steps.

What’s equally attractive is that you can lay a first-class tile floor yourself, often in one weekend, and save the $500 to $1,500 cost of hiring a pro.

The key to keeping the job simple is to cover the old vinyl or other flooring with a new thin underlayment that gives you a fresh, clean start. No messy tear-out and repair. In this article, we’ll demonstrate how to install a thin “backer board” over the old floor. Then we’ll cover tile-setting techniques, from layout and cutting to grout and cleanup.

This is a two-day project for most bathrooms, even if you don’t have any previous tile experience. If you’re comfortable using basic hand tools and have the patience to align tiles just right, you can handle this job. The entire cost of this project for a typical bath ranges from $300 to $600.

Estimating the Cost of a Tile Project

The tile itself will be your biggest cost, so start by measuring the square footage of the floor. Then add 10 percent for cutting waste. If you choose a more complex layout than the simple grid pattern we used, your waste will be greater. Most tile sells for $5 to $15 per square foot, but you can spend as little as $3 or more than $50. If you have to install backer board, add $2 per square foot to the cost of the tile. Other materials will cost about $90, regardless of bathroom size. The tile tools you’ll need (including a tile cutter) will total $60 to $80.

Assess your floor

The success of any tile job depends on a solid base, that is, a floor that flexes very little as you walk across it. If you have a concrete subfloor, this isn’t an issue. You can lay tile directly over the existing vinyl as long as it’s well adhered.

If possible, avoid tearing out vinyl flooring. Leaving it in place saves time, of course, but it also reduces asbestos hazard concerns. Asbestos was used in sheet vinyl and vinyl tile until the mid-1980s. By leaving the vinyl undisturbed, you won’t risk sending asbestos fibers into the air.

If you have a wood subfloor, there’s a good chance that you’ll have to install backer board over your vinyl to make the floor thicker and stiff enough for tile. The easiest way to see flooring thickness is to pull off a floor register. Otherwise look for plumbing passageways through the floor. As a last resort, drill through the floor with a 1-in. or larger spade bit (your new floor will cover the hole later). To prevent asbestos dust from becoming airborne, mist the bit with a spray bottle as you drill. In addition to floor thickness, you’ll need to determine joist spacing. If there’s an unfinished basement or crawlspace below the floor, simply measure the spacing. If there’s a ceiling, probe for joists with a drill bit.

If the joists are spaced 16 in. apart, the layers of structural flooring beneath the vinyl should add up to at least 1-1/8 in. With joists every 24 in., you need 1-1/2 in. If your floor is too thin for tile, add a thicker layer of tile backer board. Our floor required 1/4-in.-thick backer. Yours might need 1/2-in. backer to reach the minimum thickness. If your floor is already thick enough, you can simply prep the vinyl floor (Photos 1 – 4) and skip the backer installation (Photos 5 – 8). Then tile directly over the vinyl, following the same steps we used over backer board.

Regardless of the type of subfloor, there are two situations where you can’t leave vinyl in place: First, if large areas of the vinyl are loose, don’t set tile or backer over it. Small loose spots are acceptable and easy to deal with (Photo 4).

Second, “cushioned” sheet vinyl must be removed before you can set tile. Cushioned vinyl has a foam backing that makes it noticeably thicker and softer than standard vinyl flooring. It’s too spongy to support tile or backer board. Before removing it, call your local health department for instructions on how to check for asbestos and proper procedures if asbestos is present.

Gather Advice While You Shop

Home centers carry everything you need for this project, but begin shopping at a tile store, where you’re more likely to get expert advice. Make a quick sketch of your floor plan and jot down all the dimensions. Also take a photo of the floor at the doorway. This will help the tile store staff recommend a “transition” to neatly join the tile to the hallway flooring. Transitions come in different styles to suit any situation.

When you choose the tile itself, ask if it requires any special installation steps. Some tile, for example, should be coated with grout release before grouting. Also ask about cutting techniques for the tile. You’ll use sanded grout for the floor. Ask if sanded caulk is available in a color that matches your grout for the floor/tub and floor/wall tile joints.

Prepare the room

First, get the toilet out of your way. Stuff a rag in the hole to block sewer gases. If your home only has one toilet, you can leave it in place until you install the backer board. Keep a supply of wax rings on hand if you plan to reinstall the toilet at the end of each day.

If you expect to keep your vanity for many years to come, leave it in place and tile around it. But if you think you might replace it, remove it now. When the job’s done, you can reinstall the old vanity or put in a new one. Having the vanity out of the way gives you more workspace, and you won’t have to cut backer board and tiles to fit around it. This also eliminates the floor repair problem if you install a smaller vanity or pedestal sink in the future.

Pull off the baseboard or plan to add base shoe molding. This leads to a neater-looking job because the edges of the tile will be covered later—jagged cuts and slight measuring mistakes are hidden. If your baseboard has base shoe molding, remove only the base shoe. Backer board and tile will raise your floor 3/4 in. or more. So you’ll have to remove and undercut the door. To mark the door for cutting, stack backer board, tile and two layers of cardboard on the floor (see Photo 3). Mark the door 1/2 in. above the stack, remove the door and cut off the bottom.

Scrub, screw and patch the floor

Install a Ceramic Tile Floor in the Bathroom

Photo 1: Scrub the floor with stripper

Remove the baseboard and toilet. Using an abrasive pad, scrub the floor hard with water mixed with vinyl floor stripper.

Install a Ceramic Tile Floor in the Bathroom

Photo 2: Drive screws into the floor joists

Mark the floor joists with chalk lines and drive 2-1/2-in. screws every 8 in. Don’t leave any screw heads protruding.

Install a Ceramic Tile Floor in the Bathroom

Photo 3: Cut the door trim to accommodate tile

Undercut door trim using a jamb saw or handsaw. A piece of backer board, tile and two layers of cardboard raise the saw to the correct height above the floor.

Install a Ceramic Tile Floor in the Bathroom

Photo 4: Fill low spots with thin-set

Cut out any loose sections of vinyl with a utility knife. Fill the void with thin-set using the flat edge of a notched trowel.

Scrub the floor with a vinyl floor stripper following the manufacturer’s instructions. The stripper will dissolve wax and other residue. Scrub hard with an abrasive scouring pad (Photo 1). The tiny scratches left by scrubbing help the thin-set bond better.

Next, drive screws through the floor into the joists (Photo 2). This ensures that the subfloor and underlayment are securely fastened. If there’s an unfinished basement below the floor, locating the joists is easy: Go to the basement and drill a couple of 1/4-in. holes up through the floor next to a joist. If you can’t locate the joists from below, pick a spot near one wall and drill a hole. If the bit breaks through into hollow space, move over 1 in. and drill another hole. Keep going until you hit a joist. Then go to the opposite wall and find the other end of the joist. Measure at intervals of 16 or 24 in. from the first joist to locate the others.

While you’re driving screws, look for any spots where the vinyl has loosened from the floor. Cut out loose spots and fill them (Photo 4). If there are any copper pipes that pass through the floor, wrap them with duct tape at floor level. Cement-based thin-set and grout can corrode copper.

Install backer board

Install a Ceramic Tile Floor in the Bathroom

Photo 5: Install backer board over the floor

Cover the floor with backer board. Cut inside corners, circles and curves with a drywall saw. Space pieces 1/8 in. apart and hold each one in place with two temporary screws.

Install a Ceramic Tile Floor in the Bathroom

Drywall saw

Use a drywall saw to cut corners, circles and curves in backer board.

Install a Ceramic Tile Floor in the Bathroom

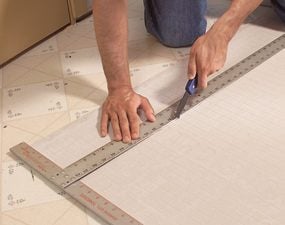
Photo 6: Score and snap the backer board

Make straight cuts with a scoring knife. Make three or four scoring passes, then snap the backer over a 2×4. When all the pieces have been laid out, label them and set them aside.

Install a Ceramic Tile Floor in the Bathroom

Scoring knife

Use a scoring knife to score the backer board.

Install a Ceramic Tile Floor in the Bathroom

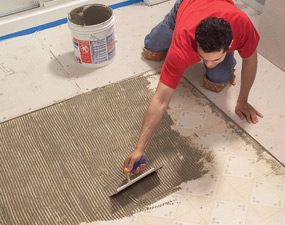
Photo 7: Trowel on the thin-set

Comb out a bed of thin-set just large enough for each piece of backer board using a 1/4-in. notched trowel held at a 45-degree angle. Screw the backer down before spreading thin-set for the next piece.

Install a Ceramic Tile Floor in the Bathroom

Notched trowel

Use a 1/4-in. notched trowel to spread the thin-set over the floor.

Install a Ceramic Tile Floor in the Bathroom

Photo 8: Cover the joints

Press adhesive-backed mesh tape over the joints and skim over the tape with thin-set. When the thin-set is firm but not fully hardened, scrape away any ridges with a putty knife.

The backer board is fastened with a combination of screws and thin-set adhesive. Cut and lay out all the pieces before you mix the thin-set (Photos 5 and 6). You can run the sheets in any direction, but be sure to stagger the joints so you never have four corners meeting at one point. Leave a 1/8-in. space between the sheets and along the vanity, tub or shower. The gap along walls must be at least 1/8 in. wide, but a wider gap (about 1/2 in.) makes the panels easier to set in place.

After cutting and fitting, label the location of each one and set them all aside. Vacuum the floor and have your drill and screws ready to go before you mix the thin-set. Read the thin-set’s label. Spread the thin-set with a 1/4-in. notched trowel. Comb in one direction so air can escape when you embed the backer (Photo 7). Drive screws every 6 in. around the perimeter of each piece and every 8 in. “in the field” (across the face of the panel). If the leftover thin-set is still workable, you can immediately embed mesh tape over the joints (Photo 8).

If the thin-set has become too stiff or chunky, mix a new batch. Use “alkali-resistant” tape that’s meant for backer board. While the tape coat of thin-set hardens, run a putty knife over all the screw heads to scrape off the “mushroom” bulges around screws. Drive in any protruding screw heads you come across.

CAUTION!

Cement products like thin-set and grout draw moisture from skin and can even cause burns that require medical attention. While most pros work bare-handed, wear gloves if you have any special sensitivity. Also wear eye protection while mixing thin-set and grout.

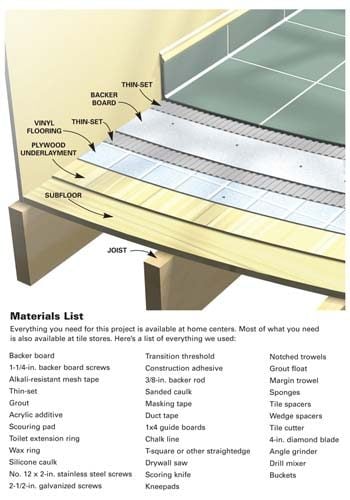
Figure A: Ceramic Tile Over Vinyl

Everything you need for this project is available at home centers. Most of what you need is also available at tile stores.

Cutaway of a tile floor over vinyl

Careful layout pays off

Install a Ceramic Tile Floor in the Bathroom

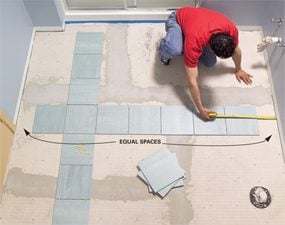
Photo 9: Test your layout to avoid small pieces along the walls

Dry-lay tile to determine the best layout. Start with centered rows, leaving equal spaces at walls. Then reposition rows until you find the optimal layout.

Install a Ceramic Tile Floor in the Bathroom

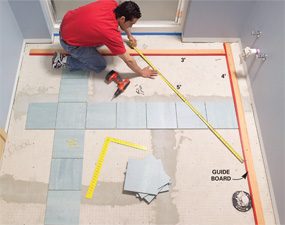
Photo 10: Attach guide boards to guide the layout

Screw guide boards to the floor following your chosen layout. Position the guides so you can lay all the field tiles without moving the guides. Make sure the guides are at right angles by measuring out a 3-4-5 triangle.

Too often, tile novices simply start setting tile in a corner and continue along two walls until the floor is covered. Sometimes they get lucky and the floor looks good. But more often this method leads to trouble:

They end up with awkward-looking, thin slivers of tile along a prominent wall or at the doorway. And the tile looks even worse when walls are badly out of square or crooked—a straight grout line running too close to a wall emphasizes the wall’s imperfections.

Whether you’re laying a simple grid pattern like we show here, or a diagonal pattern with a border, the best tile layout usually calls for centering full tiles between walls so the partial tiles along the edges will end up all the same size. Don’t rely on your tape measure and mental arithmetic. Rip open a carton of tile, grab a handful of spacers and experiment with your layout on the floor.

To begin, center rows of tile between walls so you have equal spaces along walls that face each other (Photo 9). Set the two rows parallel to the two most prominent walls. Then make adjustments, trying to achieve these three goals:

  • Use full tiles at doorways and along the bathtub or shower. These are usually the only places where the edges of the floor aren’t covered by baseboard. If you use full tiles in these exposed spots, you don’t have to worry about making smooth, perfect cuts.
  • Avoid narrow tiles along walls. Ideally, you’ll end up with tiles cut to half size or larger. Avoid cutting tile to widths less than 2 in.
  • Minimize cutting and try to avoid difficult cuts. For example: Cutting tile to an L-shape to fit around an outside corner is especially difficult when one arm of the “L” is less than 2 in. wide. The arm tends to break off as you cut.

Chances are, your layout won’t meet all these goals. Because the shower stall was the focal point in our bathroom, we made it our No. 1 layout priority. We chose to use full tiles in front of the shower. That left us with 3-in.-wide tiles along the opposite wall, which was less prominent. We also chose to center the tile rows on the shower; that meant we had to use cut tiles at the doorway.

Once you determine a layout, establish lines to guide your tile positioning. The usual method is to snap chalk lines on the floor. But chalk lines are hard to see after you’ve spread thin-set, and one row of tile may slip as you set the next row. Here’s a more reliable guide: Choose straight boards a foot shorter than the length and width of the room. Tape one edge of each board so thin-set won’t stick to them.

Then screw the boards to the floor at a right angle to form a guide that eliminates guesswork and shifting (Photo 10).

Video: Create Your Own Floor Tile Layout

Planning the layout for a tile project is usually the hardest and most time- consuming step. Watch this video to learn how a pro does it. You’ll see how to snap chalk lines and make sure they are perfectly square. Plus, you’ll learn how to avoid unsightly narrow, difficult-to-cut tiles along a wall. Don’t start a tile project until you’ve watch this video!

Set the tile (finally!)

Install a Ceramic Tile Floor in the Bathroom

Photo 11: Set the full tiles

Comb out a few square feet of thin-set and set tile against the guides. Continue until all the full tiles are in place. Tip: Watch for squeeze-out between tiles and rake it out with tile spacers.

Install a Ceramic Tile Floor in the Bathroom

Spacers detail

Keep the gaps between tiles even by using spacers

Install a Ceramic Tile Floor in the Bathroom

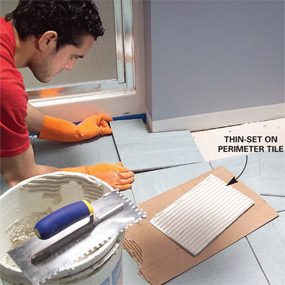
Photo 12: Spread thin-set and set the perimeter tiles.

Cut and set the perimeter tiles after the thin-set beneath the full tiles has hardened. In spaces too narrow for your trowel, comb thin-set onto the backs of tiles.

It’s usually easiest—and most efficient—to set tile in two phases: First set all the full “field” tiles (Photo 11). Then, when the thin-set has hardened for several hours, cut all the perimeter tiles and set them (Photo 12). Here are some tips for both phases of the job:

  • The trowel you use for setting tile may be different from the one you used to embed the backer. The thin-set label tells you which notch size to use relative to tile size.
  • Dampen the backer with a sponge just before applying thin-set. This keeps the thin-set from drying out too quickly.
  • Comb the thin-set in one direction so air pockets won’t be trapped under tile.
  • Open three or four cartons and mix the tiles as you set them. Pattern and color vary slightly from one carton to the next.
  • Don’t just set each tile into place; press down on the tile and wiggle it to embed it firmly in the thin-set.
  • Watch for “tipped” corners. When you press a tile in place, it’s easy to tilt it slightly so that one corner stands higher or lower than neighboring tiles.
  • When you complete a section of tile, inspect it before moving on. Make sure the tiles line up correctly and spacers are in place. Wipe any thin-set off the face of tiles with a damp sponge.
  • When the thin-set becomes chunky or too stiff, throw it away and mix more. Never try to extend the life of thin-set or grout by adding water.
  • Cut perimeter tile so that caulked joints (at tub) are the same width as grouted joints.

Prepare the floor for grout

Install a Ceramic Tile Floor in the Bathroom

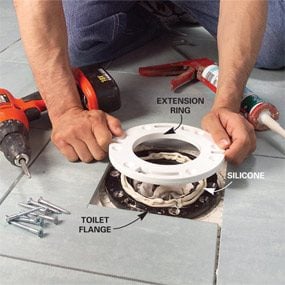
Photo 13: Install an extension ring over the toilet flange

Remove the old screws from the toilet flange and apply a heavy bead of silicone caulk. Fasten the extension ring over the old flange with stainless steel or brass screws.

Install a Ceramic Tile Floor in the Bathroom

Photo 14: Install the transition strip

Glue the transition into place with construction adhesive. If carpet meets the transition, you may have to add a new tack strip.

Install a Ceramic Tile Floor in the Bathroom

Photo 15: Stuff backer rod along the wall

Push backer rod into joints that will be caulked later. The foam rod keeps grout out of joints. After grouting, pull out the rod and caulk the joints.

When all the tiles are in place and the thin-set has hardened, remove all the spacers. Next, raise the toilet flange by adding an extension ring or two (Photo 13). The extended flange should be flush with or higher than the surrounding tile.

When you grout, fill in between the flange and tile. That way, any future leak around the flange will show up on the bathroom floor instead of on the ceiling below. If you plan to use a glue-down transition as we did, this is the time to install it.

Here’s how we dealt with our transition: First, we removed the old metal strip that covered the carpet’s edge. Then we cut our transition strip to fit between the door jambs using a miter saw. Next, we added a tack strip to hold the carpet in place. Before we could glue the transition to the floor (Photo 14), we had to remove a thin strip of the old vinyl floor.

Grout is too brittle to handle the slight shifting movements that are normal in any room. Keep grout out of joints wherever the floor meets the tub, shower, vanity or walls (Photo 15).

Pack the joints with grout

Install a Ceramic Tile Floor in the Bathroom

Photo 16: Grout the joints

Work the grout back and forth across the floor, diagonal to the joints and holding the float at a 45-degree angle. Then scrape off the excess grout, holding the float almost upright.

The thin-set directions will tell you how soon you can grout the floor—usually 24 hours. Grouting isn’t complex. Just plop a couple of scoops of grout onto the floor in a corner, work the grout into joints (Photo 16) and scrape off the excess grout before moving to the next section. In addition:

  • Mix the grout to a mashed-potatoes consistency. Adding extra liquid makes grout easier to work with but weakens it.
  • Don’t just spread the grout over the joints; press hard to pack it into the joints. If you’re doing it right, your forearm will get a good workout.
  • Whether you’re filling joints or scraping off excess grout, always push the float diagonally across the tiles.
  • Scrape off the excess to leave tile as clean as you can. The less grout you leave on the tiles, the easier cleanup will be.
  • When you’re done, cover the grout bucket with a plastic bag and set it in a cool place to slow the hardening process. During cleanup, you may find spots that need a little extra.

Grout cleanup

Install a Ceramic Tile Floor in the Bathroom

Photo 17: Clean the tiles

Wipe grout off the tile surface with a damp sponge. Wipe gently on the first pass so you don’t pull grout out of the joints. Rinse the sponge often.

Clean the surface of the tile when the grout is stiff enough to stay put in the joints but still soft enough to wipe off the tile surface. During hot, dry weather, grout can become difficult to wipe away in just 10 minutes, so get ready for cleanup before you even mix the grout. You’ll need two buckets of clean water, two sponges, a synthetic scouring pad and a dry rag.

As soon as you’re done grouting, go to the first section you grouted and wipe across a joint with a damp sponge. If the sponge pulls grout out of the joint, wait five minutes and try again. In cool, damp weather, the grout may stay too soft for an hour. When the grout is hard enough, gently wipe the tile with a damp sponge.

Rinse the sponge frequently as you wipe the entire floor (Photo 17). If you come across tough spots, scrub them with the scouring pad. Be careful where you put your feet and knees—don’t mar your perfect grout joints.

Immediately after the first pass, grab the second bucket of clean water and the fresh sponge and make a second, more thorough pass. Then, as the tile surface dries, wipe it with a dry terry cloth. The dry haze should buff off easily. If not, go for fresh water and sponge the floor again. If you can’t get rid of the haze, don’t panic. Products that remove haze are available wherever tile is sold.

Let the grout cure overnight before you caulk joints, set the toilet or reinstall baseboard. Grout sealer is a good precaution against staining: Some products can be applied 24 hours after grouting; others require a two- to three-week wait. If you have leftover tile or grout, keep them in case you have to make repairs in the future. Be sure to write down the brand, color and retailer of the tile.

How NOT to Save Money on a Tile Project

I’m a devout cheapskate, but when it comes to buying thin-set and grout, I grab the most expensive products on the shelf. More expensive thin-sets and grouts generally contain a higher proportion of the polymers that improve adhesion, durability and stain resistance.

In most situations, cheaper products would perform just fine. But if I can reduce the risks of loose tiles or cracked grout by spending an extra $30 on a typical bathroom project, I consider that a bargain.

Liquid additive is another smart investment. If the thin-set or grout label says you can mix it with water or an additive, use additive. These liquids (labeled “latex, ” “polymer” or “acrylic”) are meant to improve adhesion and stain resistance. But as a bonus, they produce a slick, creamy consistency. Thin-set combs out more smoothly, grout flows easily into joints, and both remain workable longer.

Also buy a mixer for your drill. Mixers come in various styles and sizes. Go easy on the trigger. If you run the drill at full speed, you can create millions of tiny air bubbles, which will weaken the mix.

Tile cutting tools

Install a Ceramic Tile Floor in the Bathroom

Tile cutter

A tile cutter is the fastest way to cut tile. Just push the handle forward and a small wheel scores the tile. Then push the handle down and the tile snaps in two. You can’t beat a tile cutter for convenience. It makes no mess and you can drag it around the room as you work. But a tile cutter has zero versatility. It makes straight cuts across the entire tile—no curves or corner cuts. Cutting 1 in. or less off a tile can be difficult or impossible. You can rent one at rental centers and some tile shops.

Install a Ceramic Tile Floor in the Bathroom

Wet saw

A wet saw cuts with a diamond blade while water cools the blade and eliminates dust. You can cut notches, trim off tiny slivers of tile, cut miters and even make curves. You’ll get clean cuts in any type of tile. But wet saws are messy. They spit water and raise a cloud of gritty mist. If you use one indoors, contain the mist with curtains of plastic film and cover nearby surfaces. You can buy a small wet saw like the one shown here or rent a professional model from a tile store or home or rental center. If you only have a few cuts that require a wet saw, call a tile store. Many make cuts for a small fee.

Install a Ceramic Tile Floor in the Bathroom

Angle grinder

An angle grinder equipped with a diamond blade can make straight cuts, curves and notches in any type of tile. Since all your cuts are freehand, this isn’t a precision tool, but you can grind away imperfections with the tip of the blade. Use a grinder only outside. Wear a dust mask and eye protection.

Install a Ceramic Tile Floor in the Bathroom

Nippers

Nippers are useful for rough curves and notches. They don’t cut tile, but bite out small chunks, leaving jagged edges.

Install a Ceramic Tile Floor in the Bathroom

Contour gauge

A contour gauge is a great tool for marking troublesome shapes on tile. Just press it against any odd-shaped surface (like the curved corner of a bathtub) and transfer the profile to tile.

Here are the tools that can cut your tile. Buy or rent the ones that make the most sense for your project.

In addition to the tools shown here, a carbide abrasive blade that fits in a jigsaw cuts slowly but leaves fairly clean cuts in softer types of ceramic tile and natural stone. A carbide abrasive hole saw cuts perfect holes for plumbing pipes and fixtures.

A rubbing stone is simply an abrasive block, similar to the wheel in a bench grinder. Use it to smooth sharp or slightly chipped cuts that will be exposed.

Additional Information

Required Tools for this Project

Have the necessary tools for this DIY project lined up before you start—you’ll save time and frustration.

You’ll also need these specialty tools for working with tile and backer board:
Scoring knife, Margin trowel, Tile cutter, 4-in. diamond blade, Drill mixer, Offset saw, Tile cutter, Nippers, Wet saw
You can also use an angle grinder for cutting tile.