Showing posts sorted by relevance for query structural work required. Sort by date Show all posts

Saturday, March 18, 2017

Converting a Victorian school

Read article : Converting a Victorian school

If you’ve got a big master bedroom that could potentially be partitioned, or a little used adjacent room, then adding or creating an en suite could be a great way to add a sense of luxury to your bedroom. It is also a great way of adding to the value of your home, especially if you currently have only has one bathroom.

There are several things you need to think about before you go ahead and add a new en suite to your house, from the cost of adding the bathroom, to relocating plumbing, wiring the space and deciding exactly what sanitary ware to invest in.

Find a bathroom fitter

How much will an en suite bathroom cost?

The most quoted, average cost of adding a new bathroom to a house is £3000. This is inclusive of labour, fixtures, fittings and finishes like flooring, tiling and painting. However, adding a new bathroom to your house can vary in cost, depending on where your proposed bathroom is going to be. Ideally, you want to add your en-suite directly next to an existing bathroom on the same floor, or above a bathroom on the lower floor.

The issue is, it gets more expensive to add a bathroom if you have to redirect plumbing, especially soil stacks and waste pipes. It is possible to install a small bore pipe with a macerator, but this isn’t an ideal solution. You will have to factor in the day rates of a plumber, but again, it is difficult to predict how long this job is likely to take.

It is far easier to estimate how much fixtures and fittings are going to cost once plumbing has already been sorted.

Bath

A new bath will cost from £70 for a low end, acrylic model, but expect to pay from £300 – £500 for a good quality steel example. When you start looking at cast iron, stone and composite baths, expect to pay north of £1000.

Shower

Your basic electric shower is cost effective, both to buy and to run. They can cost a little as £50, but look at paying between £100 and £200 for a stylish and functional unit. Power showers start at around £200, and feature a pump that increases the force of the water. Digital showers, shower towers, shower columns and shower cabins will cost £500 and up if you want quality, and advanced models can even cost as much as £2000

Shower enclosure

Your shower enclosure is an important decision, because this will create the overall look of the shower. A shower tray and enclosure combo will probably cost you around £150, but could cost you up to £600if you want higher quality.

Wet room enclosure

A wet room will cost upwards of £500depending on the structural work required, this includes waterproofing, plumbing, the shower and a screen, if you’ve chosen one. The cost of a wet room shower can vary depending on your fixtures and fittings, and tiling it afterwards will need to be factored in.

Basin

A simple ceramic basin is an inexpensive choice and will cost upwards of £50. Basins made for vanity units are more expensive, and the cost of the unit is usually separate. These can cost around £100 for a basic unit, but on average you will pay £200 – £300.

Toilet

Toilets are much the same as basins, with ceramic, wall-mounted examples costing around £50.Expect to pay between £150 and £300 for a good quality toilet, and quite often, savings can be made by buying it in a bundle with a matching basin.

Taps and hardware

Bathroom taps often come as an afterthought when your bathroom fixtures, but they are an important addition. A statement tap is usually enough to make even the cheapest basin look high end. You can pay as little as £20 for a basic mixer, and an average of £100 for a good quality one. To get something luxurious, you can easily pay upwards of £400,but this isn’t as extravagant as it seems if you have made a saving on your sanitary ware.

Planning permission for an en suite bathroom

Adding an en suite bathroom rarely requires planning permission if the work is happening in an existing house. If you plan on adding a bathroom to a listed building, then planning permission is essential, as you will be altering the internal fabric of the building.

Building new walls for your en suite

If you are creating a complete new room or partitioning an existing room, then you will need to build extra walls. These will usually be stud walls constructed with a timber frame with plasterboard over the top. Choose water resistant plasterboard when creating a new bathroom to avoid damp.

In the case of a bathroom, you can get structural metal components that will support the weight of wall-mounted basins. The cavity in this type of wall is also perfect for concealing pipework, cisterns, wiring and additional storage

Having a stud wall built will cost you around £15 per m², not including any internal works, like plumbing and wiring, which will need to be planned out in advance.

En suite bathroom heating and plumbing

If you have a combi boiler, which provides hot water on demand rather than requiring a cylinder, you need to ensure that it has sufficient hot water flow to supply an extra bathroom. You should also check your water pressure and choose appropriate mixer taps and shower fittings.

Most people choose heated towel rails for bathrooms, rather than radiators ad these basically offer a solution to both, drying your towels, and the need to heat the room. These can cost as little as £30 for wall mounted options, and can cost as much as £500, not including installation.

Choosing lighting for your en suite bathroom

The most important factor you need to consider when you’re choosing bathroom lighting is safety. There are strict regulations on what lighting can be used in a potentially wet environment. A lights IP rating depends on its distance to the water source, and that determines the type of light you can use. The higher the rating, the better protected the light.

The bathroom is then broken up into zones that correspond with the IP ratings of certain lights.

  • Zone 0 is inside the bath or shower, so the light needs an rating of at least IP67.
  • Zone 1 is the area directly above the bath or shower to a height of 2.25m. IP45 is recommended, but it is always safer to go higher when this close to water.
  • Zone 2 is the area stretching 0.6m from the perimeter of the bath or shower where a minimum IP rating of 44 is required.
  • The outside zone is any area where water isn’t likely to go. However, if this is still within the bathroom, it’s a good idea to choose a light with a IP44, just incase.

Featured image: This en suite bathroom was created as part of a whole-house renovation. Read more about this en suite bathroom.

Save

Save

Save

Thursday, March 22, 2018

Preparing structural steel surfaces for painting, coating standards

Read article : Preparing structural steel surfaces for painting, coating standards

Mill scale, dirt, laser scale, rust, heat-treat scale, grease, and dust interfere with paint and coatings’ adhesion to structural steel and must be removed before steel members can be coated. What are structural steel fabricators doing about surface preparation, and what options are available? Surface preparation can run from simple chemical cleaning to abrasion methods such as grinding and abrasive blasting. Many fabricators’ projects come with surface specifications prescribed by The Society for Protective Coatings (SSPC) standardsMill scale. Dirt. Laser scale. Rust. Heat-treat scale. Grease. Dust. And did we mention heavy mill scale? When these come between your structural steel and your paint or coating, bad things happen. And when the steel you fabricate holds up bridges, overpasses, buildings, and stadiums, bad things are big bad things.So what are structural steel fabricators doing about surface preparation, and what options are available? Surface preparation can run from simple chemical cleaning to abrasion methods such as grinding and abrasive blasting. How to know which methods to use?Many fabricators’ projects come with surface specifications prescribed by The Society for Protective Coatings (SSPC) standards (see Figure 1). The methods used are specified in the contract or project documents, according to SSPC Certification Program Manager Joe Berish, PCS, MCI, who administers the program. The primary documents are the specification and product data sheets, he said. The data sheets provide the surface preparation that the coatings manufacturer used when it tested its materials and demonstrated the performance applicable to the intended use and service life, according to Berish. “The coating systems manufacturers test for adhesion and performance. When they do that, they do it with a specified profile range. For example, if you were using a certain brand’s product on a bridge, the data sheet might tell you that it was tested in a laboratory at a 2- to 4-ml profile, and this would mean you might need 3 to 5 ml of paint. It’s going to give you the profile range, the thickness of the coating that you can apply, how much thinner you can and cannot use … whether you can put it over a pickled surface or a chemical-treated surface or an abrasive-blasted surface. It’s going to tell you all of that information.“What that means is that the coating manufacturer, in the laboratory, has taken a piece of metal that met that description and they have actually tested it and here are the test results,” Berish continued. “And to get the paint manufacturer to provide a warrantee, it has to be known that it was applied under those same conditions.” The surface preparation’s standard name indicates the method used, and all surface preparation standards use the prefix SP, he said. “For example [SSPC] SP 5, SP 6, and SP 10 are all defined as abrasive blast cleaning standards. SSPC SP 8 is the standard for pickling as a means of surface preparation. The differences in all of these standards are the cleaning methods, cleanliness levels, and surface profile. Different methods may produce a similar level of cleanliness, but each will still result in differences such as surface profile or flash rusting.”Why would a customer choose abrasive or blast cleaning over pickling or solvent cleaning—or vice versa? “The contract or specification and coating product data sheet may require a surface profile which cannot be achieved by pickling, chemical stripping, or solvent cleaning,” Berish said. “Also, the coating being applied may not be compatible with all methods of surface preparation. In addition, some choices may be made dependent on the availability of equipment that the fabricator may have.”  Cost is also a consideration, which depends on the amount of surface area to be prepared, Berish continued. “For example, if it is just a few square feet and does not require a surface profile, chemical stripping may be cost-effective; conversely, if there are several thousand square feet of surface to be prepared, pickling or abrasive blasting would be more cost-effective.”Whether or not the waste produced would need to be disposed of as hazardous has an effect on the methods used as well.“The customer will give the fabricator a build sheet, if you will,” Berish said. “’We want it to be fabricated like this: the bolts located here, with this diameter.’ It’s the same with the surface condition. Just by the material they’re going to use, they’re going to go to that material data sheet that will tell what surface standard is compatible with that material—SP 1, SP 2 or 3, SP 6 or SP 10.” Figure 1
The SSPC’s surface preparation’s standard name indicates the method used, and all surface preparation standards use the prefix SP.SSPC-SP 1: Solvent CleaningThe first line of defense is simply cleaning the structural member with acetone, a thinner, or another type of solvent. “Cleaning with a solvent and a cloth is a precursor to every other surface preparation standard out there. It’s a given,” Berish said.Cortec® Technical Service Engineer John Wulterkens said that fabricators can remove mill scale, oxides, and corrosion from the metal surface using either VpCI®-422 or VpCI-426 water-based liquids (see Figure 2). “VpCI-422 is more ‘ecofriendly’ (biodegradable); VpCI-426 is stronger and works faster. Depending on the application, the gel versions of both products can be used on vertical or overhead surfaces, or on parts that cannot be treated in a dip bath.”After the scale is removed, cleaning and neutralization should be performed with a water-based alkaline cleaner, he added. “This will leave behind a cleaner surface for painting, coating, and welding. The cleaners (and rust/oxide/scale removers) contain flash corrosion inhibitors, so after the neutralization and cleaning stage, the surface will remain flash rust-free for up to a week, depending on conditions.”SSPC 2, SSPC 3: Hand Tool, Power Tool CleaningBass Mechanical, a structural steel fabricator in Elizabethtown, Pa., has 40- by 80-foot drive-through bays that handle both medium- and large-scale structural steel fabrication. The company fabricates and welds carbon steel, aluminum, stainless, and nickel aluminum into trusses, box girders, plate girders, beams, columns, mezzanines, stairways, and railings.Before sending its products out for coating, the company performs some minimal surface prep, according to Jerry Miller, chief operations officer. “We usually go to an SSPC-SP 2 or SP 3, which requires the steel to be free of grease, moisture, contaminants, heavy mill scale, and rust.” Miller said the company uses a thinner and a power tool to remove the contaminants. Then it uses high-pressure air to blow the dirt or dust and rust away,” Miller said. Standards SP 2 and SP 3 require the use of a hand or power tool to satisfy the requirement, Berish said. “By standard, SP 2 means that the surface is clean of all oils and loosely inherent material. So SP 2 is hand cleaning with the use of hand tools—a wire brush or a scraper. The use of a chemical treatment alone cannot make it an SP 2 because you cannot remove inherent materials with chemicals alone.” SP 3 is the standard for cleaning and removing loosely inherent material using a power tool, such as a grinder (see Figure 3).SSPC-SP 6, Blast CleaningTo achieve an SSPC-SP 6 grade surface cleanliness, fabricators use a shotblast cleaning machine (see Figure 4). An SSPC-SP 6 finish is the most common for structural steel, according to Alex Berghouse, product manager for blast equipment at Peddinghaus, Bradley, Ill. “That will get all the difficult residue off the steel—mill scale, rust, dirt, and so forth.”Berghouse explained how the blast machines work: The raw structural steel enters the shotblast machine, and as the material passes through the zero point, the operation is initiated. The turbines engage when the machine senses the material’s presence. The turbines throw the shot or abrasive onto the material to clean the steel. With an adjustable brush mechanism, the machine cleans off the excess abrasive and returns it to the hopper to be recycled and used again and again. The process continues until the full piece passes through the entire turbine orientation. “The speed can vary, but it is normally set about 3 to 5 feet per minute, depending on the structural profiles that are being processed. So the steel goes in laden with rust, dirt, and scale and comes out clean and ready for the next fabrication process,” Berghouse said. “The primary application for the blast determines the number of turbines you need to achieve the proper clean surface requirements,” Berghouse said.Figure 2
At left is a metal surface with corrosion removed using VpCI®-422; at right, a metal surface before the corrosion was removed. Photos courtesy of Cortec Corp., St. Paul, Minn.“There are all different types of classifications for blast cleaning, depending not only on the postprocess, such as painting or welding, but also on which application, such as for bridge construction or building construction,” he said.Before entering the blast machine, a structural steel member must be cleaned of oil and grease, Berghouse cautioned. “If a structural member goes into the blast system with any kind of excessive moisture, oil, or liquids, a filtering problem can arise. The filter cartridges will become gummed up with contaminants and won’t filter properly.”Peddinghaus designs its filtration system with inverted, conical-type filtering units intended to keep the particles loose and allow them to flow freely into the collection system. The blast system can be a stand-alone system or it can be an integrated part of the structural steel fabrication line. This includes material handling technology for moving profiles via roller conveyor and cross transfer systems, according to Peddinghaus Chief Sales Officer Lyle Menke. “Conveying systems bring the beams into the machines, which minimizes overhead crane handling.” The operator loads the structural member onto the cross transfer, which moves it to the infeed roller conveyor that delivers it to the blast machine, he continued. After it has been cleaned, the member is rolled to an outfeed transfer which can deliver into a band sawing machine; then to a structural drilling machine; and finally (if required) into a thermal cutting machine for cutting of copes, blocks, and similar design shapes. An arc writing machine uses plasma technology to write the layout, welding, and fitting information for each beam. “The welding personnel then can locate the marking and weld identification and weld each piece to finalize the structural section.”SSPC-SP 8, P&ODave Hansen, co-owner and production manager of Hansen Steel Services, Santa Fe Springs, Calif., said that the company mostly just grinds the scale to remove it from spot areas that call for only minimal joining, such as welding a base plate. Otherwise, many of the components they fabricate undergo pickling and oiling (P&O) to chemically (acid) remove the scale before fabrication and then apply an oily rust inhibitor afterward while it’s being stored before downstream processes. “One of the concerns facing beam fabricators is that base plates must have drilled holes. When a hole is drilled, it requires cooling oil for the cut. All of that oil that has now stained the base plate needs to be cleaned free of residue before a paint primer can be applied. So not only is sanding and grinding needed for prep, but the removal of all oil.  It’s not just ‘blow and go,’ unfortunately,” Hansen said. SSPC-SP 10, Near-whiteSP 10 is an abrasive blast cleaning standard. “We call that near-white metal,” SSPC’s Berish said. “By the nature of the definition of the standard, it’s gone through abrasive blasting, would completely remove all old paint, mill scale, and rust, leaving no more than 5 percent of staining—discoloration with no volume.”The surface profile that results depends on the type of abrasive used. “Abrasives can leave anywhere from a 0.5 profile to a 5- or 6-mm profile,” Berish said. “You’ll have the best paint adhesion with that finish, because it’s run at a slower speed through the machine,” Berghouse said.“SP 10 is the standard for bridge builders, because bridges are exposed to the elements and support transportation,” Menke added. “For bridge components, special types of paint are applied in addition to the primers to avoid rust and so that when the original coat starts to peel, paint can be reapplied in the field years afterward.” How to Know If Achieved?How do fabricators know and verify that they have achieved the desired surface condition? A trained and certified inspector evaluates the surface to the standards in the contract. Visual guides and written industry standards provide the evaluation criteria, Berish said. “Without proper training, they would not be qualified to provide the evaluation with a clear understanding of the standards.”Figure 3
SSPC-SP 3 is the standard for cleaning and removing loosely inherent material using a power tool, such as a grinder. Photo courtesy of Bass Mechanical, Elizabethtown, Pa.The SSPC is an ANSI-accredited organization, and the consensus standards have been developed through an ANSI process. Bass Mechanical, 717-367-0890, www.bassmechanical.comCortec® Corp., 651-429-1100, www.cortecvci.comHansen Steel Services,  562-692-6900, www.hansensteel.comPeddinghaus Corp., 815-937-3800, ext. 1145, www.peddinghaus.comThe Society for Protective Coatings, 412-281-2331, ext. 2235, berish@sspc.org, www.sspc.orgFigure 4
To achieve an SSPC-SP 6 grade surface cleanliness, fabricators use a shotblast cleaning machine. Photo courtesy of Peddinghaus, Bradley, Il

Friday, September 1, 2017

Capital Basements Unveils UK-Based Basement Extension Service

Read article : Capital Basements Unveils UK-Based Basement Extension Service

  Capital Basements Unveils UK-Based Basement Extension Service
Many homeowners choose to transform the basements in their homes into playrooms, or nanny bedrooms when a baby arrives. Some do the job alone; others employ building firms or interior decorators. The birth of a child is not the only reason to take advantage of a basement to increase the living space.

imageDepending on the demands of daily life, one might turn it into a bathroom, sauna room, bedroom, kitchen, or accommodation for relatives, or temporary guests. Building a separate entrance might transform it into a real apartment, or for those who like to work out, who not turn it into a home gym? The possibilities are endless.

For those who are looking to do it themselves, with little to no building experience, important factors, such as ventilation and humidity, should be considered carefully. Many basements are musty because of improper insulation and poor ventilation. Also, they are usually darker and colder than the rest of the building. A floor heating system will provide exceptional results in this case.

However, basement extensions are not the only means available for people that want to increase their living space. For example, loft conversions are also something that could be considered.

About:
Capital Basements delivers quality innovative basement designs that exceed customers’ expectations within budget. Every member of the company is highly specialised and experienced in their own field. The provided services are fully project managed.

Our in-house design experts know how to make the very best use of confined space within your property. They always consider ways to allow the most natural light in, along with the minimum amount of dead circulation space. Our designers know exactly how much space is required for a bathroom or en-suite and will come up with a solution and layout that will suit your requirements.

The company offers an in-house structural design service, including all the required method and construction statements. An experienced structural engineer can reduce the cost of the project by the way it is designed. The structural engineer works closely with the design team, ensuring that the best and most effective layout is created.

For more information, visit the link below.

Related Links:
http://capitalbasements.co.uk

###

Media Contact:
Capital Basements
295 Chiswick High Rd, Chiswick, London W4 4HH
020 8099 8450
info@capitalbasements.co.uk

image

Published on: 2017-08-21

Limited copyright is granted for you to use and/or republish any story on this site for any legitimate media purpose as long as you reference 7thSpace and any source mentioned in the story above. Please make sure to read our disclaimer prior to contacting 7thSpace Interactive. To contact our editors, visit our online helpdesk. If you wish submit your own press release, click here.
Discussions

Tuesday, January 23, 2018

Fiora Shower Trays & Radiators Pages 101 - 150 - Text Version

Read article : Fiora Shower Trays & Radiators Pages 101 - 150 - Text Version

SILEX Collection 98/99 MAX. 203 X 100 CM. Smooth framed Slate framedSMOOTH TEXTURE0T OFF WHITE 0P TOTAL WHITE 18T CREAM 33T WENGE31T GREY 22T BLACK 44T CARBON 36T CAPPUCCINO 37T CENERE

AVANTthe designNEW DRAIN AND NEW TEXTURE A new addition to the Fiora Silex family. The new Avant shower tray has an innovative design which includes a new drain and a texture formed by slate plates to guarantee maximum safety and optimum user comfort.PAG.100/109

AVANTthe designLAYOUT 01White slate tile

SILEX Collection 102/103

AVANTthe designLAYOUT 01White slate tile

SILEX Collection 104/105

AVANTthe designLAYOUT 02Black slate tile

SILEX Collection 106/107

AVANTNew drain and new textureDifferent size options Width cutting option MEASUREMENTS120x70 120x80 120x90 Grating in stainless 11 Shower tray dimensions 120x90130x70 130x80 130x90 steel or solid colours 130x90140x70 140x80 140x90 Optional measurements 140x90150x70 150x80 150x90 64,8 150x90160x70 160x80 160x90 120x70 120x80 160x90170x70 170x80 170x90 130x70 130x80 170x90180x70 180x80 180x90 140x70 140x80 180x90 150x70 150x80 160x70 160x80 170x70 170x80 180x70 180x80 Height 4 cmAVAILABLE COLOURS FOR SLATE15 different coloursSOLID SLATE0T OFF WHITE 0P TOTAL WHITE 18T CREAM 33T WENGE31T GREY 22T BLACK 44T CARBON 36T CAPPUCCINO 37T CENERE

SILEX Collection 108/109TEXTURES1 texture typeSlate tile(anti-slip) Avant slate tileNATURE SLATENT0 WHITE NT1 CREAM NT2 BLACKNT3 GREY NT4 CAPPUCCINO NT5 CENERE

FRAMEDthe functionalityFUNCTIONALITY, BEAUTY AND QUALITY The design of the Silex Framed shower tray combines functionality, beauty and quality which is able to meet the most heterogeneous demands. A vast array of finishes will fit in with your home regardless of your style.PAG.110/117

SILEX Collection 112/113 FRAMED the functionality LAYOUT 01 Nature grey slate

SILEX Collection 114/115 FRAMED the functionality LAYOUT 02 Cenere slate

FRAMEDDrain middleMEASUREMENTS TEXTURES Square slateShower tray dimensions 1 texture typeRectangular. Optional measurements State (anti-slip)170x90 / 160x90150x90 / 140x90 Rectangular slate170x75 / 160x75150x75 / 140x75 Square100x100 Height4 cm AVAILABLE COLOURS FOR SLATE 15 different coloursSOLID SLATE0T OFF WHITE 0P TOTAL WHITE 18T CREAM 33T WENGE 31T GREY 22T BLACK 44T CARBON 36T CAPUCCINO 37T CENERENATURE SLATENT0 WHITE NT1 CREAM NT2 BLACK NT3 GREY NT4 CAPUCCINO NT5 CENERE

FRAMED 116/117Drain displacedMEASUREMENTS TEXTURES Slate (anti-slip)Shower tray dimensions 2 texture types SmoothTray framed drain displaced (anti-slip) Height 4 cm100x75 / 120x80 90x90 / 80x80Tray framed drain centred 4 cm90x70 Smooth square Smooth rectangular Smooth angular Slate angularOTrnaeysfirzaemoendlyangularun Radius 50,4 cm Height Square slate Rectangular slate 4 cm90x90AVAILABLE COLOURS FOR SLATE AND SMOOTH15 different coloursSMOOTH TEXTURE0T OFF WHITE 0P TOTAL WHITE 18T CREAM 33T WENGE 31T GREY 22T BLACK 44T CARBON 36T CAPUCCINO 37T CENERE

MIXEDIN ADDITION TO THE USUAL COMFORTAND ELEGANCE Two distinct areas, an array of advantages. The Silex Mixed shower tray emphasises the feelings of comfort and elegance which are inherent in all products bearing the Fiora name. Maximum comfort and safety using incomparable textures.PAG.118/125

MIXEDLAYOUT 01Black slate

SILEX Collection 120/121

SILEX Collection 122/123 MIXED LAYOUT 01 Black slate

MIXEDFramed drain Different size options 45 90 4080 50 45 100 Made-to-measure 90 Made-to-measure Max. 200 Max. 200 AVAILABLE COLOURS FOR SLATE 15 different coloursSOLID SLATE0T OFF WHITE 0P TOTAL WHITE 18T CREAM 33T WENGE31T GREY 22T BLACK 44T CARBON 36T CAPPUCCINO 37T CENERE

SILEX Collection 124/125TEXTURES1 texture typeSlate(anti-slip) Slate mixedNATURE SLATENT0 WHITE NT1 CREAM NT2 BLACKNT3 GREY NT4 CAPPUCCINO NT5 CENERE

BOX FIORAREPLACING your bathwith a SILEX SHOWER TRAYINSTALLING THE SHOWER TRAYThanks to the SILEX collection by Fiora, changing your bath for a shower tray no longer needs to be a complicated andexpensive process. This is due to the fact that the shower trays feature an original and practical assembly system which coversthe wall with plates in the same finish as the shower tray. Finally, and thanks to the new collection, Fiora offers the possibilityof including polished aluminium profiling in the tray finish to improve the quality and aesthetics of the arrangement. Thissimple process ensures that the bathroom does not have to be retiled. STEP ONEThe idea of replacing your bath with the shower tray.

SILEX Collection 126/127Preparation for the installation STEP TWO STEP THREEInstallation of the SILEX shower tray, with walls finished in the same material.

A new EXTENDABLE BRACKETfor the INSTALLATION of the SILEX THE INSTALLATION OF THE SHOWER TRAY. Developed based on a system of rails that does not require construction work or Mounting and installing your Silex shower tray is much quicker and easier. Forget the old concept of construction work and complications when fitting a shower tray. With this new system that is based on the use of rails that are adjustable in both height and size, you will be able to perform the installation with ease, in a quick and safe manner, ensuring perfect stability and the sealing of the assembly. RAIL ASSEMBLY SYSTEM FOR ANGULAR SHOWER TRAYS With the aim of providing much more personalised solutions, the SEP model is also available in the version required to install angular shower trays.

SILEX Collection 128/129X shower tray SEP®mortar System HEIGHT ADJUSTABLE EXTENDABLE SYSTEM LEGS The assembly system This new assembly is both extendable in system has several height width and in length adjustable legs that are to provide support for adaptable to any space. different tray sizes. WALL/FLOOR ANTI-LEAK SYSTEM ANCHORING The system has a A solid and effective system of butyl self- system for anchoring to adhesive tape that the wall and/or floor in allows for effective order to ensure the safety sealing preventing and effectiveness of the water leaks in addition installation. to contributing to soundproofing.

SEP® SystemCOMPLIANCE WITH THE DIN 4109 STANDARDAcoustic insulation in buildingsOur lives are surrounded by sounds: those form outside: the traffic, people, the street; and those from inside our home:children, music, the neighbours. The noise in our daily life may entail health problems, from sleep disorders and moodswings to stress problems.One of the most requested solutions for defending the peace and tranquillity in the home is acoustic insulation. Thecompanies in the business continue to develop different materials in order to provide their customers with the utmostquality in fulfilling their functions.Therefore, representing one of the reference brand names in the business entails comprehensive compliance with allthe quality requirements. Fiora ensures compliance with the DIN 4109 Standard that refers to “Acoustic insulation inbuildings”.Through this standard there is a control in the reduction of both the air-borne and structural noise that is perceivedby the recipient. Good acoustic insulation is intended to minimise the transmitted energy. Therefore the appropriatematerials are those that have the property of reflecting or absorbing a significant part of the incident sound wave energy.Thus, both the material as well as the design and placement of the shower tray by means of the new rail-free assemblysystem ensure that when the sound waves hit it, a significant part of these are dissipated within it, thus reducing theenergy emitted on the other side. This is largely made possible by the large number of support points in the system; manylegs with their sound insulating blocks and a cellular rubber profile with a butyl finish.

SILEX Collection 130/131 SPEND YOUR TIME ON WHAT YOU WANT Advantages derived from a system: eliminate problems and reduce your installation time. Up until now we have explained the physical and potential qualities of the new bracket assembly. Below, we will discuss three basic aspects of the system, above all, when performing or rectifying an installation; the elimination of the bother of the construction work, the streamlining of the installation process and the rectification of the process in the event of a water leak or a faulty installation.1 ELIMINATE PROBLEMS 2 SPEED UP 3 IN THE EVENT OF LEAKAGE FROM THE MORTAR THE INSTALLATION OR ERROR IT ALLOWS THE INSTALLATION TO BE REDONE This new bracket assembly has been As it involves an installation In the event that the installation is designed based on an adaptable rails that does not require not properly performed and it must system and it therefore eliminates construction works, we again, the re-installing of the bracket all the bother that complicated eliminate the time required is far quicker and easier than in other construction works involve or those for setting the mortar, so that processes. from the use of mortar: noise, dirt, the overall installation time water leaks, etc. of the new assemblies system is largely reduced.

SILEX DISPLAYNew exhibition elements SILEX DISPLAY: SEE, TOUCH, UNDERSTAND. The second Silex support is its display. It is used to highlight the main qualities of the shower tray and the brand name itself. Moreover, this display includes a real physical example of a shower tray in the collection in order to be able to immediately see the incredible quality of the original and real tray.180 cm 120 cm 80 cm

SILEX Collection 132/133 STANDFLOOR SILEX - MODERN, FUNCTIONAL AND ATTRACTIVE This modern and effective display stand graphically shows just how convenient, easy and practical it is to make the transition from a bathtub to a shower tray. In addition, it is highly attractive and its dimensions make it adaptable to fit any space. It includes a drawer for the leaflets that provide more information.154 cm 50 cm

New!! SILEXRUSTICA

New!! RUSTICA COLOURS TEJA SOLID COLOURS Off white Total white EXTRA FLAT / FRAMED NATURE COLOURSChannel for fixed glass in custom-framed Nature white Nature cream trays. 700 / 800 / 900 / 1000 mm P. 140/141 2400 mm Panels 7 mm

SILEX Collection R U S T I C A 136/137 2 OPTIONS: Extra flat Custom framed P. 138/139EXTRA FLAT FRAMED New!! New!! New!! INTEGRATED grating, new design, ARCILLA ARENA ALBERO variety of colours (19).Cream Grey Black Carbon Wenge Cappuccino Cenere PAGE.140/141 RUSTICA TEXTURE, for 4 new colours, TEJA, ARCILLA, ARENA AND ALBERO IN ADDITION: 6 nature colours and 9 solid colours PAGE 154/155Nature grey Nature black Nature cappuccino Nature Cenere FIORA BOX, New panels for changing a bathtub for a shower. P. 142/143 19 colours combinable with the shower trays to cover the walls of the shower or of the entire roomSpace with bathtub Space without bathtub Space with shower tray and RUSTICA panels

EXTRA FLAT andCustom FRAMEDTHE NEW SILEX RUSTICA RANGE IS OFFERED IN ALL THEOPTIONS FOR EXTRA-FLAT AND CUSTOM FRAMED TRAYS. THEUTMOST ADAPTABILITY WITH A NEW AESTHETIC.The extra flat and custom framed trays come with new, exclusive finishes that can be fullyintegrated in the plane of the floor or framed, which reinforces its appearance and can beadapted to suit irregular architectures. EXTRA FLAT FRAMEDEXTRA FLATTeja + Fiora Box

SILEX Collection R U S T I C A 138/139

GRATING in Silexpolthe same material as the tray.THE DESIGN OF THE SILEX RUSTICA COLLECTION GRATINGIS TOTALLY INTEGRATED IN THE TRAY. AND WITH THESAME COLOUR OPTIONS. In addition, the grating is easily removed from the tray in order to clean the integrated drain trap. Like in all models of the Silex collection, the technology designed enables a high and fluid draining capacity. Waste Channel for fixed glass in custom-framed trays.FRAMEDArcilla

SILEX Collection R U S T I C A 140/141

700 / 800 / 900 / 1000 mm 2400 mm FIORA BOX New panels. THE NEW PANELS DESIGNED FOR THE RUSTICA COLLECTION MAKE IT EASY TO ACHIEVE AN OPTIMAL RESULT IN THE REFURBISHMENT AND IN THE AESTHETICS OF THE ROOM. These new panels have been designed not only to cover the bare areas left after removing the bathtub. Their appearance, finish and multiple possibilities of colours make them an ideal option to cover other walls within the room. 7 mm PROCESS TO CHANGE A BATHTUB FOR A SHOWER EXTRA FLAT Cappuccino + Fiora Box

SILEX Collection R U S T I C A 142/143

EXTRA FLATNature white

SILEX Collection R U S T I C A 144/145

EXTRA FLATNature Black + Fiora Box

SILEX Collection R U S T I C A 146/147

EXTRA FLATAlbero + Fiora Box


Wednesday, November 29, 2017

How to Lay Tile: Install a Ceramic Tile Floor In the Bathroom

Read article : How to Lay Tile: Install a Ceramic Tile Floor In the Bathroom

Cover up an old floor

Whether you’re replacing an old shabby floor or installing a new one, you can’t beat ceramic or stone tile for durability and appearance. When laid properly, it’s virtually a forever floor that requires almost no care and maintenance. And you can select materials from a vast array of colors and textures. We’ll cover how to lay tile in a few steps.

What’s equally attractive is that you can lay a first-class tile floor yourself, often in one weekend, and save the $500 to $1,500 cost of hiring a pro.

The key to keeping the job simple is to cover the old vinyl or other flooring with a new thin underlayment that gives you a fresh, clean start. No messy tear-out and repair. In this article, we’ll demonstrate how to install a thin “backer board” over the old floor. Then we’ll cover tile-setting techniques, from layout and cutting to grout and cleanup.

This is a two-day project for most bathrooms, even if you don’t have any previous tile experience. If you’re comfortable using basic hand tools and have the patience to align tiles just right, you can handle this job. The entire cost of this project for a typical bath ranges from $300 to $600.

Estimating the Cost of a Tile Project

The tile itself will be your biggest cost, so start by measuring the square footage of the floor. Then add 10 percent for cutting waste. If you choose a more complex layout than the simple grid pattern we used, your waste will be greater. Most tile sells for $5 to $15 per square foot, but you can spend as little as $3 or more than $50. If you have to install backer board, add $2 per square foot to the cost of the tile. Other materials will cost about $90, regardless of bathroom size. The tile tools you’ll need (including a tile cutter) will total $60 to $80.

Assess your floor

The success of any tile job depends on a solid base, that is, a floor that flexes very little as you walk across it. If you have a concrete subfloor, this isn’t an issue. You can lay tile directly over the existing vinyl as long as it’s well adhered.

If possible, avoid tearing out vinyl flooring. Leaving it in place saves time, of course, but it also reduces asbestos hazard concerns. Asbestos was used in sheet vinyl and vinyl tile until the mid-1980s. By leaving the vinyl undisturbed, you won’t risk sending asbestos fibers into the air.

If you have a wood subfloor, there’s a good chance that you’ll have to install backer board over your vinyl to make the floor thicker and stiff enough for tile. The easiest way to see flooring thickness is to pull off a floor register. Otherwise look for plumbing passageways through the floor. As a last resort, drill through the floor with a 1-in. or larger spade bit (your new floor will cover the hole later). To prevent asbestos dust from becoming airborne, mist the bit with a spray bottle as you drill. In addition to floor thickness, you’ll need to determine joist spacing. If there’s an unfinished basement or crawlspace below the floor, simply measure the spacing. If there’s a ceiling, probe for joists with a drill bit.

If the joists are spaced 16 in. apart, the layers of structural flooring beneath the vinyl should add up to at least 1-1/8 in. With joists every 24 in., you need 1-1/2 in. If your floor is too thin for tile, add a thicker layer of tile backer board. Our floor required 1/4-in.-thick backer. Yours might need 1/2-in. backer to reach the minimum thickness. If your floor is already thick enough, you can simply prep the vinyl floor (Photos 1 – 4) and skip the backer installation (Photos 5 – 8). Then tile directly over the vinyl, following the same steps we used over backer board.

Regardless of the type of subfloor, there are two situations where you can’t leave vinyl in place: First, if large areas of the vinyl are loose, don’t set tile or backer over it. Small loose spots are acceptable and easy to deal with (Photo 4).

Second, “cushioned” sheet vinyl must be removed before you can set tile. Cushioned vinyl has a foam backing that makes it noticeably thicker and softer than standard vinyl flooring. It’s too spongy to support tile or backer board. Before removing it, call your local health department for instructions on how to check for asbestos and proper procedures if asbestos is present.

Gather Advice While You Shop

Home centers carry everything you need for this project, but begin shopping at a tile store, where you’re more likely to get expert advice. Make a quick sketch of your floor plan and jot down all the dimensions. Also take a photo of the floor at the doorway. This will help the tile store staff recommend a “transition” to neatly join the tile to the hallway flooring. Transitions come in different styles to suit any situation.

When you choose the tile itself, ask if it requires any special installation steps. Some tile, for example, should be coated with grout release before grouting. Also ask about cutting techniques for the tile. You’ll use sanded grout for the floor. Ask if sanded caulk is available in a color that matches your grout for the floor/tub and floor/wall tile joints.

Prepare the room

First, get the toilet out of your way. Stuff a rag in the hole to block sewer gases. If your home only has one toilet, you can leave it in place until you install the backer board. Keep a supply of wax rings on hand if you plan to reinstall the toilet at the end of each day.

If you expect to keep your vanity for many years to come, leave it in place and tile around it. But if you think you might replace it, remove it now. When the job’s done, you can reinstall the old vanity or put in a new one. Having the vanity out of the way gives you more workspace, and you won’t have to cut backer board and tiles to fit around it. This also eliminates the floor repair problem if you install a smaller vanity or pedestal sink in the future.

Pull off the baseboard or plan to add base shoe molding. This leads to a neater-looking job because the edges of the tile will be covered later—jagged cuts and slight measuring mistakes are hidden. If your baseboard has base shoe molding, remove only the base shoe. Backer board and tile will raise your floor 3/4 in. or more. So you’ll have to remove and undercut the door. To mark the door for cutting, stack backer board, tile and two layers of cardboard on the floor (see Photo 3). Mark the door 1/2 in. above the stack, remove the door and cut off the bottom.

Scrub, screw and patch the floor

Install a Ceramic Tile Floor in the Bathroom

Photo 1: Scrub the floor with stripper

Remove the baseboard and toilet. Using an abrasive pad, scrub the floor hard with water mixed with vinyl floor stripper.

Install a Ceramic Tile Floor in the Bathroom

Photo 2: Drive screws into the floor joists

Mark the floor joists with chalk lines and drive 2-1/2-in. screws every 8 in. Don’t leave any screw heads protruding.

Install a Ceramic Tile Floor in the Bathroom

Photo 3: Cut the door trim to accommodate tile

Undercut door trim using a jamb saw or handsaw. A piece of backer board, tile and two layers of cardboard raise the saw to the correct height above the floor.

Install a Ceramic Tile Floor in the Bathroom

Photo 4: Fill low spots with thin-set

Cut out any loose sections of vinyl with a utility knife. Fill the void with thin-set using the flat edge of a notched trowel.

Scrub the floor with a vinyl floor stripper following the manufacturer’s instructions. The stripper will dissolve wax and other residue. Scrub hard with an abrasive scouring pad (Photo 1). The tiny scratches left by scrubbing help the thin-set bond better.

Next, drive screws through the floor into the joists (Photo 2). This ensures that the subfloor and underlayment are securely fastened. If there’s an unfinished basement below the floor, locating the joists is easy: Go to the basement and drill a couple of 1/4-in. holes up through the floor next to a joist. If you can’t locate the joists from below, pick a spot near one wall and drill a hole. If the bit breaks through into hollow space, move over 1 in. and drill another hole. Keep going until you hit a joist. Then go to the opposite wall and find the other end of the joist. Measure at intervals of 16 or 24 in. from the first joist to locate the others.

While you’re driving screws, look for any spots where the vinyl has loosened from the floor. Cut out loose spots and fill them (Photo 4). If there are any copper pipes that pass through the floor, wrap them with duct tape at floor level. Cement-based thin-set and grout can corrode copper.

Install backer board

Install a Ceramic Tile Floor in the Bathroom

Photo 5: Install backer board over the floor

Cover the floor with backer board. Cut inside corners, circles and curves with a drywall saw. Space pieces 1/8 in. apart and hold each one in place with two temporary screws.

Install a Ceramic Tile Floor in the Bathroom

Drywall saw

Use a drywall saw to cut corners, circles and curves in backer board.
Install a Ceramic Tile Floor in the Bathroom

Photo 6: Score and snap the backer board

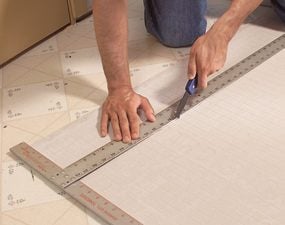
Make straight cuts with a scoring knife. Make three or four scoring passes, then snap the backer over a 2×4. When all the pieces have been laid out, label them and set them aside.

Install a Ceramic Tile Floor in the Bathroom

Scoring knife

Use a scoring knife to score the backer board.

Install a Ceramic Tile Floor in the Bathroom

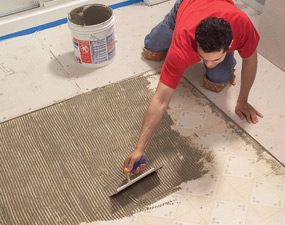
Photo 7: Trowel on the thin-set

Comb out a bed of thin-set just large enough for each piece of backer board using a 1/4-in. notched trowel held at a 45-degree angle. Screw the backer down before spreading thin-set for the next piece.

Install a Ceramic Tile Floor in the Bathroom

Notched trowel

Use a 1/4-in. notched trowel to spread the thin-set over the floor.

Install a Ceramic Tile Floor in the Bathroom

Photo 8: Cover the joints

Press adhesive-backed mesh tape over the joints and skim over the tape with thin-set. When the thin-set is firm but not fully hardened, scrape away any ridges with a putty knife.

The backer board is fastened with a combination of screws and thin-set adhesive. Cut and lay out all the pieces before you mix the thin-set (Photos 5 and 6). You can run the sheets in any direction, but be sure to stagger the joints so you never have four corners meeting at one point. Leave a 1/8-in. space between the sheets and along the vanity, tub or shower. The gap along walls must be at least 1/8 in. wide, but a wider gap (about 1/2 in.) makes the panels easier to set in place.

After cutting and fitting, label the location of each one and set them all aside. Vacuum the floor and have your drill and screws ready to go before you mix the thin-set. Read the thin-set’s label. Spread the thin-set with a 1/4-in. notched trowel. Comb in one direction so air can escape when you embed the backer (Photo 7). Drive screws every 6 in. around the perimeter of each piece and every 8 in. “in the field” (across the face of the panel). If the leftover thin-set is still workable, you can immediately embed mesh tape over the joints (Photo 8).

If the thin-set has become too stiff or chunky, mix a new batch. Use “alkali-resistant” tape that’s meant for backer board. While the tape coat of thin-set hardens, run a putty knife over all the screw heads to scrape off the “mushroom” bulges around screws. Drive in any protruding screw heads you come across.

CAUTION!

Cement products like thin-set and grout draw moisture from skin and can even cause burns that require medical attention. While most pros work bare-handed, wear gloves if you have any special sensitivity. Also wear eye protection while mixing thin-set and grout.

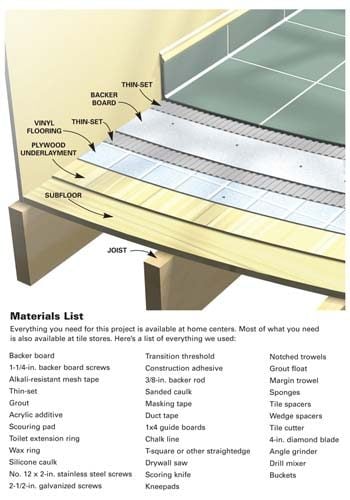
Figure A: Ceramic Tile Over Vinyl

Everything you need for this project is available at home centers. Most of what you need is also available at tile stores.

Cutaway of a tile floor over vinyl

Careful layout pays off

Install a Ceramic Tile Floor in the Bathroom

Photo 9: Test your layout to avoid small pieces along the walls

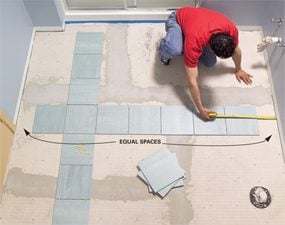
Dry-lay tile to determine the best layout. Start with centered rows, leaving equal spaces at walls. Then reposition rows until you find the optimal layout.

Install a Ceramic Tile Floor in the Bathroom

Photo 10: Attach guide boards to guide the layout

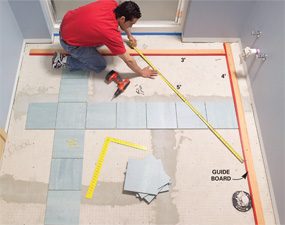
Screw guide boards to the floor following your chosen layout. Position the guides so you can lay all the field tiles without moving the guides. Make sure the guides are at right angles by measuring out a 3-4-5 triangle.

Too often, tile novices simply start setting tile in a corner and continue along two walls until the floor is covered. Sometimes they get lucky and the floor looks good. But more often this method leads to trouble:

They end up with awkward-looking, thin slivers of tile along a prominent wall or at the doorway. And the tile looks even worse when walls are badly out of square or crooked—a straight grout line running too close to a wall emphasizes the wall’s imperfections.

Whether you’re laying a simple grid pattern like we show here, or a diagonal pattern with a border, the best tile layout usually calls for centering full tiles between walls so the partial tiles along the edges will end up all the same size. Don’t rely on your tape measure and mental arithmetic. Rip open a carton of tile, grab a handful of spacers and experiment with your layout on the floor.

To begin, center rows of tile between walls so you have equal spaces along walls that face each other (Photo 9). Set the two rows parallel to the two most prominent walls. Then make adjustments, trying to achieve these three goals:

  • Use full tiles at doorways and along the bathtub or shower. These are usually the only places where the edges of the floor aren’t covered by baseboard. If you use full tiles in these exposed spots, you don’t have to worry about making smooth, perfect cuts.
  • Avoid narrow tiles along walls. Ideally, you’ll end up with tiles cut to half size or larger. Avoid cutting tile to widths less than 2 in.
  • Minimize cutting and try to avoid difficult cuts. For example: Cutting tile to an L-shape to fit around an outside corner is especially difficult when one arm of the “L” is less than 2 in. wide. The arm tends to break off as you cut.

Chances are, your layout won’t meet all these goals. Because the shower stall was the focal point in our bathroom, we made it our No. 1 layout priority. We chose to use full tiles in front of the shower. That left us with 3-in.-wide tiles along the opposite wall, which was less prominent. We also chose to center the tile rows on the shower; that meant we had to use cut tiles at the doorway.

Once you determine a layout, establish lines to guide your tile positioning. The usual method is to snap chalk lines on the floor. But chalk lines are hard to see after you’ve spread thin-set, and one row of tile may slip as you set the next row. Here’s a more reliable guide: Choose straight boards a foot shorter than the length and width of the room. Tape one edge of each board so thin-set won’t stick to them.

Then screw the boards to the floor at a right angle to form a guide that eliminates guesswork and shifting (Photo 10).

Video: Create Your Own Floor Tile Layout

Planning the layout for a tile project is usually the hardest and most time- consuming step. Watch this video to learn how a pro does it. You’ll see how to snap chalk lines and make sure they are perfectly square. Plus, you’ll learn how to avoid unsightly narrow, difficult-to-cut tiles along a wall. Don’t start a tile project until you’ve watch this video!

Set the tile (finally!)

Install a Ceramic Tile Floor in the Bathroom

Photo 11: Set the full tiles

Comb out a few square feet of thin-set and set tile against the guides. Continue until all the full tiles are in place. Tip: Watch for squeeze-out between tiles and rake it out with tile spacers.

Install a Ceramic Tile Floor in the Bathroom

Spacers detail

Keep the gaps between tiles even by using spacers

Install a Ceramic Tile Floor in the Bathroom

Photo 12: Spread thin-set and set the perimeter tiles.

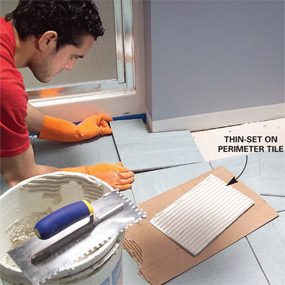
Cut and set the perimeter tiles after the thin-set beneath the full tiles has hardened. In spaces too narrow for your trowel, comb thin-set onto the backs of tiles.

It’s usually easiest—and most efficient—to set tile in two phases: First set all the full “field” tiles (Photo 11). Then, when the thin-set has hardened for several hours, cut all the perimeter tiles and set them (Photo 12). Here are some tips for both phases of the job:

  • The trowel you use for setting tile may be different from the one you used to embed the backer. The thin-set label tells you which notch size to use relative to tile size.
  • Dampen the backer with a sponge just before applying thin-set. This keeps the thin-set from drying out too quickly.
  • Comb the thin-set in one direction so air pockets won’t be trapped under tile.
  • Open three or four cartons and mix the tiles as you set them. Pattern and color vary slightly from one carton to the next.
  • Don’t just set each tile into place; press down on the tile and wiggle it to embed it firmly in the thin-set.
  • Watch for “tipped” corners. When you press a tile in place, it’s easy to tilt it slightly so that one corner stands higher or lower than neighboring tiles.
  • When you complete a section of tile, inspect it before moving on. Make sure the tiles line up correctly and spacers are in place. Wipe any thin-set off the face of tiles with a damp sponge.
  • When the thin-set becomes chunky or too stiff, throw it away and mix more. Never try to extend the life of thin-set or grout by adding water.
  • Cut perimeter tile so that caulked joints (at tub) are the same width as grouted joints.

Prepare the floor for grout

Install a Ceramic Tile Floor in the Bathroom

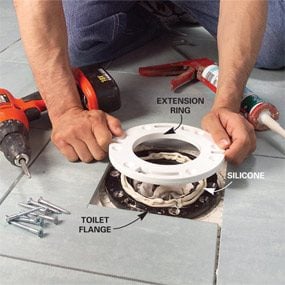
Photo 13: Install an extension ring over the toilet flange

Remove the old screws from the toilet flange and apply a heavy bead of silicone caulk. Fasten the extension ring over the old flange with stainless steel or brass screws.

Install a Ceramic Tile Floor in the Bathroom

Photo 14: Install the transition strip

Glue the transition into place with construction adhesive. If carpet meets the transition, you may have to add a new tack strip.

Install a Ceramic Tile Floor in the Bathroom

Photo 15: Stuff backer rod along the wall

Push backer rod into joints that will be caulked later. The foam rod keeps grout out of joints. After grouting, pull out the rod and caulk the joints.

When all the tiles are in place and the thin-set has hardened, remove all the spacers. Next, raise the toilet flange by adding an extension ring or two (Photo 13). The extended flange should be flush with or higher than the surrounding tile.

When you grout, fill in between the flange and tile. That way, any future leak around the flange will show up on the bathroom floor instead of on the ceiling below. If you plan to use a glue-down transition as we did, this is the time to install it.

Here’s how we dealt with our transition: First, we removed the old metal strip that covered the carpet’s edge. Then we cut our transition strip to fit between the door jambs using a miter saw. Next, we added a tack strip to hold the carpet in place. Before we could glue the transition to the floor (Photo 14), we had to remove a thin strip of the old vinyl floor.

Grout is too brittle to handle the slight shifting movements that are normal in any room. Keep grout out of joints wherever the floor meets the tub, shower, vanity or walls (Photo 15).

Pack the joints with grout

Install a Ceramic Tile Floor in the Bathroom

Photo 16: Grout the joints

Work the grout back and forth across the floor, diagonal to the joints and holding the float at a 45-degree angle. Then scrape off the excess grout, holding the float almost upright.

The thin-set directions will tell you how soon you can grout the floor—usually 24 hours. Grouting isn’t complex. Just plop a couple of scoops of grout onto the floor in a corner, work the grout into joints (Photo 16) and scrape off the excess grout before moving to the next section. In addition:

  • Mix the grout to a mashed-potatoes consistency. Adding extra liquid makes grout easier to work with but weakens it.
  • Don’t just spread the grout over the joints; press hard to pack it into the joints. If you’re doing it right, your forearm will get a good workout.
  • Whether you’re filling joints or scraping off excess grout, always push the float diagonally across the tiles.
  • Scrape off the excess to leave tile as clean as you can. The less grout you leave on the tiles, the easier cleanup will be.
  • When you’re done, cover the grout bucket with a plastic bag and set it in a cool place to slow the hardening process. During cleanup, you may find spots that need a little extra.

Grout cleanup

Install a Ceramic Tile Floor in the Bathroom

Photo 17: Clean the tiles

Wipe grout off the tile surface with a damp sponge. Wipe gently on the first pass so you don’t pull grout out of the joints. Rinse the sponge often.

Clean the surface of the tile when the grout is stiff enough to stay put in the joints but still soft enough to wipe off the tile surface. During hot, dry weather, grout can become difficult to wipe away in just 10 minutes, so get ready for cleanup before you even mix the grout. You’ll need two buckets of clean water, two sponges, a synthetic scouring pad and a dry rag.

As soon as you’re done grouting, go to the first section you grouted and wipe across a joint with a damp sponge. If the sponge pulls grout out of the joint, wait five minutes and try again. In cool, damp weather, the grout may stay too soft for an hour. When the grout is hard enough, gently wipe the tile with a damp sponge.

Rinse the sponge frequently as you wipe the entire floor (Photo 17). If you come across tough spots, scrub them with the scouring pad. Be careful where you put your feet and knees—don’t mar your perfect grout joints.

Immediately after the first pass, grab the second bucket of clean water and the fresh sponge and make a second, more thorough pass. Then, as the tile surface dries, wipe it with a dry terry cloth. The dry haze should buff off easily. If not, go for fresh water and sponge the floor again. If you can’t get rid of the haze, don’t panic. Products that remove haze are available wherever tile is sold.

Let the grout cure overnight before you caulk joints, set the toilet or reinstall baseboard. Grout sealer is a good precaution against staining: Some products can be applied 24 hours after grouting; others require a two- to three-week wait. If you have leftover tile or grout, keep them in case you have to make repairs in the future. Be sure to write down the brand, color and retailer of the tile.

How NOT to Save Money on a Tile Project

I’m a devout cheapskate, but when it comes to buying thin-set and grout, I grab the most expensive products on the shelf. More expensive thin-sets and grouts generally contain a higher proportion of the polymers that improve adhesion, durability and stain resistance.

In most situations, cheaper products would perform just fine. But if I can reduce the risks of loose tiles or cracked grout by spending an extra $30 on a typical bathroom project, I consider that a bargain.

Liquid additive is another smart investment. If the thin-set or grout label says you can mix it with water or an additive, use additive. These liquids (labeled “latex, ” “polymer” or “acrylic”) are meant to improve adhesion and stain resistance. But as a bonus, they produce a slick, creamy consistency. Thin-set combs out more smoothly, grout flows easily into joints, and both remain workable longer.

Also buy a mixer for your drill. Mixers come in various styles and sizes. Go easy on the trigger. If you run the drill at full speed, you can create millions of tiny air bubbles, which will weaken the mix.

Tile cutting tools
Install a Ceramic Tile Floor in the Bathroom

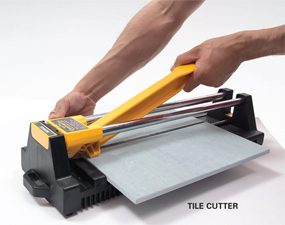
Tile cutter

A tile cutter is the fastest way to cut tile. Just push the handle forward and a small wheel scores the tile. Then push the handle down and the tile snaps in two. You can’t beat a tile cutter for convenience. It makes no mess and you can drag it around the room as you work. But a tile cutter has zero versatility. It makes straight cuts across the entire tile—no curves or corner cuts. Cutting 1 in. or less off a tile can be difficult or impossible. You can rent one at rental centers and some tile shops.

Install a Ceramic Tile Floor in the Bathroom

Wet saw

A wet saw cuts with a diamond blade while water cools the blade and eliminates dust. You can cut notches, trim off tiny slivers of tile, cut miters and even make curves. You’ll get clean cuts in any type of tile. But wet saws are messy. They spit water and raise a cloud of gritty mist. If you use one indoors, contain the mist with curtains of plastic film and cover nearby surfaces. You can buy a small wet saw like the one shown here or rent a professional model from a tile store or home or rental center. If you only have a few cuts that require a wet saw, call a tile store. Many make cuts for a small fee.

Install a Ceramic Tile Floor in the Bathroom

Angle grinder

An angle grinder equipped with a diamond blade can make straight cuts, curves and notches in any type of tile. Since all your cuts are freehand, this isn’t a precision tool, but you can grind away imperfections with the tip of the blade. Use a grinder only outside. Wear a dust mask and eye protection.

Install a Ceramic Tile Floor in the Bathroom

Nippers

Nippers are useful for rough curves and notches. They don’t cut tile, but bite out small chunks, leaving jagged edges.

Install a Ceramic Tile Floor in the Bathroom

Contour gauge

A contour gauge is a great tool for marking troublesome shapes on tile. Just press it against any odd-shaped surface (like the curved corner of a bathtub) and transfer the profile to tile.

Here are the tools that can cut your tile. Buy or rent the ones that make the most sense for your project.

In addition to the tools shown here, a carbide abrasive blade that fits in a jigsaw cuts slowly but leaves fairly clean cuts in softer types of ceramic tile and natural stone. A carbide abrasive hole saw cuts perfect holes for plumbing pipes and fixtures.

A rubbing stone is simply an abrasive block, similar to the wheel in a bench grinder. Use it to smooth sharp or slightly chipped cuts that will be exposed.

Additional Information

Required Tools for this Project

Have the necessary tools for this DIY project lined up before you start—you’ll save time and frustration.

You’ll also need these specialty tools for working with tile and backer board:
Scoring knife, Margin trowel, Tile cutter, 4-in. diamond blade, Drill mixer, Offset saw, Tile cutter, Nippers, Wet saw
You can also use an angle grinder for cutting tile.

Tuesday, April 11, 2017

How to Lay Tile: Install a Ceramic Tile Floor In the Bathroom

Read article : How to Lay Tile: Install a Ceramic Tile Floor In the Bathroom

Cover up an old floor

Whether you’re replacing an old shabby floor or installing a new one, you can’t beat ceramic or stone tile for durability and appearance. When laid properly, it’s virtually a forever floor that requires almost no care and maintenance. And you can select materials from a vast array of colors and textures. We’ll cover how to lay tile in a few steps.

What’s equally attractive is that you can lay a first-class tile floor yourself, often in one weekend, and save the $500 to $1,500 cost of hiring a pro.

The key to keeping the job simple is to cover the old vinyl or other flooring with a new thin underlayment that gives you a fresh, clean start. No messy tear-out and repair. In this article, we’ll demonstrate how to install a thin “backer board” over the old floor. Then we’ll cover tile-setting techniques, from layout and cutting to grout and cleanup.

This is a two-day project for most bathrooms, even if you don’t have any previous tile experience. If you’re comfortable using basic hand tools and have the patience to align tiles just right, you can handle this job. The entire cost of this project for a typical bath ranges from $300 to $600.

Estimating the Cost of a Tile Project

The tile itself will be your biggest cost, so start by measuring the square footage of the floor. Then add 10 percent for cutting waste. If you choose a more complex layout than the simple grid pattern we used, your waste will be greater. Most tile sells for $5 to $15 per square foot, but you can spend as little as $3 or more than $50. If you have to install backer board, add $2 per square foot to the cost of the tile. Other materials will cost about $90, regardless of bathroom size. The tile tools you’ll need (including a tile cutter) will total $60 to $80.

Assess your floor

The success of any tile job depends on a solid base, that is, a floor that flexes very little as you walk across it. If you have a concrete subfloor, this isn’t an issue. You can lay tile directly over the existing vinyl as long as it’s well adhered.

If possible, avoid tearing out vinyl flooring. Leaving it in place saves time, of course, but it also reduces asbestos hazard concerns. Asbestos was used in sheet vinyl and vinyl tile until the mid-1980s. By leaving the vinyl undisturbed, you won’t risk sending asbestos fibers into the air.

If you have a wood subfloor, there’s a good chance that you’ll have to install backer board over your vinyl to make the floor thicker and stiff enough for tile. The easiest way to see flooring thickness is to pull off a floor register. Otherwise look for plumbing passageways through the floor. As a last resort, drill through the floor with a 1-in. or larger spade bit (your new floor will cover the hole later). To prevent asbestos dust from becoming airborne, mist the bit with a spray bottle as you drill. In addition to floor thickness, you’ll need to determine joist spacing. If there’s an unfinished basement or crawlspace below the floor, simply measure the spacing. If there’s a ceiling, probe for joists with a drill bit.

If the joists are spaced 16 in. apart, the layers of structural flooring beneath the vinyl should add up to at least 1-1/8 in. With joists every 24 in., you need 1-1/2 in. If your floor is too thin for tile, add a thicker layer of tile backer board. Our floor required 1/4-in.-thick backer. Yours might need 1/2-in. backer to reach the minimum thickness. If your floor is already thick enough, you can simply prep the vinyl floor (Photos 1 – 4) and skip the backer installation (Photos 5 – 8). Then tile directly over the vinyl, following the same steps we used over backer board.

Regardless of the type of subfloor, there are two situations where you can’t leave vinyl in place: First, if large areas of the vinyl are loose, don’t set tile or backer over it. Small loose spots are acceptable and easy to deal with (Photo 4).

Second, “cushioned” sheet vinyl must be removed before you can set tile. Cushioned vinyl has a foam backing that makes it noticeably thicker and softer than standard vinyl flooring. It’s too spongy to support tile or backer board. Before removing it, call your local health department for instructions on how to check for asbestos and proper procedures if asbestos is present.

Gather Advice While You Shop

Home centers carry everything you need for this project, but begin shopping at a tile store, where you’re more likely to get expert advice. Make a quick sketch of your floor plan and jot down all the dimensions. Also take a photo of the floor at the doorway. This will help the tile store staff recommend a “transition” to neatly join the tile to the hallway flooring. Transitions come in different styles to suit any situation.

When you choose the tile itself, ask if it requires any special installation steps. Some tile, for example, should be coated with grout release before grouting. Also ask about cutting techniques for the tile. You’ll use sanded grout for the floor. Ask if sanded caulk is available in a color that matches your grout for the floor/tub and floor/wall tile joints.

Prepare the room

First, get the toilet out of your way. Stuff a rag in the hole to block sewer gases. If your home only has one toilet, you can leave it in place until you install the backer board. Keep a supply of wax rings on hand if you plan to reinstall the toilet at the end of each day.

If you expect to keep your vanity for many years to come, leave it in place and tile around it. But if you think you might replace it, remove it now. When the job’s done, you can reinstall the old vanity or put in a new one. Having the vanity out of the way gives you more workspace, and you won’t have to cut backer board and tiles to fit around it. This also eliminates the floor repair problem if you install a smaller vanity or pedestal sink in the future.

Pull off the baseboard or plan to add base shoe molding. This leads to a neater-looking job because the edges of the tile will be covered later—jagged cuts and slight measuring mistakes are hidden. If your baseboard has base shoe molding, remove only the base shoe. Backer board and tile will raise your floor 3/4 in. or more. So you’ll have to remove and undercut the door. To mark the door for cutting, stack backer board, tile and two layers of cardboard on the floor (see Photo 3). Mark the door 1/2 in. above the stack, remove the door and cut off the bottom.

Scrub, screw and patch the floor

Install a Ceramic Tile Floor in the Bathroom

Photo 1: Scrub the floor with stripper

Remove the baseboard and toilet. Using an abrasive pad, scrub the floor hard with water mixed with vinyl floor stripper.

Install a Ceramic Tile Floor in the Bathroom

Photo 2: Drive screws into the floor joists

Mark the floor joists with chalk lines and drive 2-1/2-in. screws every 8 in. Don’t leave any screw heads protruding.

Install a Ceramic Tile Floor in the Bathroom

Photo 3: Cut the door trim to accommodate tile

Undercut door trim using a jamb saw or handsaw. A piece of backer board, tile and two layers of cardboard raise the saw to the correct height above the floor.

Install a Ceramic Tile Floor in the Bathroom

Photo 4: Fill low spots with thin-set

Cut out any loose sections of vinyl with a utility knife. Fill the void with thin-set using the flat edge of a notched trowel.

Scrub the floor with a vinyl floor stripper following the manufacturer’s instructions. The stripper will dissolve wax and other residue. Scrub hard with an abrasive scouring pad (Photo 1). The tiny scratches left by scrubbing help the thin-set bond better.

Next, drive screws through the floor into the joists (Photo 2). This ensures that the subfloor and underlayment are securely fastened. If there’s an unfinished basement below the floor, locating the joists is easy: Go to the basement and drill a couple of 1/4-in. holes up through the floor next to a joist. If you can’t locate the joists from below, pick a spot near one wall and drill a hole. If the bit breaks through into hollow space, move over 1 in. and drill another hole. Keep going until you hit a joist. Then go to the opposite wall and find the other end of the joist. Measure at intervals of 16 or 24 in. from the first joist to locate the others.

While you’re driving screws, look for any spots where the vinyl has loosened from the floor. Cut out loose spots and fill them (Photo 4). If there are any copper pipes that pass through the floor, wrap them with duct tape at floor level. Cement-based thin-set and grout can corrode copper.

Install backer board

Install a Ceramic Tile Floor in the Bathroom

Photo 5: Install backer board over the floor

Cover the floor with backer board. Cut inside corners, circles and curves with a drywall saw. Space pieces 1/8 in. apart and hold each one in place with two temporary screws.

Install a Ceramic Tile Floor in the Bathroom

Drywall saw

Use a drywall saw to cut corners, circles and curves in backer board.

Install a Ceramic Tile Floor in the Bathroom

Photo 6: Score and snap the backer board

Make straight cuts with a scoring knife. Make three or four scoring passes, then snap the backer over a 2×4. When all the pieces have been laid out, label them and set them aside.

Install a Ceramic Tile Floor in the Bathroom

Scoring knife

Use a scoring knife to score the backer board.

Install a Ceramic Tile Floor in the Bathroom

Photo 7: Trowel on the thin-set

Comb out a bed of thin-set just large enough for each piece of backer board using a 1/4-in. notched trowel held at a 45-degree angle. Screw the backer down before spreading thin-set for the next piece.

Install a Ceramic Tile Floor in the Bathroom

Notched trowel

Use a 1/4-in. notched trowel to spread the thin-set over the floor.

Install a Ceramic Tile Floor in the Bathroom

Photo 8: Cover the joints

Press adhesive-backed mesh tape over the joints and skim over the tape with thin-set. When the thin-set is firm but not fully hardened, scrape away any ridges with a putty knife.

The backer board is fastened with a combination of screws and thin-set adhesive. Cut and lay out all the pieces before you mix the thin-set (Photos 5 and 6). You can run the sheets in any direction, but be sure to stagger the joints so you never have four corners meeting at one point. Leave a 1/8-in. space between the sheets and along the vanity, tub or shower. The gap along walls must be at least 1/8 in. wide, but a wider gap (about 1/2 in.) makes the panels easier to set in place.

After cutting and fitting, label the location of each one and set them all aside. Vacuum the floor and have your drill and screws ready to go before you mix the thin-set. Read the thin-set’s label. Spread the thin-set with a 1/4-in. notched trowel. Comb in one direction so air can escape when you embed the backer (Photo 7). Drive screws every 6 in. around the perimeter of each piece and every 8 in. “in the field” (across the face of the panel). If the leftover thin-set is still workable, you can immediately embed mesh tape over the joints (Photo 8).

If the thin-set has become too stiff or chunky, mix a new batch. Use “alkali-resistant” tape that’s meant for backer board. While the tape coat of thin-set hardens, run a putty knife over all the screw heads to scrape off the “mushroom” bulges around screws. Drive in any protruding screw heads you come across.

CAUTION!

Cement products like thin-set and grout draw moisture from skin and can even cause burns that require medical attention. While most pros work bare-handed, wear gloves if you have any special sensitivity. Also wear eye protection while mixing thin-set and grout.

Figure A: Ceramic Tile Over Vinyl

Everything you need for this project is available at home centers. Most of what you need is also available at tile stores.

Cutaway of a tile floor over vinyl

Careful layout pays off

Install a Ceramic Tile Floor in the Bathroom

Photo 9: Test your layout to avoid small pieces along the walls

Dry-lay tile to determine the best layout. Start with centered rows, leaving equal spaces at walls. Then reposition rows until you find the optimal layout.

Install a Ceramic Tile Floor in the Bathroom

Photo 10: Attach guide boards to guide the layout

Screw guide boards to the floor following your chosen layout. Position the guides so you can lay all the field tiles without moving the guides. Make sure the guides are at right angles by measuring out a 3-4-5 triangle.

Too often, tile novices simply start setting tile in a corner and continue along two walls until the floor is covered. Sometimes they get lucky and the floor looks good. But more often this method leads to trouble:

They end up with awkward-looking, thin slivers of tile along a prominent wall or at the doorway. And the tile looks even worse when walls are badly out of square or crooked—a straight grout line running too close to a wall emphasizes the wall’s imperfections.

Whether you’re laying a simple grid pattern like we show here, or a diagonal pattern with a border, the best tile layout usually calls for centering full tiles between walls so the partial tiles along the edges will end up all the same size. Don’t rely on your tape measure and mental arithmetic. Rip open a carton of tile, grab a handful of spacers and experiment with your layout on the floor.

To begin, center rows of tile between walls so you have equal spaces along walls that face each other (Photo 9). Set the two rows parallel to the two most prominent walls. Then make adjustments, trying to achieve these three goals:

  • Use full tiles at doorways and along the bathtub or shower. These are usually the only places where the edges of the floor aren’t covered by baseboard. If you use full tiles in these exposed spots, you don’t have to worry about making smooth, perfect cuts.
  • Avoid narrow tiles along walls. Ideally, you’ll end up with tiles cut to half size or larger. Avoid cutting tile to widths less than 2 in.
  • Minimize cutting and try to avoid difficult cuts. For example: Cutting tile to an L-shape to fit around an outside corner is especially difficult when one arm of the “L” is less than 2 in. wide. The arm tends to break off as you cut.

Chances are, your layout won’t meet all these goals. Because the shower stall was the focal point in our bathroom, we made it our No. 1 layout priority. We chose to use full tiles in front of the shower. That left us with 3-in.-wide tiles along the opposite wall, which was less prominent. We also chose to center the tile rows on the shower; that meant we had to use cut tiles at the doorway.

Once you determine a layout, establish lines to guide your tile positioning. The usual method is to snap chalk lines on the floor. But chalk lines are hard to see after you’ve spread thin-set, and one row of tile may slip as you set the next row. Here’s a more reliable guide: Choose straight boards a foot shorter than the length and width of the room. Tape one edge of each board so thin-set won’t stick to them.

Then screw the boards to the floor at a right angle to form a guide that eliminates guesswork and shifting (Photo 10).

Video: Create Your Own Floor Tile Layout

Planning the layout for a tile project is usually the hardest and most time- consuming step. Watch this video to learn how a pro does it. You’ll see how to snap chalk lines and make sure they are perfectly square. Plus, you’ll learn how to avoid unsightly narrow, difficult-to-cut tiles along a wall. Don’t start a tile project until you’ve watch this video!

Set the tile (finally!)

Install a Ceramic Tile Floor in the Bathroom

Photo 11: Set the full tiles

Comb out a few square feet of thin-set and set tile against the guides. Continue until all the full tiles are in place. Tip: Watch for squeeze-out between tiles and rake it out with tile spacers.

Install a Ceramic Tile Floor in the Bathroom

Spacers detail

Keep the gaps between tiles even by using spacers

Install a Ceramic Tile Floor in the Bathroom

Photo 12: Spread thin-set and set the perimeter tiles.

Cut and set the perimeter tiles after the thin-set beneath the full tiles has hardened. In spaces too narrow for your trowel, comb thin-set onto the backs of tiles.

It’s usually easiest—and most efficient—to set tile in two phases: First set all the full “field” tiles (Photo 11). Then, when the thin-set has hardened for several hours, cut all the perimeter tiles and set them (Photo 12). Here are some tips for both phases of the job:

  • The trowel you use for setting tile may be different from the one you used to embed the backer. The thin-set label tells you which notch size to use relative to tile size.
  • Dampen the backer with a sponge just before applying thin-set. This keeps the thin-set from drying out too quickly.
  • Comb the thin-set in one direction so air pockets won’t be trapped under tile.
  • Open three or four cartons and mix the tiles as you set them. Pattern and color vary slightly from one carton to the next.
  • Don’t just set each tile into place; press down on the tile and wiggle it to embed it firmly in the thin-set.
  • Watch for “tipped” corners. When you press a tile in place, it’s easy to tilt it slightly so that one corner stands higher or lower than neighboring tiles.
  • When you complete a section of tile, inspect it before moving on. Make sure the tiles line up correctly and spacers are in place. Wipe any thin-set off the face of tiles with a damp sponge.
  • When the thin-set becomes chunky or too stiff, throw it away and mix more. Never try to extend the life of thin-set or grout by adding water.
  • Cut perimeter tile so that caulked joints (at tub) are the same width as grouted joints.

Prepare the floor for grout

Install a Ceramic Tile Floor in the Bathroom

Photo 13: Install an extension ring over the toilet flange

Remove the old screws from the toilet flange and apply a heavy bead of silicone caulk. Fasten the extension ring over the old flange with stainless steel or brass screws.

Install a Ceramic Tile Floor in the Bathroom

Photo 14: Install the transition strip

Glue the transition into place with construction adhesive. If carpet meets the transition, you may have to add a new tack strip.

Install a Ceramic Tile Floor in the Bathroom

Photo 15: Stuff backer rod along the wall

Push backer rod into joints that will be caulked later. The foam rod keeps grout out of joints. After grouting, pull out the rod and caulk the joints.

When all the tiles are in place and the thin-set has hardened, remove all the spacers. Next, raise the toilet flange by adding an extension ring or two (Photo 13). The extended flange should be flush with or higher than the surrounding tile.

When you grout, fill in between the flange and tile. That way, any future leak around the flange will show up on the bathroom floor instead of on the ceiling below. If you plan to use a glue-down transition as we did, this is the time to install it.

Here’s how we dealt with our transition: First, we removed the old metal strip that covered the carpet’s edge. Then we cut our transition strip to fit between the door jambs using a miter saw. Next, we added a tack strip to hold the carpet in place. Before we could glue the transition to the floor (Photo 14), we had to remove a thin strip of the old vinyl floor.

Grout is too brittle to handle the slight shifting movements that are normal in any room. Keep grout out of joints wherever the floor meets the tub, shower, vanity or walls (Photo 15).

Pack the joints with grout

Install a Ceramic Tile Floor in the Bathroom

Photo 16: Grout the joints

Work the grout back and forth across the floor, diagonal to the joints and holding the float at a 45-degree angle. Then scrape off the excess grout, holding the float almost upright.

The thin-set directions will tell you how soon you can grout the floor—usually 24 hours. Grouting isn’t complex. Just plop a couple of scoops of grout onto the floor in a corner, work the grout into joints (Photo 16) and scrape off the excess grout before moving to the next section. In addition:

  • Mix the grout to a mashed-potatoes consistency. Adding extra liquid makes grout easier to work with but weakens it.
  • Don’t just spread the grout over the joints; press hard to pack it into the joints. If you’re doing it right, your forearm will get a good workout.
  • Whether you’re filling joints or scraping off excess grout, always push the float diagonally across the tiles.
  • Scrape off the excess to leave tile as clean as you can. The less grout you leave on the tiles, the easier cleanup will be.
  • When you’re done, cover the grout bucket with a plastic bag and set it in a cool place to slow the hardening process. During cleanup, you may find spots that need a little extra.

Grout cleanup

Install a Ceramic Tile Floor in the Bathroom

Photo 17: Clean the tiles

Wipe grout off the tile surface with a damp sponge. Wipe gently on the first pass so you don’t pull grout out of the joints. Rinse the sponge often.

Clean the surface of the tile when the grout is stiff enough to stay put in the joints but still soft enough to wipe off the tile surface. During hot, dry weather, grout can become difficult to wipe away in just 10 minutes, so get ready for cleanup before you even mix the grout. You’ll need two buckets of clean water, two sponges, a synthetic scouring pad and a dry rag.

As soon as you’re done grouting, go to the first section you grouted and wipe across a joint with a damp sponge. If the sponge pulls grout out of the joint, wait five minutes and try again. In cool, damp weather, the grout may stay too soft for an hour. When the grout is hard enough, gently wipe the tile with a damp sponge.

Rinse the sponge frequently as you wipe the entire floor (Photo 17). If you come across tough spots, scrub them with the scouring pad. Be careful where you put your feet and knees—don’t mar your perfect grout joints.

Immediately after the first pass, grab the second bucket of clean water and the fresh sponge and make a second, more thorough pass. Then, as the tile surface dries, wipe it with a dry terry cloth. The dry haze should buff off easily. If not, go for fresh water and sponge the floor again. If you can’t get rid of the haze, don’t panic. Products that remove haze are available wherever tile is sold.

Let the grout cure overnight before you caulk joints, set the toilet or reinstall baseboard. Grout sealer is a good precaution against staining: Some products can be applied 24 hours after grouting; others require a two- to three-week wait. If you have leftover tile or grout, keep them in case you have to make repairs in the future. Be sure to write down the brand, color and retailer of the tile.

How NOT to Save Money on a Tile Project

I’m a devout cheapskate, but when it comes to buying thin-set and grout, I grab the most expensive products on the shelf. More expensive thin-sets and grouts generally contain a higher proportion of the polymers that improve adhesion, durability and stain resistance.

In most situations, cheaper products would perform just fine. But if I can reduce the risks of loose tiles or cracked grout by spending an extra $30 on a typical bathroom project, I consider that a bargain.

Liquid additive is another smart investment. If the thin-set or grout label says you can mix it with water or an additive, use additive. These liquids (labeled “latex, ” “polymer” or “acrylic”) are meant to improve adhesion and stain resistance. But as a bonus, they produce a slick, creamy consistency. Thin-set combs out more smoothly, grout flows easily into joints, and both remain workable longer.

Also buy a mixer for your drill. Mixers come in various styles and sizes. Go easy on the trigger. If you run the drill at full speed, you can create millions of tiny air bubbles, which will weaken the mix.

Tile cutting tools

Install a Ceramic Tile Floor in the Bathroom

Tile cutter

A tile cutter is the fastest way to cut tile. Just push the handle forward and a small wheel scores the tile. Then push the handle down and the tile snaps in two. You can’t beat a tile cutter for convenience. It makes no mess and you can drag it around the room as you work. But a tile cutter has zero versatility. It makes straight cuts across the entire tile—no curves or corner cuts. Cutting 1 in. or less off a tile can be difficult or impossible. You can rent one at rental centers and some tile shops.

Install a Ceramic Tile Floor in the Bathroom

Wet saw

A wet saw cuts with a diamond blade while water cools the blade and eliminates dust. You can cut notches, trim off tiny slivers of tile, cut miters and even make curves. You’ll get clean cuts in any type of tile. But wet saws are messy. They spit water and raise a cloud of gritty mist. If you use one indoors, contain the mist with curtains of plastic film and cover nearby surfaces. You can buy a small wet saw like the one shown here or rent a professional model from a tile store or home or rental center. If you only have a few cuts that require a wet saw, call a tile store. Many make cuts for a small fee.

Install a Ceramic Tile Floor in the Bathroom

Angle grinder

An angle grinder equipped with a diamond blade can make straight cuts, curves and notches in any type of tile. Since all your cuts are freehand, this isn’t a precision tool, but you can grind away imperfections with the tip of the blade. Use a grinder only outside. Wear a dust mask and eye protection.

Install a Ceramic Tile Floor in the Bathroom

Nippers

Nippers are useful for rough curves and notches. They don’t cut tile, but bite out small chunks, leaving jagged edges.

Install a Ceramic Tile Floor in the Bathroom

Contour gauge

A contour gauge is a great tool for marking troublesome shapes on tile. Just press it against any odd-shaped surface (like the curved corner of a bathtub) and transfer the profile to tile.

Here are the tools that can cut your tile. Buy or rent the ones that make the most sense for your project.

In addition to the tools shown here, a carbide abrasive blade that fits in a jigsaw cuts slowly but leaves fairly clean cuts in softer types of ceramic tile and natural stone. A carbide abrasive hole saw cuts perfect holes for plumbing pipes and fixtures.

A rubbing stone is simply an abrasive block, similar to the wheel in a bench grinder. Use it to smooth sharp or slightly chipped cuts that will be exposed.

Additional Information

Required Tools for this Project

Have the necessary tools for this DIY project lined up before you start—you’ll save time and frustration.

You’ll also need these specialty tools for working with tile and backer board:
Scoring knife, Margin trowel, Tile cutter, 4-in. diamond blade, Drill mixer, Offset saw, Tile cutter, Nippers, Wet saw
You can also use an angle grinder for cutting tile.