Showing posts sorted by date for query bath tub mixer. Sort by relevance Show all posts

Tuesday, March 27, 2018

Two Axor projects win three awards at the European Hotel Design Awards 2011

Read article : Two Axor projects win three awards at the European Hotel Design Awards 2011

Tuesday 22nd November marked the annual European Hotel Design Awards at the Park Plaza Hotel, Westminster Bridge. Held on the eve of the prestigious 2011 Sleep Event, the black tie dinner was hosted by BBC Radio 2 presenter Jeremy Vine and celebrated the very best in new hotel design from across Europe.

Recognised by the judges for their creative excellence and commercial viability, two of the winning projects - The Savoy Hotel and Four Seasons, Park Lane, London, both feature showers and bathroom fittings from international bathroom brand Axor, the designer brand from Hansgrohe. 

Following an ambitious £220 million restoration, the Savoy re-opened in October 2010 and won two awards ‘Interior Design of the Year’ for its lobby and public areas and one of the key accolades of the night ‘The European Hotel Design of the Year’.  A British icon since 1889, the new design successfully blends old and new while allowing English Edwardian and Art Deco interiors to shine with timeless elegance and glamour.  The Axor Montreux collection with its nostalgic, turn of the 20th century styling and modern technology was a perfect fit for the bathrooms in 215 of the hotel’s 268 guestrooms and suites.

Axor designers, Phoenix Design, combined clear, geometric shapes with pure, traditional elements such as filigree cross handles, ceramic detailing at the centre of each mixer handle and accessories such as wall lights with handmade crystal glass shades, soap dishes and towel rails.  Other unique reminiscences of the era include bridge mixer taps and a freestanding version of the bath tub mixer. All taps, shower and accessories are available with a distinctive brushed or polished nickel finish or, as chosen by the Savoy, the timeless option of polished chrome.

These latest two awards join a cavalcade of prizes to round off a successful first re-opening year including the ‘2011 Hot List’ from CondĂ© Nast Traveller and ‘Favourite UK Hotel’ at the Telegraph Travel Awards.

The Four Seasons on London’s Park Lane won the top award ‘Architecture of the Year’ for conversion of an existing hotel building. Hansgrohe supplied its design-led, superbly crafted Axor Citterio bathroom collection to all 192 luxury guest rooms, including 45 one, two and three-bedroom suites with airy views across fashionable Mayfair rooftops and the greenery of Hyde Park. 

Axor Citterio was the ideal partner for the finely detailed bathrooms which feature delicate marble and brushed steel, enhanced by walnut and marble cabinetry and vanity mirrors with integrated televisions. There are over 70 individual items bearing the Axor Citterio label including a wide choice of mixers for basins, bidets and baths, as well as coordinating showers, showerpipes, bath tubs and accessories.  All are characterised by a strong geometric design with gleaming, perfectly crafted chrome surfaces and a harmonious combination of straight angular edges next to rounded curves.  Designed to perfectly blend into both modern and classic interiors, the line radiates luxury as an expression of quality, workmanship, expertise and added value.

Ben Reed, Contract Manager responsible for both the Savoy and Four Seasons hotels comments, “It has been a privilege to be involved with these tremendous hotel projects. The Savoy is steeped in history so was not only a great contract to win but crucial to get right in order to meet the exacting standards required of the hotel design team. With the Four Seasons, we worked very closely from start to finish with the client’s designers at ReardonSmith Architects, so I am delighted also to see the practice recognised and rewarded for their vision and talent with Patrick Reardon winning the award for ‘Outstanding Contribution’ ‘.


Axor, the designer brand of Hansgrohe AG, successfully realizes “Designer Visions for Your Bathroom". In cooperation with Axor, leading product designers, architects and interior designers develop their vision for the bathroom as a living space. The Axor collections offer a great number of unique and sustainable solutions to create personalised bathrooms of the highest aesthetic and technological levels. To date, Axor collections have been created by Philippe Starck, Antonio Citterio, Jean-Marie Massaud, Patricia Urquiola as well as Ronan and Erwan Bouroullec. They all contribute towards making life in and around the bathroom a little more meaningful and beautiful. The Axor brand is headed by Philippe Grohe.


Thursday, March 8, 2018

4 bed detached house for sale in Llantrisant Road, Capel Llanilltern, Cardiff CF5 - 43271927

Read article : 4 bed detached house for sale in Llantrisant Road, Capel Llanilltern, Cardiff CF5 - 43271927


Summary
A charming detached four bedroom family residence, approached by a gated private drive with extensive private parking, and set within a private garden plot of appromimate 1.95 acres. With a stunning range of outdoor leisure features including a swimming pool and hot tub.

Description
Ty Newydd Farm is a distinctive house of character, built 1998 by the current owners on the site of an original period farm cottage which was reputed to date back to 1700 and occupied a an overall plot of 1.95 acres. This unique four bedroom family home enjoys the special benefits of ensuite shower rooms serving each of the double sized bedrooms plus a large period family bathroom equipped with a free standing roll top suite. Recently a stunning bespoke kitchen has been installed providing a wonderful social space (30'1 x 14'9), centred around a large island unit with Quartz granite work tops, stylish integrated appliances and inset with a charming stone Inglenook fireplace with contemporary log burner and a solid wood mantle. There are two utility rooms and two ground floor cloak rooms. The living space is truly impressive including five principle reception rooms plus a grand entrance reception hall inset with a wide staircase returning to the east and west first floors. All windows are double glazed with white PVC units, and there are two feature windows, both hexagon in design with coloured leaded glass. Central heating is oil fired with panel radiators and a modern tank installed also in 1998. Charming character features include exposed beamed ceilings and natural stone walls providing a Farm House theme, whilst the living space provide a contemporary style with both a large formal dining room for social meals, and a relaxing lounge with a stone Minster fireplace!

The Property
With a family in mind the capacious cinema room (18'10 x 17'8) offers a wonderful entertainment centre, whilst both the sitting room (19'11 x 13'6) and the sun lounge (16'3 x 15'0) offer flexible living space with french doors that open onto the gardens. Each of the double bedrooms also include individual walk-in wardrobes, and the unique advantage with the living space on the first floor is the undoubtable fact that each bedroom is well proportioned with pleasing outlooks across the surrounding gardens and grounds. A truly impressive family house situated within only a short drive to Cardiff, and within easy access to an exit onto the M4, allowing fast travel to Newport, Swansea and Bristol.

Outside Leisure Features
Whilst the property is approached by a long gated private entrance drive which leads to both a large double garage (20'10 x 22'1) and a double car-port (20'11 x 20'5), the outside space includes many separate areas for activity including a large L shaped lawn which is screened by high conifer trees, a fully heated outdoor swimming pool, a large decked sun terrace, an undercover patio and a matching covered hot tub. There is also a further summer house and a separate self contained home office. There are three further outdoor rooms buildings which could be converted into stables, whilst one of these buildings is already converted into a fully sound proof studio!

School Catchment
The property lies within the school catchment of Radyr High School, whilst local primary schools include Craig-y-Parc off Heol-y-Parc in Pentyrch Village, and Creigiau Primary School in Creigiau.

Ground Floor

Entrance Reception Hall 16' 8" x 14' 9" ( 5.08m x 4.50m )
A most imposing and charming large entrance reception hall, inset with a 6 ft wide spindle balustrade staircase with newel posts, exposed beamed ceiling, double radiator, approached from an open fronted porch via two part panelled white PVC coloured leaded glass double entrance doors with side screen windows. Built in understair cloaks hanging cupboard.

Downstairs Cloakroom 8' 5" x 2' 9" ( 2.57m x 0.84m )
Fitted stylish modern and contemporary cloakroom suite with tiled walls and floor, comprising a large shaped pedestal wash hand basin with stylish chrome mixer taps and pop-up waste, slimline W.C., PVC Georgian style window to rear.

Understairs Cloaks Cupboard

Lounge 20' x 15' 5" ( 6.10m x 4.70m )
Gracious room inset with a Minster fireplace with granite surround and hearth, exposed beamed ceiling, PVC double glazed Georgian style window with outlooks across a front sun terrace, further PVC Georgian double glazed french doors opening on to the rear gardens, double radiator.

Cinema Room 18' 10" x 17' 8" ( 5.74m x 5.38m )
A fantastic cinema/games room, equipped with ceiling with spotlights, wide PVC double glazed Georgian style windows overlooking the courtyard front gardens, projector screen, exposed stone walls, feature Living Flame electric contemporary fire, surround sound.

Formal Dining Room 20' 2" x 16' 2" ( 6.15m x 4.93m )
An elegant room with an exposed beamed ceiling, PVC Georgian style double glazed window with views across the pretty front courtyard, PVC Georgian style window to rear, double radiator.

Kitchen And Breakfast Room 30' 1" x 14' 9" ( 9.17m x 4.50m )
Well fitted along two sides with an extensive range of stylish and contemporary bespoke floor and eye level units with high gloss doors, panel fronts and chrome handles, Quartz granite work surfaces with island unit and large breakfast bar, integrated Bosch Schott Ceran electric induction hob with a stainless steel canopy style extractor hood with glass surround and lights, two integrated stainless steel sinks with a powerful power jet chrome mixer tap, integrated aeg dishwasher, integrated Hoover wine cooler. Two tall storage larder units, two integrated Bosch fan assisted electric ovens, ceramic tiled floor throughout, space for the housing of two American style fridge freezers, exposed stone inglenook fireplace inset with a log and multifuel cast iron burner with stone hearth, two double radiators, PVC window with side garden aspect, PVC window with front garden aspect, PVC double glazed outer door to front courtyard. LED plinth lights.

Utility Room One 12' 6" x 7' 11" ( 3.81m x 2.41m )
With access to an outer hall with radiator and PVC Georgian style door with access to rear gardens. Well fitted along one side with high gloss contemporary floor and eye level units with chrome handles and solid work surfaces with a ceramic tiled surround, exposed beamed ceiling, radiator, PVC Georgian style window to rear.

Second Downstairs Cloakroom 6' 11" x 3' 7" ( 2.11m x 1.09m )
Suite comprising wall mounted wash hand basin with chrome mixer taps and pop-up waste, W.C., ceramic tiled floor and walls, PVC window to side, radiator.

Utility Room Two 8' 6" x 4' 5" ( 2.59m x 1.35m )
Approached from the kitchen, fitted along two sides with high gloss contemporary and stylish floor and eye level units with laminate work surfaces and chrome handles, incorporating a modern sink with mixer taps, vegetable cleaner, space with plumbing for an automatic washing machine, space for the housing of a tumble drier, space for the housing of a low level fridge, ceramic tiled floor and walls, ceiling with spotlights.

Sitting Room 19' 11" x 13' 6" ( 6.07m x 4.11m )
A stunning room with solid oak floor and exposed beamed ceilings, PVC double glazed Georgian style french doors opening on to the rear gardens, further double glazed Georgian style window overlooking the front courtyard gardens, square opening leading to...........

Sun Lounge 16' 3" x 15' maximum ( 4.95m x 4.57m maximum )
A large and versatile sun lounge conservatory, inset with a solid wood floor, cavity brick outer plinth walls surmounted by PVC double glazed Georgian style windows, inset with PVC french doors opening onto a block paved courtyard front garden, double radiator, standard ceiling with spotlights.

First Floor Landing
Three PVC double glazed Georgian style windows with rear aspect, spindle balustrade landing, exposed beamed ceiling.

Master Bedroom One 19' 10" x 15' 5" ( 6.05m x 4.70m )
Gracious room with an exposed beamed ceiling, elegant coloured leaded glass hexagon shaped window with side aspect, two further PVC Georgian style double glazed windows with front and rear aspect, double radiator.

Ensuite Shower Room 7' 2" x 4' 3" ( 2.18m x 1.30m )
White suite with walls largely ceramic tiled, ceramic tiled floor, shaped pedestal wash hand basin, W.C., separate ceramic tiled shower cubicle with Mira shower unit and glass shower door. Radiator, PVC double glazed Georgian window to front, beamed ceiling with spotlights.

Walk-In Wardrobe 7' 2" x 5' 5" ( 2.18m x 1.65m )
An extensive hanging and storage space, electric light.

Bedroom Two 16' 7" x 16' 3" ( 5.05m x 4.95m )
A large impressive bedroom with an exposed beamed ceiling, double radiator, PVC Georgian style double glazed window with pleasing front aspect across the courtyard gardens and towards adjacent fields.

Ensuite Shower Room 7' 1" x 4' 3" ( 2.16m x 1.30m )
Modern white Ideal standard suite with ceramic tiled floor and ceramic tiled walls, comprising shaped pedestal wash hand basin, corner shaped corner ceramic tiled cubicle with Mira shower unit and shaped clear glass sliding doors and screen, radiator, PVC Georgian style double glazed window to front, beamed ceiling with spotlights.

Ensuite Dressing Room/wardrobe 7' 2" x 5' 6" ( 2.18m x 1.68m )
With extensive hanging space and shelving, together with a small access leading to the roof space, electric ceiling light.

Bedroom Three 15' 9" x 12' 6" ( 4.80m x 3.81m )
A charming room, equipped with three Velux double glazed windows, three further PVC Georgian style side windows overlooking a side garden with pergola, ceiling with spotlights, double radiator.

First Floor Landing Continued
Built-in linen cupboard and a further built-in full height airing cupboard with copper hot water factory insulated tank. Two further PVC Georgian style windows overlooking front courtyard, radiator, part beamed ceiling with spotlights.

Ensuite Shower Room 10' 11" x 6' 2" ( 3.33m x 1.88m )
Stylish modern recently installed suite with limestone style ceramic tiled floor and walls, comprising double size shower with contemporary Mira shower unit and clear glass sliding doors, chrome fittings, shaped wash hand basin with a contemporary built out vanity unit, mixer taps and pop-up waste, W.C. With concealed cistern, double radiator, PVC Georgian style window to side, ceiling with spotlights, built-in bathroom full height cabinet, hardwood panelled outer door leading to second staircase providing direct access to the kitchen and breakfast room.

Built-In Wardobe 12' 6" x 3' 10" ( 3.81m x 1.17m )
Approached via double doors with leaded lights and brass handles, extensive hanging space and shelving.

Bedroom Four 18' 5" x 10' 6" ( 5.61m x 3.20m )
With an elegant hexagon shaped PVC double glazed leaded coloured glass front window, further PVC Georgian style double glazed window with front garden and courtyard aspect, double radiator.

Ensuite Shower Room 7' 8" x 6' 9" ( 2.34m x 2.06m )
Modern white suite with ceramic tiled walls, comprising shaped pedestal wash hand basin, low level W.C., separate ceramic tiled shower cubicle with New Team 3000 shower unit and glass shower door, PVC Georgian style window to side, radiator.

Walk-In Wardrobe/dressing Room 7' 8" x 6' 7" ( 2.34m x 2.01m )
A good size, fitted with extensive shelving and hanging space, electric light.

Family Bathroom 16' 8" x 7' 10" ( 5.08m x 2.39m )
A most impressive white Period style suite with ceramic tiled walls and exposed beamed high atrium style ceiling with spotlights, comprising a free standing roll top bath with gold effect mixer taps and mixer shower fitment, W.C. With hardwood toilet seat and china handle, large shaped pedestal wash hand basin, double radiator, PVC Georgian style window to rear, PVC Georgian style window to side.

Private Entrance Drive
Approached via private gates with side pillars and leading to a long sweeping entrance drive that leads into the front garden and continues to a large block paved turning area with parking for several vehicles and equipped with outside lights and water tap.

Double Carport 20' 11" x 20' 5" ( 6.38m x 6.22m )
Electric power and light.

Double Garage 22' 1" x 20' 10" ( 6.73m x 6.35m )
Approached via electronically controlled fob operated roller double width door. Electric power and light.

Home Office 14' 5" x 14' ( 4.39m x 4.27m )
Fully equipped private detached from the main house home office, independently approached from the courtyard via a PVC double glazed door with side screen window, extensive power points and light fitments, outer hall leading to downstairs cloakroom with W.C. And wash hand basin, plus additional PVC outer door.

Store Room

Hot Tub
Fully operational hot tub with a timber trellis surround with timber pitched roof.

Outdoor Swimming Pool
Large fully heated electrically powered outdoor swimming pool with cover and decked side sun terrace, bordered with timber garden seats and outside lighting. Approximate depth 1.8 meters continuos.

Breeze House
Open fronted breeze house with space for patio table and chairs beneath a rosemary tiled roof with timber outer pillars

Decked Sun Terrace
Large decked sun terrace inset with a summer house/storeroom, detached and fully equipped with electric power and light, edged with outside lights and trellising for full privacy.

Outside Lawn
Large main lawn, edged with high grown conifer trees and garden trees to afford maximum privacy and security.

Enclosed Garden
There is a further enclosed garden which could be turned into a menage or small paddock, currently with hard concrete flooring but bordered with outside walls to afford privacy and security.

Monday, March 5, 2018

Modern white bathroom with textured tiles, shower zone and central bench with storage

Read article : Modern white bathroom with textured tiles, shower zone and central bench with storage

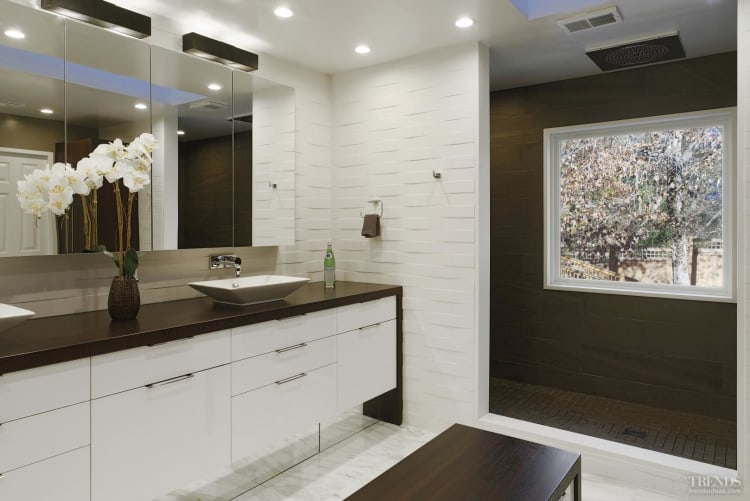
This bright, white bathroom features a textural tile wall and contrasting rich wenge wood surfaces

advertisment

When not one but several elements provide a stand-out feature in a bathroom design then the result is a sense of enveloping luxury.

Just such a feel was requested for this 28m2 bathroom by designer Paul Bentham at Jennifer Gilmer Kitchen and Bath. A sum of its parts, the project has several key features, says Bentham.

"However, the star of the renovated space is undoubtedly the undulating 3D wall tile. This creates a dramatic light and shadow play while fulfilling the agenda for a bright, white space."

Contrasting the white tiles, the tops of the vanity and central bench are in solid wenge, with waterfall sides. The natural wood is also sealed to make the surface impervious to water.

And the use of wood is continued on the framing for the huge mirror which expands the room visually and brings in light by reflecting the view out the window on the opposite wall.

advertisment

"The window's white quartz frame mimics wood trim but will last forever," says Bentham.

Replacing a seldom-used tub and tub deck, the designer set a generous shower area along the back wall of the house, with the picture window at dead centre. The shower zone has three areas, including a large central rainhead.

The square rainhead showerhead is flanked by his and hers showering points at opposite ends of the zone, each with its own fixed head and hand shower, tiled bench and storage niche.

"The Kohler Reve sinks are semi-recessed into the vanity benchtop," says Bentham. "Set on tall mirrored toekicks, the vanity, bench and storage cabinet, or armoire, all appear to float above the marble floor. Under the sinks, U-shaped drawers in solid walnut allow room for plumbing while still providing storage."

The designer also added storage space under the seat bench and in the armoire.

Credit List

Bathroom designerPaul Bentham, Jennifer Gilmer Kitchen and Bath
ContractorMARNIC Contractors
Cabinet makerPremier Custom Built
VanitySlab door, high gloss polyurethane to match Glacier
White quartz; countertop and legswenge, Durata Matte finish, waterfall legs
ArmoireSlab door, wenge veneer with high gloss polyurethane sheen
Bench, countertopWenge, Durata Matte finish, by Grothouse Inc
Toilet cubicleCustom frosted door, polished chrome hinges and handles
ToekicksMirror
BasinWhite Reve vessels from Kohler Sinks
FaucetsAllure Two Hole Basin Mixer, polished chrome, by Grohe
Shower fittingsGrohe, Euphoria Cube shower head and hand shower set, Rainshower F-Series spray, polished chrome
FloorCalacatta Gold
Shower tilesCertosa porcelain
Wall tilesWow wedge tile, white
LightingSconces above mirrors and medicine cabinets, Visual Comfort Studio Bowery in aged iron with Wax
AccessoriesEssentials Cube Collection in polished chrome, by
Grohe; towel warmerAmba Warmer with digital control by Vega; mirror with Wenge wood frame
Thresholds and window trimArctic White Quartz stone for shower curb and sides to the ceiling

Sunday, December 31, 2017

Whispering Waters - An Escape to Blue Ridge Cabin

Read article : Whispering Waters - An Escape to Blue Ridge Cabin

If you’re considering a North Georgia cabin rental for your next vacation and love the mountains, the woods and the water, you don’t have to choose--you’ll find all three in one magical spot at the lyrically named Whispering Waters.

Located in Mineral Bluff, 12 miles from downtown Blue Ridge, and 10 miles from Lake Blue Ridge and all the recreational activities it has to offer, the cabin sits on a private two-acre lot with breathtaking long-range mountain views and a stream running down the wooded valley year round.

With nature providing the backdrop and the soundtrack, your experience will be different depending on when you visit. Beautiful dogwoods bloom in spring, snow blankets the trees in winter, autumn brings brilliant colors and the sound of crickets, fireflies twinkle in early summer and you’ll hear the katydids chirp in late summer.

Designed for comfort, relaxation and entertaining, the recently updated cabin is constructed of pine top to bottom, with enormous new windows throughout to better appreciate the view. The main living area, with its wood-burning stone fireplace, dimmer controlled chandeliers, leather sofa with two built-in recliners and 12-foot glass French doors/sidelights facing the deck, invites you to kick back and relax. The 55” smart flat screen TV is on a swivel mount that allows for viewing from just about anywhere on the main level. There’s high-speed WiFi throughout the home.

The kitchen is fully stocked with every appliance, gadget and serving piece you’ll need to prepare your meals; crockpot, Keurig, hand mixer, blender, coffee maker, electric griddle, electric frying pan, and rice cooker included. The dining table seats six, but expands with leaves to accommodate ten, and there’s seating for two at the granite-topped kitchen island on leather bar stools. 

Or fire up the gas grill and enjoy a barbecue on the partially covered deck, where there’s a wood-burning hand-built stone masonry fireplace, dining and picnic tables, and ceiling fans with dimmable lighting. Afterward, you can soak your cares away in the hot tub on the private side patio, which has room for six.

When it’s time to retire for the night, you’ll slumber in comfort in either of the two master bedrooms, both featuring king beds with Tempurpedic mattresses, Pottery Barn duvets and shams, ceiling fans, digital clocks with USB ports for charging your cell phones, and 42” flat screen smart TVs. The main level master has a walk-in closet and front deck access, and the upstairs master has a private bath with granite vanity, pine floor, and walk-in glass round shower

Also on the main floor is a bunkroom tailor-made for kids, with twin bunk beds with a twin trundle, a bay window with window seat, a round gaming table and two chairs, a digital clock with USB port, and a 42” flat screen smart TV. There is a bookshelf containing books, puzzles, games, and cards for entertainment pleasure. The adjacent bathroom has a tub/shower, granite vanity, and tile floor. A full-size washer and dryer is located in one of two closets in the bunk room.

Perfect for families with older children, couples and getaways with your BFFs, Whispering Waters offers a calm and cozy retreat from the stresses of everyday life in a magnificent setting. You’ll cherish those peaceful memories long after you’ve left the mountains behind.

Sunday, December 10, 2017

4 bedroom detached house for sale, Lytton Road, Woking, GU22 7BH

Read article : 4 bedroom detached house for sale, Lytton Road, Woking, GU22 7BH

Summary

Lytton Close is an impressive individually designed four bedroom detached family home. Recently updated the property is presented to a high standard with many bespoke features. (contd...)

Description

Lytton Close is an impressive individually designed four bedroom detached family home. Recently updated the property is presented to a high standard with many bespoke features.

The accommodation comprises four good size double bedrooms with a stunning luxury style en-suite bathroom to the master that boasts a contemporary freestanding bath tub and walk in shower.

Excellent storage space and the family bathroom is also located on the first floor.

The ground floor accommodation has been arranged around the central entrance hall and comprises two very good size reception rooms looking out into the garden. A separate study and downstairs cloakroom are located nearby.   

The beating heart of this lovely family home is the open plan kitchen/family room featuring island counter and bi-folding doors to the garden. The utility room is also accessed from this useful and practical addition to the house.   

This property offers great entertaining and living space and is set in a sought after private residential road within walking distance of Woking Town Centre and the mainline Station.

Currently benefitting from ongoing re-generation Woking has adopted a brighter more contemporary image in recent years.   

Shoppers should head for the town centre where a variety of retail choice can be perused including many high street names with delicious al fresco dining to be enjoyed at Carluccio\?s and Tante Marie. The many other coffee shops, café?s, and restaurants including Nandos, Pizza Express and Costa Coffee are on hand for the shopper in need of refreshment.

The entertainment enthusiast will appreciate the New Victoria Theatre where many London and international shows can be viewed, the Ambassadors cinema complex screening the latest film releases and The Lightbox with a canal side setting for an injection of artistic culture.

Sports activities and clubs are well presented in the area with a range of gyms on offer including the recently upgraded sports centre and swimming pool, Hook Heath lawn tennis club, David Lloyd health and racquets club and Pure Gym.   

Cyclists and walkers can step out to rural countryside on Guildford downs and nearby Surrey Hills is recognized as an area of outstanding natural beauty.

Woking is not only a great place to live, it also boasts excellent access to London for commuting, shopping and leisure. Whether you require the daily commute or want to catch a West End show, hit the stores on Oxford Street or explore the historical and cultural attractions, Woking Mainline Station boasts one of the most regular direct services into central London.

You can reach the capital in around 54 minutes via the A3, while London Waterloo is just 25 minutes away by train. If you are heading further afield for business or pleasure, there?s also easy access to the M25, M3, and M4, plus Heathrow and Gatwick airports.

Detached Character Home
Four Double Bedrooms
Luxury En-suite Bathroom
Two Reception Rooms
Modern Kitchen And Family Room
Modern Family Bathroom
Utility Room
Wood Flooring
Landscaped Garden
Detached Garage
Walking Distance To Town Centre

Entrance Hall    Stairs to first floor, storage cupboards for shoes and coats, understairs storage, radiator, wood floors, doors to all rooms.

Dining Room 13\? x 10\?6\" (3.96m x 3.2m). Dual aspect reception room with double radiator, door to study area.

Study 6\?7\" x 5\?11\" (2m x 1.8m). Glazed window to side aspect, double radiator.

Cloakroom    Two piece cloakroom with low level WC, wash hand basin, window, radiator, tiled floor.

Living Room 22\?10\" x 14\? (6.96m x 4.27m). Stunning reception room with bay window and double doors leading onto rear garden, feature fireplace with heath and mantle, three radiators, stripped wood flooring.

Kitchen / Breakfast Room 19\?11\" x 13\?9\" (6.07m x 4.2m). Superb modern fitted kitchen with a range of eye and base level units solid marble roll edge work tops and island counter with breakfast bar, inset sink and drainer unit with mixer tap, space for gas range with extractor hood over, space for American fridge/freezer, integrated dishwasher, open plan to:-

Family Room 10\?8\" x 9\?9\" (3.25m x 2.97m). Superb open plan space with bi-folding doors fully opening to the garden.

Utility Room    Fitted with a range eye and base level units with roll edge work tops and inset sink and drainer unit, space and plumbing for white goods.

Master Bedroom 18\?5\" x 12\?11\" (5.61m x 3.94m). Stunning bedroom with bay window, radiator, door to:-

Ensuite Bathroom    Luxury modern fitted bathroom comprising contemporary freestanding tub as the central feature, walk-in wet area with integrated rain-soak shower, low level wc with window above, wash hand basin and vanity unit.

Bedroom Two 15\?5\" x 11\?1\" (4.7m x 3.38m). Double bedroom with window looking out to garden, radiator.

Bedroom Three 11\?6\" x 1\?1\" (3.5m x 0.33m). Window, radiator, built in wardrobe.

Bedroom Four 10\?10\" x 10\?2\" (3.3m x 3.1m). window, radiator, Velux window.

Family Bathroom    Modern fitted family bathroom comprising panel enclosed bath with shower and shower screen, wash hand basin, heated towel rail, window, fitted storage cupboard.

First Floor Landing    Doors to all rooms, access to loft, built in cupboards providing useful storage space.

OUTSIDE

Rear Garden    Panel enclosed rear garden with patio adjoining house, large lawn area, mature shrub borders and rear access to garage, outside sink and taps, access to driveway.

Front    Gated gravel driveway leading to garage, access to property and gardens.

Garage    Single garage.

4 bedrooms

Wednesday, November 29, 2017

How to Lay Tile: Install a Ceramic Tile Floor In the Bathroom

Read article : How to Lay Tile: Install a Ceramic Tile Floor In the Bathroom

Cover up an old floor

Whether you’re replacing an old shabby floor or installing a new one, you can’t beat ceramic or stone tile for durability and appearance. When laid properly, it’s virtually a forever floor that requires almost no care and maintenance. And you can select materials from a vast array of colors and textures. We’ll cover how to lay tile in a few steps.

What’s equally attractive is that you can lay a first-class tile floor yourself, often in one weekend, and save the $500 to $1,500 cost of hiring a pro.

The key to keeping the job simple is to cover the old vinyl or other flooring with a new thin underlayment that gives you a fresh, clean start. No messy tear-out and repair. In this article, we’ll demonstrate how to install a thin “backer board” over the old floor. Then we’ll cover tile-setting techniques, from layout and cutting to grout and cleanup.

This is a two-day project for most bathrooms, even if you don’t have any previous tile experience. If you’re comfortable using basic hand tools and have the patience to align tiles just right, you can handle this job. The entire cost of this project for a typical bath ranges from $300 to $600.

Estimating the Cost of a Tile Project

The tile itself will be your biggest cost, so start by measuring the square footage of the floor. Then add 10 percent for cutting waste. If you choose a more complex layout than the simple grid pattern we used, your waste will be greater. Most tile sells for $5 to $15 per square foot, but you can spend as little as $3 or more than $50. If you have to install backer board, add $2 per square foot to the cost of the tile. Other materials will cost about $90, regardless of bathroom size. The tile tools you’ll need (including a tile cutter) will total $60 to $80.

Assess your floor

The success of any tile job depends on a solid base, that is, a floor that flexes very little as you walk across it. If you have a concrete subfloor, this isn’t an issue. You can lay tile directly over the existing vinyl as long as it’s well adhered.

If possible, avoid tearing out vinyl flooring. Leaving it in place saves time, of course, but it also reduces asbestos hazard concerns. Asbestos was used in sheet vinyl and vinyl tile until the mid-1980s. By leaving the vinyl undisturbed, you won’t risk sending asbestos fibers into the air.

If you have a wood subfloor, there’s a good chance that you’ll have to install backer board over your vinyl to make the floor thicker and stiff enough for tile. The easiest way to see flooring thickness is to pull off a floor register. Otherwise look for plumbing passageways through the floor. As a last resort, drill through the floor with a 1-in. or larger spade bit (your new floor will cover the hole later). To prevent asbestos dust from becoming airborne, mist the bit with a spray bottle as you drill. In addition to floor thickness, you’ll need to determine joist spacing. If there’s an unfinished basement or crawlspace below the floor, simply measure the spacing. If there’s a ceiling, probe for joists with a drill bit.

If the joists are spaced 16 in. apart, the layers of structural flooring beneath the vinyl should add up to at least 1-1/8 in. With joists every 24 in., you need 1-1/2 in. If your floor is too thin for tile, add a thicker layer of tile backer board. Our floor required 1/4-in.-thick backer. Yours might need 1/2-in. backer to reach the minimum thickness. If your floor is already thick enough, you can simply prep the vinyl floor (Photos 1 – 4) and skip the backer installation (Photos 5 – 8). Then tile directly over the vinyl, following the same steps we used over backer board.

Regardless of the type of subfloor, there are two situations where you can’t leave vinyl in place: First, if large areas of the vinyl are loose, don’t set tile or backer over it. Small loose spots are acceptable and easy to deal with (Photo 4).

Second, “cushioned” sheet vinyl must be removed before you can set tile. Cushioned vinyl has a foam backing that makes it noticeably thicker and softer than standard vinyl flooring. It’s too spongy to support tile or backer board. Before removing it, call your local health department for instructions on how to check for asbestos and proper procedures if asbestos is present.

Gather Advice While You Shop

Home centers carry everything you need for this project, but begin shopping at a tile store, where you’re more likely to get expert advice. Make a quick sketch of your floor plan and jot down all the dimensions. Also take a photo of the floor at the doorway. This will help the tile store staff recommend a “transition” to neatly join the tile to the hallway flooring. Transitions come in different styles to suit any situation.

When you choose the tile itself, ask if it requires any special installation steps. Some tile, for example, should be coated with grout release before grouting. Also ask about cutting techniques for the tile. You’ll use sanded grout for the floor. Ask if sanded caulk is available in a color that matches your grout for the floor/tub and floor/wall tile joints.

Prepare the room

First, get the toilet out of your way. Stuff a rag in the hole to block sewer gases. If your home only has one toilet, you can leave it in place until you install the backer board. Keep a supply of wax rings on hand if you plan to reinstall the toilet at the end of each day.

If you expect to keep your vanity for many years to come, leave it in place and tile around it. But if you think you might replace it, remove it now. When the job’s done, you can reinstall the old vanity or put in a new one. Having the vanity out of the way gives you more workspace, and you won’t have to cut backer board and tiles to fit around it. This also eliminates the floor repair problem if you install a smaller vanity or pedestal sink in the future.

Pull off the baseboard or plan to add base shoe molding. This leads to a neater-looking job because the edges of the tile will be covered later—jagged cuts and slight measuring mistakes are hidden. If your baseboard has base shoe molding, remove only the base shoe. Backer board and tile will raise your floor 3/4 in. or more. So you’ll have to remove and undercut the door. To mark the door for cutting, stack backer board, tile and two layers of cardboard on the floor (see Photo 3). Mark the door 1/2 in. above the stack, remove the door and cut off the bottom.

Scrub, screw and patch the floor

Install a Ceramic Tile Floor in the Bathroom

Photo 1: Scrub the floor with stripper

Remove the baseboard and toilet. Using an abrasive pad, scrub the floor hard with water mixed with vinyl floor stripper.

Install a Ceramic Tile Floor in the Bathroom

Photo 2: Drive screws into the floor joists

Mark the floor joists with chalk lines and drive 2-1/2-in. screws every 8 in. Don’t leave any screw heads protruding.

Install a Ceramic Tile Floor in the Bathroom

Photo 3: Cut the door trim to accommodate tile

Undercut door trim using a jamb saw or handsaw. A piece of backer board, tile and two layers of cardboard raise the saw to the correct height above the floor.

Install a Ceramic Tile Floor in the Bathroom

Photo 4: Fill low spots with thin-set

Cut out any loose sections of vinyl with a utility knife. Fill the void with thin-set using the flat edge of a notched trowel.

Scrub the floor with a vinyl floor stripper following the manufacturer’s instructions. The stripper will dissolve wax and other residue. Scrub hard with an abrasive scouring pad (Photo 1). The tiny scratches left by scrubbing help the thin-set bond better.

Next, drive screws through the floor into the joists (Photo 2). This ensures that the subfloor and underlayment are securely fastened. If there’s an unfinished basement below the floor, locating the joists is easy: Go to the basement and drill a couple of 1/4-in. holes up through the floor next to a joist. If you can’t locate the joists from below, pick a spot near one wall and drill a hole. If the bit breaks through into hollow space, move over 1 in. and drill another hole. Keep going until you hit a joist. Then go to the opposite wall and find the other end of the joist. Measure at intervals of 16 or 24 in. from the first joist to locate the others.

While you’re driving screws, look for any spots where the vinyl has loosened from the floor. Cut out loose spots and fill them (Photo 4). If there are any copper pipes that pass through the floor, wrap them with duct tape at floor level. Cement-based thin-set and grout can corrode copper.

Install backer board

Install a Ceramic Tile Floor in the Bathroom

Photo 5: Install backer board over the floor

Cover the floor with backer board. Cut inside corners, circles and curves with a drywall saw. Space pieces 1/8 in. apart and hold each one in place with two temporary screws.

Install a Ceramic Tile Floor in the Bathroom

Drywall saw

Use a drywall saw to cut corners, circles and curves in backer board.
Install a Ceramic Tile Floor in the Bathroom

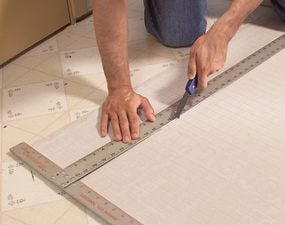
Photo 6: Score and snap the backer board

Make straight cuts with a scoring knife. Make three or four scoring passes, then snap the backer over a 2×4. When all the pieces have been laid out, label them and set them aside.

Install a Ceramic Tile Floor in the Bathroom

Scoring knife

Use a scoring knife to score the backer board.

Install a Ceramic Tile Floor in the Bathroom

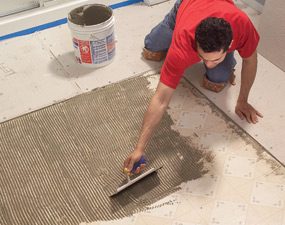
Photo 7: Trowel on the thin-set

Comb out a bed of thin-set just large enough for each piece of backer board using a 1/4-in. notched trowel held at a 45-degree angle. Screw the backer down before spreading thin-set for the next piece.

Install a Ceramic Tile Floor in the Bathroom

Notched trowel

Use a 1/4-in. notched trowel to spread the thin-set over the floor.

Install a Ceramic Tile Floor in the Bathroom

Photo 8: Cover the joints

Press adhesive-backed mesh tape over the joints and skim over the tape with thin-set. When the thin-set is firm but not fully hardened, scrape away any ridges with a putty knife.

The backer board is fastened with a combination of screws and thin-set adhesive. Cut and lay out all the pieces before you mix the thin-set (Photos 5 and 6). You can run the sheets in any direction, but be sure to stagger the joints so you never have four corners meeting at one point. Leave a 1/8-in. space between the sheets and along the vanity, tub or shower. The gap along walls must be at least 1/8 in. wide, but a wider gap (about 1/2 in.) makes the panels easier to set in place.

After cutting and fitting, label the location of each one and set them all aside. Vacuum the floor and have your drill and screws ready to go before you mix the thin-set. Read the thin-set’s label. Spread the thin-set with a 1/4-in. notched trowel. Comb in one direction so air can escape when you embed the backer (Photo 7). Drive screws every 6 in. around the perimeter of each piece and every 8 in. “in the field” (across the face of the panel). If the leftover thin-set is still workable, you can immediately embed mesh tape over the joints (Photo 8).

If the thin-set has become too stiff or chunky, mix a new batch. Use “alkali-resistant” tape that’s meant for backer board. While the tape coat of thin-set hardens, run a putty knife over all the screw heads to scrape off the “mushroom” bulges around screws. Drive in any protruding screw heads you come across.

CAUTION!

Cement products like thin-set and grout draw moisture from skin and can even cause burns that require medical attention. While most pros work bare-handed, wear gloves if you have any special sensitivity. Also wear eye protection while mixing thin-set and grout.

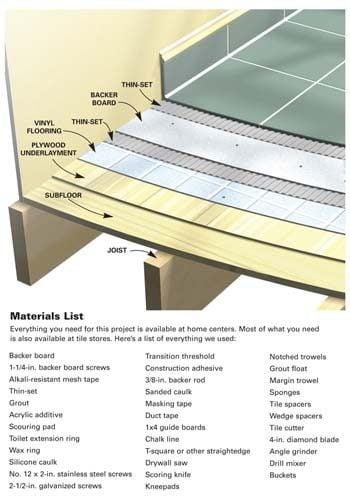
Figure A: Ceramic Tile Over Vinyl

Everything you need for this project is available at home centers. Most of what you need is also available at tile stores.

Cutaway of a tile floor over vinyl

Careful layout pays off

Install a Ceramic Tile Floor in the Bathroom

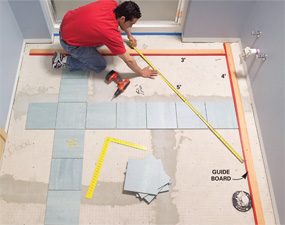
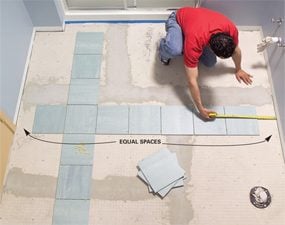
Photo 9: Test your layout to avoid small pieces along the walls

Dry-lay tile to determine the best layout. Start with centered rows, leaving equal spaces at walls. Then reposition rows until you find the optimal layout.

Install a Ceramic Tile Floor in the Bathroom

Photo 10: Attach guide boards to guide the layout

Screw guide boards to the floor following your chosen layout. Position the guides so you can lay all the field tiles without moving the guides. Make sure the guides are at right angles by measuring out a 3-4-5 triangle.

Too often, tile novices simply start setting tile in a corner and continue along two walls until the floor is covered. Sometimes they get lucky and the floor looks good. But more often this method leads to trouble:

They end up with awkward-looking, thin slivers of tile along a prominent wall or at the doorway. And the tile looks even worse when walls are badly out of square or crooked—a straight grout line running too close to a wall emphasizes the wall’s imperfections.

Whether you’re laying a simple grid pattern like we show here, or a diagonal pattern with a border, the best tile layout usually calls for centering full tiles between walls so the partial tiles along the edges will end up all the same size. Don’t rely on your tape measure and mental arithmetic. Rip open a carton of tile, grab a handful of spacers and experiment with your layout on the floor.

To begin, center rows of tile between walls so you have equal spaces along walls that face each other (Photo 9). Set the two rows parallel to the two most prominent walls. Then make adjustments, trying to achieve these three goals:

  • Use full tiles at doorways and along the bathtub or shower. These are usually the only places where the edges of the floor aren’t covered by baseboard. If you use full tiles in these exposed spots, you don’t have to worry about making smooth, perfect cuts.
  • Avoid narrow tiles along walls. Ideally, you’ll end up with tiles cut to half size or larger. Avoid cutting tile to widths less than 2 in.
  • Minimize cutting and try to avoid difficult cuts. For example: Cutting tile to an L-shape to fit around an outside corner is especially difficult when one arm of the “L” is less than 2 in. wide. The arm tends to break off as you cut.

Chances are, your layout won’t meet all these goals. Because the shower stall was the focal point in our bathroom, we made it our No. 1 layout priority. We chose to use full tiles in front of the shower. That left us with 3-in.-wide tiles along the opposite wall, which was less prominent. We also chose to center the tile rows on the shower; that meant we had to use cut tiles at the doorway.

Once you determine a layout, establish lines to guide your tile positioning. The usual method is to snap chalk lines on the floor. But chalk lines are hard to see after you’ve spread thin-set, and one row of tile may slip as you set the next row. Here’s a more reliable guide: Choose straight boards a foot shorter than the length and width of the room. Tape one edge of each board so thin-set won’t stick to them.

Then screw the boards to the floor at a right angle to form a guide that eliminates guesswork and shifting (Photo 10).

Video: Create Your Own Floor Tile Layout

Planning the layout for a tile project is usually the hardest and most time- consuming step. Watch this video to learn how a pro does it. You’ll see how to snap chalk lines and make sure they are perfectly square. Plus, you’ll learn how to avoid unsightly narrow, difficult-to-cut tiles along a wall. Don’t start a tile project until you’ve watch this video!

Set the tile (finally!)

Install a Ceramic Tile Floor in the Bathroom

Photo 11: Set the full tiles

Comb out a few square feet of thin-set and set tile against the guides. Continue until all the full tiles are in place. Tip: Watch for squeeze-out between tiles and rake it out with tile spacers.

Install a Ceramic Tile Floor in the Bathroom

Spacers detail

Keep the gaps between tiles even by using spacers

Install a Ceramic Tile Floor in the Bathroom

Photo 12: Spread thin-set and set the perimeter tiles.

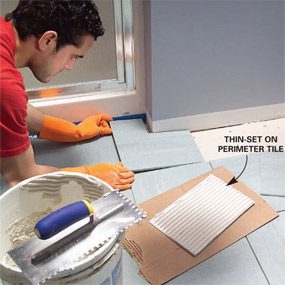
Cut and set the perimeter tiles after the thin-set beneath the full tiles has hardened. In spaces too narrow for your trowel, comb thin-set onto the backs of tiles.

It’s usually easiest—and most efficient—to set tile in two phases: First set all the full “field” tiles (Photo 11). Then, when the thin-set has hardened for several hours, cut all the perimeter tiles and set them (Photo 12). Here are some tips for both phases of the job:

  • The trowel you use for setting tile may be different from the one you used to embed the backer. The thin-set label tells you which notch size to use relative to tile size.
  • Dampen the backer with a sponge just before applying thin-set. This keeps the thin-set from drying out too quickly.
  • Comb the thin-set in one direction so air pockets won’t be trapped under tile.
  • Open three or four cartons and mix the tiles as you set them. Pattern and color vary slightly from one carton to the next.
  • Don’t just set each tile into place; press down on the tile and wiggle it to embed it firmly in the thin-set.
  • Watch for “tipped” corners. When you press a tile in place, it’s easy to tilt it slightly so that one corner stands higher or lower than neighboring tiles.
  • When you complete a section of tile, inspect it before moving on. Make sure the tiles line up correctly and spacers are in place. Wipe any thin-set off the face of tiles with a damp sponge.
  • When the thin-set becomes chunky or too stiff, throw it away and mix more. Never try to extend the life of thin-set or grout by adding water.
  • Cut perimeter tile so that caulked joints (at tub) are the same width as grouted joints.

Prepare the floor for grout

Install a Ceramic Tile Floor in the Bathroom

Photo 13: Install an extension ring over the toilet flange

Remove the old screws from the toilet flange and apply a heavy bead of silicone caulk. Fasten the extension ring over the old flange with stainless steel or brass screws.

Install a Ceramic Tile Floor in the Bathroom

Photo 14: Install the transition strip

Glue the transition into place with construction adhesive. If carpet meets the transition, you may have to add a new tack strip.

Install a Ceramic Tile Floor in the Bathroom

Photo 15: Stuff backer rod along the wall

Push backer rod into joints that will be caulked later. The foam rod keeps grout out of joints. After grouting, pull out the rod and caulk the joints.

When all the tiles are in place and the thin-set has hardened, remove all the spacers. Next, raise the toilet flange by adding an extension ring or two (Photo 13). The extended flange should be flush with or higher than the surrounding tile.

When you grout, fill in between the flange and tile. That way, any future leak around the flange will show up on the bathroom floor instead of on the ceiling below. If you plan to use a glue-down transition as we did, this is the time to install it.

Here’s how we dealt with our transition: First, we removed the old metal strip that covered the carpet’s edge. Then we cut our transition strip to fit between the door jambs using a miter saw. Next, we added a tack strip to hold the carpet in place. Before we could glue the transition to the floor (Photo 14), we had to remove a thin strip of the old vinyl floor.

Grout is too brittle to handle the slight shifting movements that are normal in any room. Keep grout out of joints wherever the floor meets the tub, shower, vanity or walls (Photo 15).

Pack the joints with grout

Install a Ceramic Tile Floor in the Bathroom

Photo 16: Grout the joints

Work the grout back and forth across the floor, diagonal to the joints and holding the float at a 45-degree angle. Then scrape off the excess grout, holding the float almost upright.

The thin-set directions will tell you how soon you can grout the floor—usually 24 hours. Grouting isn’t complex. Just plop a couple of scoops of grout onto the floor in a corner, work the grout into joints (Photo 16) and scrape off the excess grout before moving to the next section. In addition:

  • Mix the grout to a mashed-potatoes consistency. Adding extra liquid makes grout easier to work with but weakens it.
  • Don’t just spread the grout over the joints; press hard to pack it into the joints. If you’re doing it right, your forearm will get a good workout.
  • Whether you’re filling joints or scraping off excess grout, always push the float diagonally across the tiles.
  • Scrape off the excess to leave tile as clean as you can. The less grout you leave on the tiles, the easier cleanup will be.
  • When you’re done, cover the grout bucket with a plastic bag and set it in a cool place to slow the hardening process. During cleanup, you may find spots that need a little extra.

Grout cleanup

Install a Ceramic Tile Floor in the Bathroom

Photo 17: Clean the tiles

Wipe grout off the tile surface with a damp sponge. Wipe gently on the first pass so you don’t pull grout out of the joints. Rinse the sponge often.

Clean the surface of the tile when the grout is stiff enough to stay put in the joints but still soft enough to wipe off the tile surface. During hot, dry weather, grout can become difficult to wipe away in just 10 minutes, so get ready for cleanup before you even mix the grout. You’ll need two buckets of clean water, two sponges, a synthetic scouring pad and a dry rag.

As soon as you’re done grouting, go to the first section you grouted and wipe across a joint with a damp sponge. If the sponge pulls grout out of the joint, wait five minutes and try again. In cool, damp weather, the grout may stay too soft for an hour. When the grout is hard enough, gently wipe the tile with a damp sponge.

Rinse the sponge frequently as you wipe the entire floor (Photo 17). If you come across tough spots, scrub them with the scouring pad. Be careful where you put your feet and knees—don’t mar your perfect grout joints.

Immediately after the first pass, grab the second bucket of clean water and the fresh sponge and make a second, more thorough pass. Then, as the tile surface dries, wipe it with a dry terry cloth. The dry haze should buff off easily. If not, go for fresh water and sponge the floor again. If you can’t get rid of the haze, don’t panic. Products that remove haze are available wherever tile is sold.

Let the grout cure overnight before you caulk joints, set the toilet or reinstall baseboard. Grout sealer is a good precaution against staining: Some products can be applied 24 hours after grouting; others require a two- to three-week wait. If you have leftover tile or grout, keep them in case you have to make repairs in the future. Be sure to write down the brand, color and retailer of the tile.

How NOT to Save Money on a Tile Project

I’m a devout cheapskate, but when it comes to buying thin-set and grout, I grab the most expensive products on the shelf. More expensive thin-sets and grouts generally contain a higher proportion of the polymers that improve adhesion, durability and stain resistance.

In most situations, cheaper products would perform just fine. But if I can reduce the risks of loose tiles or cracked grout by spending an extra $30 on a typical bathroom project, I consider that a bargain.

Liquid additive is another smart investment. If the thin-set or grout label says you can mix it with water or an additive, use additive. These liquids (labeled “latex, ” “polymer” or “acrylic”) are meant to improve adhesion and stain resistance. But as a bonus, they produce a slick, creamy consistency. Thin-set combs out more smoothly, grout flows easily into joints, and both remain workable longer.

Also buy a mixer for your drill. Mixers come in various styles and sizes. Go easy on the trigger. If you run the drill at full speed, you can create millions of tiny air bubbles, which will weaken the mix.

Tile cutting tools

Install a Ceramic Tile Floor in the Bathroom

Tile cutter

A tile cutter is the fastest way to cut tile. Just push the handle forward and a small wheel scores the tile. Then push the handle down and the tile snaps in two. You can’t beat a tile cutter for convenience. It makes no mess and you can drag it around the room as you work. But a tile cutter has zero versatility. It makes straight cuts across the entire tile—no curves or corner cuts. Cutting 1 in. or less off a tile can be difficult or impossible. You can rent one at rental centers and some tile shops.

Install a Ceramic Tile Floor in the Bathroom

Wet saw

A wet saw cuts with a diamond blade while water cools the blade and eliminates dust. You can cut notches, trim off tiny slivers of tile, cut miters and even make curves. You’ll get clean cuts in any type of tile. But wet saws are messy. They spit water and raise a cloud of gritty mist. If you use one indoors, contain the mist with curtains of plastic film and cover nearby surfaces. You can buy a small wet saw like the one shown here or rent a professional model from a tile store or home or rental center. If you only have a few cuts that require a wet saw, call a tile store. Many make cuts for a small fee.

Install a Ceramic Tile Floor in the Bathroom

Angle grinder

An angle grinder equipped with a diamond blade can make straight cuts, curves and notches in any type of tile. Since all your cuts are freehand, this isn’t a precision tool, but you can grind away imperfections with the tip of the blade. Use a grinder only outside. Wear a dust mask and eye protection.

Install a Ceramic Tile Floor in the Bathroom

Nippers

Nippers are useful for rough curves and notches. They don’t cut tile, but bite out small chunks, leaving jagged edges.

Install a Ceramic Tile Floor in the Bathroom

Contour gauge

A contour gauge is a great tool for marking troublesome shapes on tile. Just press it against any odd-shaped surface (like the curved corner of a bathtub) and transfer the profile to tile.

Here are the tools that can cut your tile. Buy or rent the ones that make the most sense for your project.

In addition to the tools shown here, a carbide abrasive blade that fits in a jigsaw cuts slowly but leaves fairly clean cuts in softer types of ceramic tile and natural stone. A carbide abrasive hole saw cuts perfect holes for plumbing pipes and fixtures.

A rubbing stone is simply an abrasive block, similar to the wheel in a bench grinder. Use it to smooth sharp or slightly chipped cuts that will be exposed.

Additional Information

Required Tools for this Project

Have the necessary tools for this DIY project lined up before you start—you’ll save time and frustration.

You’ll also need these specialty tools for working with tile and backer board:
Scoring knife, Margin trowel, Tile cutter, 4-in. diamond blade, Drill mixer, Offset saw, Tile cutter, Nippers, Wet saw
You can also use an angle grinder for cutting tile.

Friday, November 10, 2017

Complete Bathroom Suite Inc 1600MM Bath Tub Basin Sink Toilet Set • £118.95

Read article : Complete Bathroom Suite Inc 1600MM Bath Tub Basin Sink Toilet Set • £118.95

See Details on eBay

£118.95 Buy It Now 7d, 30-Day Returns

Seller: betterbathrooms_outlet (81,181) 98.8% Top-Rated Plus, Location: GB, Ships to: GB, Item: 281088808169Condition: New, Bath Style: Straight Bath, MPN: Does not apply, Features: Bath, Brand: Better Bathrooms Outlet, Guarantee Year: 10,Details: UK Customer Service & Payment Hotline 01942 369 826 Mon-Fri 8am-8pm Sat 9am-5pm Sun 10am-4pm --> SALE Best Sellers Bathroom Suites Baths Shower Enclosures Toilets Basins Taps Furniture Showers Shower Systems Accessories Assisted Living Flooring Heating Lighting Mirrors Plumbing Stone Care Tiles Wastes & Plugs Spares Other Categories Basins Baths Furniture Showers Shower Systems Shower Enclosures Pivot & Hinged Quadrant Walk In Bi Fold Sliding Door Bathroom Suites Taps Tap Packs Tap Range Toilets Assisted Living Accessories Plumbing Flooring Heating Lighting Mirrors Spares / Other Stone Care Tiles Underfloor Heating Wastes & Plugs Wall Hung Bathroom Suites Back to Wall Suites Furniture Bathroom Suites Designer Bathroom Suites 2 Piece Toilet & Basin Sets Shower Cubicle Suites Cloakroom Suites Freestanding Bath Suites Straight Bath Suites Complete Suites 2 Piece Suites With Taps Bathroom Furniture Suites Traditional Toilet & Basin Set Shower Bath Suites Complete Bathroom Suites Modern Toilet & Basin Sets Towel Rails Towel Rings Toilet Brushes and Holders Soap Dish Holders Accessory Packs Robe Hooks Other Accessories Tumbler and Holders Toilet Paper Holders Natural Stone Tiles Wall Tiles Tile Accessories & Tools Floor Tiles Ceramic Tiles Adhesives Grouts Bonding Mosaic Tiles Border Tiles Latest Products Thermostatic Bath Shower Mixer Valve Chrome Modern Bathroom Tap Wall Mounted £69.95£111.95 View item Bathroom Storage Cabinet ; 1200mm Walnut Cabinet Internal Shelving ; Soft Close £212.95£340.95 View item --> Complete Bathroom Suite Inc 1600MM Bath Tub Basin Sink Toilet Set £109.95-395.95 Was: £ More Information Combine the luxurious mira mono shower bath with option of suite for a stunning complete bathroom design. Matching toilet and basin sets are included to complete a classy finish Mira Mono 1600mm Single Ended Bath - Length: 1600mm - Width: 695mm - Material Spec: Manufactured from 5mm Thick Acrylic - BS19001 Accredited - Includes: Complete Leg Set - Excludes: Taps, Waste and Bath panels - Excludes: Pre-Drilled Tap Holes Jet Bathroom Suite - Manufactured from high quality ceramic - Toilet: Height 750mm | Width: 360mm | Projection 670mm - Includes: Soft close seat - Basin: Height 790mm | Width: 485mm | Depth 400mm - Includes: 1 Tap Hole Full Pedestal - Includes: 3/6 litre dual flush cistern - Includes: Internal Overflow - Excludes: Taps and waste -

 Price - PicClick Insights - Price  Seller - Over 81,181 items sold. 1.2% negative feedback. Top-Rated Plus! Top-Rated Seller, 30-day return policy, ships in 1 business day with tracking. PicClick Insights - Seller Over 81,181 items sold. 1.2% negative feedback. Top-Rated Plus! Top-Rated Seller, 30-day return policy, ships in 1 business day with tracking. Recent Feedback