Showing posts sorted by date for query simple small bathtub. Sort by relevance Show all posts

Sunday, March 11, 2018

50 cheap and chic ways to perk up your bathroom

Read article : 50 cheap and chic ways to perk up your bathroom
Giving your bathroom a facelift doesn’t have to break the bank. In fact, you can do it on a dime, without compromising style. Here are 50 cheap and chic ways to update one of the most used rooms in the house.

1 Repaint – nothing perks up a room like a fresh coat of paint.

2 Invest in new towels to replace any that are looking worse for wear.

3 If you’re running out of space to store toiletries, keep the overflow in a rustic wooden bowl or wicker basket.

4Declutter. Clearing off the surface of your bathroom counter does wonders for making the room look fresh and clean.

5 Install new faucets for a quick upgrade.

6Add fresh flowers.

7 Opt for colourful towels if your bathroom walls are a neutral colour.

8 Play with patterns without having to turn to wallpaper or a new paint job with inexpensive wall decals.

9Floating candles in a glass bowl on the counter add warmth.

10 Toiletries in beautiful packaging can go a long way to pretty up your counter.

11 Replace your shower curtain.

12 Place a tall vase filled with dried flowers on the floor for some rustic charm.

13 Incense in an ornate holder is functional and decorative.

14 Line the counter with matching accessories (toothbrush holder, soap dispenser) ideally from the same line, for a uniform look.

15 Install a floating shelf above the toilet and line with small plants that don’t require a lot of light.

16
Shampoo, conditioner and soap dispensers eliminate clutter around the tub.17 Place a small stool in one corner of the bathroom and neatly stack towels on it.

18 Search out some interesting hooks for bath towels.

19 Room diffusers are both decorative and do a lot to refresh the room.

20 A wall-mounted magazine rack creates space.

21 House extra rolls of toilet paper in a ceramic pot or urn.

22 Find a new use for an old chair by painting it a bright colour and stacking magazines on it.

23 Line drawers with pretty wallpaper samples.

24 Fill a square, glass container with shells you or your kids have collected from various family vacations.

25
Group candles of varying sizes around the bathtub for instant ambiance.

26
Tie colourful ribbon around small groupings of rolled up neutral-coloured hand towels. Display on the counter.

27 Put a small shelf behind the toilet to store books.

28 Frame a piece of corkboard and use it to house your jewellery. Chances are you’re probably choosing accessories at the same time you’re applying make-up.

29
Frame vacation photos of the beach or waterfalls for some aqua-themed style.

30 Clear up clutter around the tub with a simple shower caddy.

31 If there is a window in your bathroom, add plants for a nice splash of green in your space.

32 Stagger towel hooks for an asymmetrical display of bath towels, ideally in graduating shades of the same colour.

33 Purge all the junk that’s accumulated in the drawers of the vanity. No wonder you can’t find the tweezers!

34 If you have kids, avoid countertop chaos by assigning each their own toiletries basket. There are many inexpensive options at most home decor stores.

35 Treat yourself to a bamboo bath caddy, with spots for a book, candle and glass of wine.

36 Clean out the medicine cabinet regularly to avoid a pile-up of expired creams and capsules.

37 Do away with the ratty bath mat and replace it with something plush and soft.

38 Line the back of the counter with small glass bottles and place a fresh cut flower in each.

39 Clean the bathroom from top to bottom to make it sparkle.

40 Add artwork if you have the wall space.

41 A stack of three neatly folded black or charcoal towels on a white countertop makes a style statement, so long as the counter is clear of clutter.

42 Replace an over-the-sink medicine cabinet with one that fits tightly in the corner if you can. Install an elegant mirror in its place.

43 Store the little things (hair elastics, lip gloss) in a pretty box or basket with a lid to avoid a tidal wave of trinkets taking over the counter.

44 House make-up in a vintage-inspired jewellery box.

45 Remove the door to one cabinet and show off your prettiest toiletries and perfume bottles.

46 Get rid of any cleaning products you have lying around. Store these under the sink in the kitchen.

47 Put a small end table beside the tub (of the same height) and use it to house your bath towel while you’re soaking.

48 Install new knobs or pulls on cabinets. Brushed metal is a stylish option.

49 Put dimmers on light fixtures so you have the option of softer lighting.

50 Try to keep clutter off your counter all the time, not just when company’s coming.

Pick and choose from this list as a way to continually upgrade your bathroom and keep it looking tidy and fresh.

Wednesday, March 7, 2018

A Small Bathroom That Feels Big

Read article : A Small Bathroom That Feels Big

The small bath problem and proposed solutions

A Small Bathroom That Feels Big

Lead photo

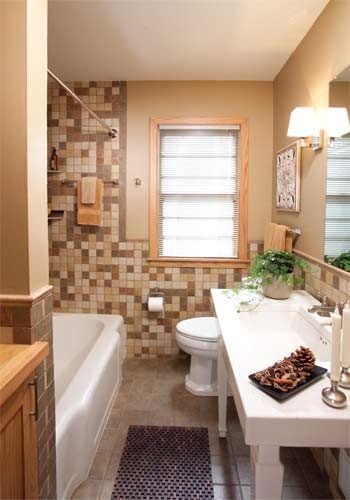
Bathroom after remodeling

The kitchen may be the heart of the home, but over the past 20 years, the bathroom has morphed into the home's soul—a savored refuge from our busy world. Once little more than utilitarian space, the bath has expanded, both in size and in role, to serve as a pleasing retreat.

How to create such a retreat in an ordinary, compact 5 x 9-ft. bathroom could easily leave the owner feeling like a, well, lost soul. Remodeling a bath built to accommodate a standard 5-ft. tub, a toilet and a vanity without adding footage can be a challenge.

Just ask Pam Peterson, who wanted to mine more space from her small 1954 bathroom. She turned to designer Matthew Rain of Abode Drafting, who, along with the remodelers at Mike Otto Construction, “grew” her limited space without changing the room's footprint and added modern elegance to a dated room.

Their solution relied on several fixes: reconfiguring the linen closet; brightening up the fixtures; updating the wall, tile and floor surfaces; and radically changing the vanity.

The Bathroom, Before and After

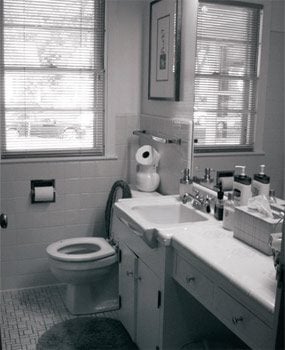
An oversized vanity and solid-color harvest gold tile visually shrank this already small bathroom.

With the installation of bright fixtures and right-sized pieces, this bathroom gains a big-time feel.

Black and white beforeBathroom before remodeling

Fewer doors, more space

A Small Bathroom That Feels Big

More storage, fewer swinging doors

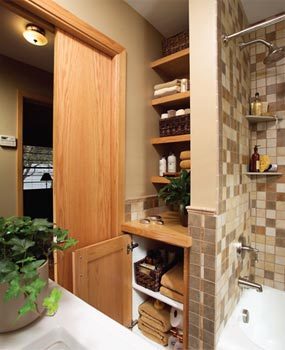
This corner is now functional storage with an open look and feel. Eliminating most of the cabinet doors and adding a pocket door created a greater sense of space.

Rain cleaned up the structural clutter by rethinking the original linen closet. It had four cabinet doors in the bathroom and another access door from the hallway. “With all those cabinet doors and the big bathroom door, I felt I was always dodging and weaving anytime I needed to get something,” says Peterson of the old layout. “Some door was always in the way.”

The new design turned a bad closet into a great one by shedding all but one of the bathroom cabinet doors and removing the hallway cabinetry entirely. “The new wall space in the hall allowed us to turn the old bathroom door into a pocket door. Eliminating a door 'in-swing' immediately gives a room a bigger feel,” says Rain.

The new bathroom storage area has five custom open shelves made of red oak (to match the room's new light-toned trim), perfect for stacks of towels (photo). “By leaving these shelves open, it also adds to the room's feeling of spaciousness,” says Rain, “and because you can quickly grab a towel, it's functional as well.”

Tiled for a big feel

A Small Bathroom That Feels Big

Mixed tile colors

The rough edges and rich colors of the tile create the illusion of natural stone, but in reality, it's low-maintenance porcelain. Because the mosaic style breaks up the color pattern, the eye perceives that the room is larger.

Despite the recent interest in retro fashion, there is little nostalgia for the old harvest gold look. In this bathroom, the wall and floor surfaces were replaced with an easy-to-clean porcelain tile in a palette of warm colors—including gold.

While the mosaic tile is beautiful, it also serves a design purpose. “Both the scale of the 2-inch tile and the random arrangement give the feeling of being in a larger room,” says Rain. He found 2-in. tile that could be ordered in a random mix, which took the guesswork out of how much of each tile color to purchase for a mosaic (photo). “The dark floor tiles in a larger format, here a 6-by-6, also add to the spaciousness,” Rain says.

Bright, clean and open for small spaces

A Small Bathroom That Feels Big

Photo 1: Open sink console

To accent the open space underneath the console vanity, a polished chrome finish P-trap was used.

A Small Bathroom That Feels Big

Photo 2: New faucet and a refinished tub

The brushed nickel finish was selected for its long wear and because “it simply doesn't show dirt as much,” says designer Matthew Rain. The bathtub was refinished so it would match the clean white color of the new fixtures.

Peterson wanted a crisp look that wasn't overly modern. “I didn't want anything too elaborate in this little bath. It's hard to appreciate things in such a small room because there is no place to stand back and take it in,” she says. “I wanted a look with simple lines.”

Rain selected nearly all of the fixtures and accessories from Kohler's Memoirs collection. “The style matched up well with my client's tastes and the products were 'right-sized' for the scale of the room,” says Rain, adding that shopping online saved him and his client hours of legwork.

After 50 years of use, the tub was beginning to show its age. Replacement wasn't feasible without either special ordering an expensive custom bathtub to fit the constraints of the room or undertaking a more extensive remodel. “Because it's a high-quality cast-iron tub, I decided to spend $500 to refinish it,” says Peterson (Photo 2). “It looks good and saved money in demolition and installation costs.”

Warranties on tub refinishing vary but usually hover around the five-year mark. “I've found that a refinished tub will last about seven years when it's used every day or around 10 with low use,” says remodeler Mike Otto.

The old vanity was dated and with its clunky style took up too much space in the small bath. A contemporary console sink with square legs was used as a replacement with eye-popping results (Photo 1). The console style offers enough space to place toiletries by the basin but without the chunkiness of a traditional vanity.

“This is probably one of the biggest changes in the room when it comes to opening things up,” says Peterson. “I had wanted some unique pieces in the room and this is definitely one of them.”

Tuesday, March 6, 2018

Beach Cottage with Transitional Coastal Interiors

Read article : Beach Cottage with Transitional Coastal Interiors

Dining Room. Cottage Dining room with glass bubble cluster chandelier. Cottage Dining Room. <a href=Stunning open concept dining living room with a walnut dining table lined with William Sonoma Farallon Armchairs below a glass bubble cluster chandelier. #DiningRoom #Cottage #CottageDiningRoom #GlassBubbleClusterChandelier" width="642" height="448" />

With impeccable transitional coastal interiors by Nina Liddle Design, and located in Sconset, a small village in Nantucket, this beach cottage is all about color, pattern and nautical decor.

The cottage exudes sun-filled spaces with white walls that serve as a canvas for all the colors that beautifully come from slipcovered and upholstered furniture, decorative pillows and accessories.

A modern, transitional white kitchen brings this beach cottage to the next level, leaving nothing to wish for, except the desire to spend the entire summer or an entire life in this dreamy place.

Take the day to imagine yourself in this bright and airy cottage. I know the colors found here will make your day a tiny bit happier!

Beach Cottage with Transitional Coastal Interiors

Foyer. Coastal Foyer. Coastal Entrance Foyer. With a hint of color, this <a href=stunning foyer features shiplap walls, a wraparound staircase with a sisal stair runner beside an Oomph Fenwick Console Table, with a pair of raffia wrapped poufs and a rectangular raffia mirror. #Foyer #Entryway #Entrance Nina Liddle Design." width="642" height="967" />

With a hint of color, this stunning foyer features shiplap walls, a wraparound staircase with a sisal stair runner beside an orange Oomph Fenwick Console Table. A pair of raffia wrapped poufs were placed under the console while a rectangular raffia mirror is placed above it.

Open Concept Living Room

<a href=Open Concept Living Room. Open Concept Living Room Ideas. This open concept living room is painted in Benjamin Moore Horizon. #OpenConcept #Interiors #LivingRoom #BenjaminMooreHorizon #BMHorizon #BenjaminMoorePaintColors" width="642" height="427" />

 This open concept living room is painted in Benjamin Moore Horizon.

Decor

Living Room Chair and Pillow Ideas. Coastal Living room chair and pillow ideas. This coastal living room also <a href=features blue armchairs with white piping and decorative pillows and a accordion side table. #LivingRoom #Coastal #Chair #Pillows" width="642" height="444" />

The living room also features blue armchairs with white piping and decorative pillows and a accordion side table.

Dining Room

Dining Room. Cottage Dining room with glass bubble cluster chandelier. Cottage Dining Room. <a href=Stunning open concept dining living room with a walnut dining table lined with William Sonoma Farallon Armchairs below a glass bubble cluster chandelier. #DiningRoom #Cottage #CottageDiningRoom #GlassBubbleClusterChandelier The Muriel Chandelier by Oly Studio." width="642" height="448" />

This stunning open concept dining and living room exudes beauty with a walnut dining table lined with William Sonoma Farallon Armchairs below The Muriel Chandelier by Oly Studio. Timeless choices with a hint of “unexpected”. Love that!

Built-in Cabinet

Built-in cabinet. Living Room Built-in Display Cabinet. Living Room with custom Built-in Display Cabinet. The living room features a custom built-in display cabinet just before entering the kitchen area. Notice the <a href=large seaweed art print against the dark glossy navy blue backdrop, lit by a library wall sconce. The shelves display stacked books, coral and seashells. #LivingRoom #Cabinet #Builtin #DisplayCabinet #Bookshelves #Bookcase Nina Liddle Design." width="642" height="965" />

This living room continues to surprise with a custom built-in display cabinet placed just before entering the kitchen area. Notice the large seaweed art print against the dark glossy navy blue backdrop, lit by a library wall sconce. The shelves display stacked books, corals and seashells.

Kitchen

Kitchen Cottage. Cottage Kitchen Design. White Cottage Kitchen. White coastal kitchen Ideas. Stunning U-shaped kitchen with white cabinetry accented with <a href=brushed nickel hardware alongside white quartzite countertops with a subway tiled backsplash. The kitchen features a stainless steel stove below a white paneled stove hood accented with corbels across from a stainless steel industrial style, built-in refrigerator. A farm sink stands below three sash windows opposite an extra long kitchen island lined with Piston Barstools illuminated by a pair of lacquered navy lantern pendants from Oomph. Nina Liddle Design." width="642" height="464" />

Isn’t this an amazing kitchen? This coastal U-shaped kitchen features white cabinetry accented with brushed nickel hardware and white quartzite countertops. The backsplash are classic white subway tiles. The kitchen also features a stainless steel range below a white paneled stove hood accented with corbels. A farmhouse sink stands below three sash windows.

Kitchen Accessories

White Kitchen. Coastal White Kitchen. Modern Coastal White Kitchen. Transitional Coastal White Kitchen. Kitchen with white, flush front cabinets accented with brushed nickel pulls and white quartzite counters which highlight a stainless steel stove with subway tiled backsplash and paneled stove hood accented with corbels. The kitchen features an elongated kitchen island with Piston Barstools tucked below a white quartzite countertop lit by a pair of <a href=lacquered navy lantern pendants. The designer used a pair of the Oomph Palo Alto Lantern in this kitchen. Nina Liddle Design." width="642" height="913" />

The long kitchen island is lined with LEM Piston Barstools illuminated by a pair of lacquered navy lantern pendants. The designer used the Oomph Palo Alto Lantern in this kitchen.

Kitchen Paint Color

Horizon Benjamin Moore. <a href=Benjamin Moore Horizon paint color. Benjamin Moore Horizon. Benjamin Moore light gray paint color. Benjamin Moore Horizon. #BenjaminMooreHorizon #BMHorizon #Horizon #BenjaminMooreGray #BenjaminMoorePaintColors" width="642" height="433" />

The wall paint color is Horizon by Benjamin Moore. This paint color works beautifully with the white cabinets.

 Banquette

Breakfast nook banquette. Banquette ideas. Breakfast nook with custom banquette with storage and a Dining table is the <a href=Saarinen Tulip Table from Room and Board. Nina Liddle Design. #Banquette #BreakfastNook #Nook" width="642" height="487" />

This entire space makes me smile! I love the colors found here. The breakfast nook features a custom banquette with storage and colorful fabric choices.

The dining table is the Saarinen Tulip Tablefrom Room and Board.

Navy & Green

Pillow Fabric Ideas. Pillow Combination Ideas. Interior Deisgner Pillows. #Pillows <a href=Nina Liddle Design." width="642" height="454" />

Summery colors!

Breakfast Nook

<a href=Benjamin Moore Horizon. Kitchen Nook Paint Color Benjamin Moore Horizon. #BenjaminMooreHorizon Nina Liddle Design." width="642" height="430" />

The kitchen nook paint color is also Benjamin Moore Horizon.

Mudroom

Mudroom. Coastal Mudroom. Coastal Mud Room Ideas. Beach mud room with wall length, built-in lockers featuring a built-in storage bench with <a href=overhead cubbies alongside wood planked walls with a ceiling mount surfboard over ivory floors layered with a gray rag rug. #Mudroom #Coastal Nina Liddle Design." width="642" height="929" />

This fun, coastal mud room offers built-in lockers featuring a built-in storage bench with overhead cubbies alongside wood planked walls and ivory floors, layered with a gray rag rug. A closet laundry room is on the right.

The vintage surfboard is from a store in California called Surfing Cowboys.

Powder Room

Phillip Jeffries Wallpaper. Chain Link 5641 in Aqua on Ivory Manila Hemp Phillip Jeffries. <a href=Nina Liddle Design. The wallpaper in this turquoise powder room is the Chain Link 5641 in Aqua on Ivory Manila Hemp by Phillip Jeffries." width="642" height="965" />

The wallpaper in this turquoise powder room is the Chain Link 5641 in Aqua on Ivory Manila Hemp by Phillip Jeffries.Isn’t it beautiful?

Lighting

<a href=Ro Sham Beaux Malibu Turquoise Chandelier. Ro Sham Beaux Chandelier. Coastal Ro Sham Beaux Chandelier. Turquoise Ro Sham Beaux Chandelier. #RoShamBeaux #RoShamBeauxChandelier" width="642" height="538" />

Oh, I love this one! Lighting is the Ro Sham Beaux Malibu Turquoise Chandelier. It costs around $688.00 – $1,242.00, depending on the size (12″W x 12″D x 15″H” OR 18″W x 18″D x 28″H” ).

Bathroom Sink

Kallista Sink. Bathroom with Kallista sink. #Kallista #Sink #Bathroom <a href=Nina Liddle Design." width="642" height="438" />

Timeless pedestal sink by Kallista.

Master Bedroom

Bedroom. Beach House Bedroom Design. Beach House bedroom with a <a href=white Greek Key mirror reflecting a Ro Sham Beaux Frankie Beaded Chandelier hung over a peacock blue, nailhead trimmed headboard on bed layered in white bed linens topped with a pair of chartreuse pillows and an aqua blue striped pillow flanked by a pair of modern white nightstands topped with Robert Abbey Triple Gourd Lamps in Peacock. Nina Liddle Design." width="642" height="890" />

It’s summer year-round in this master bedroom! The master bedroom features a white Greek Key mirror reflecting a beaded chandelier hung over a peacock blue, nailhead trimmed headboard. White nightstands topped with Robert Abbey Triple Gourd Lamps in Peacockadd an airy feel to the space.

Chandelier

<a href=Ro Sham Beaux Frankie Malibu Clear Chandelier. Ro Sham Beaux Frankie Beaded Chandelier. #RoShamBeauxFrankieBeadedChandelier" width="642" height="838" />

Ro Sham Beaux Frankie Malibu Clear Chandelier.Price? $3,220.00 – $3,680.00. It’s definitely the “jewelry” of this room.

 Pick Your Colors

Beach House Bedroom. Coastal Beach House Bedroom. White greek key mirror greek key framed mirror mirror over headboard peacock blue headboard peacock blue headboard with nailhead trim modern white nightstand two drawer nightstand peacock blue lamp peacock blue gourd lamp peacock blue triple gourd lamp white bed linens white sheets white euro shams chartreuse pillow chartreuse geometric pillow aqua blue striped pillow sash window bed between windows nightstands in front of windows blue walls blue wall color vaulted ceiling tongue and groove vaulted ceiling clear beaded chandelier beaded jute chandelier woven window shades greek key mirror square greek key mirror mirror above headboard peacock blue bed peacock blue velvet bed peacock blue velvet bed peacock blue table lamps Ro Sham Beaux Frankie Beaded Chandelier Robert Abbey Triple Gourd Lamp Peacock.

I love the teal accessories mixed with green and turquoise in this bedroom. This is a very fresh color scheme.

 Coastal Blue and Green Bedroom

Blue and Green Bedroom. Coastal Blue and Green Bedroom. <a href=Wall paint color is BM Horizon. #Blue #Green #Bedroom #BMHorizon Nina Liddle Design." width="642" height="439" />

The wall color is once again Benjamin Moore Horizon – a very soothing gray.

Master Bathroom

Bathroom. gray walls gray wall color shiplap clad wall shiplap paneled walls shiplap half wall dormer ceiling dormer ceiling bathroom ideas built in shower glass front shower frameless shower door <a href=rainfall shower head linear marble tile surround linear marble tile marble shower floor marble shower ceiling rectangular marble floor tile freestanding tub freestanding bathtub floor mount faucet floor mount faucet with shower head plantation shutters bathroom plantation shutters woven baskets white sink vanity with shelf sink vanity with drawers dual sink vanity with shelf nickel cabinet pulls marble counter gray marble counter white lacquered mirror glossy white mirror square polished nickel wall sconce white and gray bathroom extra long vanity extra long sink vanity extra long washstand long sink vanity long washstand Jonathan Adler White Rococo Mirror. Nina Liddle Design." width="642" height="445" />

Who wouldn’t love to have this bathroom? This bathroom features an extra long, white dual sink vanity with lower shelf filled with baskets and drawers accented with nickel pulls alongside a white marble counter and shallow backsplash with a pair of Jonathan Adler White Rococo Mirrors. A large walk-in shower stands at the far end of the space tucked below the dormer ceiling with a seamless glass door and a linear marble mosaic, surround with marble tiled shower floors and ceiling, accented with a rainfall shower head. A freestanding tub situated below a plantation windows finishes the space, framed by shiplap clad half walls over rectangular marble tiled floors.

Bathroom Countertop

Bathroom countertop. Bathroom countertop ideas. Bathroom features polished <a href=white marble countertop with polished nickel bathroom faucet. #Bathroom" width="642" height="473" />

 Stunning polished white marble countertop with polished nickel bathroom faucet. A simple coral brings a coastal feel to this space.

Bathroom Storage

White bathroom vanity. White bathroom vanity featuring an extra long, <a href=white dual sink vanity with lower shelf filled with baskets. #WhiteBathroomVanity" width="642" height="472" />

Extra storage and texture can easily be added with baskets under the vanity.

Guest Bedroom Paint Color

Sail Cloth Benjamin Moore. <a href=Benjamin Moore Sail Cloth. Benjamin Moore Sail Cloth is a great neutral paint color. #BenjaminMooreSailCloth #BenjaminMooreNeutrals #BenjaminMoorePaintColors" width="642" height="464" />

The paint color in this bedroom is Benjamin Moore Sail Cloth. This is a great neutral paint color.

Vanity Paint Color

Knockout Orange Sherwin Williams. <a href=Sherwin Williams Knockout Orange. Sherwin Williams Orange Paint Color. #SherwinWilliamsKnockoutOrange #SherwinWilliamsPaintColors" width="642" height="478" />

The vanity paint color is Sherwin Williams Knockout Orange.

Sconces

<a href=Jonathan Adler Parker Pendant Wall Sconces." width="642" height="600" />

The sconces are the Jonathan Adler Parker Pendant Wall Sconces.

Orange & Turquoise Guest Bedroom

Bedroom. Beach House Bedroom Ideas. Beach House bedroom with tongue and groove, cathedral ceilings adorned with a <a href=geometric lantern pendant hung over an orange ikat headboard on bed layered with white bed linens and a pair of blue geometric pillows. The bed is flanked by a pair of white two drawer nightstands topped with mercury glass lamps with a pair of Arteriors Home Tennyson Turquoise Linen Stools at the foot of the bed over hardwood floors layered with a braided jute rug. #Bedroom #BeachHouse #BeachHouseBedroom Nina Liddle Design." width="642" height="965" />

This guest bedroom features tongue and groove cathedral ceilings adorned with a geometric lantern pendant hung over an orange ikat headboard. The bed is flanked by a pair of white nightstands topped with mercury glass lamps and a beautiful braided jute rug.

Turquoise Stools

Arteriors Home Tennyson Turquoise Linen Stools. <a href=Nina Liddle Design." width="642" height="462" />

Stunning Arteriors Home Tennyson Turquoise Linen Stools.

Lantern

White Lantern. White geometric lantern pendant. #geometriclanternpendant #WhiteLantern <a href=Nina Liddle Design." width="642" height="965" />

This geometric white lantern is a show-stopper!

Blue & White Coastal Bedroom

Blue and White bedroom. Coastal Blue and White bedroom. Beach house Blue and White bedroom. Nautical Blue and White bedroom. Nautical bedroom with shiplap clad accent wall featuring <a href=framed sailboat blueprints over a blue striped headboard on bed layered with white bed linens topped with blue sailor knot pillows and a blue fringed rug throw. A pair of two-tone nightstands stand on either side of the bed topped with Pottery Barn Rope Knot Table Lamps with a Serena and Lily Montara Mirror." width="642" height="456" />

This nautical bedroom looks amazing with channel groove boards accent wall and framed sailboat blueprints.

The lamps are the Pottery Barn Rope Knot Table Lamps and mirror is the Serena and Lily Montara Mirror.

Coastal Touch

Coastal Bedroom. Coastal Bedroom Decor Ideas. Coastal Bedroom featuring <a href=framed sailboat blueprints over a blue striped headboard. #CoastalBedroom #SailboatBlueprints Nina Liddle Design." width="642" height="483" />

Blue and white decor is always beautiful, soothing and classic.


See more Inspiring Interior Design Ideas in my Archives.

Interior Design Ideas: Paint Color


 Doesn’t it this place makes you feel happier? I love the stunning colors brought to this light, airy home. It certainly makes it feel more alive.

Talking about happiness, I hope you’re feeling happy today, but if not, put everything that is bothering you aside. Maybe you’re forgetting to look at the good things in life and is putting too much of your energy and health towards the bad stuff.

When was it the last time you said “That’s it! I will think about myself right now”? We tend to always focus on people, on how they’re feeling, on how they’re doing or on how things are going and we rarely stop to thing about HOW WE ARE.

Take this day to look at yourself. Look in the mirror and only say what you love about yourself. Do not allow any criticism to come to your mind. Say all the things you can remember that you have accomplished in life. Try to remember all the details, from childhood, to your teenager years to this day.

Look at yourself and think about all the good things you have done to others. Even the small gestures count.

Now, look at yourself and say what a good person you are and that you are loved. Tell yourself that you understand that life has not always been fair but that you will always be here, you will always be present and you will always be alert.

Tell yourself that no matter what, you will always love yourself.

Also, remember to tell yourself that you’re walking on the right path at this moment. You’re taking the directions you need, you’re making the necessary changes and you’re paying attention. You are growing and you’re open to learn.

And most of all, tell yourself that no matter where this path takes you, you will always be loved.

Take today to remind yourself of how important you really are.

I know you can do that because I know you believe in that.

with Love,

Luciane at HomeBunch.com

Interior Design Services within Your Budget

Come Follow me on

Come Follow me on

Get Home Bunch Posts Via Email

Contact Luciane

Sources: Interiors by Nina Liddle Design. Photos by Kit Noble.

Thursday, January 25, 2018

Simple Changes for Making a Home Senior-Friendly

Read article : Simple Changes for Making a Home Senior-Friendly

Dear Savvy Senior,

What tips or products can you recommend to help make a home safer and more convenient for aging in place? My husband and I are in our 70s and don't have the money for any big renovations, but we want to do what we can to stay in our house as long as possible.

--Homebodies

Dear Homebodies,

There are lots of small adjustments and simple modifications you can do to make your home safer and livable as you age that are very inexpensive or completely free. Here are several to consider.

Fall-Proofing

Since falls are the leading cause of home injury among seniors, a good place to start is by picking up any possible clutter that can cause you to trip like newspapers, books, shoes, clothes, electrical or phone cords. If you have throw rugs, remove them or use double-sided tape to secure them. And if you have stairs, consider putting handrails on both sides.

Good lighting is also very important, so add lamps or light fixtures where needed, and install brighter full-spectrum bulbs in existing fixtures to improve visibility. Also purchase some inexpensive plug-in night lights for the bedroom, bathroom and hallways, and consider installing motion sensor lights outside the front and back doors and in the driveway.

In the bathroom get some non-skid bath rugs for the floors, put a non-slip rubber mat or self-stick strips on the floor of the tub/shower and have a carpenter install grab bars inside the tub/shower.

And in the kitchen, organize your cabinets so the things you use most often are within easy reach without using a step stool.

Simple Modifications

Growing old can also bring about various physical limitations which can make your home more difficult to use. Some simple solutions, for example, that can help weak or arthritic hands is to replace round doorknobs with lever handles, or get some inexpensive doorknob lever adapters. The same goes for twist knob kitchen or bathroom faucets. You can easily replace them with lever faucet handles that you can purchase for a few dollars in most hardware stores, or get a single lever handle faucet installed.

In the kitchen, you can make your cabinets and pantry easier to access by installing pullout shelves or lazy susans. And D-shaped pull-handles for the cabinets and drawers are also recommended because they're more comfortable to grasp than knobs.

In the bathroom, consider getting a hand-held adjustable shower head installed and purchasing a shower or bathtub seat so you can shower from a safe seated position if need be. And for easier toilet access, purchase a toilet seat riser for a few dollars. This can make sitting down and standing up a little easier, especially if you're 6" or taller.

And, if you get to the point where you need to use a walker or wheelchair, you can adapt your house by installing ramps on entrance steps, and mini-ramps to go over high entrance thresholds. And, you can widen the doorways an additional two inches by installing "swing clear" offset door hinges.

More Tips

For many more tips, visit The Fall Prevention Center of Excellence, and see "The AARP Home Fit Guide" which offers dozens of modification suggestions to make your home safe and livable as you age.

Or, if you want personalized help, get an in-home assessment with an occupational therapist, or OT, who can evaluate your home, make modification recommendations and refer you to products and services to help you make improvements. Medicare will pay for a home assessment by an OT if prescribed by a doctor. Ask your physician for a referral.

Send your senior questions to: Savvy Senior, P.O. Box 5443, Norman, OK 73070, or visit SavvySenior.org. Jim Miller is a contributor to the NBC Today show and author of "The Savvy Senior" book.

Sunday, December 10, 2017

How To Fix Noisy Shower Pipes and Stop the Banging Noise

Read article : How To Fix Noisy Shower Pipes and Stop the Banging Noise

How to Fix Noisy Shower Pipes - Making a Banging Noise

How to Fix Noisy Shower Pipes - well actually it's the shower faucet hardware making a banging noise. If you ever encounter a loud banging noise in your shower, don't look behind the curtain. I had just finished renovating my bathroom, including installing new shower plumbing, new tub, fresh ceramic tiles and the works, everything looked and worked great. I actually have two bathrooms back-to-back, and now started work on the second bathroom. You might question my sanity renovating two bathrooms one after another, but I'll leave that topic for another day.

The second bathroom was a conversion from a tub-shower to a shower surround. I had removed the old bathtub, removed all of the old ceramic tiles and opened up the wall where the shower hardware was located. I had purchased new shower hardware and hired a professional to perform the install. After the new shower hardware was installed the installer had tested the new shower hardware for leaks and everything looked good.

Seeing as I had just finished the first bathroom reno, I was in no rush to begin immediately on the second bathroom, which was a good thing. The next day we noticed that whenever we shut off the water taps on the first bathroom, there was a banging noise. At first the noise was subtle and as each day passed the noise got louder and louder. In fact the same noise was heard when flushing the toilet and also when turning off the water in the shower. The banging noise sounded like two pipes were banging together and always occurred when the water was shut off.

Looking For The Noisy Shower Pipes


I figured I better check out these noises, especially since we were now down to one functional bathroom. The first thing I thought of was perhaps there were a few pipes banging together whenever the water was shut off. Since both bathrooms share a common wall for all plumbing, there is a bit of a maze of copper piping. The wall in the second bathroom was still open from when the new shower hardware was installed. So I took my flashlight and looked inside the wall cavity for any pipes that may be in need of securing. Could not see any thing loose.

I had my family flush the toilet and turn the shower on and off repeatedly in the first bathroom, so I could listen to the noise in the wall and see where it was coming from. Since I was renovating the second bathroom anyway, I figured I would open up the entire wall so I could pinpoint the area where the banging noise was coming from. I finally determined there were in fact no loose pipes knocking against each other or on the wood studs. But the noise was coming from the first bathrooms shower hardware. Interesting, as this was absolutely fine until the second shower unit hardware was installed.

So I called in a plumber to check out the new shower hardware in the first bathroom. He disassembled the shower hardware and pulled out the "cartridge", a replaceable unit. He didn't have a spare to match our hardware but said I could get one at any local home hardware store.

Noisy Shower Hardware Was Making the Banging Noise - Here's How to Fix

I bought a new cartridge and replaced the part myself, but the noise was still there. I took apart the shower hardware again and this time dove deeper inside. There was another little removable part to the left of the cartridge, that looks like a small flute; made of metal, cylindrical in shape with holes strategically placed around its shell. I removed this part, and then re-inserted it into the shower hardware and reassembled. When I tested the shower, the noise was finally gone.

If you ever encounter a banging noise in your shower and can't determine where it's coming from, do not open up your walls or call a plumber. Simply open up the shower hardware and remove and re-insert the components illustrated. This will save you and your family a lot of grief. There was likely an air lock inside the shower hardware, which in turn caused the banging noise whenever the water valves were shutoff. The air lock may have been caused when the new shower hardware was installed in the second bathroom or maybe that was just a coincidence.

How to Disassemble Shower Hardware

There are just a few simple steps required to disassemble the shower hardware, also illustrated in this article. First remove the Cap off the end of the shower lever, in my case I could easily remove this by hand with a little twist action, Once the cap is removed, remove the screw that secures the shower lever. Note never place any parts or tools directly on the bathtub or other porcelain like objects as they could get easily scratched.

The shower hardware sleeve or outer casing can now be removed by simply unscrewing the sleeve unit. Once the outer casing is removed, there should be at least two screws visible, which hold the cover plate to the wall. Remove these two screws and the cover plate.

With the cover plate removed, you should see two valve screws. These are water valve shutoff screws and must now be closed before removing any more parts. Close the water shutoff valves by turning these screws clockwise until that can turn no more. If you have an older shower hardware unit, there will be no set screws. In this case, shut the water off at the main water valve for your home.

Once the water has been shut off, either by the two set screws or your homes main water valve, pull the cartridge out of the hardware. Sometimes this unit may need replacement. In my case the problem was an air lock in the water coupler.

Locate the water coupler beside the cold water line. It is hidden behind and connected to a large screw. Remove the screw and the coupler will follow, they are one. Simply reseat the coupler and then reassemble the shower hardware in the reverse order. Don't forget to turn the water valve set screws back on fully, once you have the coupler and cartridge back in place.

One other tip on unplugging your drain, don't waste time pouring chemicals to remove hair from your drain, use a snake. This is a small coil which extends into the drain channel and grabs anything in its path, especially hair.

Wednesday, November 29, 2017

How to Lay Tile: Install a Ceramic Tile Floor In the Bathroom

Read article : How to Lay Tile: Install a Ceramic Tile Floor In the Bathroom

Cover up an old floor

Whether you’re replacing an old shabby floor or installing a new one, you can’t beat ceramic or stone tile for durability and appearance. When laid properly, it’s virtually a forever floor that requires almost no care and maintenance. And you can select materials from a vast array of colors and textures. We’ll cover how to lay tile in a few steps.

What’s equally attractive is that you can lay a first-class tile floor yourself, often in one weekend, and save the $500 to $1,500 cost of hiring a pro.

The key to keeping the job simple is to cover the old vinyl or other flooring with a new thin underlayment that gives you a fresh, clean start. No messy tear-out and repair. In this article, we’ll demonstrate how to install a thin “backer board” over the old floor. Then we’ll cover tile-setting techniques, from layout and cutting to grout and cleanup.

This is a two-day project for most bathrooms, even if you don’t have any previous tile experience. If you’re comfortable using basic hand tools and have the patience to align tiles just right, you can handle this job. The entire cost of this project for a typical bath ranges from $300 to $600.

Estimating the Cost of a Tile Project

The tile itself will be your biggest cost, so start by measuring the square footage of the floor. Then add 10 percent for cutting waste. If you choose a more complex layout than the simple grid pattern we used, your waste will be greater. Most tile sells for $5 to $15 per square foot, but you can spend as little as $3 or more than $50. If you have to install backer board, add $2 per square foot to the cost of the tile. Other materials will cost about $90, regardless of bathroom size. The tile tools you’ll need (including a tile cutter) will total $60 to $80.

Assess your floor

The success of any tile job depends on a solid base, that is, a floor that flexes very little as you walk across it. If you have a concrete subfloor, this isn’t an issue. You can lay tile directly over the existing vinyl as long as it’s well adhered.

If possible, avoid tearing out vinyl flooring. Leaving it in place saves time, of course, but it also reduces asbestos hazard concerns. Asbestos was used in sheet vinyl and vinyl tile until the mid-1980s. By leaving the vinyl undisturbed, you won’t risk sending asbestos fibers into the air.

If you have a wood subfloor, there’s a good chance that you’ll have to install backer board over your vinyl to make the floor thicker and stiff enough for tile. The easiest way to see flooring thickness is to pull off a floor register. Otherwise look for plumbing passageways through the floor. As a last resort, drill through the floor with a 1-in. or larger spade bit (your new floor will cover the hole later). To prevent asbestos dust from becoming airborne, mist the bit with a spray bottle as you drill. In addition to floor thickness, you’ll need to determine joist spacing. If there’s an unfinished basement or crawlspace below the floor, simply measure the spacing. If there’s a ceiling, probe for joists with a drill bit.

If the joists are spaced 16 in. apart, the layers of structural flooring beneath the vinyl should add up to at least 1-1/8 in. With joists every 24 in., you need 1-1/2 in. If your floor is too thin for tile, add a thicker layer of tile backer board. Our floor required 1/4-in.-thick backer. Yours might need 1/2-in. backer to reach the minimum thickness. If your floor is already thick enough, you can simply prep the vinyl floor (Photos 1 – 4) and skip the backer installation (Photos 5 – 8). Then tile directly over the vinyl, following the same steps we used over backer board.

Regardless of the type of subfloor, there are two situations where you can’t leave vinyl in place: First, if large areas of the vinyl are loose, don’t set tile or backer over it. Small loose spots are acceptable and easy to deal with (Photo 4).

Second, “cushioned” sheet vinyl must be removed before you can set tile. Cushioned vinyl has a foam backing that makes it noticeably thicker and softer than standard vinyl flooring. It’s too spongy to support tile or backer board. Before removing it, call your local health department for instructions on how to check for asbestos and proper procedures if asbestos is present.

Gather Advice While You Shop

Home centers carry everything you need for this project, but begin shopping at a tile store, where you’re more likely to get expert advice. Make a quick sketch of your floor plan and jot down all the dimensions. Also take a photo of the floor at the doorway. This will help the tile store staff recommend a “transition” to neatly join the tile to the hallway flooring. Transitions come in different styles to suit any situation.

When you choose the tile itself, ask if it requires any special installation steps. Some tile, for example, should be coated with grout release before grouting. Also ask about cutting techniques for the tile. You’ll use sanded grout for the floor. Ask if sanded caulk is available in a color that matches your grout for the floor/tub and floor/wall tile joints.

Prepare the room

First, get the toilet out of your way. Stuff a rag in the hole to block sewer gases. If your home only has one toilet, you can leave it in place until you install the backer board. Keep a supply of wax rings on hand if you plan to reinstall the toilet at the end of each day.

If you expect to keep your vanity for many years to come, leave it in place and tile around it. But if you think you might replace it, remove it now. When the job’s done, you can reinstall the old vanity or put in a new one. Having the vanity out of the way gives you more workspace, and you won’t have to cut backer board and tiles to fit around it. This also eliminates the floor repair problem if you install a smaller vanity or pedestal sink in the future.

Pull off the baseboard or plan to add base shoe molding. This leads to a neater-looking job because the edges of the tile will be covered later—jagged cuts and slight measuring mistakes are hidden. If your baseboard has base shoe molding, remove only the base shoe. Backer board and tile will raise your floor 3/4 in. or more. So you’ll have to remove and undercut the door. To mark the door for cutting, stack backer board, tile and two layers of cardboard on the floor (see Photo 3). Mark the door 1/2 in. above the stack, remove the door and cut off the bottom.

Scrub, screw and patch the floor

Install a Ceramic Tile Floor in the Bathroom

Photo 1: Scrub the floor with stripper

Remove the baseboard and toilet. Using an abrasive pad, scrub the floor hard with water mixed with vinyl floor stripper.

Install a Ceramic Tile Floor in the Bathroom

Photo 2: Drive screws into the floor joists

Mark the floor joists with chalk lines and drive 2-1/2-in. screws every 8 in. Don’t leave any screw heads protruding.

Install a Ceramic Tile Floor in the Bathroom

Photo 3: Cut the door trim to accommodate tile

Undercut door trim using a jamb saw or handsaw. A piece of backer board, tile and two layers of cardboard raise the saw to the correct height above the floor.

Install a Ceramic Tile Floor in the Bathroom

Photo 4: Fill low spots with thin-set

Cut out any loose sections of vinyl with a utility knife. Fill the void with thin-set using the flat edge of a notched trowel.

Scrub the floor with a vinyl floor stripper following the manufacturer’s instructions. The stripper will dissolve wax and other residue. Scrub hard with an abrasive scouring pad (Photo 1). The tiny scratches left by scrubbing help the thin-set bond better.

Next, drive screws through the floor into the joists (Photo 2). This ensures that the subfloor and underlayment are securely fastened. If there’s an unfinished basement below the floor, locating the joists is easy: Go to the basement and drill a couple of 1/4-in. holes up through the floor next to a joist. If you can’t locate the joists from below, pick a spot near one wall and drill a hole. If the bit breaks through into hollow space, move over 1 in. and drill another hole. Keep going until you hit a joist. Then go to the opposite wall and find the other end of the joist. Measure at intervals of 16 or 24 in. from the first joist to locate the others.

While you’re driving screws, look for any spots where the vinyl has loosened from the floor. Cut out loose spots and fill them (Photo 4). If there are any copper pipes that pass through the floor, wrap them with duct tape at floor level. Cement-based thin-set and grout can corrode copper.

Install backer board

Install a Ceramic Tile Floor in the Bathroom

Photo 5: Install backer board over the floor

Cover the floor with backer board. Cut inside corners, circles and curves with a drywall saw. Space pieces 1/8 in. apart and hold each one in place with two temporary screws.

Install a Ceramic Tile Floor in the Bathroom

Drywall saw

Use a drywall saw to cut corners, circles and curves in backer board.
Install a Ceramic Tile Floor in the Bathroom

Photo 6: Score and snap the backer board

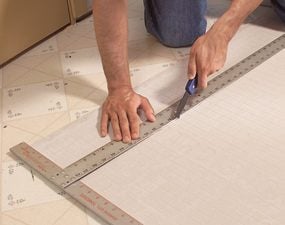
Make straight cuts with a scoring knife. Make three or four scoring passes, then snap the backer over a 2×4. When all the pieces have been laid out, label them and set them aside.

Install a Ceramic Tile Floor in the Bathroom

Scoring knife

Use a scoring knife to score the backer board.

Install a Ceramic Tile Floor in the Bathroom

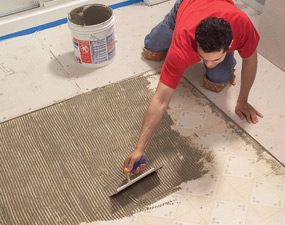
Photo 7: Trowel on the thin-set

Comb out a bed of thin-set just large enough for each piece of backer board using a 1/4-in. notched trowel held at a 45-degree angle. Screw the backer down before spreading thin-set for the next piece.

Install a Ceramic Tile Floor in the Bathroom

Notched trowel

Use a 1/4-in. notched trowel to spread the thin-set over the floor.

Install a Ceramic Tile Floor in the Bathroom

Photo 8: Cover the joints

Press adhesive-backed mesh tape over the joints and skim over the tape with thin-set. When the thin-set is firm but not fully hardened, scrape away any ridges with a putty knife.

The backer board is fastened with a combination of screws and thin-set adhesive. Cut and lay out all the pieces before you mix the thin-set (Photos 5 and 6). You can run the sheets in any direction, but be sure to stagger the joints so you never have four corners meeting at one point. Leave a 1/8-in. space between the sheets and along the vanity, tub or shower. The gap along walls must be at least 1/8 in. wide, but a wider gap (about 1/2 in.) makes the panels easier to set in place.

After cutting and fitting, label the location of each one and set them all aside. Vacuum the floor and have your drill and screws ready to go before you mix the thin-set. Read the thin-set’s label. Spread the thin-set with a 1/4-in. notched trowel. Comb in one direction so air can escape when you embed the backer (Photo 7). Drive screws every 6 in. around the perimeter of each piece and every 8 in. “in the field” (across the face of the panel). If the leftover thin-set is still workable, you can immediately embed mesh tape over the joints (Photo 8).

If the thin-set has become too stiff or chunky, mix a new batch. Use “alkali-resistant” tape that’s meant for backer board. While the tape coat of thin-set hardens, run a putty knife over all the screw heads to scrape off the “mushroom” bulges around screws. Drive in any protruding screw heads you come across.

CAUTION!

Cement products like thin-set and grout draw moisture from skin and can even cause burns that require medical attention. While most pros work bare-handed, wear gloves if you have any special sensitivity. Also wear eye protection while mixing thin-set and grout.

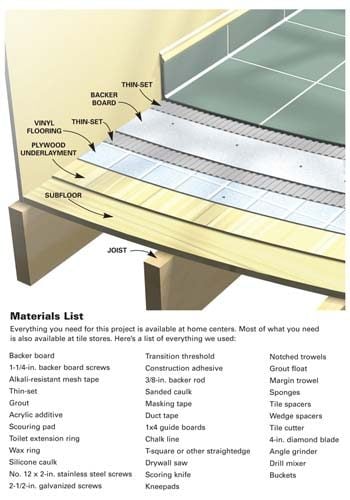
Figure A: Ceramic Tile Over Vinyl

Everything you need for this project is available at home centers. Most of what you need is also available at tile stores.

Cutaway of a tile floor over vinyl

Careful layout pays off

Install a Ceramic Tile Floor in the Bathroom

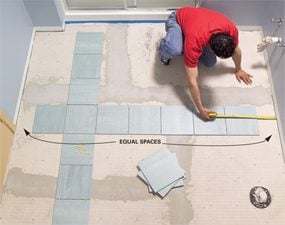
Photo 9: Test your layout to avoid small pieces along the walls

Dry-lay tile to determine the best layout. Start with centered rows, leaving equal spaces at walls. Then reposition rows until you find the optimal layout.

Install a Ceramic Tile Floor in the Bathroom

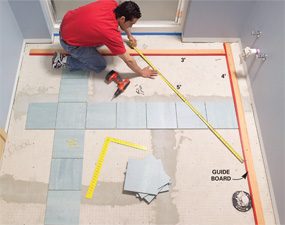
Photo 10: Attach guide boards to guide the layout

Screw guide boards to the floor following your chosen layout. Position the guides so you can lay all the field tiles without moving the guides. Make sure the guides are at right angles by measuring out a 3-4-5 triangle.

Too often, tile novices simply start setting tile in a corner and continue along two walls until the floor is covered. Sometimes they get lucky and the floor looks good. But more often this method leads to trouble:

They end up with awkward-looking, thin slivers of tile along a prominent wall or at the doorway. And the tile looks even worse when walls are badly out of square or crooked—a straight grout line running too close to a wall emphasizes the wall’s imperfections.

Whether you’re laying a simple grid pattern like we show here, or a diagonal pattern with a border, the best tile layout usually calls for centering full tiles between walls so the partial tiles along the edges will end up all the same size. Don’t rely on your tape measure and mental arithmetic. Rip open a carton of tile, grab a handful of spacers and experiment with your layout on the floor.

To begin, center rows of tile between walls so you have equal spaces along walls that face each other (Photo 9). Set the two rows parallel to the two most prominent walls. Then make adjustments, trying to achieve these three goals:

  • Use full tiles at doorways and along the bathtub or shower. These are usually the only places where the edges of the floor aren’t covered by baseboard. If you use full tiles in these exposed spots, you don’t have to worry about making smooth, perfect cuts.
  • Avoid narrow tiles along walls. Ideally, you’ll end up with tiles cut to half size or larger. Avoid cutting tile to widths less than 2 in.
  • Minimize cutting and try to avoid difficult cuts. For example: Cutting tile to an L-shape to fit around an outside corner is especially difficult when one arm of the “L” is less than 2 in. wide. The arm tends to break off as you cut.

Chances are, your layout won’t meet all these goals. Because the shower stall was the focal point in our bathroom, we made it our No. 1 layout priority. We chose to use full tiles in front of the shower. That left us with 3-in.-wide tiles along the opposite wall, which was less prominent. We also chose to center the tile rows on the shower; that meant we had to use cut tiles at the doorway.

Once you determine a layout, establish lines to guide your tile positioning. The usual method is to snap chalk lines on the floor. But chalk lines are hard to see after you’ve spread thin-set, and one row of tile may slip as you set the next row. Here’s a more reliable guide: Choose straight boards a foot shorter than the length and width of the room. Tape one edge of each board so thin-set won’t stick to them.

Then screw the boards to the floor at a right angle to form a guide that eliminates guesswork and shifting (Photo 10).

Video: Create Your Own Floor Tile Layout

Planning the layout for a tile project is usually the hardest and most time- consuming step. Watch this video to learn how a pro does it. You’ll see how to snap chalk lines and make sure they are perfectly square. Plus, you’ll learn how to avoid unsightly narrow, difficult-to-cut tiles along a wall. Don’t start a tile project until you’ve watch this video!

Set the tile (finally!)

Install a Ceramic Tile Floor in the Bathroom

Photo 11: Set the full tiles

Comb out a few square feet of thin-set and set tile against the guides. Continue until all the full tiles are in place. Tip: Watch for squeeze-out between tiles and rake it out with tile spacers.

Install a Ceramic Tile Floor in the Bathroom

Spacers detail

Keep the gaps between tiles even by using spacers

Install a Ceramic Tile Floor in the Bathroom

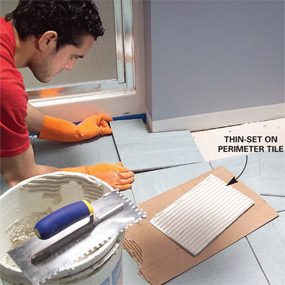
Photo 12: Spread thin-set and set the perimeter tiles.

Cut and set the perimeter tiles after the thin-set beneath the full tiles has hardened. In spaces too narrow for your trowel, comb thin-set onto the backs of tiles.

It’s usually easiest—and most efficient—to set tile in two phases: First set all the full “field” tiles (Photo 11). Then, when the thin-set has hardened for several hours, cut all the perimeter tiles and set them (Photo 12). Here are some tips for both phases of the job:

  • The trowel you use for setting tile may be different from the one you used to embed the backer. The thin-set label tells you which notch size to use relative to tile size.
  • Dampen the backer with a sponge just before applying thin-set. This keeps the thin-set from drying out too quickly.
  • Comb the thin-set in one direction so air pockets won’t be trapped under tile.
  • Open three or four cartons and mix the tiles as you set them. Pattern and color vary slightly from one carton to the next.
  • Don’t just set each tile into place; press down on the tile and wiggle it to embed it firmly in the thin-set.
  • Watch for “tipped” corners. When you press a tile in place, it’s easy to tilt it slightly so that one corner stands higher or lower than neighboring tiles.
  • When you complete a section of tile, inspect it before moving on. Make sure the tiles line up correctly and spacers are in place. Wipe any thin-set off the face of tiles with a damp sponge.
  • When the thin-set becomes chunky or too stiff, throw it away and mix more. Never try to extend the life of thin-set or grout by adding water.
  • Cut perimeter tile so that caulked joints (at tub) are the same width as grouted joints.

Prepare the floor for grout

Install a Ceramic Tile Floor in the Bathroom

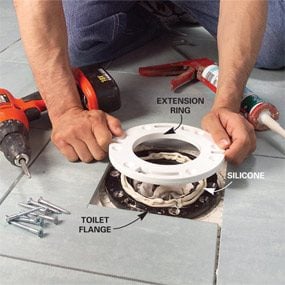
Photo 13: Install an extension ring over the toilet flange

Remove the old screws from the toilet flange and apply a heavy bead of silicone caulk. Fasten the extension ring over the old flange with stainless steel or brass screws.

Install a Ceramic Tile Floor in the Bathroom

Photo 14: Install the transition strip

Glue the transition into place with construction adhesive. If carpet meets the transition, you may have to add a new tack strip.

Install a Ceramic Tile Floor in the Bathroom

Photo 15: Stuff backer rod along the wall

Push backer rod into joints that will be caulked later. The foam rod keeps grout out of joints. After grouting, pull out the rod and caulk the joints.

When all the tiles are in place and the thin-set has hardened, remove all the spacers. Next, raise the toilet flange by adding an extension ring or two (Photo 13). The extended flange should be flush with or higher than the surrounding tile.

When you grout, fill in between the flange and tile. That way, any future leak around the flange will show up on the bathroom floor instead of on the ceiling below. If you plan to use a glue-down transition as we did, this is the time to install it.

Here’s how we dealt with our transition: First, we removed the old metal strip that covered the carpet’s edge. Then we cut our transition strip to fit between the door jambs using a miter saw. Next, we added a tack strip to hold the carpet in place. Before we could glue the transition to the floor (Photo 14), we had to remove a thin strip of the old vinyl floor.

Grout is too brittle to handle the slight shifting movements that are normal in any room. Keep grout out of joints wherever the floor meets the tub, shower, vanity or walls (Photo 15).

Pack the joints with grout

Install a Ceramic Tile Floor in the Bathroom

Photo 16: Grout the joints

Work the grout back and forth across the floor, diagonal to the joints and holding the float at a 45-degree angle. Then scrape off the excess grout, holding the float almost upright.

The thin-set directions will tell you how soon you can grout the floor—usually 24 hours. Grouting isn’t complex. Just plop a couple of scoops of grout onto the floor in a corner, work the grout into joints (Photo 16) and scrape off the excess grout before moving to the next section. In addition:

  • Mix the grout to a mashed-potatoes consistency. Adding extra liquid makes grout easier to work with but weakens it.
  • Don’t just spread the grout over the joints; press hard to pack it into the joints. If you’re doing it right, your forearm will get a good workout.
  • Whether you’re filling joints or scraping off excess grout, always push the float diagonally across the tiles.
  • Scrape off the excess to leave tile as clean as you can. The less grout you leave on the tiles, the easier cleanup will be.
  • When you’re done, cover the grout bucket with a plastic bag and set it in a cool place to slow the hardening process. During cleanup, you may find spots that need a little extra.

Grout cleanup

Install a Ceramic Tile Floor in the Bathroom

Photo 17: Clean the tiles

Wipe grout off the tile surface with a damp sponge. Wipe gently on the first pass so you don’t pull grout out of the joints. Rinse the sponge often.

Clean the surface of the tile when the grout is stiff enough to stay put in the joints but still soft enough to wipe off the tile surface. During hot, dry weather, grout can become difficult to wipe away in just 10 minutes, so get ready for cleanup before you even mix the grout. You’ll need two buckets of clean water, two sponges, a synthetic scouring pad and a dry rag.

As soon as you’re done grouting, go to the first section you grouted and wipe across a joint with a damp sponge. If the sponge pulls grout out of the joint, wait five minutes and try again. In cool, damp weather, the grout may stay too soft for an hour. When the grout is hard enough, gently wipe the tile with a damp sponge.

Rinse the sponge frequently as you wipe the entire floor (Photo 17). If you come across tough spots, scrub them with the scouring pad. Be careful where you put your feet and knees—don’t mar your perfect grout joints.

Immediately after the first pass, grab the second bucket of clean water and the fresh sponge and make a second, more thorough pass. Then, as the tile surface dries, wipe it with a dry terry cloth. The dry haze should buff off easily. If not, go for fresh water and sponge the floor again. If you can’t get rid of the haze, don’t panic. Products that remove haze are available wherever tile is sold.

Let the grout cure overnight before you caulk joints, set the toilet or reinstall baseboard. Grout sealer is a good precaution against staining: Some products can be applied 24 hours after grouting; others require a two- to three-week wait. If you have leftover tile or grout, keep them in case you have to make repairs in the future. Be sure to write down the brand, color and retailer of the tile.

How NOT to Save Money on a Tile Project

I’m a devout cheapskate, but when it comes to buying thin-set and grout, I grab the most expensive products on the shelf. More expensive thin-sets and grouts generally contain a higher proportion of the polymers that improve adhesion, durability and stain resistance.

In most situations, cheaper products would perform just fine. But if I can reduce the risks of loose tiles or cracked grout by spending an extra $30 on a typical bathroom project, I consider that a bargain.

Liquid additive is another smart investment. If the thin-set or grout label says you can mix it with water or an additive, use additive. These liquids (labeled “latex, ” “polymer” or “acrylic”) are meant to improve adhesion and stain resistance. But as a bonus, they produce a slick, creamy consistency. Thin-set combs out more smoothly, grout flows easily into joints, and both remain workable longer.

Also buy a mixer for your drill. Mixers come in various styles and sizes. Go easy on the trigger. If you run the drill at full speed, you can create millions of tiny air bubbles, which will weaken the mix.

Tile cutting tools

Install a Ceramic Tile Floor in the Bathroom

Tile cutter

A tile cutter is the fastest way to cut tile. Just push the handle forward and a small wheel scores the tile. Then push the handle down and the tile snaps in two. You can’t beat a tile cutter for convenience. It makes no mess and you can drag it around the room as you work. But a tile cutter has zero versatility. It makes straight cuts across the entire tile—no curves or corner cuts. Cutting 1 in. or less off a tile can be difficult or impossible. You can rent one at rental centers and some tile shops.

Install a Ceramic Tile Floor in the Bathroom

Wet saw

A wet saw cuts with a diamond blade while water cools the blade and eliminates dust. You can cut notches, trim off tiny slivers of tile, cut miters and even make curves. You’ll get clean cuts in any type of tile. But wet saws are messy. They spit water and raise a cloud of gritty mist. If you use one indoors, contain the mist with curtains of plastic film and cover nearby surfaces. You can buy a small wet saw like the one shown here or rent a professional model from a tile store or home or rental center. If you only have a few cuts that require a wet saw, call a tile store. Many make cuts for a small fee.

Install a Ceramic Tile Floor in the Bathroom

Angle grinder

An angle grinder equipped with a diamond blade can make straight cuts, curves and notches in any type of tile. Since all your cuts are freehand, this isn’t a precision tool, but you can grind away imperfections with the tip of the blade. Use a grinder only outside. Wear a dust mask and eye protection.

Install a Ceramic Tile Floor in the Bathroom

Nippers

Nippers are useful for rough curves and notches. They don’t cut tile, but bite out small chunks, leaving jagged edges.

Install a Ceramic Tile Floor in the Bathroom

Contour gauge

A contour gauge is a great tool for marking troublesome shapes on tile. Just press it against any odd-shaped surface (like the curved corner of a bathtub) and transfer the profile to tile.

Here are the tools that can cut your tile. Buy or rent the ones that make the most sense for your project.

In addition to the tools shown here, a carbide abrasive blade that fits in a jigsaw cuts slowly but leaves fairly clean cuts in softer types of ceramic tile and natural stone. A carbide abrasive hole saw cuts perfect holes for plumbing pipes and fixtures.

A rubbing stone is simply an abrasive block, similar to the wheel in a bench grinder. Use it to smooth sharp or slightly chipped cuts that will be exposed.

Additional Information

Required Tools for this Project

Have the necessary tools for this DIY project lined up before you start—you’ll save time and frustration.

You’ll also need these specialty tools for working with tile and backer board:
Scoring knife, Margin trowel, Tile cutter, 4-in. diamond blade, Drill mixer, Offset saw, Tile cutter, Nippers, Wet saw
You can also use an angle grinder for cutting tile.