Showing posts sorted by relevance for query tools. Sort by date Show all posts

Thursday, June 22, 2017

Makita Sub-Compact Drill and Impact Driver - 18v Goes Ninja

Read article : Makita Sub-Compact Drill and Impact Driver - 18v Goes Ninja

What's This?This post is sponsored by The Home Depot. Tool brands take their colors seriously, and when one of them deviates from the color everyone recognizes them by, it means one of two things: 1) They are making a statement to differentiate a particular tool, or, 2) their brand manager is getting fired. Makita has recently made a chroma-curious move and released a new line of 18v Cordless tools in, wait for it, black! They sent us their 18V LXT Sub-Compact Combo Kit (CX200RB) several months ago, which includes both the Makita Sub-Compact Drill (XFD11ZB) and Makita Sub-Compact Impact Driver (XDT15ZB). We’re pretty sure their brand manager isn’t getting fired over the new color scheme, so let’s talk about these new tools, and why you might want to own them.

[embedded content]

As we all know, it’s a cordless world out there when it comes to power tools. Even outdoor power equipment is making the rapid progression toward cordless technology. Just about every power tool, including those many thought would “never” go cordless, are available in cordless platforms. All that cordless goodness does come at a cost. For one thing, things can get messy when it comes to battery platforms and chargers. I often dream of a day when all the tool companies come together to pursue a universal standard for chargers and batteries. From a consumer standpoint, being able to use one charger and any brand’s battery would make life a lot easier.
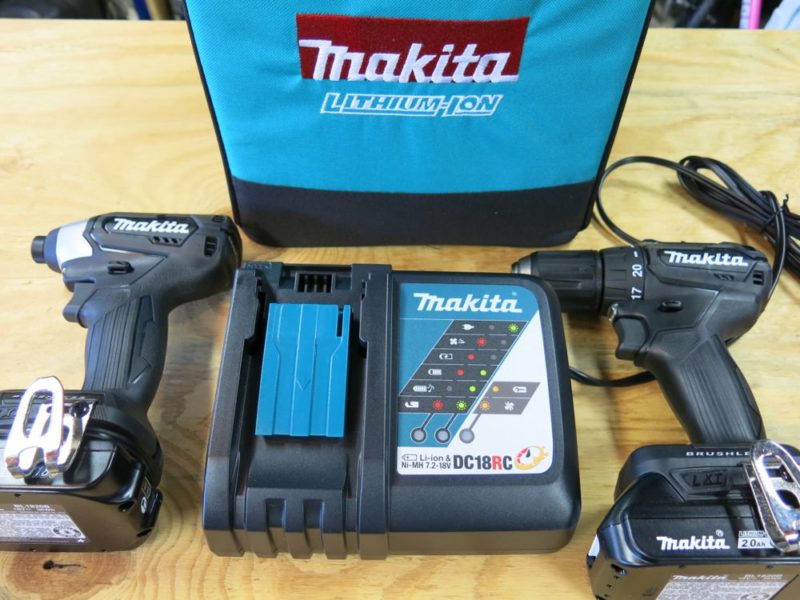
The Makita Sub-Compact CX200RB KitThe Makita Sub-Compact CX200RB Kit

Unfortunately, that’s not likely to happen for a variety of reasons. For one, many tool brands invest a great deal in innovation focused on batteries, chargers and the tech that enables batteries to communicate with both chargers and the tools themselves. Those same companies aren’t going to be excited to join in a sharing circle of competitors, singing Kumbaya as they exchange their hard-fought intellectual property. Brands also benefit from practical brand loyalty here too. The tool companies that offer a large variety of the most appealing tools can encourage some buyers to stick to a single brand’s cordless platform exclusively. If you don’t believe that, check out some of the photos posted to social media showing loyal tool users showcasing mountains of red, blue, green or yellow cordless tools.

Even if you stick to one brand, you’re likely going to have tools in both 12v and 18v lines. Which brings us to this current review. Makita is looking to bridge the gap between 12v and 18v lines by providing the compact form factor users love in the 12v platform, with much of the power and performance users love about the 18v platform. For some of you, this might mean you leave some or all of your 12v gear behind and just carry your 18v tools, batteries and charger.

Makita Sub-Compact Drill / Driver & Impact Driver – Get a Grip on the Ergonomics
makita 18v sub-compactComfortable ergo with a compact form-factor make the Makita Sub-Compact tools feel like a natural extension of your hand

One of the great things about 12v tools is their ergonomics. Many 12v drills and drivers just feel better than some of their bulkier 18v counterparts. The Makita sub-compact drill and it’s sibling impact driver feel more like a 12v tool in your hand, and that’s thanks to Makita’s choice to use a brushless motor that’s smaller in size than what you would find on a comparable 18v tool. While some bulkier 18v tools can feel awkward and cumbersome to wield, the Makita sub-compact tools instead feel like a natural extension of your arm (albeit with a lot more torque). And, because there isn’t a 12v battery crammed into it, the trim and slender grip on the sub-compact actually feels even better than many chunkier 12v grips.

Sub-Compact Weight – Float Like a Butterfly, Sting Like a Bee

The sub-compact benefits don’t stop with how the tool feels in your grip, they’re also relatively light, especially if you’re using the lightweight Makita 2.0 Ah battery. At just 2.8 and 2.6 lbs for the drill/driver and impact driver respectively (with the 2.0 battery), arm fatigue is kept to a minimum.

Makita 18V Sub-Compact Drill & Impact Driver Features and Performance
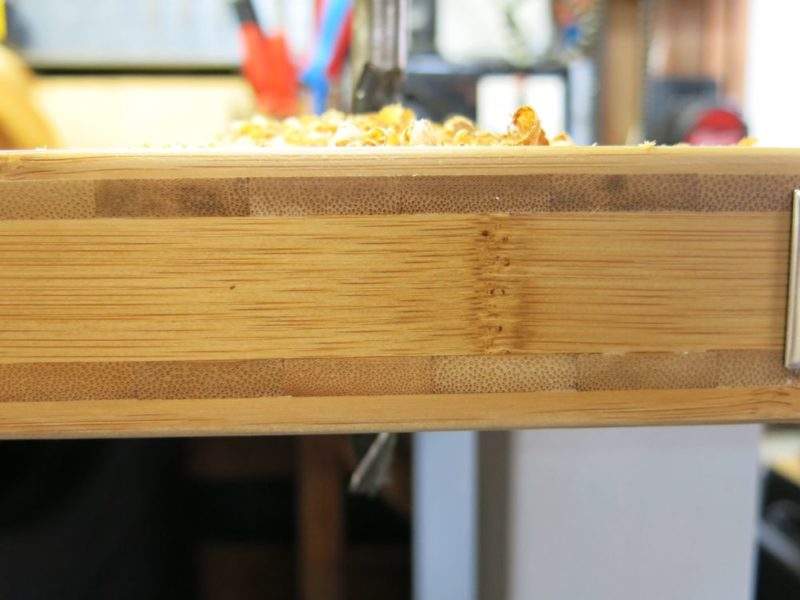
One of several tasks for the Makita Sub-Compact tools – drilling through solid bambooThe bamboo benchtop was no match for the Makita sub-compact drill
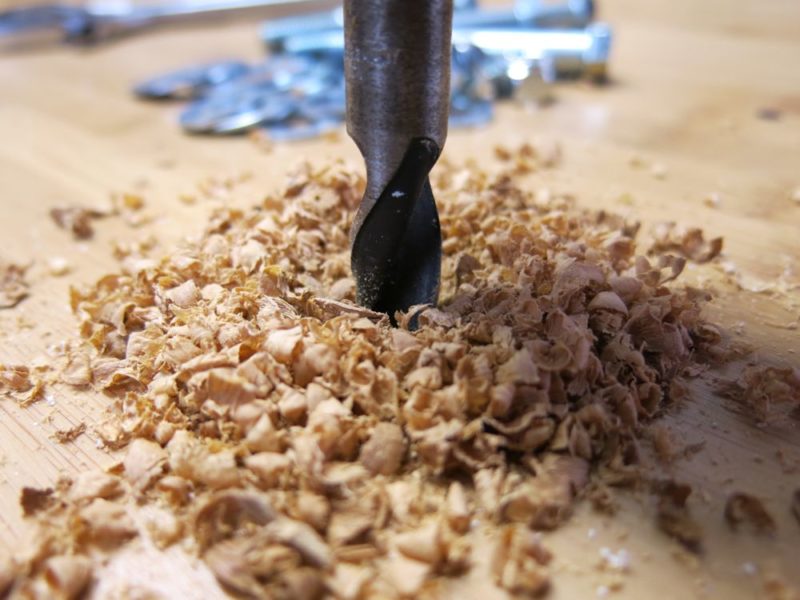
I used the 18V Sub-Compact Drill and Driver on a variety of tasks including installing recessed alarm sensors, drilling glass, assembling office furniture, installing a flat screen, installing a bench vise on a bamboo bench-top, removing a glass shower door assembly, installing closet railings, drilling into plaster, and general tasks for around the home. Some of that work was done off-site and these Sub-Compact tools were compelling to bring along since I suspected I might need more juice than a 12v might provide, but I also didn’t want to lug bulkier tools along. I dropped the Makita Sub-Compact Drill and driver into a tool bag filled with other tools and I didn’t feel like I was lugging my shop with me.
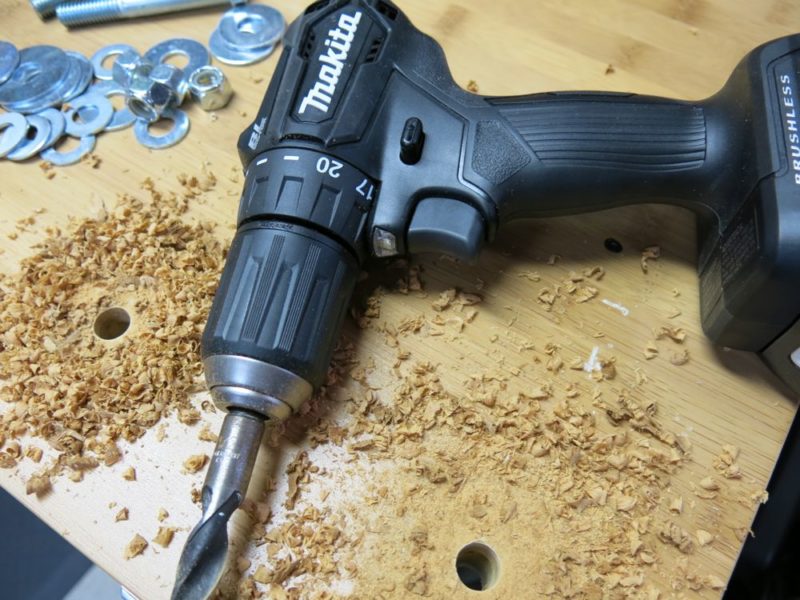
The bit got hot, but the drill stayed cool

The Makita Sub-Compact 1/2″ Driver Drill (XFD11)
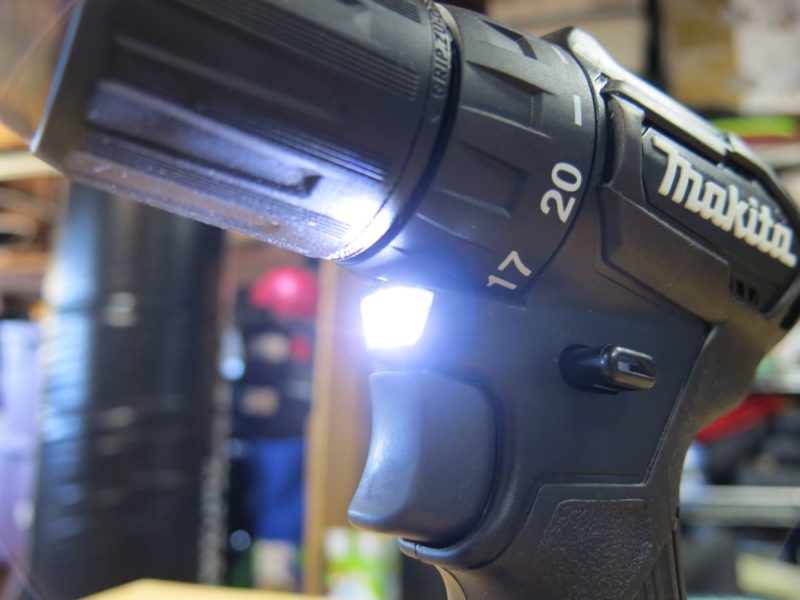
Lots of clutch settings and a bright LED. We didn’t use the clutch given that we had the sub-compact impact driver on call.

This nimble powerhouse delivers 0-1700 RPM with a tiny 6-3/8″ overall length. You can adjust fastening torque from 20 different settings via the ring next to the chuck, or set it in drill mode to disable the clutch. The tool features two speeds, with the higher speed intended for lower-load activities. I found the optional belt clip handy given that the tool isn’t likely one you’ll slip into your toolbelt pouches. That’s one downside to the Sub-Compact line – 12v tools (assuming you’re using a lower capacity slim battery) are sleek enough that many users store them in their tool pouches. Despite the Sub-Compact’s very trim size, you won’t be likely to do that given the bulkier 18V form-factor. One little known fact is that you can use this tool like a manual screwdriver by switching the forward/reverse switch to neutral. However Makita recommends you don’t get carried away and try to loosen rusted lugnuts this way. Frankly, assuming you have both these tools on hand, you’ll probably want to use the driver drill more or less exclusively for drilling and the Sub-Compact Impact Driver for fasteners.
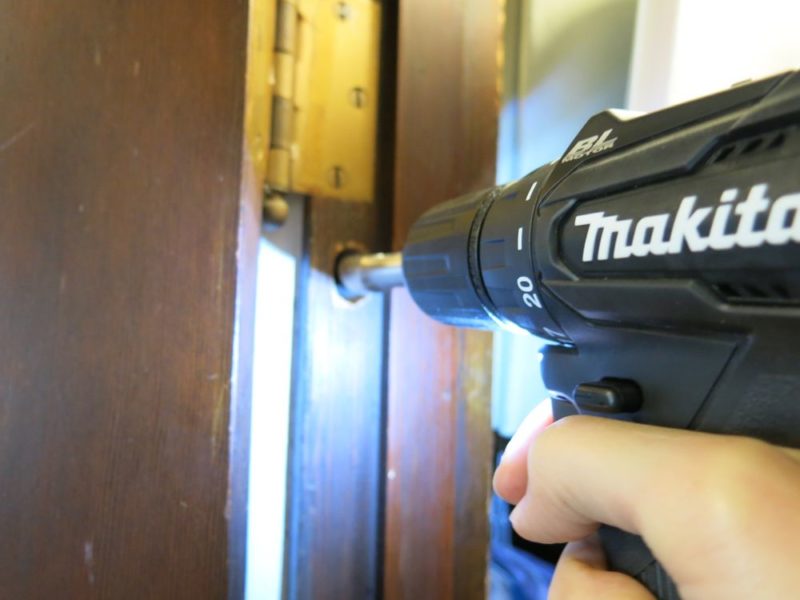
The Makita sub-compact drill / driver drilling out a dense door frame for a home automation sensor.

The Makita Sub-Compact Impact Driver (XDT15)
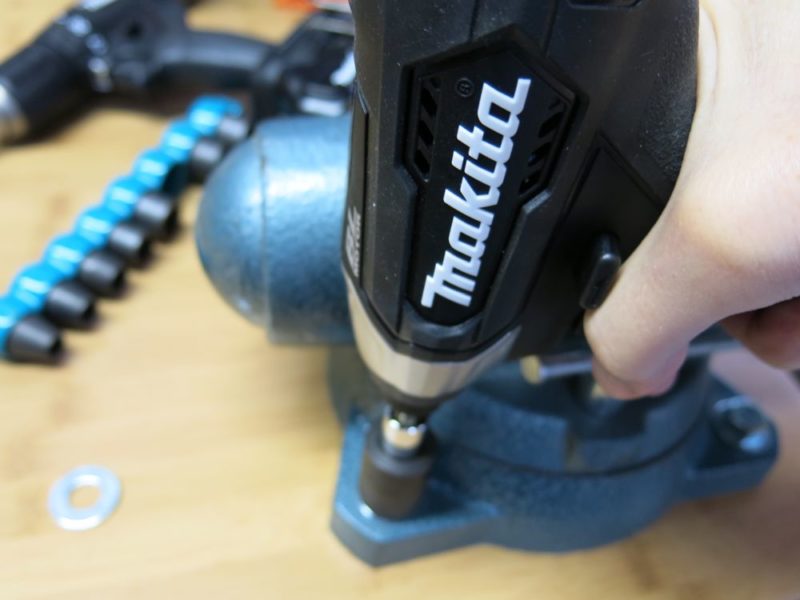
Once the holes were drilled, the Makita sub-compact impact driver stepped in to snug up the beefy hardware.

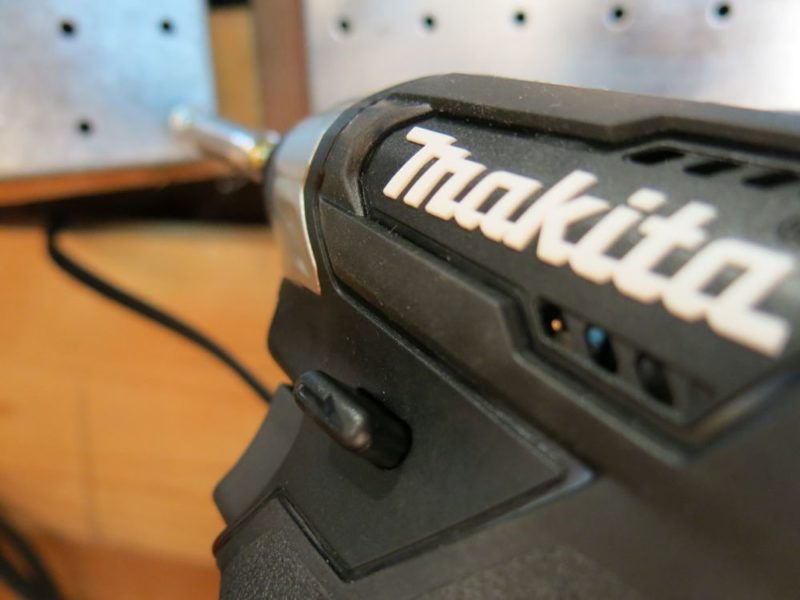
While not exactly ninja-quiet, the impact driver delivers a punishing 0-3900 impacts per minute to coerce fasteners into submission. It sports an even smaller 5-5/16″ overall length, making it ideal for tight-quarters fastener combat. At the base of the tool, you’ll find a somewhat confusing array of options for controlling the impact force. I’ll walk through each here, since they are not intuitively obvious (or, they weren’t to me anyway).
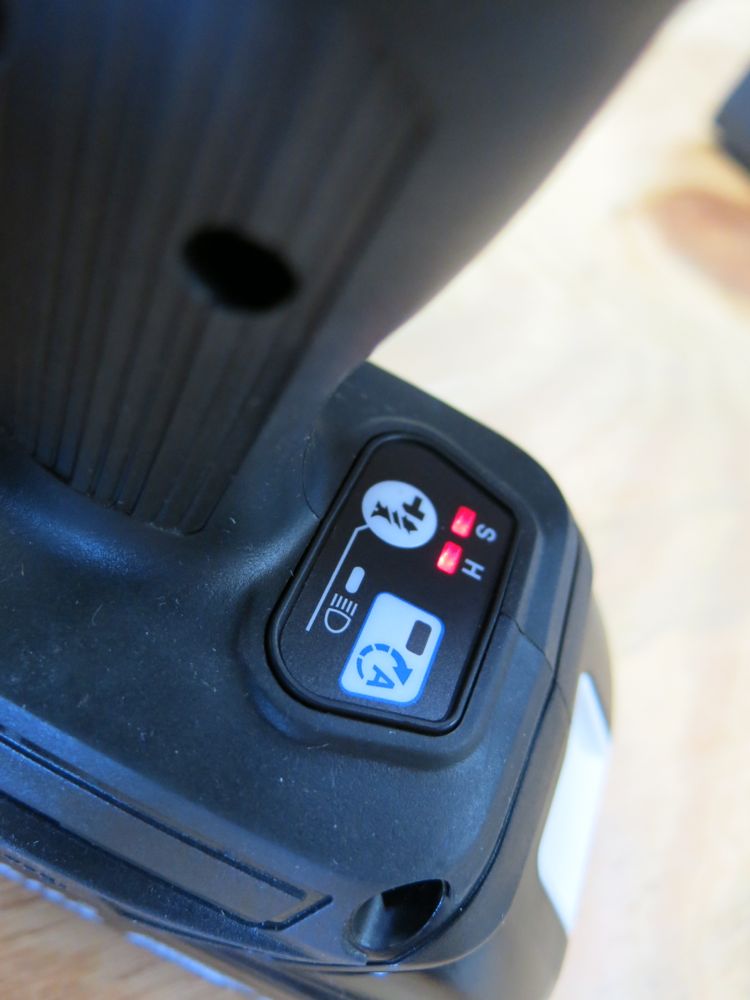
The indicator lights/settings weren’t quite as intuitive as we’d like.

There are three separate areas with indicator lights “S” for “Soft”, “H” for Hard and “A” for Assist Mode. Soft mode is engaged when just the light under the S is lit. It’s best for working with smaller fasteners and more delicate materials. Maximum impacts in S mode is 1600 IPM. If you’re in “H” or hard mode both the S and H lights are lit. I found this a little confusing as typically indicator lights are on one setting or another, not both. Presumably Makita lit both to indicate you can still operate the tool in the lower IPM range, but I think a single indicator light would make things more clear to users. In hard mode the tool delivers up to 3900 IPM’s. Plenty of impacts for most screws and reasonably-sizes bolts out there. Lastly, “A” or assist mode will automagically start screws slow and then gear up to higher speeds and impacts once you’re on track. This is great for longer fasteners and if you’re tool lazy to adjust speed yourself. “A” mode has the same maximums as the Hard setting by the way. In a world of Low-Medium-High or 1-2-3 settings, I think S-H-A isn’t as clear as it could be.
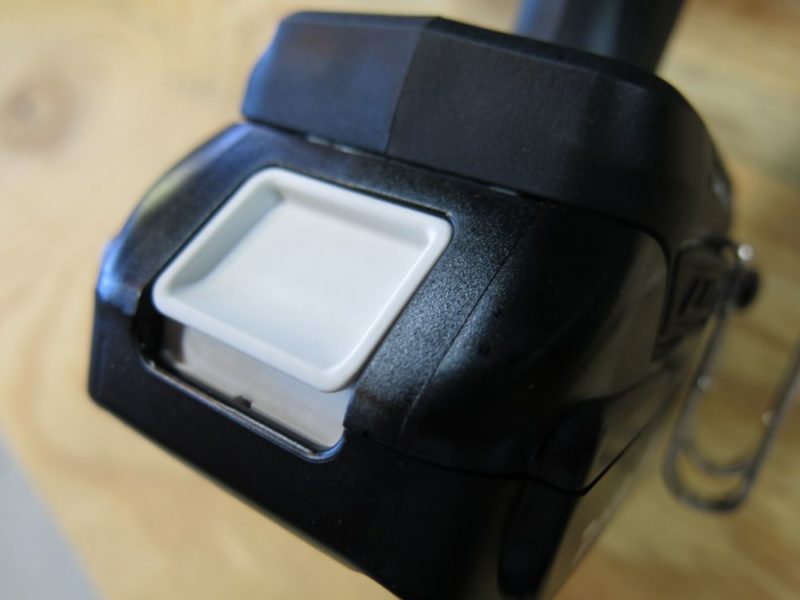
A single push button makes swapping batteries a snap.

Both tools have an onboard LED light just under the chuck / bit holder that lights during operation and stays lit about 10 second after. The light position casts a pretty significant shadow and isn’t super-bright, but it’s still useful if you’re working in a dark space. I found it very helpful working in a couple dark closets. As with many other Makita tools, you’ll find a fuel gauge on the battery itself rather than on the body of the tool, which is handy to for checking charge level on batteries that aren’t slid into a tool.
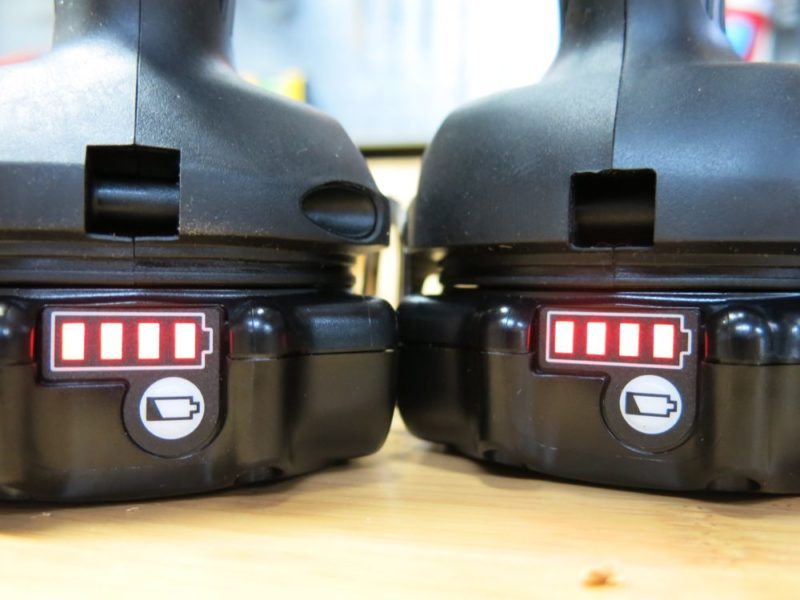
The 18v batteries have onboard charge status, handy for checking charge even if the battery isn’t hooked up to a tool.

Another nice bonus to the 18V battery is that it makes a much more stable stand than trying to balance the barrel-style 12V battery tools (many of which will simply fall over). You can set these Makita Sub-Compact tools on the ground, a nearby shelf or table and they’re ready to grab and go.
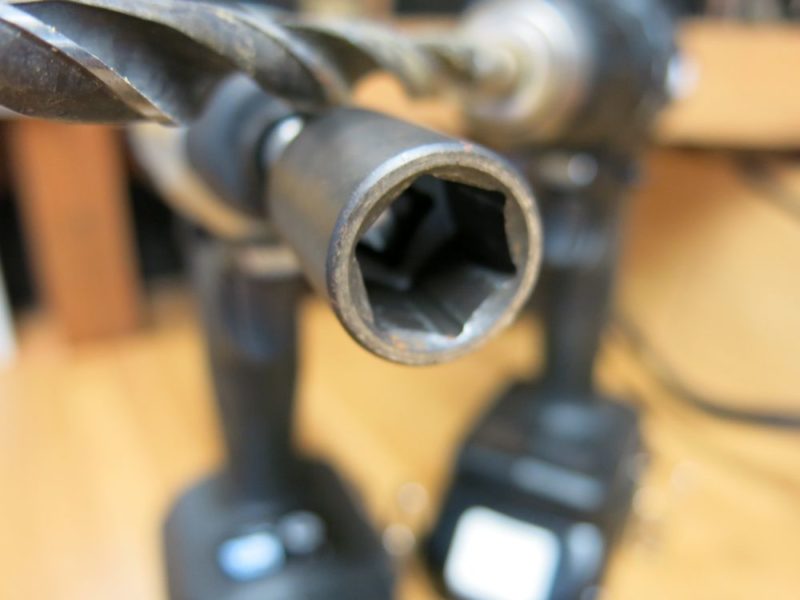
Both drill and driver stand up easily and are very stable when compared to trying to stand up a 12v barrel-style battery

The 18V LXT Sub-Compact Combo Kit (Cx200RB) we tested comes in a cube style carrying case that, sadly, is not black (which means it does NOT match my ninja outfit). While it handily fits the tools and charger, with room to spare for batteries and accessories, I can’t see carrying that cube anywhere, even with the included shoulder strap. The cube is bulky and better-suited to storing your lunch. With ninja-style tools like these, I’ll instead tuck them away in more agile storage when transporting them.

While functional and spacious, we weren’t in love with the cube-style carrying case.

The new 18V LXT Sub-Compact line from Makita has a lot going for it: great ergonomics, compact size, light weight and plenty of power for most applications you would want to use them for. Whether you’re a pro looking to minimize how much gear you’re toting, or you’re a homeowner looking for the convenience of a 12v tool, with many of the power advantages of an 18V tool, the Makita Sub-Compact Drill/Driver and Impact Driver is a great value and a winning combination. Plus, they’re black, which is awesome!

makita sub compact kitBuy the Makita CX200RB kit from our sponsor The Home Depot

You can find the 18V LXT Sub-Compact Combo Kit (Cx200RB) for a very reasonable $239 price tag at The Home Depot. The kit includes both Sub-Compact tools, 18V charger, two 2.0AH batteries and the lunch box, errr, I mean storage case.

Buy Now - via Home Depot

I acknowledge that The Home Depot is partnering with Home Fixated in sponsored content. As a part of the sponsorship, Home Fixated is receiving compensation for the purpose of promoting The Home Depot. All expressed opinions and experiences are our own words. This post complies with the Word Of Mouth Marketing Association (WOMMA) Ethics Code and applicable Federal Trade Commission guidelines.

Monday, May 29, 2017

Modern Waterfall Monobloc Bath Filler Mixer Tap Chrome Bathroom Tub Faucet TB108

Read article : Modern Waterfall Monobloc Bath Filler Mixer Tap Chrome Bathroom Tub Faucet TB108
Home >> Categories >> DIY & Tools >> Details
photo SaleBanner.jpg

Top Quality Brands at the Lowest Prices


by Luxury For Less Ltd

Average Rating

Category

DIY & Tools

RRP

£69.99

Price

Availability

Usually dispatched within 24 hours

Features

- 10 Year Warranty - Chrome plated solid brass - 1/4 turn ceramic disc technology - Laser printed dials - Fixtures and fittings included

Description

This iBathUK bath tap will fit seamlessly into any modern bathroom, it is crafted from solid brass and plated in a thick layer of chrome to create a dazzling and long lasting finish. All of our taps also come with a 10 Year Warranty for your peace of mind.


Product Features:

  • Chrome plated solid brass
  • Laser engraved hot and cold indicators
  • Latest ceramic disc technology
  • Easy to operate lever
  • Supplied complete with fittings and product manual
  • 10 Year Warranty

Notice:
  • iBathUK products are supplied exclusively by iBathUK. We do not sell through resellers.
  • Please be aware that the quality assurance from our leading 10 year warranty will not be available if you purchase from any other seller on this iBathUK branded listing.

Will it work in my bathroom?

For this tap to operate, your water system will need to produce at least 0.5 Bar of pressure, however we recommend 1 bar for optimal performance.
This can be achieved if you have one of the following:

  • Combination boiler systems
  • Gravity fed systems (only with a pump)
  • Mega flow system
  • Pumped hot water systems
  • Un-vented hot water systems

Others Also Bought

Customer Questions & Answers

Typical questions asked about products:

- Is the item durable?

- Is this item easy to use?

- What are the dimensions of this item?

Product Knowledge

Customer Reviews

There are no customer reviews yet.

Back to Top

DIY & Tools Store

photo SaleBanner.jpg


Power Tools

Hand Tools

Hardware


Back to Top

Sunday, October 8, 2017

Local Daily Record | Local News

Read article : Local Daily Record | Local News

Friday, Aug. 4

• Michael Shriver, of Enid, reported someone took three Mig style welders, three gas powered electric generators, miscellaneous hand tools, a big screen television, four large-sized car speakers, four medium sized car speakers and eight tires from the 1500 block of South 2nd. Estimated loss, $4,900.

Saturday, Aug. 5

• Ron Anderson, of Enid, reported that between 8 a.m. and 5 p.m. Aug. 1, he lost his black Glock 42 .380 caliber handgun somewhere in Enid. Estimated loss, $500.

• Meloney Jacobs, of Enid, reported someone took her 1992 blue Ford F150 from Taco Bell at 402 S. Van Buren. Estimated loss, $500.

• Ryan Ginn, of Ardmore, reported someone took miscellaneous currency, a black Apple iPod Touch, JBL Bluetooth headphones, Apple Lightning charger cable, purple Mirco USB charger cable and miscellaneous prescription drugs. Estimated loss, $488.

Sunday, Aug. 6

• Lindsey Harman, of Enid, reported that between July 21 and July 25, someone took a dresser, miscellaneous bath products, clothing, wall art, toys and bedding from her residence in the 4100 block of South Van Buren. Estimated loss, $2,425.

Monday, Aug. 7

• Cawayne Mingo, of Enid, reported that between 4 p.m. and 4:30 p.m. Aug. 4, someone took his black Apple iPhone 7 Plus with a black Griffin protective case while it was in the 500 block of East Oklahoma. Estimated loss, $925.

Tuesday, Aug. 8

• Patrick Lloyd, of the 700 block of South 4th, reported sometime between 12 a.m. Aug. 7 and 2:31 p.m. Aug. 8, someone entered his residence and stole three flat-screen televisions and cash. Estimated loss, $650.

• Michael Martens, of the 1800 block of Norman, reported sometime between 10 a.m. Aug. 7 and 7:30 a.m. Aug. 8, someone pried open the back door of his residence and stole a steel toolbox containing miscellaneous tools, a propane heater, ice chest, cat food, a lawnmower and a fiberglass ladder. Estimated loss and damage, $730.

Wednesday, Aug. 9

• Jessica Perez, no address given, reported sometime between 10:30 p.m. Aug. 8 and 8 a.m. Aug. 9, someone entered her vehicle while it was parked in the 1100 block of South Oakwood taking a wallet and its contents. Estimated loss, $2,765.

 Thursday, Aug. 10

• William Leroy Gainer, of Drummond, reported at 9:38 p.m. Aug. 10, someone damaged the driver’s side rear panel and passenger side doors and left blood on the front seat of his vehicle while it was parked in the 2000 block of West Rupe. Estimated damage, $600.

 Friday, Aug. 11

• Michael Lynn Martins, of Enid, reported between 6:30 p.m. Aug. 10 and 8:32 a.m. Aug. 1,1 someone entered a residence in the 500 block of West State and took miscellaneous tools. Estimated loss, $1,570.

Saturday, Aug. 5

• 8:29 a.m. 2230 W. Elm, false alarm or false call.

• 9:25 a.m.: 1132 E. Oklahoma, medical assist.

• 1:35 p.m.: 2730 N. Van Buren, medical assist.

• 3:23 p.m.: 1201 N. 102nd, grass fire.

• 3:30 p.m.: 1710 Mimosa Drive, dispatched and canceled en route.

• 5:58 p.m.: 2705 W. Oklahoma, medical assist.

• 6:14 p.m.: 2530 N. Monroe, medical assist.

Sunday, Aug. 6

• 12:14 a.m.: 525 S. Quincy, EMS call.

• 5:40 a.m.: 501 S. Hoover, medical assist.

• 6:22 a.m.: 900 W. Phillips, medical assist.

• 9:29 a.m.: 5801 N.Oakwood, medical assist.

• 11:04 a.m.: 225 W. Garriott, medical assist.

• 2:37 p.m.: 509 W. Oak, dispatched and canceled en route.

• 4:22 p.m.: 805 W. Oxford, police matter.

• 6:09 p.m.: 3828 N. Washington, medical assist.

• 9:32 p.m.: 1817 Mosher Drive, medical assist.

• 9:52 p.m.: 520 E. Cherokee, helicopter landing area assistance.

• 11:53 p.m.: 6102 W. Chestnut, medical assist.

Monday, Aug. 7

• 7:46 a.m.: 5605 Arrowhead Drive, medical assist.

• 8:27 a.m.: 616 W. Randolph, medical assist.

• 1:04 p.m.: 1521 N. Kennedy, authorized controlled burn.

• 1:20 p.m.: 826 W. Nagel, medical assist.

• 3:12 p.m.: 419 S. Harrison, medical assist.

• 3:16 p.m.: 520 E. Cherokee, helicopter landing area assistance.

• 3:39 p.m.: 1913 W. Elm, medical assist.

• 5:17 p.m.: 702 W. Iowa, medical assist.

• 5:19 p.m.: 1918 Field Drive, medical assist.

• 7:06 p.m.: 1101 W. Pine, recreational fire.

• 8:33 p.m.: 1022 E. Cherokee, medical assist.

• 11:30 p.m.: 1726 Centennial, person in distress.

Tuesday, Aug. 8

• 1:14 a.m.: 4502 W. Randolph, person in distress.

• 4:26 a.m.: 2618 Mt. Vernon, EMS call, excluding vehicle accident with injury.

• 5:15 a.m.: 1404 N. Garland, alarm system sounded due to malfunction.

• 6:19 a.m.: 2010 W. Maple, medical assist.

• 7:49 a.m.: 1002 Sequoyah Drive, unintentional transmission of alarm.

• 11:56 a.m.: 406 W. Birch, medical assist.

• 12:42 p.m.: 2817 W. Chestnut, medical assist.

• 2:36 p.m.: 1225 S. Cleveland, medical assist.

• 3:10 p.m.: 221 S. 30th, medical assist.

• 4:02 p.m.: 4202 LaMesa Drive, false alarm or false call.

• 7:54 p.m.: 1219 N. Grand, medical assist.

• 8:37 p.m.: 1305 S. Ritchie, medical assist.

Wednesday, Aug. 9

• 3:51 a.m.: 4202 LaMesa Drive, medical assist.

• 3:57 a.m.: 820 W. Pine, medical assist.

• 6:38 a.m.: 3400 S. Van Buren, smoke or odor investigation.

• 8:21 a.m.: 301 S. Grand, no incident found on arrival at dispatch address.

 • 11:55 a.m.: 628 E. Maple, gas leak (natural gas or LPG).

• 2:39 p.m.: 3236 Neilson Drive, medical assist.

• 3:11 p.m.: 2618 Mt. Vernon, person in distress, other. 

• 3:47 p.m.: 3607 Buffalo Drive, medical assist.

• 6:13 p.m.: 3800 W. Purdue, off-road vehicle or heavy equipment fire. 

• 6:19 p.m.: 5801 N. Oakwood, false alarm or false call, other.

• 7:17 p.m.: 5103 W. Garriott, smoke detector activation, no fire, unintentional.

• 8:42 p.m.: 3900 N. Oakwood, brush or brush-and-grass mixture fire.

• 9:37 p.m.: 2626 Northgate Drive, power line down.

• 9:54 p.m.: 5506 W. Chestnut, power line down.

• 10:07 p.m.: 428 S. Fillmore, medical assist.

• 10:27 p.m.: 1600 N. Van Buren, person in distress, other. 

• 11:41 p.m.: 4810 Spring Ridge, medical assist.

Thursday, Aug. 10

• 3:04 a.m.: 3607 Buffalo Drive, medical assist.

• 6:25 a.m.: 5801 N. Oakwood, smoke detector activation, no fire, unintentional.

• 7:40 a.m.: 2618 Mt. Vernon, medical assist. 

• 10:43 a.m.: 2101 E. Oak, medical assist.

• 10:53 a.m.: 600 S. Monroe, alarm system activation, no fire, unintentional.

• 11:59 a.m.: 6405 Memorial Drive, medical assist.

• 12:55 p.m.: 2705 London Lane, medical assist.

• 1:29 p.m.: 628 E. Maple, medical assist.

• 2:06 p.m.: 4018 Shenandoah, medical assist.

• 3:45 p.m.: 929 S. Oakwood, gas leak.

• 9:20 p.m.: 310 W. Garriott, fire, other.

• 9:35 p.m.: 2604 N. Jackson, medical assist.

• 9:40 p.m.: 4810 Spring Ridge, medical assist.

• 10:01 p.m.: 410 W. Illinois, building fire.

• 11:56 p.m.: 2112 W. Maple, medical assist.

Sunday, March 4, 2018

Homemade Shower Spray Recipes : TipNut.com

Read article : Homemade Shower Spray Recipes : TipNut.com

BottleFor Daily Use:

1/3 cup rubbing alcohol
1 cup water

  • Mix in a spray bottle and shake. Apply to surface, no rinsing required.

Tile and Grout Cleaner:

1/2 cup of baking soda
1/3 cup of ammonia
1/4 cup of white vinegar
7 cups of water

  • Combine all the ingredients in a labeled bottle and shake well to mix. Apply to surface then wipe off with a damp sponge. Do not use with bleach.

*Source: Queen of Clean

Borax Mix:

3 cups hot water
1/2 cup Vinegar
1 TBS Dish Detergent
1 TBS Borax

  • Mix together in a bottle, shake then apply to area as needed.

Door Tracks:
*First published February 14, 2007 and moved to this page for better organization

If it’s just regular cleaning you need to do, simply pour vinegar in the tracks, soak for a few minutes then rinse out with water.

Make sure the drain holes aren’t clogged with gunk, you want the water to flow out easily. Also lay towels on the bathroom floor along the bathtub to catch any water overflow.

If it’s a grime, gunk and mildew disaster on your hands, you can try the following tips…

First clean out as much as you can, then stuff the drain holes with small, tight wads of toilet paper or chunks of paper towel. Pour preferred grime buster solution (listed below) in the track to completely cover without flowing over, then allow to soak for an hour or two.

Loosening Up The Grime:

  • Coca-Cola
  • Vinegar
  • Denture Tablets (first dissolved in warm water)
  • Bleach & Water

After soaking, unclog the drain holes and allow cleaner to flow out of the tracks. Rinse well with hot water. Then get your tools out and dig into the little corners and crevices. See below for some tools to try.

Tools

  • Shower Track & Grout Brush
  • Old Toothbrush
  • Q-tips
  • Handheld Steam Cleaner
  • Screwdriver and rag to dig into grime corners

If things are really bad:

  • Remove the doors to do a thorough cleaning job. Instructions can be found at WikiHow.

Caution:

  • I don’t know how the above solutions will react with all the various metals and finishes used for tracks, please test first before using to ensure they (or the finish) won’t be damaged.

Published: November 1, 2007
Updated: August 18, 2012

Friday, March 24, 2017

Eagle Bath Sliding Door Steam Shower Enclosure Unit

Read article : Eagle Bath Sliding Door Steam Shower Enclosure Unit

Should you getting to test value. benefits and look points when you are interested in a lot more feature about Category tools & home improvement > kitchen & bath fixtures > bathroom fixtures > showers > shower doors.

Product Eagle Bath Sliding Door Steam Shower Enclosure Unit

<a href=Eagle Bath Sliding Door Steam Shower Enclosure Unit Reviews" src="http://images.prosperentcdn.com/images/250x250/i.walmartimages.com/i/mp/00/85/96/74/00/0085967400219_P255045_500X500.jpg" title="Eagle Bath Sliding Door Steam Shower Enclosure Unit Read Review" style="border: 0px;" />

###Check Price Eagle Bath Sliding Door Steam Shower Enclosure Unit Today###!!

EGLB1002 Features Includes door Material: Tempered glass Door design: Sliding Self cleaning steam generator Acupuncture body massage (6 jets) Computer control panel with timer Product Type: Shower enclosure/Tub enclosure Enclosure Shape: Rectangle Frame Finish: Grey Glass Component: Yes Door Included: Yes Shower Base Included: Yes Steam Shower: Yes Glass Type: Tempered glass Door Type: Sliding Generic Specifications Steam sauna (3KW generator) with aromatherapy steam outlet 110V whirlpool massage (8 Jets) 110V ETL certified (US and Canada electrical safety) Dimensions Overall Height - Top to Bottom: 87' Overall Width - Side to Side: 59' Overall Depth - Front to Back: 34' Overall Product Weight: 360 lbs

[Read more]

<a href=Eagle Bath Sliding Door Steam Shower Enclosure Unit" src="https://encrypted-tbn0.gstatic.com/images?q=tbn:ANd9GcQOw5UfjljCJBTf0BIbSqBfo77LZOwlNSthf04LgHE4BzTSwB4CxQ" />

Eagle Bath Sliding Door Steam Shower Enclosure Unit Review

Eagle Bath Sliding Door Steam Shower Enclosure Unit SpecificationsEGLB1002 Features Includes door Material: Tempered glass Door design: Sliding Self cleaning steam generator Acupuncture body massage (6 jets) Computer control panel with timer Product Type: Shower enclosure/Tub enclosure Enclosure Shape: Rectangle Frame Finish: Grey Glass Component: Yes Door Included: Yes Shower Base Included: Yes Steam Shower: Yes Glass Type: Tempered glass Door Type: Sliding Generic Specifications Steam sauna (3KW generator) with aromatherapy steam outlet 110V whirlpool massage (8 Jets) 110V ETL certified (US and Canada electrical safety) Dimensions Overall Height - Top to Bottom: 87' Overall Width - Side to Side: 59' Overall Depth - Front to Back: 34' Overall Product Weight: 360 lbs

<a href=Eagle Bath Sliding Door Steam Shower Enclosure Unit Reviews" src="http://images.prosperentcdn.com/images/250x250/i.walmartimages.com/i/mp/00/85/96/74/00/0085967400219_P255045_500X500.jpg" title="Eagle Bath Sliding Door Steam Shower Enclosure Unit Read Review" style="border: 0px;" />

When thinking to acquire excellent price.be sure you examine with regard to tools & home improvement > kitchen & bath fixtures > bathroom fixtures > showers > shower doors testimonies. you can test to search for object info. Read customer reviews gives a a lot more proportionate idea of the excellent in addition to undesirable of your merchandise. You might try to consider simillar goods and definitely will help you to make a firm decision invest in.

<a href=Eagle Bath Sliding Door Steam Shower Enclosure Unit" src="https://encrypted-tbn0.gstatic.com/images?q=tbn:ANd9GcQwkQEf3qahFvvp57kcn0hSRv0mK52RRCHeYMXcqNZW91QUVFRsdg" />

Eagle Bath Sliding Door Steam Shower Enclosure Unit

Eagle Bath Sliding Door Steam Shower Enclosure Unit Get a personal well-designed and trendy purchasing trolleys to sign up the newest trend available in the market today. Do you think you're constantly on the run? Would you like to travel gentle but still appear fashionable while shopping? And then. consider using a fantastic and incredibly inexpensi...

category : tools & home improvement > kitchen & bath fixtures > bathroom fixtures > showers > shower doors for brand : Eagle Bath From : WalmartEagle Bath Sliding Door Steam Shower Enclosure Unit

Wednesday, November 29, 2017

How to Lay Tile: Install a Ceramic Tile Floor In the Bathroom

Read article : How to Lay Tile: Install a Ceramic Tile Floor In the Bathroom

Cover up an old floor

Whether you’re replacing an old shabby floor or installing a new one, you can’t beat ceramic or stone tile for durability and appearance. When laid properly, it’s virtually a forever floor that requires almost no care and maintenance. And you can select materials from a vast array of colors and textures. We’ll cover how to lay tile in a few steps.

What’s equally attractive is that you can lay a first-class tile floor yourself, often in one weekend, and save the $500 to $1,500 cost of hiring a pro.

The key to keeping the job simple is to cover the old vinyl or other flooring with a new thin underlayment that gives you a fresh, clean start. No messy tear-out and repair. In this article, we’ll demonstrate how to install a thin “backer board” over the old floor. Then we’ll cover tile-setting techniques, from layout and cutting to grout and cleanup.

This is a two-day project for most bathrooms, even if you don’t have any previous tile experience. If you’re comfortable using basic hand tools and have the patience to align tiles just right, you can handle this job. The entire cost of this project for a typical bath ranges from $300 to $600.

Estimating the Cost of a Tile Project

The tile itself will be your biggest cost, so start by measuring the square footage of the floor. Then add 10 percent for cutting waste. If you choose a more complex layout than the simple grid pattern we used, your waste will be greater. Most tile sells for $5 to $15 per square foot, but you can spend as little as $3 or more than $50. If you have to install backer board, add $2 per square foot to the cost of the tile. Other materials will cost about $90, regardless of bathroom size. The tile tools you’ll need (including a tile cutter) will total $60 to $80.

Assess your floor

The success of any tile job depends on a solid base, that is, a floor that flexes very little as you walk across it. If you have a concrete subfloor, this isn’t an issue. You can lay tile directly over the existing vinyl as long as it’s well adhered.

If possible, avoid tearing out vinyl flooring. Leaving it in place saves time, of course, but it also reduces asbestos hazard concerns. Asbestos was used in sheet vinyl and vinyl tile until the mid-1980s. By leaving the vinyl undisturbed, you won’t risk sending asbestos fibers into the air.

If you have a wood subfloor, there’s a good chance that you’ll have to install backer board over your vinyl to make the floor thicker and stiff enough for tile. The easiest way to see flooring thickness is to pull off a floor register. Otherwise look for plumbing passageways through the floor. As a last resort, drill through the floor with a 1-in. or larger spade bit (your new floor will cover the hole later). To prevent asbestos dust from becoming airborne, mist the bit with a spray bottle as you drill. In addition to floor thickness, you’ll need to determine joist spacing. If there’s an unfinished basement or crawlspace below the floor, simply measure the spacing. If there’s a ceiling, probe for joists with a drill bit.

If the joists are spaced 16 in. apart, the layers of structural flooring beneath the vinyl should add up to at least 1-1/8 in. With joists every 24 in., you need 1-1/2 in. If your floor is too thin for tile, add a thicker layer of tile backer board. Our floor required 1/4-in.-thick backer. Yours might need 1/2-in. backer to reach the minimum thickness. If your floor is already thick enough, you can simply prep the vinyl floor (Photos 1 – 4) and skip the backer installation (Photos 5 – 8). Then tile directly over the vinyl, following the same steps we used over backer board.

Regardless of the type of subfloor, there are two situations where you can’t leave vinyl in place: First, if large areas of the vinyl are loose, don’t set tile or backer over it. Small loose spots are acceptable and easy to deal with (Photo 4).

Second, “cushioned” sheet vinyl must be removed before you can set tile. Cushioned vinyl has a foam backing that makes it noticeably thicker and softer than standard vinyl flooring. It’s too spongy to support tile or backer board. Before removing it, call your local health department for instructions on how to check for asbestos and proper procedures if asbestos is present.

Gather Advice While You Shop

Home centers carry everything you need for this project, but begin shopping at a tile store, where you’re more likely to get expert advice. Make a quick sketch of your floor plan and jot down all the dimensions. Also take a photo of the floor at the doorway. This will help the tile store staff recommend a “transition” to neatly join the tile to the hallway flooring. Transitions come in different styles to suit any situation.

When you choose the tile itself, ask if it requires any special installation steps. Some tile, for example, should be coated with grout release before grouting. Also ask about cutting techniques for the tile. You’ll use sanded grout for the floor. Ask if sanded caulk is available in a color that matches your grout for the floor/tub and floor/wall tile joints.

Prepare the room

First, get the toilet out of your way. Stuff a rag in the hole to block sewer gases. If your home only has one toilet, you can leave it in place until you install the backer board. Keep a supply of wax rings on hand if you plan to reinstall the toilet at the end of each day.

If you expect to keep your vanity for many years to come, leave it in place and tile around it. But if you think you might replace it, remove it now. When the job’s done, you can reinstall the old vanity or put in a new one. Having the vanity out of the way gives you more workspace, and you won’t have to cut backer board and tiles to fit around it. This also eliminates the floor repair problem if you install a smaller vanity or pedestal sink in the future.

Pull off the baseboard or plan to add base shoe molding. This leads to a neater-looking job because the edges of the tile will be covered later—jagged cuts and slight measuring mistakes are hidden. If your baseboard has base shoe molding, remove only the base shoe. Backer board and tile will raise your floor 3/4 in. or more. So you’ll have to remove and undercut the door. To mark the door for cutting, stack backer board, tile and two layers of cardboard on the floor (see Photo 3). Mark the door 1/2 in. above the stack, remove the door and cut off the bottom.

Scrub, screw and patch the floor

Install a Ceramic Tile Floor in the Bathroom

Photo 1: Scrub the floor with stripper

Remove the baseboard and toilet. Using an abrasive pad, scrub the floor hard with water mixed with vinyl floor stripper.

Install a Ceramic Tile Floor in the Bathroom

Photo 2: Drive screws into the floor joists

Mark the floor joists with chalk lines and drive 2-1/2-in. screws every 8 in. Don’t leave any screw heads protruding.

Install a Ceramic Tile Floor in the Bathroom

Photo 3: Cut the door trim to accommodate tile

Undercut door trim using a jamb saw or handsaw. A piece of backer board, tile and two layers of cardboard raise the saw to the correct height above the floor.

Install a Ceramic Tile Floor in the Bathroom

Photo 4: Fill low spots with thin-set

Cut out any loose sections of vinyl with a utility knife. Fill the void with thin-set using the flat edge of a notched trowel.

Scrub the floor with a vinyl floor stripper following the manufacturer’s instructions. The stripper will dissolve wax and other residue. Scrub hard with an abrasive scouring pad (Photo 1). The tiny scratches left by scrubbing help the thin-set bond better.

Next, drive screws through the floor into the joists (Photo 2). This ensures that the subfloor and underlayment are securely fastened. If there’s an unfinished basement below the floor, locating the joists is easy: Go to the basement and drill a couple of 1/4-in. holes up through the floor next to a joist. If you can’t locate the joists from below, pick a spot near one wall and drill a hole. If the bit breaks through into hollow space, move over 1 in. and drill another hole. Keep going until you hit a joist. Then go to the opposite wall and find the other end of the joist. Measure at intervals of 16 or 24 in. from the first joist to locate the others.

While you’re driving screws, look for any spots where the vinyl has loosened from the floor. Cut out loose spots and fill them (Photo 4). If there are any copper pipes that pass through the floor, wrap them with duct tape at floor level. Cement-based thin-set and grout can corrode copper.

Install backer board

Install a Ceramic Tile Floor in the Bathroom

Photo 5: Install backer board over the floor

Cover the floor with backer board. Cut inside corners, circles and curves with a drywall saw. Space pieces 1/8 in. apart and hold each one in place with two temporary screws.

Install a Ceramic Tile Floor in the Bathroom

Drywall saw

Use a drywall saw to cut corners, circles and curves in backer board.

Install a Ceramic Tile Floor in the Bathroom

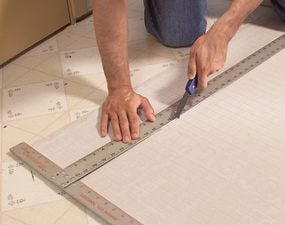
Photo 6: Score and snap the backer board

Make straight cuts with a scoring knife. Make three or four scoring passes, then snap the backer over a 2×4. When all the pieces have been laid out, label them and set them aside.

Install a Ceramic Tile Floor in the Bathroom

Scoring knife

Use a scoring knife to score the backer board.

Install a Ceramic Tile Floor in the Bathroom

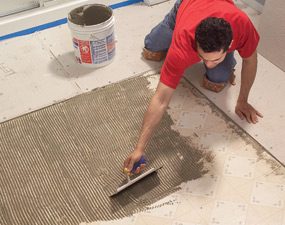
Photo 7: Trowel on the thin-set

Comb out a bed of thin-set just large enough for each piece of backer board using a 1/4-in. notched trowel held at a 45-degree angle. Screw the backer down before spreading thin-set for the next piece.

Install a Ceramic Tile Floor in the Bathroom

Notched trowel

Use a 1/4-in. notched trowel to spread the thin-set over the floor.

Install a Ceramic Tile Floor in the Bathroom

Photo 8: Cover the joints

Press adhesive-backed mesh tape over the joints and skim over the tape with thin-set. When the thin-set is firm but not fully hardened, scrape away any ridges with a putty knife.

The backer board is fastened with a combination of screws and thin-set adhesive. Cut and lay out all the pieces before you mix the thin-set (Photos 5 and 6). You can run the sheets in any direction, but be sure to stagger the joints so you never have four corners meeting at one point. Leave a 1/8-in. space between the sheets and along the vanity, tub or shower. The gap along walls must be at least 1/8 in. wide, but a wider gap (about 1/2 in.) makes the panels easier to set in place.

After cutting and fitting, label the location of each one and set them all aside. Vacuum the floor and have your drill and screws ready to go before you mix the thin-set. Read the thin-set’s label. Spread the thin-set with a 1/4-in. notched trowel. Comb in one direction so air can escape when you embed the backer (Photo 7). Drive screws every 6 in. around the perimeter of each piece and every 8 in. “in the field” (across the face of the panel). If the leftover thin-set is still workable, you can immediately embed mesh tape over the joints (Photo 8).

If the thin-set has become too stiff or chunky, mix a new batch. Use “alkali-resistant” tape that’s meant for backer board. While the tape coat of thin-set hardens, run a putty knife over all the screw heads to scrape off the “mushroom” bulges around screws. Drive in any protruding screw heads you come across.

CAUTION!

Cement products like thin-set and grout draw moisture from skin and can even cause burns that require medical attention. While most pros work bare-handed, wear gloves if you have any special sensitivity. Also wear eye protection while mixing thin-set and grout.

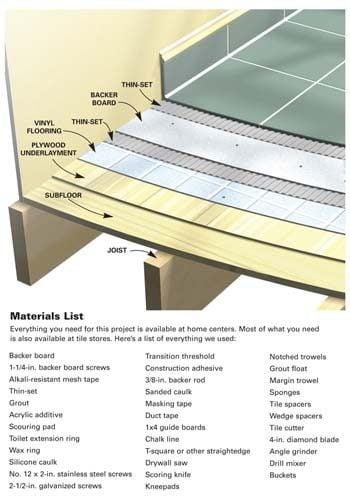
Figure A: Ceramic Tile Over Vinyl

Everything you need for this project is available at home centers. Most of what you need is also available at tile stores.

Cutaway of a tile floor over vinyl

Careful layout pays off

Install a Ceramic Tile Floor in the Bathroom

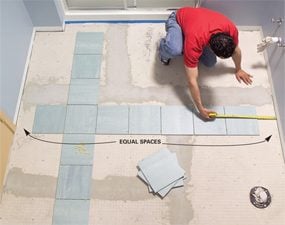
Photo 9: Test your layout to avoid small pieces along the walls

Dry-lay tile to determine the best layout. Start with centered rows, leaving equal spaces at walls. Then reposition rows until you find the optimal layout.

Install a Ceramic Tile Floor in the Bathroom

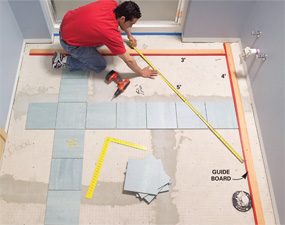
Photo 10: Attach guide boards to guide the layout

Screw guide boards to the floor following your chosen layout. Position the guides so you can lay all the field tiles without moving the guides. Make sure the guides are at right angles by measuring out a 3-4-5 triangle.

Too often, tile novices simply start setting tile in a corner and continue along two walls until the floor is covered. Sometimes they get lucky and the floor looks good. But more often this method leads to trouble:

They end up with awkward-looking, thin slivers of tile along a prominent wall or at the doorway. And the tile looks even worse when walls are badly out of square or crooked—a straight grout line running too close to a wall emphasizes the wall’s imperfections.

Whether you’re laying a simple grid pattern like we show here, or a diagonal pattern with a border, the best tile layout usually calls for centering full tiles between walls so the partial tiles along the edges will end up all the same size. Don’t rely on your tape measure and mental arithmetic. Rip open a carton of tile, grab a handful of spacers and experiment with your layout on the floor.

To begin, center rows of tile between walls so you have equal spaces along walls that face each other (Photo 9). Set the two rows parallel to the two most prominent walls. Then make adjustments, trying to achieve these three goals:

  • Use full tiles at doorways and along the bathtub or shower. These are usually the only places where the edges of the floor aren’t covered by baseboard. If you use full tiles in these exposed spots, you don’t have to worry about making smooth, perfect cuts.
  • Avoid narrow tiles along walls. Ideally, you’ll end up with tiles cut to half size or larger. Avoid cutting tile to widths less than 2 in.
  • Minimize cutting and try to avoid difficult cuts. For example: Cutting tile to an L-shape to fit around an outside corner is especially difficult when one arm of the “L” is less than 2 in. wide. The arm tends to break off as you cut.

Chances are, your layout won’t meet all these goals. Because the shower stall was the focal point in our bathroom, we made it our No. 1 layout priority. We chose to use full tiles in front of the shower. That left us with 3-in.-wide tiles along the opposite wall, which was less prominent. We also chose to center the tile rows on the shower; that meant we had to use cut tiles at the doorway.

Once you determine a layout, establish lines to guide your tile positioning. The usual method is to snap chalk lines on the floor. But chalk lines are hard to see after you’ve spread thin-set, and one row of tile may slip as you set the next row. Here’s a more reliable guide: Choose straight boards a foot shorter than the length and width of the room. Tape one edge of each board so thin-set won’t stick to them.

Then screw the boards to the floor at a right angle to form a guide that eliminates guesswork and shifting (Photo 10).

Video: Create Your Own Floor Tile Layout

Planning the layout for a tile project is usually the hardest and most time- consuming step. Watch this video to learn how a pro does it. You’ll see how to snap chalk lines and make sure they are perfectly square. Plus, you’ll learn how to avoid unsightly narrow, difficult-to-cut tiles along a wall. Don’t start a tile project until you’ve watch this video!

Set the tile (finally!)

Install a Ceramic Tile Floor in the Bathroom

Photo 11: Set the full tiles

Comb out a few square feet of thin-set and set tile against the guides. Continue until all the full tiles are in place. Tip: Watch for squeeze-out between tiles and rake it out with tile spacers.

Install a Ceramic Tile Floor in the Bathroom

Spacers detail

Keep the gaps between tiles even by using spacers

Install a Ceramic Tile Floor in the Bathroom

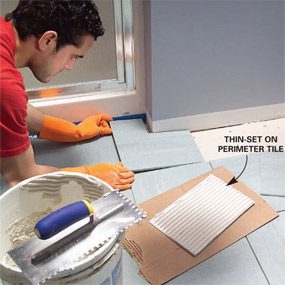
Photo 12: Spread thin-set and set the perimeter tiles.

Cut and set the perimeter tiles after the thin-set beneath the full tiles has hardened. In spaces too narrow for your trowel, comb thin-set onto the backs of tiles.

It’s usually easiest—and most efficient—to set tile in two phases: First set all the full “field” tiles (Photo 11). Then, when the thin-set has hardened for several hours, cut all the perimeter tiles and set them (Photo 12). Here are some tips for both phases of the job:

  • The trowel you use for setting tile may be different from the one you used to embed the backer. The thin-set label tells you which notch size to use relative to tile size.
  • Dampen the backer with a sponge just before applying thin-set. This keeps the thin-set from drying out too quickly.
  • Comb the thin-set in one direction so air pockets won’t be trapped under tile.
  • Open three or four cartons and mix the tiles as you set them. Pattern and color vary slightly from one carton to the next.
  • Don’t just set each tile into place; press down on the tile and wiggle it to embed it firmly in the thin-set.
  • Watch for “tipped” corners. When you press a tile in place, it’s easy to tilt it slightly so that one corner stands higher or lower than neighboring tiles.
  • When you complete a section of tile, inspect it before moving on. Make sure the tiles line up correctly and spacers are in place. Wipe any thin-set off the face of tiles with a damp sponge.
  • When the thin-set becomes chunky or too stiff, throw it away and mix more. Never try to extend the life of thin-set or grout by adding water.
  • Cut perimeter tile so that caulked joints (at tub) are the same width as grouted joints.

Prepare the floor for grout

Install a Ceramic Tile Floor in the Bathroom

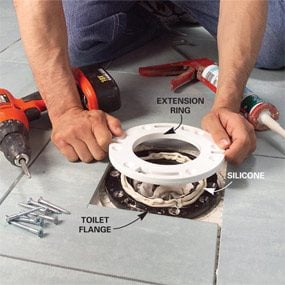
Photo 13: Install an extension ring over the toilet flange

Remove the old screws from the toilet flange and apply a heavy bead of silicone caulk. Fasten the extension ring over the old flange with stainless steel or brass screws.

Install a Ceramic Tile Floor in the Bathroom

Photo 14: Install the transition strip

Glue the transition into place with construction adhesive. If carpet meets the transition, you may have to add a new tack strip.

Install a Ceramic Tile Floor in the Bathroom

Photo 15: Stuff backer rod along the wall

Push backer rod into joints that will be caulked later. The foam rod keeps grout out of joints. After grouting, pull out the rod and caulk the joints.

When all the tiles are in place and the thin-set has hardened, remove all the spacers. Next, raise the toilet flange by adding an extension ring or two (Photo 13). The extended flange should be flush with or higher than the surrounding tile.

When you grout, fill in between the flange and tile. That way, any future leak around the flange will show up on the bathroom floor instead of on the ceiling below. If you plan to use a glue-down transition as we did, this is the time to install it.

Here’s how we dealt with our transition: First, we removed the old metal strip that covered the carpet’s edge. Then we cut our transition strip to fit between the door jambs using a miter saw. Next, we added a tack strip to hold the carpet in place. Before we could glue the transition to the floor (Photo 14), we had to remove a thin strip of the old vinyl floor.

Grout is too brittle to handle the slight shifting movements that are normal in any room. Keep grout out of joints wherever the floor meets the tub, shower, vanity or walls (Photo 15).

Pack the joints with grout

Install a Ceramic Tile Floor in the Bathroom

Photo 16: Grout the joints

Work the grout back and forth across the floor, diagonal to the joints and holding the float at a 45-degree angle. Then scrape off the excess grout, holding the float almost upright.

The thin-set directions will tell you how soon you can grout the floor—usually 24 hours. Grouting isn’t complex. Just plop a couple of scoops of grout onto the floor in a corner, work the grout into joints (Photo 16) and scrape off the excess grout before moving to the next section. In addition:

  • Mix the grout to a mashed-potatoes consistency. Adding extra liquid makes grout easier to work with but weakens it.
  • Don’t just spread the grout over the joints; press hard to pack it into the joints. If you’re doing it right, your forearm will get a good workout.
  • Whether you’re filling joints or scraping off excess grout, always push the float diagonally across the tiles.
  • Scrape off the excess to leave tile as clean as you can. The less grout you leave on the tiles, the easier cleanup will be.
  • When you’re done, cover the grout bucket with a plastic bag and set it in a cool place to slow the hardening process. During cleanup, you may find spots that need a little extra.

Grout cleanup

Install a Ceramic Tile Floor in the Bathroom

Photo 17: Clean the tiles

Wipe grout off the tile surface with a damp sponge. Wipe gently on the first pass so you don’t pull grout out of the joints. Rinse the sponge often.

Clean the surface of the tile when the grout is stiff enough to stay put in the joints but still soft enough to wipe off the tile surface. During hot, dry weather, grout can become difficult to wipe away in just 10 minutes, so get ready for cleanup before you even mix the grout. You’ll need two buckets of clean water, two sponges, a synthetic scouring pad and a dry rag.

As soon as you’re done grouting, go to the first section you grouted and wipe across a joint with a damp sponge. If the sponge pulls grout out of the joint, wait five minutes and try again. In cool, damp weather, the grout may stay too soft for an hour. When the grout is hard enough, gently wipe the tile with a damp sponge.

Rinse the sponge frequently as you wipe the entire floor (Photo 17). If you come across tough spots, scrub them with the scouring pad. Be careful where you put your feet and knees—don’t mar your perfect grout joints.

Immediately after the first pass, grab the second bucket of clean water and the fresh sponge and make a second, more thorough pass. Then, as the tile surface dries, wipe it with a dry terry cloth. The dry haze should buff off easily. If not, go for fresh water and sponge the floor again. If you can’t get rid of the haze, don’t panic. Products that remove haze are available wherever tile is sold.

Let the grout cure overnight before you caulk joints, set the toilet or reinstall baseboard. Grout sealer is a good precaution against staining: Some products can be applied 24 hours after grouting; others require a two- to three-week wait. If you have leftover tile or grout, keep them in case you have to make repairs in the future. Be sure to write down the brand, color and retailer of the tile.

How NOT to Save Money on a Tile Project

I’m a devout cheapskate, but when it comes to buying thin-set and grout, I grab the most expensive products on the shelf. More expensive thin-sets and grouts generally contain a higher proportion of the polymers that improve adhesion, durability and stain resistance.

In most situations, cheaper products would perform just fine. But if I can reduce the risks of loose tiles or cracked grout by spending an extra $30 on a typical bathroom project, I consider that a bargain.

Liquid additive is another smart investment. If the thin-set or grout label says you can mix it with water or an additive, use additive. These liquids (labeled “latex, ” “polymer” or “acrylic”) are meant to improve adhesion and stain resistance. But as a bonus, they produce a slick, creamy consistency. Thin-set combs out more smoothly, grout flows easily into joints, and both remain workable longer.

Also buy a mixer for your drill. Mixers come in various styles and sizes. Go easy on the trigger. If you run the drill at full speed, you can create millions of tiny air bubbles, which will weaken the mix.

Tile cutting tools

Install a Ceramic Tile Floor in the Bathroom

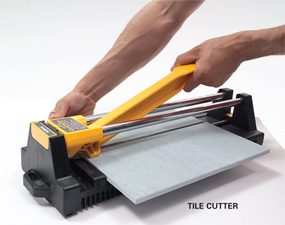
Tile cutter

A tile cutter is the fastest way to cut tile. Just push the handle forward and a small wheel scores the tile. Then push the handle down and the tile snaps in two. You can’t beat a tile cutter for convenience. It makes no mess and you can drag it around the room as you work. But a tile cutter has zero versatility. It makes straight cuts across the entire tile—no curves or corner cuts. Cutting 1 in. or less off a tile can be difficult or impossible. You can rent one at rental centers and some tile shops.

Install a Ceramic Tile Floor in the Bathroom

Wet saw

A wet saw cuts with a diamond blade while water cools the blade and eliminates dust. You can cut notches, trim off tiny slivers of tile, cut miters and even make curves. You’ll get clean cuts in any type of tile. But wet saws are messy. They spit water and raise a cloud of gritty mist. If you use one indoors, contain the mist with curtains of plastic film and cover nearby surfaces. You can buy a small wet saw like the one shown here or rent a professional model from a tile store or home or rental center. If you only have a few cuts that require a wet saw, call a tile store. Many make cuts for a small fee.

Install a Ceramic Tile Floor in the Bathroom

Angle grinder

An angle grinder equipped with a diamond blade can make straight cuts, curves and notches in any type of tile. Since all your cuts are freehand, this isn’t a precision tool, but you can grind away imperfections with the tip of the blade. Use a grinder only outside. Wear a dust mask and eye protection.

Install a Ceramic Tile Floor in the Bathroom

Nippers

Nippers are useful for rough curves and notches. They don’t cut tile, but bite out small chunks, leaving jagged edges.

Install a Ceramic Tile Floor in the Bathroom

Contour gauge

A contour gauge is a great tool for marking troublesome shapes on tile. Just press it against any odd-shaped surface (like the curved corner of a bathtub) and transfer the profile to tile.

Here are the tools that can cut your tile. Buy or rent the ones that make the most sense for your project.

In addition to the tools shown here, a carbide abrasive blade that fits in a jigsaw cuts slowly but leaves fairly clean cuts in softer types of ceramic tile and natural stone. A carbide abrasive hole saw cuts perfect holes for plumbing pipes and fixtures.

A rubbing stone is simply an abrasive block, similar to the wheel in a bench grinder. Use it to smooth sharp or slightly chipped cuts that will be exposed.

Additional Information

Required Tools for this Project

Have the necessary tools for this DIY project lined up before you start—you’ll save time and frustration.

You’ll also need these specialty tools for working with tile and backer board:
Scoring knife, Margin trowel, Tile cutter, 4-in. diamond blade, Drill mixer, Offset saw, Tile cutter, Nippers, Wet saw
You can also use an angle grinder for cutting tile.