Read article : Making Bifold Doors Into A Screen To Hide The Water Heater
We know this was supposed to be the final chapter when it comes to our big basement makeover, but because we tackled two different DIY projects (making a screen to block off our fugly water heater and frosting the windows for 100% privacy that still lets in the light) we realized it would be crazy to try to squeeze all those step by step photos and instructions into one post… so we’re breaking it down to two. Just look at it as twice the fun. So without further ado, here’s how we made a custom screen to hide our eye-sore of a water heater with $18 worth of secondhand bi-fold doors and a quart of punchy bright green paint (stay tuned for the window-frosting tutorial coming soon).
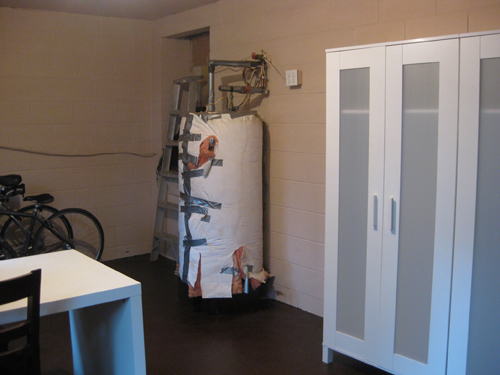
Before we get into all the nitty gritty details, we should remind you what the aforementioned water heater looks like. Remember this guy?
Of course the room has come a long way from that point (we added a rug, brought in a bike rack, upgraded the the lighting situation, papered the insides of the armoires, hung some art, brought in some storage, and organized our paint). But the frighteningly gross water heater remained… taunting us with its hideousness. We debated springing for a tankless variety, but because we’re big fans of working with what you have (and didn’t want to cart off our fully functional water heater to a landfill) we opted to create a screen that will block off the water heater along with the ugly trap door in the wall behind it (which leads to the crawl space under the house). And when this water heater finally breathes it’s last breath we’ll definitely consider upgrading to a tankless one (and we’ll still be able to use the screen to hide the unsightly trap door in the wall behind it).
But how did we end up with a giant screen without blowing our meager basement budget (many store-bought ones are in the $100-300 range and a bunch of those weren’t even tall enough to work for our space)? We just brainstormed materials that we could use to whip one up on the cheap. Here’s how it all went down.
Step 1: Locate three adequately tall bi-fold doors that are sturdy enough to stand on their own and will easily obscure a 6′ water heater. After debating the use of everything from all-weather curtain panels hung from the ceiling to bookcases on wheels (which could be pushed aside for water heater access) we finally decided a screen was the perfect solution for our space. And what’s an easier way to make a screen than hinging three bi-fold doors together and calling it a day? At first we thought about cutting a full sized door in half but bi-folds are like pre-cut doors, so they’re ready to go. Even better. Plus they’re easy to move, relatively simple to find, and definitely would add some playful color to the room if we opted to paint them a bold hue.
So a plan was born. For just $18 we snagged these three bi-fold doors at our local Habitat For Humanity ReStore (they were having a 40% off door sale when we went in- uh, awesome!). Plus they already came with enough hinges to join them all together and create one large screen. Jackpot.

When we got to the checkout the lady was like “um, you’re missing a door” (since there are supposed to be four) but we explained that this wonky set of three bi-folds was actually perfect for us since we were going to make a screen by joining them together and didn’t need a fourth. She seemed excited for us until we mentioned that we were going to attempt to shove them into our good ol’ Nissan Maxima. Then she just shook her head and muttered good luck. Of course we took it as a personal challenge…
![]()
That’s me flashing my victory smile. A lot of people write to us and ask how we take on so many projects with such a small car. We’re just like anyone else with a modestly sized ride… we squeeze things in when we can and call John’s sister and beg to borrow her Ford Explorer when we can’t. In a pinch we’ve even been known to rent a pick-up truck from Home Depot for a few hours, just to cart something around. It’s all about, in the words of the ever-fabulous Tim Gunn, making it work.
Tip: when you recline the front seat and place large objects in the car as we did above, you can actually fasten the passenger side seat belt across them, which can help keep things safely in place so they don’t slide around and encroach on the person in the back seat- especially when she has an ever-expanding belly full of baby to protect).
Step 2: Place bi-fold doors on cardboard (for painting) and hinge them together in the room where your screen will be living (to avoid the annoyance of building it in one place and then moving it halfway across the house afterwards). When we finally got our precious cargo home we placed the doors on a large piece of paint-ready cardboard, hinged them together with the free hinges that we inherited with the doors, and stepped back to take a look. By golly this just might work. We also did a bit of puttying/sanding to fill in any recessed parts of the doors and smooth out anything that wasn’t exactly ready for paint (but for $18 pre-used doors, they weren’t bad at all).

Step 3: Paint your newly made screen. That’s it. You’re done. I guess we should elaborate a bit. We used one quart of semi-gloss latex paint by Behr, which we had color matched to Benjamin Moore’s Bunker Hill Green 566. Two coats later John was finished. I love this whole being pregnant thing. No painting for me (of course for the impending bathroom and nursery projects we’ll be using no-VOC paint so I’ll be back on painting duty, but for the separate entry basement we figured low-VOC Behr paint worked for us- and at just $14 for the quart it put our total cost for the entire screen project at… (drumroll please)… $32!

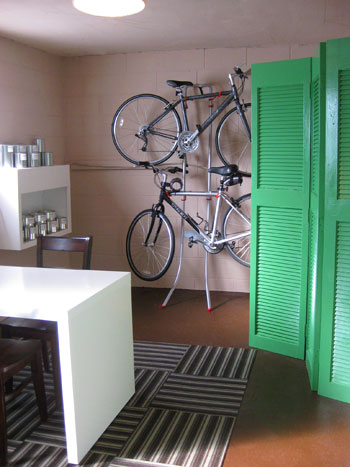
We love the happy burst of emerald green that it brings to the space (it complements the paper behind the armoire doors, the large green tupperware bins we brought in, the storage boxes in our Ikea workstation, and even the subtle green stripes in the rug). And the function is great. It definitely hides the ugly stuff but still makes it easily accessible. Best of all, there’s still more than enough room- over 35″- to walk to the other side of the basement, roll out our bikes, etc.
So that’s how you give an old set of bi-fold doors a whole new life on the cheap. We’ll be back with a window frosting tutorial followed by an entire basement project wrap-up (complete with photos from start to finish and even a budget breakdown for your viewing pleasure). And while we’re on the subject of repurposing bi-fold doors, have you guys reused doors or windows in any interesting ways? We’d love to hear how you’re giving old household staples a second life with a bit of DIY determination so do tell.
Psst- Want to look back on our big basement makeover from start to almost-finished? Here’s the first post, the second post, the third post, the forth post, the fifth post, the sixth post, and the seventh post. Ah memories.
No comments:
Post a Comment