Showing posts sorted by relevance for query covered shower curtains. Sort by date Show all posts

Wednesday, March 14, 2018

It's true, no one can stand coloured bathrooms! Huge national survey unveils the bathroom features we sincerely hate (and those we love...) | Latest press releases | PressGo

Read article : It's true, no one can stand coloured bathrooms! Huge national survey unveils the bathroom features we sincerely hate (and those we love...) | Latest press releases | PressGo

Press Release

Coloured suites, shower curtains, carpet, and gold taps are the bathroom features we just can't stand

www.Plumbworld.co.uk

If you have avocado bath, sink and toilet look away now!

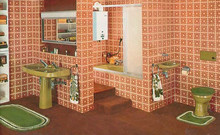
In what's thought to be one of the largest ever national customer surveys on bathroom chic, coloured suites, shower curtains, carpet, and gold taps were singled out as the bathroom features that people love to hate.

Plumbworld.co.uk, one of the UK's largest online bathroom retailers, ran an online survey to understand the parts of the bathroom that drive the UK public to despair and those they can't do without.

 The survey found:

•         8/10 people hate coloured bathroom suites•         7/10 hate carpet in the bathroom•         6/10 hate shower curtains

•         6/10 hate gold taps

•         8/10 love white suites

•         7/10 love tiled bathroom floors

•         9/10 prefer blinds to curtains in the bathroom

•         7/10 love chrome taps in the bathroom

•         9/10 say a shower is very important in a bathroom

"The nation has spoken! And it's said Granny's old bathroom suite, mildew-covered shower curtains, and damp carpet are things it can do without," said James Hickman, managing director of Plumworld.co.uk.

"The kind of bathrooms people favour are chic, contemporary and simple in design. That means chrome instead of gold, light colour schemes and white suites, tiled floors, screens instead of curtains, and absolutely no carpet."

The survey asked "what is your opinion of coloured bathroom suites, like avocado or coral pink", 4,073 people  (80.48% of those surveyed) said they hated them, 811 (16.02%) said they had no strong view, while 177 (3.5%) claimed to love them.

Asked "when the shower is over the bath, what do you think about using a shower curtain to keep the water in the bath?", 3,117 (62.24%) said they hated them, 1,399 (27.94%) felt indifferent, while 492 (9.82%) said them loved them.

When asked "what do you think about carpet in the bathroom?", 3,794 (75.77%) of those surveyed said they hated it, 869 (17.36%) had no strong view, while 344 (6.87%) said it was something they loved.

A further question asked: "what do you think of gold bathroom taps?" to which 3,111 (62.56%) said they hated them, 1,594 (32.05%) said they had no strong view, while for 268 people (5.39%) said gold taps were something they absolutely loved.

In contrast, when asked: "what do you think of chrome bathroom taps?", 3,767 people (74.97%) said they loved them, 1,203 people (23.94%) said they didn't have a strong view, while just 55 people (1.09%) said they hated them.

Simple and sophisticated is the order of the day when it comes to bathroom suites. Asked "what is your opinion of white bathrooms suites?", 4007 people (79.36%) said they loved them. Just 964 (19.09%) didn't have a strong view and 78 (1.54%) said they hated white bathrooms.

As shower curtains didn't go down well with the public, the survey then asked what they thought about screens. It asked: "when the shower is over the bath, what do you think about fixed screens?",
3,301 people (65.35%) said they loved screens, with 1,462 (28.94%) indifferent and 288 (5.70%) against them.

The survey also wanted to explore what people thought was the best way to cover their windows. It asked: "which type of window covering do you prefer in a bathroom?", 4,733 people (94.64%) said blinds with just 268 (5.36%) preferring curtains.

When asked "what do you think about titled flooring in a bathroom?", 3,486 people (69.35%) said they loved it, 1,298 (25.82%) had no string view, while 243 (4.83%) said they hated tiled floors.

Full survey results can be found here:

http://www.plumbworld.co.uk/bathroom-survey-results

Contact Name:
Scott Morris
Role:
E-Commerce Manager
Company:
www.Plumbworld.co.uk
Contact Email:
click to reveal e-mail
Contact Phone:
01386768498
Company Website:
http://www.plumbworld.co.uk

Saturday, October 21, 2017

How to Install Sterling Shower Doors

Read article : How to Install Sterling Shower Doors

All Kohler shower doors are covered in a CleanCoat treatment that resists buildup and simplifies cleanup. Water runs down the length of...

How to Install Frameless Shower Doors. Frameless shower doors are made of thick, sleek glass that can make a bathroom look larger...

Learning how to install a shower door is moderately easy for almost anyone. Whether you are learning to install a glass sliding...

Kohler is a producer of bathroom accessories and fixtures that has proven itself time and time again, since opening in 1907. Their...

Shower doors are a convenient alternative to shower curtains. They add style as well as keeping the bathroom looking clean. Shower curtains...

Installing a shower door over a fiberglass shower is the easiest type of shower door to install because there is no need...

Most shower doors are installed on a track. The track allows the shower door to slide back and forth in place. This...

The Sterling Kinkaid Neo-Angle Shower Base is a self contained shower base unit that is designed to be installed into a corner...

Finish installing a shower by putting on shower doors. Learn how to add a new bathroom to a home, including tips on...

Wednesday, April 5, 2017

20 Cute Mermaid-Inspired Bathroom Décor Ideas

Read article : 20 Cute Mermaid-Inspired Bathroom Décor Ideas
cute mermaid inspired bathroom decor ideas cover

Not only a little girl can be a mermaid fan, a grown up can be too! Whatever type of girl you are, if you feeling the call of the sea, why not add ocean-inspired touches to your spaces? We’ve already shared some ideas but today I’ll be more specific, let’s add some mermaid touches to your bathroom.

Tiles

Tiles are the main thing for any bathroom, and if you want to create a mermaid-inspired space, your choice is fish scale tiles. Fish scale tiles are truly seaside-inspired, they are just amazing! All shades of green, blue and purple are right what you need to remind of fish in the sea.

teal and <a href=turquoise fish scale tiles in the shower zone create a show-stopping impression" title="teal and turquoise fish scale tiles in the shower zone create a show stopping impression" src="https://i.shelterness.com/2017/05/02-teal-and-turquoise-fish-scale-tiles-in-the-shower-zone-create-a-show-stopping-impression.jpg" width="540" height="732" />

teal and turquoise fish scale tiles in the shower zone create a show-stopping impression

one green fish scale tile wall for a bold statement in a marble bathroom

one green fish scale tile wall for a bold statement in a marble bathroom

shower area clad with fish scale tiles in the shades of blue

shower area clad with fish scale tiles in the shades of blue

light blue fish scale tiles create a calming impression and gold fixtures add interest

light blue fish scale tiles create a calming impression and gold fixtures add interest

fish scale tile sink wall in the shades of blue and green

fish scale tile sink wall in the shades of blue and green

Shower Curtain

Add a mermaid feel easily with a proper shower curtain! This is a cheap and easy solution that doesn’t require much expense. Choose shades of green and blue, try a ruffled curtain that will remind of sea waves, and ombre curtains are cool, too.

<a href=fish scale curtain in green shades" title="fish scale curtain in green shades" src="https://i.shelterness.com/2017/05/07-fish-scale-curtain-in-green-shades.jpg" width="427" height="640" />

fish scale curtain in green shades

ombre ruffled shower curtain from white to teal

ombre ruffled shower curtain from white to teal

ruffled aqua-<a href=colred curtain inspired by sea waves" title="ruffled aqua colred curtain inspired by sea waves" src="https://i.shelterness.com/2017/05/09-ruffled-aqua-colred-curtain-inspired-by-sea-waves.jpg" width="564" height="846" />

ruffled aqua-colred curtain inspired by sea waves

neutral shower curtain with white sea creatures painted

neutral shower curtain with white sea creatures painted

Mirrors

A mirror or a mirror frame is another cool idea to try, a very easy solution that can be DIYed or bought for cheap. You can find a shell-shaped mirror, or cover the frame with shells and starfish. Sea rope is another cool idea to add a nautical feel.

bubble mirrors inspired by the ocean ones

bubble mirrors inspired by the ocean ones

super lush shell and coral bathroom mirror frame wows

super lush shell and coral bathroom mirror frame wows

twine covered mirror with starfish decor

twine covered mirror with starfish decor

shell-shaped mirror is a cute and very modern idea for a bathroom

shell-shaped mirror is a cute and very modern idea for a bathroom

Accessories

Accessories is one more great solution to rock, cheap, fast and easily changeable. These can be teal and aqua soap holders, sea creature hooks for towels, shell shaped soap holders and bathroom mason jars for storage with sea creature décor.

<a href=mermaid soap holder is a simple and easy idea to realize" title="mermaid soap holder is a simple and easy idea to realize" src="https://i.shelterness.com/2017/05/16-mermaid-soap-holder-is-a-simple-and-easy-idea-to-realize.jpg" width="498" height="480" />

mermaid soap holder is a simple and easy idea to realize

blue mason jars with twine and starfish decor for stroing bathroom supplies

blue mason jars with twine and starfish decor for stroing bathroom supplies

create your own <a href=mermaid inspired jewelry bowls with some treasures of old knobs and shells" title="create your own mermaid inspired jewelry bowls with some treasures of old knobs and shells" src="https://i.shelterness.com/2017/05/19-create-your-own-mermaid-inspired-jewelry-bowls-with-some-treasures-of-old-knobs-and-shells.jpg" width="564" height="774" />

create your own mermaid inspired jewelry bowls with some treasures of old knobs and shells

scallop bathroom containers and holders in shades of green

scallop bathroom containers and holders in shades of green

sea reature towel hooks are an easy and cheap idea to add an ocean flavor to the decor

sea reature towel hooks are an easy and cheap idea to add an ocean flavor to the decor

Wednesday, November 15, 2017

Bathrooms - Freestanding Tub Faucet

Read article : Bathrooms - Freestanding Tub Faucet

Elegant bathroom with marble clad soaking tub in front of a seamless glass shower with gray and white marble tiled surround accented with satin nickel rainfall shower head and faucet.

Grant K. Gibson

Stunning bathroom with a pair of columns framing the alcove accented with barrel ceiling tub over a rectangular plinth tub paired with tub filler faucet over gray marble floors alongside pale gray walls.

Blue Water Home Builders

Elegant bathroom with light blue upper walls over beadboard clad lower walls which showcase the Waterworks Candide Tub set on an angle with a floor mount faucet with adjustable shower head.

Christopher Burns Interiors

Windows covered with stacked plantation shutters are positioned above a roll top freestanding bathtub fitted with a teak tray and a polished nickel floor mount tub filler and placed on gray marble floor tiles beneath a bell jar lantern.

Parkes and Lamb Interiors

Stunning bathroom with shiplap paneled walls alongside vaulted ceilings adorned with a wooden chandelier.

House of Fifty

Nautical bathroom features tongue and groove ceiling over tongue and groove walls which is a backdrop to a porthole mirror over whitewashed sink vanity topped with white and gray marble atop marble basketweave tile floor next to wainscoted drop-in bathtub accented with sliding glass doors.

Hamptons Habitat

Beach cottage bathroom features white tongue and groove paneled walls framing drop-in tub situated across white double washstand with built-in shelving and white marble countertop over wood floors.

Romair Homes

Beautiful cottage bathroom with dove gray tongue and groove walls and gray footed vanity featuring shaker cabinets accented with nickel pulls below white counters which frame dual oval sinks with a gray parsons mirror above lit by a pair of glass, sphere shaped pendants.

Style at Home

Stunning bathroom features beige framing a freestanding tub with floor mount faucet situated below a small square window with a built-in, seamless glass shower to the right finished with a subway tile surround over marble mosaic tiled floors.

Toulmin Homes

Amazing bedroom with tongue and groove walls, rustic sloped ceiling, iron and glass lantern over black wingback headboard paired with linen ruffled bedding and oil rubbed bronze swing-arm sconce.

The Iron Gate

Simple yet romantic bathroom is fitted with a freestanding vintage bathtub paired with a polished nickel vintage floor mount tub filler fixed in front of a floor to ceiling window covered in ivory curtains.

Stocker Hoesterey Montenegro

White cottage bathroom with oval mirror over white marble top vanity placed in front of curved windows covered in white cafe curtains over hardwood floors.

Curtis and Windham

Friday, September 8, 2017

2018 Fountaine Pajot Helia 44 Sail Boat For Sale

Read article : 2018 Fountaine Pajot Helia 44 Sail Boat For Sale

" } ; var triggerClick = function(){ jQuery('#boatPoints > div.detailsCallToAction > button.contactSellerLightboxOpen.contactSellerLightboxOpen_2744362').trigger('click'); }; (function($) { var isTouch = function () { try{ document.createEvent("TouchEvent"); return true; } catch(e){ return false; } } galleriaImages_2744362.push(galleriaCTA_2744362); var galleriaLength = galleriaImages_2744362.length; Galleria.configure({ idleMode: false }); if ( 0 !== $('#galleria_2744362').length) { var counter = 0; Galleria.loadTheme('//newimagesgz.yachtworld.com/includes/js/galleria/themes/classic-white/galleria.classic-white.min.js'); Galleria.ready(function() { var self = this; function genThumbFn(n) { return function() { self.lazyLoad( [n]); }; } for ( k = 0 ; k

Price is landed in the USA , Duty paid! This boat is already on reserve! The Helia 44 is designed by naval architects Berret Racoupeau and the Fountaine Pajot design office, to Fountaine Pajot Catamarans shipyard's exacting standards for beauty, comfort and performance. Her majestic lines, sleek horizontal styling and flush twin solar panels deliver top performances under sail with innovative living areas including her new lounge deck connected directly to the steering station. The Helia 44 meaning 'sunshine' in Greek is the ultimate light-filled and spacious catamaran built and is the epitome of liveaboard luxury. Welcome on board the new flagship for cruising catamarans of its size.

Additional Specs, Equipment and Information:


Specs
Designer: Berret Racoupeau
Keel: Fin
Hull Shape: Catamaran

Dimensions
LOA: 43 ft 5 in
Beam: 24 ft 3 in
Maximum Draft: 3 ft 8 in
Dry Weight: 10800 kgs

Engines
Total Power: 80 HP

Engine 1:
Engine Brand: Volvo
Engine Type: Inboard
Engine/Fuel Type: Diesel
Location: Port
Drive Type: Sail drive
Engine Power: 40 HP
Engine 2:
Engine Brand: Volvo
Engine Type: Inboard
Engine/Fuel Type: Diesel
Location: Starboard
Drive Type: Sail drive
Engine Power: 40 HP

Tanks
Fresh Water Tanks: 2 (375 Liters)
Fuel Tanks: (470 Liters)

Electronics
GPS
Plotter
Compass
Repeater(s)
Wind speed and direction
Navigation center
Depthsounder
VHF
Autopilot
Radar
Log-speedometer

Sails
Fully battened mainsail
Furling genoa

Rigging
Steering wheel
Electric winch

Inside Equipment
Oven
Electric head
Manual bilge pump
Battery charger
Electric bilge pump
Fresh water maker
Microwave oven
Refrigerator
Deep freezer
Air conditioning

Electrical Equipment
Shore power inlet
Generator
Inverter

Outside Equipment/Extras
Solar panel
Cockpit shower

Covers
Lazyjacks
Spray hood
Bimini Top


Interior General
  • Saloon / cabin flooring : parquet
  • Lining on rotproof glass felt
  • Sofa coshions leather style
  • Polyeter foam mattresses


Saloon
  • Saloon accessed through a sliding door – 1 leaf with entrance carpet
  • Panoramic view through picture windows
  • Natural lighting by 2 roof bay
  • 1 wooden table
  • 6 places bench seat
  • Large cupboards under bench
  • Ventilation via  large front-opening hatches
  • Principal lighting by spot LED + environment lighting by orientable spots LED


Kitchen
  • Open kitchen to the outside by sliding bay
  • Ventilation via 1 hull porthole
  • Large worktop
  • 2 sinks
  • 1 dustbin with vertical access,evacuation bags by independent door
  • Drinking water, hot and cold, pressurized by mixer
  • 1 stainless hob with 3 gaz fire equipped with clamp pan
  • 1 stainless oven gaz
  • 3 large cupboards under sinks acomodating dishwasher (option)
  • 2 storage cupboards. One of them can receive one fridge (option)
  • 1 cutlery drawer
  • 190L cold storage volume
  • 1large cupboard in starboard side of the entry door
  • LED spotlighting


Chart Table
  • Wooden chart table and storage with flap
  • Hight navigation instruments console
  • Electric panel 12V
  • One 12V electric outlet
  • Chart table lighting by reading light


Interior Layout QUATUOR VERSION

4 double cabins and 4 bathrooms

Starboard hull: 2 double cabins & 2 Bathrooms

Aft Cabin :

  • Access through wooden door in passageway
  • Double bed (1,60x2,00 m approximately.) with lateral access (island bed)
  • 1 Drawer under bed with frontal access
  • Shelving on side of bed
  • 1 Hanging closet
  • 1 Console with internal shelves
  • Ventilation though1 deck hatch + via 1 porthole overlooking rear deck
  • Rear panoramic bay
  • Large non-opening outward-facing picture window
  • Curtains on all openings
  • Main lighting via spotlights LED and 2 bedside reading lights
  • Coat hook
  • Cupboards storage under bed


Aft and forward bathrooms :

  • Access through wooden door
  • Worktop with sink
  • Mirror + shelves
  • Hot and cold water by mixer
  • Separate shower with mixer tap with built-in showerhead
  • Shower with electrical drainage pump
  • Large manuel marine toilet
  • Cupboard storage with internal shelves under worktop
  • Coat hook
  • Ventilation through 1 deck hatch
  • 2 spotlights

Passageway :

  • 1 cupboard

Fore cabin :

  • Access through wooden door in passageway
  • Double bed (1,60/1,3x 2m approximately.) with lateral access (island bed)
  • 1 Drawer under bed with frontal access
  • 1 hanging closet
  • 1 console with internal shelves
  • 1 shelve above bed
  • Ventilation through 1 deck hatch and 1 hull hatch
  • 1 escape hatch opening
  • Large non-opening outward-facing picture window
  • Curtains on all openings
  • Main lighting via spotlights LED and 2 bedside reading lights
  • Coat hook
  • Cupboards storage under bed

Fore peak :

  • Access via a wooden door in for cabin
  • Fully-painted, gel-coat finish
  • Buoyancy reserve under half-height shelf

Port Hull: 2 double cabins & 2 bathrooms

Aft Cabin :

  • Access through wooden door in passageway
  • Double bed (1,60x2,00 m approximately.) with lateral access (island bed)
  • 1 Drawer under bed with frontal access
  • Shelving on side of bed
  • 1 Hanging closet
  • 1 Console with internal shelves
  • Ventilation though1 deck hatch + via1 porthole overlooking rear deck
  • Rear panoramic bay
  • Large non-opening outward-facing picture window
  • Curtains on all openings
  • Main lighting via spotlights LED and 2 bedside reading lights
  • Coat hook
  • Cupboards storage under bed

Aft and forward bathrooms :

  • Access through wooden door
  • Worktop with sink
  • Mirror + shelves
  • Hot and cold water by mixer
  • Separate shower with mixer tap with built-in showerhead
  • Shower with electrical drainage pump
  • Large manuel marine toilet
  • Cupboard storage with internal shelves under worktop
  • Coat hook
  • Ventilation through 1 deck hatch
  • 2 spotlights

Passageway :

  •  1 cupboard

Fore cabin :

  • Access through wooden door in passageway
  • Double bed (1,60/1,10 x 2m approximately.) with lateral access (island bed)
  • 1 Drawer under bed with frontal access
  • 1 hanging closet
  • 1 console with internal shelves
  • 1 shelve above bed
  • Ventilation through 1 deck hatch and 1hull hatch
  • 1 escape hatch opening
  • Large non-opening outward-facing picture window
  • Curtains on all openings
  • Main lighting via spotlights LED ans 2 bedside reading lights
  • Coat hook
  • Cupboards storage under bed

Fore peak :

  • Access via a wooden door in for cabin
  • Fully-painted, gel-coat finish
  • Buoyancy reserve under half-height shelf


Interior Layout MAESTRO VERSION

1 owner’s suite to starboard and 2 double cabins to port

Starbord hull: 1 owner's suite
Access to owner‘s suite starbord through wodden door at the bottom of the companionway.

Sleeping space :

  • Double bed (1,60x2,00 m approx.) lateral access (island bed) and slatted base à lattes
  • 1 Drawer under bed with frontal access
  • Shelving on sides of bed
  • Ventilation via 1 deck hatch + 1 porthole overlooking on the rear deck
  • Rear panoramic bay
  • Large non-opening outward-facing picture window
  • Curtains on all openings
  • Main lighting by spotlights LED and 2 reading lights
  • Coat Hook
  • Cupboards storage under bed.

Desk area :

  • Wooden writing desk with tray on flap
  • 1 Bench
  • Upper arrangement
  • Large consoles storage : hanging closet and cupboard
  • Library area
  • Main lighting by spotlights LED and 1 reading light on desk
  • Ventilation via 1 desk hach

Storage and laundry area :

  • Access via wooden door from passageway
  • 2 Large storage consoles with shelves and hanging closet accomodating one wash machine (5kg) in option
  • Lining
  • Ventilation via 1 desk hach

Bathroom area :

  • Resin worktop with sink
  • Large storage cupboard winth internal shelves under worktop
  • Arrangement above worktop
  • Mirror
  • Hot and cold water by mixer tap
  • Manuel marine toilet
  • Bathroom accessories (Toilet tissue holder + towel rail)
  • Separate shower via Altuglas door
  • Hot and cold water shower by mixer tap with built-in showerhead
  • Shower with electric drainage pump
  • 1 non-opening outward-facing picture window
  • Lighting with 2 spotlights

Fore peak :

  • Access through wooden door via storage and laundry area
  • Fully-painted, gel-coat finish
  • Buoyancy reserve under half-height shelf 

Port hull: 2 double cabins & 2 bathrooms

Aft Cabin :

  • Access through wooden door in passageway
  • Double bed (1,60x2,00 m approximately.) with lateral access (island bed)
  • 1 Drawer under bed with frontal access
  • Shelving on side of bed
  • 1 Hanging closet
  • 1 Console with internal shelves
  • Ventilation though1 deck hatch + via1 porthole overlooking rear deck
  • Rear panoramic bay
  • Large non-opening outward-facing picture window
  • Curtains on all openings
  • Main lighting via spotlights LED and 2 bedside reading lights
  • Coat hook
  • Cupboards storage under bed
  • Aft and forward bathrooms :
  • Access through wooden door
  • Worktop with sink
  • Mirror + shelves
  • Hot and cold water by mixer
  • Separate shower with mixer tap with built-in showerhead
  • Shower with electrical drainage pump
  • Large manuel marine toilet
  • Cupboard storage with internal shelves under worktop
  • Coat hook
  • Ventilation through 1 deck hatch
  • 2 spotlights

Passageway :

  • 1 cupboard

Fore cabin :

  • Access through wooden door in passageway
  • Double bed (1,60/1,10 x 2m approximately.) with lateral access (island bed)
  • 1 Drawer under bed with frontal access
  • 1 hanging closet
  • 1 console with internal shelves
  • 1 shelve above bed
  • Ventilation through 1 deck hatch and 1 hull hatch
  • 1 escape hatch opening
  • Large non-opening outward-facing picture window
  • Curtains on all openings
  • Main lighting via spotlights LED ans 2 bedside reading lights
  • Coat hook
  • Cupboards storage under bed

Fore peak :

  • Access s via a wooden door in for cabin
  • Fully-painted, gel-coat finish
  • Buoyancy reserve under half-height shelf


Deck Layout

Helm station :

  • Accessed via stairs from cockpit
  • Triple helmsman seat
  • Instrument control panel
  • 360° visibility
  • Stairs to access of lounge deck

Lounge deck:

  • Access via stairs through helm station
  • Area available for solarium and mattresses

Cockpit:

  • Large single storey cockpit
  • Cockpit rigid Bimini top
  • 1 x 6 persons bench seat around the table
  • 1 Teck cockpit table
  • Passe plat to the kitchen by sliding bay
  • 1 fainting sofa
  • 1 Large storage area on the bench
  • 1 Large storage area on the fainting sofa
  • 1 Gaz chest for 2 bottles
  • Natural lighting and ventilation via deck haches
  • Lighting by waterproof spotlights

Fore deck :

  • 1 Large chest for anchorage and halyard tail storage at bottom of mast
  • 1 large chest accomodating on Electric group (option)

2 SEngine holds:


Motorization

Engines and Equipments :

  • 2 motors 40CV
  • 2 Fixes blades propeller
  • Salt water filter
  • Engine cooling by heat exchanger
  • Complete engine panel and dual controls at helm station
  • Hour meter

Fuel system :

  • 1 Fuel tank with filling by plug-hole on bridge equipped with an anti-overflow
  • Electric fuel gauge (indicator on chart table)
  • 1 fuel pre-filter / water separator + 1 engine fuel filter/engine
  • Fuel shutoff valves


Plumbing
  • Freshwater tanks with electric gauge
  • 1 electric pump and pressure accumulator
  • 1 water heater 40 l
  • 1 electrical bilge pump (2 m3/h) in each engine hold
  • 1 electric bilge pump (2m3/h) in each hull
  • 1 manual exterior bilge pump


Electronics

Circuit de puissance :

  • 2 x 115A/12V engine alternators
  • 1 set starboard onboard/engine batteries of 600A/h
  • 1 port engine batterie of 100A/h/ 800CCA
  • 1 Manual back-up link et 1 Automatic back-up link

12V electrical distribution panel :

Electronic :

  • 1 V.H.F.mast head antenna


Rigging and Sails

Mast and boom:

  • Mast and boom in anodized aluminum
  • Complete standing rigging
  • Ball bearing mainsail luff cars
  • 1 tackle on mainsail halyard
  • 1 topping lift
  • 3 reef pennants
  • 1 genoa halyard
  • 1 spinnaker halyard
  • lazy-jack
  • clutches on all halyards for genoa, spinnaker and topping lift
  • clutches on reef pennants at boom exit
  • 2 flag halyards
  • Navigation, running and mooring lights
  • Deck lighting

Voiles :

  • Full batten mainsail
  • Roller genoa furler
  • Genoa with anti UV band


Fittings

G.V. et génois :

  • 1 mainsheet tackle led aft to coachroof
  • 1 clutch for mainsail sheet
  • 2 x 50-size winches for genoa and mainsail sheets
  • 1 Ball bearing mainsheet traveler
  • 2 x tackle on mainsheet traveler clutches with back on roof
  • 2 x genoa tracks with load block
  • 2 genoa sheets
  • 1 winch taille 46 pour drisses de G.V. et prise de ris

Other equipment: 

  • “Push pull” steering system with leather covered steering wheel helm
  • 2 rudders linked mechanically by stock arm + transversal tube
  • Emergency tiller
  • 1 steering compass
  • 3 winch handles and 3 pockets
  • Pulpit and pushpit, stanchions with upper and lower guardrails
  • Pulpits with seatings
  • Access to transom
  • 1 swim ladder
  • 1 cold water shower in port transom
  • 2 x tender davit kayak carrier with 1 x winch 40
  • 7 mooring cleats ( 2 foredeck + 2 middle + 2 astern  1 in anchor well)
  • Protection for both transom
  • 6 fenders
  • 2 x 50 ft long mooring lines
  • 1 x 1000W electric windlass with circuit breaker protection
  • Anchor fairlead under bridgedeck with built-in bridle
  • 1 roller on forward beam
  • Net on forward beam
  • 1 kit of spare parts


Disclaimer
The Company offers the details of this vessel in good faith but cannot guarantee or warrant the accuracy of this information nor warrant the condition of the vessel. A buyer should instruct his agents, or his surveyors, to investigate such details as the buyer desires validated. This vessel is offered subject to prior sale, price change, or withdrawal without notice.

Saturday, December 2, 2017

Greening our bathrooms without sacrificing the experience of our guests at yök Casa + Cultura : TreeHugger

Read article : Greening our bathrooms without sacrificing the experience of our guests at yök Casa + Cultura : TreeHugger

It seems there is more to tackle than saving water when you want to go green in the bathroom. A while back, I wrote about why reclaimed sinks were the most eco-friendly option for wash basins at yök Casa + Cultura.

yök's green bathrooms save water and use friendly and recycled materials© Carlos Barruz for yök

Regarding mirrors, the most eco-friendly option, since they are not recyclable, is also to choose them second hand. This, as with all reused objects, avoids more of them being made. In general, we tried to use as less material as possible without making the bathrooms uncomfortable. Instead of shelves for example, we placed plenty of hooks on the walls.

yök's green bathrooms save water and use friendly and recycled materials© Carlos Barruz for yök

When it comes to the wet areas, we only covered those with tiles that needed to, like the inside of the shower and the bit above the sink. These square coloured tiles are the classic bathroom tiles used in Barcelona. Made in Spain by Fabresa, dry clay is locally obtained and undergoes a quick double firing process, saving energy and CO2 emissions both in the transportation and in the fabrication process. As with all tiles, it will be difficult to recycle them (only a downcycling is possible), which is why it is important to choose a timeless design, good quality material and as less surface as possible. The rest of the walls are painted with white low-VOC paint, suitable for humid environments.

Most of the floors have a fabulous mosaic flooring from 1900 which we restored. Where areas were missing (one of the rooms used to house the kitchen, which didn’t have a noble floor) we just filled up the small area with cement and sealed it. We managed to avoid shower curtains, usually made from PVC and not long-lasting, by installing recyclable glass doors.

yök's green bathrooms save water and use friendly and recycled materialsyök Casa + Cultura's Instagram/via

The lights are second hand porcelain arms which we rewired so that they can fit LED bulbs. The vintage switches and plugs are new and very long-lasting as they are made of porcelain. They are also made locally, by Fontini.

After careful studies by Xavier Mor from Renòwatt, we came to the conclusion that the greenest option to heat our hot water for the showers are efficient gas heaters if we offset the CO2 emissions; which we will!

yök's green bathrooms save water and use friendly and recycled materials© Carlos Barruz for yök

Last but not least comes the water in the bathrooms. At yök we do not only work hard to save energy, but also water. According to Airbnb, guests in Europe renting a home use 45% less water than when staying in a hotel. Even though, there is a lot one can do to reduce the water consumption in holiday lettings, especially in a country that is feeling the stress of the water crisis.

Here is a recap: we installed Roca’s L20 series of shower heads and faucets. They are equipped with aerators and Cold Start, meaning the hot water is only triggered if you move the handle to the left. Most taps fire up the hot water every time you lift the handle in the middle position, wasting energy unnecessarily. The toilets have a dual-flush system as it is the easiest for guests from all different cultures to understand without having to leave instructions.

yök's green bathrooms save water and use friendly and recycled materials© Carlos Barruz for yök

Upstairs in our office, we installed the w+w toilet by Roca (top photo). It recycles the water used in the sink to flush the toilet. However, as it is made from a huge amount of un-upcyclable material (porcelain), we are not sure saving some water will make up for that. In fact, Roca had LEED analyse their different toilets and some of them, like the Meridian series we installed in the apartments, save the same or more water depending on how you use it. In the end however, we installed it not only as a water-saving and conservation maker (this is definitely working) but for space-saving reasons. The only way we could fit a toilet and sink in the small space provided was to install the w+w.

Coming up next are our branded soap dispensers to remind our guests that water is precious while they soap themselves with 100% natural citrus soap made in Valencia.

Friday, March 16, 2018

Traveling the Canadian Rockies on VIA Rail

Read article : Traveling the Canadian Rockies on VIA Rail

Overnight passenger train travel can be more expensive and slower than air travel today. So why should you go? And where?

After spending two nights traveling the Canadian Rockies on VIA Rail‘s Canadian, the ‘why’ is easy to answer: in an age when traveling to a destination has become only about getting from Point A to Point B in a rushed, often stressful manner, a few days (or more) aboard a passenger train is a vacation in itself. The pace is relaxed, the scenery can be fantastic, and the service is friendly. After my experience aboard The Canadian, I would venture to say passenger train travel is in fact the sole remaining mode of idyllic transportation from the golden age, outlasting air and cruise travel.

The Canadian

Incorporating a VIA Rail journey into a Canadian vacation itinerary will greatly enrich your trip. There are many routes to choose between, the longest being the four day journey from Vancouver to Toronto on the Canadian. We opted for a fraction of this trip, embarking in Vancouver and departing in Jasper, Alberta (then returning on the same route after days of sightseeing in the Canadian Rockies). The 20-hour one-way trip was spent taking in the scenery from one of several observation cars with 360 degree views, dining in the relaxed yet elegant dining cars, getting to know fellow passengers, and sleeping, reading, working, or napping. We found that the ‘rail level’ views and relaxed pace afforded a more intimate experience with the British Columbia and Alberta wilderness.

observation dome

Who to take with you:

If you’re bringing kids, I wouldn’t recommend this trip for kids under age six (though as always, parents know their own children best). During the rail trip, passengers are definitely confined to a series of train cars, and young kids would certainly get restless. Is there enough for older kids to do? Here’s what we found: a variety of board games in the ‘activity cars’, on-going snacks and juices in the lounges, and interesting sights out the window, whether it be scenery whizzing by or temporary stops at stations or through towns. In other words: not a lot of on-board entertainment.

If you travel with kids, we recommend downloading a few movies onto a computer, iPod, or iPad, and bringing plenty of reading material, activity books (such as coloring books) and card games. Plan on several hours between each meal that you’ll need to fill. Expect a primarily-adults-only passenger list: during our October trip, we saw only two children aboard the Canadian. This is not to discourage families from bringing kids: rather, know you’ll need to bring diversions and entertainment as needed. WiFi was not available aboard our train, though 3G and 4G service could be found via roaming off and on.

panorama car

Which fare to book:

Determining which fare is right for you can be tricky. On the Canadian, there are two basic options: sleeper or economy. In economy, you’ll get a seat that reclines, access to an observation car with upper deck, access to a lounge with tables and chairs, and the option to buy food at the Starlight Cafe, serving meals and snacks to go. Passengers sleep in their seats, and share bathroom facilities. Economy is obviously the more affordable option, but quite frankly, didn’t look too appealing (despite the fact that VIA Rail seats are considerably more comfortable than airline seats).

Sleeper fare offers three bed configurations (each a different price) in the Sleeper Plus category.Passengers can opt between a one-passenger or two-passenger private cabin, or a semi-private upper or lower berth (closed with curtains). We experienced Sleeper Plus in a two-passenger cabin. We had a tiny-yet-functional cabin space with two chairs and a large window, a private bathroom with toilet, and a sink. Also included: a small amount of storage space and two outlets (yay!). In the evenings, a train steward comes by to lower your beds, which in the two-passenger cabin is bunk-bed style: upper and lower single beds. Beds are fully made-up each evening, and very comfortable (provided you’re not quite tall).

two passenger cabin

The one-passenger private cabin features one bench-like seat that flattens to accommodate a bed, plus a sink and toilet (the latter of which features a cushioned cover to become an ottoman during the day, but is covered up by the bed at night…a definite downside). Both the two-passenger and one-passenger cabins share one shower per car.

The last sleeper option is to book an upper or lower berth. These compartments feature bench seats (two facing each other) during the day, which fold out to become a lower berth bed at night. The upper berth bed folds out from the wall by the ceiling. These berths are made up at night and feature thick curtains for privacy. They share a public toilet and shower (one per car).

VIA Rail food

All Sleeper Plus fares include meals in the dining car (breakfast, lunch, and dinner, depending on when you’re onboard), snacks in the lounge, access to several observation cars and lounges, and complimentary champagne and appetizers upon embarkation.

Here’s a photo depicting 1. a two-passenger cabin made up for bed, 2. a lower berth made up for day, 3. coach seats:

VIA Rail

Which to book will depend on your comfort level (how much privacy do you need?) and your meal needs. We absolutely recommend the all-inclusive dining: if you opt out of this, you can buy meals a la carte in the cafe, but this option would get old (and expensive) if traveling more than one night. We enjoyed the privacy of a cabin, but could have been comfortable in an upper and lower berth as well. Keep in mind that only up to two passengers fit in a cabin: families of four or more will need to book two (or more) cabins or opt for two or more upper/lower berths in a row. (The latter option will allow for more freedom of movement between beds as needed, but you’ll only have access to a shared bathroom.

View our VIA Rail experience video:

[embedded content]

Tips:

1. Carry-on sized bags only are allowed onboard. Full-sized bags will need to be checked, so plan accordingly. Cabins have space for up to two carry-on bags, but if you opt for a berth, you’d be better off with only a large tote or backpack.

2. Bring a water bottle to refill. While coffee, tea, and juice is on offer at all times, I found the need to also keep a water bottle filled to prevent dehydration. If you like to sip coffee or tea all day, bring a small thermos or insulated mug.

3. Bring a hair dryer if you’ll need one: in cabins, towels, shampoo, and soap are provided, but not hair dryers.

4. Be prepared for plenty of motion and some train noise at night. We slept surprisingly well onboard, but you’ll definitely feel the movement.

Date last visited:

October 2013

Fare cost:

Calculate Via Rail fares here. Definitely plan early and check for fare discounts, offered several times per year. What we found: VIA Rail is not more economical than flying, so you need to consider the fare cost a part of your vacation experience, not part of your transportation costs.

Directions:

If embarking in Vancouver on the Canadian, you’ll depart from Pacific Station. Located next to Science World, it’s easy to get here from SkyRail from either the airport or the Waterfront station in downtown Vancouver.

As I disclose whenever applicable, we experienced The Canadian as guests of the VIA Rail, for the purpose of review. All opinions are our own, and we hope our experience inspires and equips other traveling families to make great decisions about rail travel.

About the author

Amy Whitley AUTHOR: Amy Whitley is the founding editor of Pit Stops for Kids and content editor of Trekaroo. She writes on staff monthly as a family travel expert at Go Green Travel Green and Practical Travel Gear, and contributes to Outdoors NW as an outdoor adventure traveler. Find Amy at Google.

Comments

comments

Tuesday, December 5, 2017

30 Ways To Upgrade Your Apartment On A Budget

Read article : 30 Ways To Upgrade Your Apartment On A Budget

So you’ve just moved into your first apartment on your own (or with roommates), and you seem to be baffled by how expensive everything is! Well don’t worry, because there are ways to upgrade your apartment on a budget. Sure, you pay electricity and internet.. and water..and heat. There is some serious budgeting needed in order to live comfortably. I also understand that you want to know more than just “put baking soda in your fridge to avoid it from stinking up.” So here are 15 great ways to upgrade your apartment while on a budget! Good luck!

*This article is in collaboration with Kayla Nannariello.

1. Use Command Hooks!

The most standard tool among students! Command hooks have a universal purpose, to make life easier. I have command hooks for clothes, I have command hooks for lights, I have command hooks for my whiteboard and anything else I want to hang. they can hold a lot of weight depending on the size of hooks you get. I have hooks for my keys, my umbrella, any dangling wires and even my night light! These little life and space savers not only make it easier to find stuff, but also make your place look so much cleaner and organized…something you definitely want to see when you come back from a long day of classes. This way you will have a place to put your keys instead of throwing them around and regretting it the next morning when you’re rushing around.

2. Use the free cups and bottles you get around campus fairs (housing fair, clubs and organizations fairs, career fair.)

Don’t just use them to drink; use them as pen stands, stands to hold your dish washing brush, fill them up with change that you don’t want in your wallet. I covered my cup with three layers of paper on the top and made a slit through the center and there you have it, your college piggy bank (you’re going to need that money for laundry and err..)
The bottles particularly, can be used to store pretty much anything. One of my bottles is filled up with paper clips. The other is in the fridge so I have cold water when I need it, and another one makes for an easy lime-juice dispenser.

3. Don’t hold back, get a huge trash can.

This is by far the most convenient thing I have done for myself in the apartment. We bought a 55 gallon trash can from Walmart and now we save on trash bags all the time…and the best part? We don’t have to take it out very often. If you want to budget and you’re lazy, this is a win-win. Moreover, these giant cans have a cover, so they don’t stink up the apartment even if you decide to dump food that’s days old because, come on, let’s face it, every college student forgets to throw away old food for a long time because they actually forgot or they’re just procrastinating.

4. Keep those twist ties you get with almost anything you buy.

You know when you buy a loaf of bread or something that has wound up wire over it? And you decide to throw it away? Don’t. These things can come in handy at any time in your apartment. Leaving for summer and don’t want to let the cutlery just lie around? Use this to wind up the spoons together and store them away. Phone charger too long for where its plugged in? Wind it up a bit and hold it together with this! Tape can make it sticky, very easily. Opened a pack of Doritos and want to save it for later? Don’t leave it open, use these!

5. Use an old or cheap blanket as a window blind.

I’m not kidding, some blankets at Walmart go for less than $8, and if you are renting an apartment, it’s highly unlikely that it will come with fancy blackout curtains. Get a blanket, and use command hooks to hang it up right around your window. Put two loops at the bottom corners so you can roll it up and hook it to the hooks on the top to make a blind, there you go! Cheap and easy blackout curtains to help you sleep in after that rough Friday night.

6. Use over-the-door hooks.

You don’t want to have to deal with putting 5 command hooks up when you know you need them there, and you want something that you can load up more than just the capacity of those sticky magicians. They’re cheap and there are so many options on Amazon. There are no restrictions for these and you do not need to do any work, just stick the hooks over the door so they hold on and hang away! In any case, most rental apartments will not allow you to drill holes and screw in hooks and this is the only alternative to get hooks as strong.

7. Get LED strip lighting for your apartment.

Ever get that feeling when you don’t want any lights on but also want to be able to see and move around your room? Here’s your solution, and it’s pretty cool. These lights go for anywhere between $15-$25, and they come in lengths up to 32 feet! You simply put them across the top of your room’s walls with command hooks (of course) or if the wall is flat enough then you can even use their built-in adhesive. They have a remote, and they are LEDs, so they’re barely using any electricity. They have brightness control and color changing capabilities for when you’re throwing that Saturday night party. It’s easy, cheap and will impress any guests. They can set the mood, become an ideal everyday light and even become party strobe lights.

8. When life gives you lemons, CLEAN!

You know how after you make a glass of lemonade, you throw out the squeezed lemon…right? Wrong. This is the perfect way to save yourself from over-spraying the kitchen with Febreze. Just throw that thing into the sink disposal, run it and run warm water as you do so. Crushed lemon will release a fresh aroma, much better than using any spray since it’s acidity will clean as well. Got a dirty or stinky microwave? Grab any microwavable mid-sized bowl and fill it halfway with water, cut a lemon in half and squeeze both halves only a little into the water, not all the way. Now dump them into the water and microwave for 3 minutes. Once it’s done, your microwave will smell fresh and will be much easier to clean!

9. Use a giant bowl of water to keep your room air from being too dry.

The weather gets dry and cold in the winter, which means we all start having dry hands, and feel really dehydrated. Our apartment heaters can be the culprit in this dry air problem. A simple solution is to take a large bowl, fill it with water and simply place it in your room. This works, and it works well. It will keep the air slightly humid and especially if you’re from a less cold region, you will be saved from terrible and painful dry skin. Save your money and don’t buy those heavy and space hogging humidifiers, do this instead!

10. Use Brita filters!

If you’re the kind that likes to drink bottled or filtered water, you’d be spending at least $4 a day or more than those who drink tap water. But what if I said you could drink filtered tap water? Look no further! If you don’t already know about Brita jugs and filters, you need to know. These things have filters built into them, so it’s as easy as filling up a jug by turning on the faucet. It even reminds you when to change a filter, and no its not every week, it’s around every 4 months.

11. Buy everything in bulk.

If you’re at Walmart and you love getting orange juice for that night, it is very likely that you will come back to get more. Instead, save yourself the trouble and the money…buy a giant jug of it, or even four jugs of it. Buying bigger packs saves more than you think, and you will have to make less trips, so there’s time and energy saved too! This applies to pretty much anything from frozen food to toilet paper. I would even recommend buying the large boxes of laundry detergent/pods. You’re not going to stop doing laundry, so you might as well stock up.

Using Amazon’s ‘dash buttons’ is a pretty neat way to be lazy too. Just press the button when you’re running low and there you have it, delivered supplies to your doorstep. They even have these things for Red bull and Gatorade cases, and they don’t cost anything extra. You get a discount on your first order that matches the amount you paid to get the button so that’s pretty neat and convenient.

12. Buy Windex, a lot of it.

This magical solution we all know is much more useful than you think it is. You can use it to clean counters, tables, wall stains, floor spills and pretty much anything that your apartment life can throw at you. Simply buy a refill after your first spray bottle. Fear not, Windex can even clean your stained bathroom mirror very easily so you can look good and feel fresh every morning!

13. Buy space-savers for literally everything.

I have one for snacks, one for stationery and one for cutlery. We also have one in the living room which helps when we simply leave our stuff out. There are sizes that fit on a table to keep small items and sizes that stand alone and can even be used as a bedside table or in my case, a place to keep the bowl of water so the air doesn’t get too dry!

14. Look into Mainstays products.

They make inexpensive household items such as the space-savers I mentioned. They also make furniture, so if you’re looking for a desk in your room, a chair, a comfortable chair to watch TV in, sheets, blankets and anything else you might need, they probably have it. Remember, most of these items are the cheapest when the semester starts and the large stores are having their sales. Most of my kitchen, including plates, cooking vessels and cutlery is from Mainstays, they have great deals and it’s definitely worth it.

15. Add some Throw Pillows!

Throw pillows are a great way to spruce up your apartment without spending too much     money. They come in millions of prints, so you’ll always be able to find ones that match your personal style and the look you’re going for!

16. Use decorative baskets as opposed to plastic storage bins.

Baskets are a great alternative to plastic storage bins. They act as decor but keep your things organized just as well! There are so many cute basket options out there whether you enjoy wired baskets, canvas, or woven ones and they come in all shapes and sizes to fit into whatever space you need!

17. Wall art makes a huge difference!

Dress up any boring drab walls you have in your apartment with some wall art. The possibilites here are endless! You can even buy just the prints or download prints from sites like Etsy and add your own frame.

18. Add slipcovers to your furniture.

Do you have an old beat up couch and can’t afford to buy a new one? No worries, just buy a slipcover. Slipcovers are awesome because they come in so many different colors and designs, and you can switch them out whenever you want a new look!

19. Make your space more inviting with picture frames.

Another cheap way to spruce up your apartment is to buy cute picture frames and fill them with your favorite pictures! It’s a great way to add a personal touch to your apartment. This will make your living space feel more cozy just like the home you grew up in!

20.  A rug.

If you don’t like your flooring, area rugs are a great way to cover it up. They come in so many different sizes that you’re bound to find one that will fit your space. A good rug can do wonders for an apartment by covering up any messed up flooring and making your apartment look bigger than it actually is.

21. Set out some candles.

They’re cheap, they smell good, and they act as decor. Candles have a great way of turning any drab apartment into an inviting atmosphere!

22. Decorate with artificial succulents.

Fake succulents are great because they require no maintenance. And unlike real plants, you don’t have to worry about replacing it when it dies.

23. Your table lamps can make a statement.

Instead of buying simple lamps for your end tables, get more interesting ones. Not only will they dress up the room, but they are bound to be a conversation starter.

24. Buy simple furniture.

When buying furniture, don’t buy anything crazy. Go for things that are neutral colors and won’t go out of style and can look timeless in any setting.

25. Choose the right comforter.

Your comforter can make or a break a room, and unless you are absolutely in love with a printed comforter, I wouldn’t buy it. Instead, go for a solid color, preferably a neutral. This way you aren’t limited on how you decorate your room. The solid color also gives the room a very clean feel.

26. Opt for placemats.

Placemats are a super cheap way to make your dining room or kitchen look instantly more put together.

27. Get a shower curtain.

Shower curtains take up the most room in a bathroom, so make sure yours is something that people won’t mind looking at. Resist the crazy printed ones and instead, go for a simple print that will dress up your bathroom and make it seem brighter and bigger.

28. Add a good throw blanket into the mix.

Throw blankets are great because they give a cozy feel to the room and it’s always great to have a blanket nearby, but they also work as decoration.

29. Add some mirrors to your walls.

Mirrors are amazing because they make the room look bigger and they tend to draw in people’s attention.

30. If you ever need anything for your apartment, always look it up Amazon first.

When I was setting up my apartment, there were many things I found that I didn’t even know would help me so much! For example, many of my sockets have a switch extension, so I can turn them off while I am not using them, without unplugging them. This is especially useful for behind the bed and under the desk sockets, since unplugging requires a lot of effort and plugging it back in is even worse…you might even have to move the entire piece of furniture. Power strips, USB adapters and anything you can think off, it’s probably cheaper on Amazon.

Do you have any other good ideas on ways to upgrade your apartment on a budget? Share in the comments below!

shareonpinterest

30 Ways to upgrade your apartment on a budget

*This is a sponsored post. All opinions are my own.

Featured Image source:http: //homelk.com/apartments/cute-college-apartment-bedrooms-for-girls

image


Tags: apartment essentials, apartment hacks, things you need for your first apartment, upgrade your apartment, upgrade your apartment on a budget, ways to upgrade apartment

Wednesday, November 29, 2017

How to Lay Tile: Install a Ceramic Tile Floor In the Bathroom

Read article : How to Lay Tile: Install a Ceramic Tile Floor In the Bathroom

Cover up an old floor

Whether you’re replacing an old shabby floor or installing a new one, you can’t beat ceramic or stone tile for durability and appearance. When laid properly, it’s virtually a forever floor that requires almost no care and maintenance. And you can select materials from a vast array of colors and textures. We’ll cover how to lay tile in a few steps.

What’s equally attractive is that you can lay a first-class tile floor yourself, often in one weekend, and save the $500 to $1,500 cost of hiring a pro.

The key to keeping the job simple is to cover the old vinyl or other flooring with a new thin underlayment that gives you a fresh, clean start. No messy tear-out and repair. In this article, we’ll demonstrate how to install a thin “backer board” over the old floor. Then we’ll cover tile-setting techniques, from layout and cutting to grout and cleanup.

This is a two-day project for most bathrooms, even if you don’t have any previous tile experience. If you’re comfortable using basic hand tools and have the patience to align tiles just right, you can handle this job. The entire cost of this project for a typical bath ranges from $300 to $600.

Estimating the Cost of a Tile Project

The tile itself will be your biggest cost, so start by measuring the square footage of the floor. Then add 10 percent for cutting waste. If you choose a more complex layout than the simple grid pattern we used, your waste will be greater. Most tile sells for $5 to $15 per square foot, but you can spend as little as $3 or more than $50. If you have to install backer board, add $2 per square foot to the cost of the tile. Other materials will cost about $90, regardless of bathroom size. The tile tools you’ll need (including a tile cutter) will total $60 to $80.

Assess your floor

The success of any tile job depends on a solid base, that is, a floor that flexes very little as you walk across it. If you have a concrete subfloor, this isn’t an issue. You can lay tile directly over the existing vinyl as long as it’s well adhered.

If possible, avoid tearing out vinyl flooring. Leaving it in place saves time, of course, but it also reduces asbestos hazard concerns. Asbestos was used in sheet vinyl and vinyl tile until the mid-1980s. By leaving the vinyl undisturbed, you won’t risk sending asbestos fibers into the air.

If you have a wood subfloor, there’s a good chance that you’ll have to install backer board over your vinyl to make the floor thicker and stiff enough for tile. The easiest way to see flooring thickness is to pull off a floor register. Otherwise look for plumbing passageways through the floor. As a last resort, drill through the floor with a 1-in. or larger spade bit (your new floor will cover the hole later). To prevent asbestos dust from becoming airborne, mist the bit with a spray bottle as you drill. In addition to floor thickness, you’ll need to determine joist spacing. If there’s an unfinished basement or crawlspace below the floor, simply measure the spacing. If there’s a ceiling, probe for joists with a drill bit.

If the joists are spaced 16 in. apart, the layers of structural flooring beneath the vinyl should add up to at least 1-1/8 in. With joists every 24 in., you need 1-1/2 in. If your floor is too thin for tile, add a thicker layer of tile backer board. Our floor required 1/4-in.-thick backer. Yours might need 1/2-in. backer to reach the minimum thickness. If your floor is already thick enough, you can simply prep the vinyl floor (Photos 1 – 4) and skip the backer installation (Photos 5 – 8). Then tile directly over the vinyl, following the same steps we used over backer board.

Regardless of the type of subfloor, there are two situations where you can’t leave vinyl in place: First, if large areas of the vinyl are loose, don’t set tile or backer over it. Small loose spots are acceptable and easy to deal with (Photo 4).

Second, “cushioned” sheet vinyl must be removed before you can set tile. Cushioned vinyl has a foam backing that makes it noticeably thicker and softer than standard vinyl flooring. It’s too spongy to support tile or backer board. Before removing it, call your local health department for instructions on how to check for asbestos and proper procedures if asbestos is present.

Gather Advice While You Shop

Home centers carry everything you need for this project, but begin shopping at a tile store, where you’re more likely to get expert advice. Make a quick sketch of your floor plan and jot down all the dimensions. Also take a photo of the floor at the doorway. This will help the tile store staff recommend a “transition” to neatly join the tile to the hallway flooring. Transitions come in different styles to suit any situation.

When you choose the tile itself, ask if it requires any special installation steps. Some tile, for example, should be coated with grout release before grouting. Also ask about cutting techniques for the tile. You’ll use sanded grout for the floor. Ask if sanded caulk is available in a color that matches your grout for the floor/tub and floor/wall tile joints.

Prepare the room

First, get the toilet out of your way. Stuff a rag in the hole to block sewer gases. If your home only has one toilet, you can leave it in place until you install the backer board. Keep a supply of wax rings on hand if you plan to reinstall the toilet at the end of each day.

If you expect to keep your vanity for many years to come, leave it in place and tile around it. But if you think you might replace it, remove it now. When the job’s done, you can reinstall the old vanity or put in a new one. Having the vanity out of the way gives you more workspace, and you won’t have to cut backer board and tiles to fit around it. This also eliminates the floor repair problem if you install a smaller vanity or pedestal sink in the future.

Pull off the baseboard or plan to add base shoe molding. This leads to a neater-looking job because the edges of the tile will be covered later—jagged cuts and slight measuring mistakes are hidden. If your baseboard has base shoe molding, remove only the base shoe. Backer board and tile will raise your floor 3/4 in. or more. So you’ll have to remove and undercut the door. To mark the door for cutting, stack backer board, tile and two layers of cardboard on the floor (see Photo 3). Mark the door 1/2 in. above the stack, remove the door and cut off the bottom.

Scrub, screw and patch the floor

Install a Ceramic Tile Floor in the Bathroom

Photo 1: Scrub the floor with stripper

Remove the baseboard and toilet. Using an abrasive pad, scrub the floor hard with water mixed with vinyl floor stripper.

Install a Ceramic Tile Floor in the Bathroom

Photo 2: Drive screws into the floor joists

Mark the floor joists with chalk lines and drive 2-1/2-in. screws every 8 in. Don’t leave any screw heads protruding.

Install a Ceramic Tile Floor in the Bathroom

Photo 3: Cut the door trim to accommodate tile

Undercut door trim using a jamb saw or handsaw. A piece of backer board, tile and two layers of cardboard raise the saw to the correct height above the floor.

Install a Ceramic Tile Floor in the Bathroom

Photo 4: Fill low spots with thin-set

Cut out any loose sections of vinyl with a utility knife. Fill the void with thin-set using the flat edge of a notched trowel.

Scrub the floor with a vinyl floor stripper following the manufacturer’s instructions. The stripper will dissolve wax and other residue. Scrub hard with an abrasive scouring pad (Photo 1). The tiny scratches left by scrubbing help the thin-set bond better.

Next, drive screws through the floor into the joists (Photo 2). This ensures that the subfloor and underlayment are securely fastened. If there’s an unfinished basement below the floor, locating the joists is easy: Go to the basement and drill a couple of 1/4-in. holes up through the floor next to a joist. If you can’t locate the joists from below, pick a spot near one wall and drill a hole. If the bit breaks through into hollow space, move over 1 in. and drill another hole. Keep going until you hit a joist. Then go to the opposite wall and find the other end of the joist. Measure at intervals of 16 or 24 in. from the first joist to locate the others.

While you’re driving screws, look for any spots where the vinyl has loosened from the floor. Cut out loose spots and fill them (Photo 4). If there are any copper pipes that pass through the floor, wrap them with duct tape at floor level. Cement-based thin-set and grout can corrode copper.

Install backer board

Install a Ceramic Tile Floor in the Bathroom

Photo 5: Install backer board over the floor

Cover the floor with backer board. Cut inside corners, circles and curves with a drywall saw. Space pieces 1/8 in. apart and hold each one in place with two temporary screws.

Install a Ceramic Tile Floor in the Bathroom

Drywall saw

Use a drywall saw to cut corners, circles and curves in backer board.
Install a Ceramic Tile Floor in the Bathroom

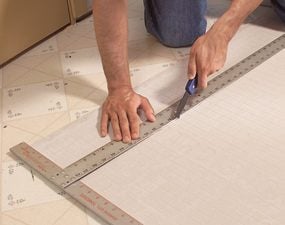
Photo 6: Score and snap the backer board

Make straight cuts with a scoring knife. Make three or four scoring passes, then snap the backer over a 2×4. When all the pieces have been laid out, label them and set them aside.

Install a Ceramic Tile Floor in the Bathroom

Scoring knife

Use a scoring knife to score the backer board.

Install a Ceramic Tile Floor in the Bathroom

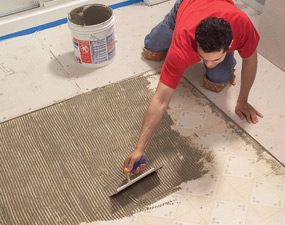
Photo 7: Trowel on the thin-set

Comb out a bed of thin-set just large enough for each piece of backer board using a 1/4-in. notched trowel held at a 45-degree angle. Screw the backer down before spreading thin-set for the next piece.

Install a Ceramic Tile Floor in the Bathroom

Notched trowel

Use a 1/4-in. notched trowel to spread the thin-set over the floor.

Install a Ceramic Tile Floor in the Bathroom

Photo 8: Cover the joints

Press adhesive-backed mesh tape over the joints and skim over the tape with thin-set. When the thin-set is firm but not fully hardened, scrape away any ridges with a putty knife.

The backer board is fastened with a combination of screws and thin-set adhesive. Cut and lay out all the pieces before you mix the thin-set (Photos 5 and 6). You can run the sheets in any direction, but be sure to stagger the joints so you never have four corners meeting at one point. Leave a 1/8-in. space between the sheets and along the vanity, tub or shower. The gap along walls must be at least 1/8 in. wide, but a wider gap (about 1/2 in.) makes the panels easier to set in place.

After cutting and fitting, label the location of each one and set them all aside. Vacuum the floor and have your drill and screws ready to go before you mix the thin-set. Read the thin-set’s label. Spread the thin-set with a 1/4-in. notched trowel. Comb in one direction so air can escape when you embed the backer (Photo 7). Drive screws every 6 in. around the perimeter of each piece and every 8 in. “in the field” (across the face of the panel). If the leftover thin-set is still workable, you can immediately embed mesh tape over the joints (Photo 8).

If the thin-set has become too stiff or chunky, mix a new batch. Use “alkali-resistant” tape that’s meant for backer board. While the tape coat of thin-set hardens, run a putty knife over all the screw heads to scrape off the “mushroom” bulges around screws. Drive in any protruding screw heads you come across.

CAUTION!

Cement products like thin-set and grout draw moisture from skin and can even cause burns that require medical attention. While most pros work bare-handed, wear gloves if you have any special sensitivity. Also wear eye protection while mixing thin-set and grout.

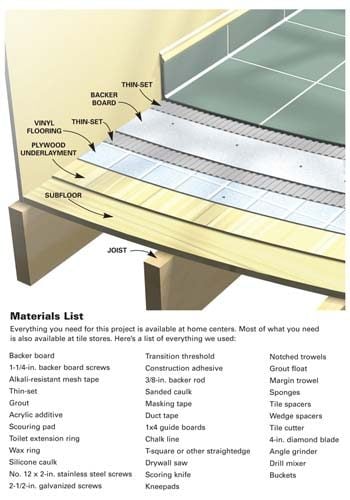
Figure A: Ceramic Tile Over Vinyl

Everything you need for this project is available at home centers. Most of what you need is also available at tile stores.

Cutaway of a tile floor over vinyl

Careful layout pays off

Install a Ceramic Tile Floor in the Bathroom

Photo 9: Test your layout to avoid small pieces along the walls

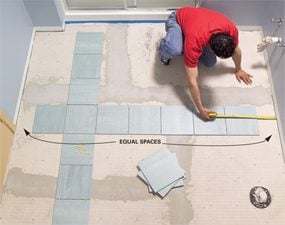
Dry-lay tile to determine the best layout. Start with centered rows, leaving equal spaces at walls. Then reposition rows until you find the optimal layout.

Install a Ceramic Tile Floor in the Bathroom

Photo 10: Attach guide boards to guide the layout

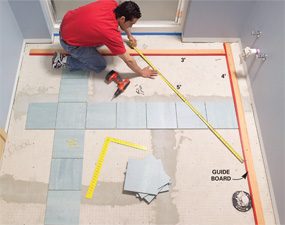
Screw guide boards to the floor following your chosen layout. Position the guides so you can lay all the field tiles without moving the guides. Make sure the guides are at right angles by measuring out a 3-4-5 triangle.

Too often, tile novices simply start setting tile in a corner and continue along two walls until the floor is covered. Sometimes they get lucky and the floor looks good. But more often this method leads to trouble:

They end up with awkward-looking, thin slivers of tile along a prominent wall or at the doorway. And the tile looks even worse when walls are badly out of square or crooked—a straight grout line running too close to a wall emphasizes the wall’s imperfections.

Whether you’re laying a simple grid pattern like we show here, or a diagonal pattern with a border, the best tile layout usually calls for centering full tiles between walls so the partial tiles along the edges will end up all the same size. Don’t rely on your tape measure and mental arithmetic. Rip open a carton of tile, grab a handful of spacers and experiment with your layout on the floor.

To begin, center rows of tile between walls so you have equal spaces along walls that face each other (Photo 9). Set the two rows parallel to the two most prominent walls. Then make adjustments, trying to achieve these three goals:

  • Use full tiles at doorways and along the bathtub or shower. These are usually the only places where the edges of the floor aren’t covered by baseboard. If you use full tiles in these exposed spots, you don’t have to worry about making smooth, perfect cuts.
  • Avoid narrow tiles along walls. Ideally, you’ll end up with tiles cut to half size or larger. Avoid cutting tile to widths less than 2 in.
  • Minimize cutting and try to avoid difficult cuts. For example: Cutting tile to an L-shape to fit around an outside corner is especially difficult when one arm of the “L” is less than 2 in. wide. The arm tends to break off as you cut.

Chances are, your layout won’t meet all these goals. Because the shower stall was the focal point in our bathroom, we made it our No. 1 layout priority. We chose to use full tiles in front of the shower. That left us with 3-in.-wide tiles along the opposite wall, which was less prominent. We also chose to center the tile rows on the shower; that meant we had to use cut tiles at the doorway.

Once you determine a layout, establish lines to guide your tile positioning. The usual method is to snap chalk lines on the floor. But chalk lines are hard to see after you’ve spread thin-set, and one row of tile may slip as you set the next row. Here’s a more reliable guide: Choose straight boards a foot shorter than the length and width of the room. Tape one edge of each board so thin-set won’t stick to them.

Then screw the boards to the floor at a right angle to form a guide that eliminates guesswork and shifting (Photo 10).

Video: Create Your Own Floor Tile Layout

Planning the layout for a tile project is usually the hardest and most time- consuming step. Watch this video to learn how a pro does it. You’ll see how to snap chalk lines and make sure they are perfectly square. Plus, you’ll learn how to avoid unsightly narrow, difficult-to-cut tiles along a wall. Don’t start a tile project until you’ve watch this video!

Set the tile (finally!)

Install a Ceramic Tile Floor in the Bathroom

Photo 11: Set the full tiles

Comb out a few square feet of thin-set and set tile against the guides. Continue until all the full tiles are in place. Tip: Watch for squeeze-out between tiles and rake it out with tile spacers.

Install a Ceramic Tile Floor in the Bathroom

Spacers detail

Keep the gaps between tiles even by using spacers

Install a Ceramic Tile Floor in the Bathroom

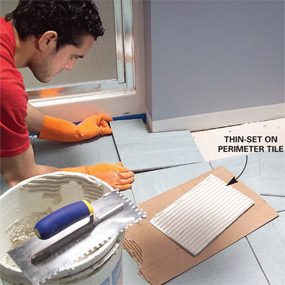
Photo 12: Spread thin-set and set the perimeter tiles.

Cut and set the perimeter tiles after the thin-set beneath the full tiles has hardened. In spaces too narrow for your trowel, comb thin-set onto the backs of tiles.

It’s usually easiest—and most efficient—to set tile in two phases: First set all the full “field” tiles (Photo 11). Then, when the thin-set has hardened for several hours, cut all the perimeter tiles and set them (Photo 12). Here are some tips for both phases of the job:

  • The trowel you use for setting tile may be different from the one you used to embed the backer. The thin-set label tells you which notch size to use relative to tile size.
  • Dampen the backer with a sponge just before applying thin-set. This keeps the thin-set from drying out too quickly.
  • Comb the thin-set in one direction so air pockets won’t be trapped under tile.
  • Open three or four cartons and mix the tiles as you set them. Pattern and color vary slightly from one carton to the next.
  • Don’t just set each tile into place; press down on the tile and wiggle it to embed it firmly in the thin-set.
  • Watch for “tipped” corners. When you press a tile in place, it’s easy to tilt it slightly so that one corner stands higher or lower than neighboring tiles.
  • When you complete a section of tile, inspect it before moving on. Make sure the tiles line up correctly and spacers are in place. Wipe any thin-set off the face of tiles with a damp sponge.
  • When the thin-set becomes chunky or too stiff, throw it away and mix more. Never try to extend the life of thin-set or grout by adding water.
  • Cut perimeter tile so that caulked joints (at tub) are the same width as grouted joints.

Prepare the floor for grout

Install a Ceramic Tile Floor in the Bathroom

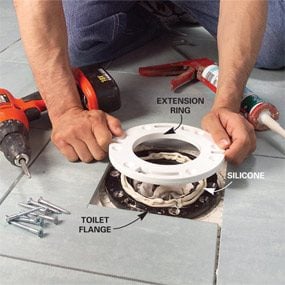
Photo 13: Install an extension ring over the toilet flange

Remove the old screws from the toilet flange and apply a heavy bead of silicone caulk. Fasten the extension ring over the old flange with stainless steel or brass screws.

Install a Ceramic Tile Floor in the Bathroom

Photo 14: Install the transition strip

Glue the transition into place with construction adhesive. If carpet meets the transition, you may have to add a new tack strip.

Install a Ceramic Tile Floor in the Bathroom

Photo 15: Stuff backer rod along the wall

Push backer rod into joints that will be caulked later. The foam rod keeps grout out of joints. After grouting, pull out the rod and caulk the joints.

When all the tiles are in place and the thin-set has hardened, remove all the spacers. Next, raise the toilet flange by adding an extension ring or two (Photo 13). The extended flange should be flush with or higher than the surrounding tile.

When you grout, fill in between the flange and tile. That way, any future leak around the flange will show up on the bathroom floor instead of on the ceiling below. If you plan to use a glue-down transition as we did, this is the time to install it.

Here’s how we dealt with our transition: First, we removed the old metal strip that covered the carpet’s edge. Then we cut our transition strip to fit between the door jambs using a miter saw. Next, we added a tack strip to hold the carpet in place. Before we could glue the transition to the floor (Photo 14), we had to remove a thin strip of the old vinyl floor.

Grout is too brittle to handle the slight shifting movements that are normal in any room. Keep grout out of joints wherever the floor meets the tub, shower, vanity or walls (Photo 15).

Pack the joints with grout

Install a Ceramic Tile Floor in the Bathroom

Photo 16: Grout the joints

Work the grout back and forth across the floor, diagonal to the joints and holding the float at a 45-degree angle. Then scrape off the excess grout, holding the float almost upright.

The thin-set directions will tell you how soon you can grout the floor—usually 24 hours. Grouting isn’t complex. Just plop a couple of scoops of grout onto the floor in a corner, work the grout into joints (Photo 16) and scrape off the excess grout before moving to the next section. In addition:

  • Mix the grout to a mashed-potatoes consistency. Adding extra liquid makes grout easier to work with but weakens it.
  • Don’t just spread the grout over the joints; press hard to pack it into the joints. If you’re doing it right, your forearm will get a good workout.
  • Whether you’re filling joints or scraping off excess grout, always push the float diagonally across the tiles.
  • Scrape off the excess to leave tile as clean as you can. The less grout you leave on the tiles, the easier cleanup will be.
  • When you’re done, cover the grout bucket with a plastic bag and set it in a cool place to slow the hardening process. During cleanup, you may find spots that need a little extra.

Grout cleanup

Install a Ceramic Tile Floor in the Bathroom

Photo 17: Clean the tiles

Wipe grout off the tile surface with a damp sponge. Wipe gently on the first pass so you don’t pull grout out of the joints. Rinse the sponge often.

Clean the surface of the tile when the grout is stiff enough to stay put in the joints but still soft enough to wipe off the tile surface. During hot, dry weather, grout can become difficult to wipe away in just 10 minutes, so get ready for cleanup before you even mix the grout. You’ll need two buckets of clean water, two sponges, a synthetic scouring pad and a dry rag.

As soon as you’re done grouting, go to the first section you grouted and wipe across a joint with a damp sponge. If the sponge pulls grout out of the joint, wait five minutes and try again. In cool, damp weather, the grout may stay too soft for an hour. When the grout is hard enough, gently wipe the tile with a damp sponge.

Rinse the sponge frequently as you wipe the entire floor (Photo 17). If you come across tough spots, scrub them with the scouring pad. Be careful where you put your feet and knees—don’t mar your perfect grout joints.

Immediately after the first pass, grab the second bucket of clean water and the fresh sponge and make a second, more thorough pass. Then, as the tile surface dries, wipe it with a dry terry cloth. The dry haze should buff off easily. If not, go for fresh water and sponge the floor again. If you can’t get rid of the haze, don’t panic. Products that remove haze are available wherever tile is sold.

Let the grout cure overnight before you caulk joints, set the toilet or reinstall baseboard. Grout sealer is a good precaution against staining: Some products can be applied 24 hours after grouting; others require a two- to three-week wait. If you have leftover tile or grout, keep them in case you have to make repairs in the future. Be sure to write down the brand, color and retailer of the tile.

How NOT to Save Money on a Tile Project

I’m a devout cheapskate, but when it comes to buying thin-set and grout, I grab the most expensive products on the shelf. More expensive thin-sets and grouts generally contain a higher proportion of the polymers that improve adhesion, durability and stain resistance.

In most situations, cheaper products would perform just fine. But if I can reduce the risks of loose tiles or cracked grout by spending an extra $30 on a typical bathroom project, I consider that a bargain.

Liquid additive is another smart investment. If the thin-set or grout label says you can mix it with water or an additive, use additive. These liquids (labeled “latex, ” “polymer” or “acrylic”) are meant to improve adhesion and stain resistance. But as a bonus, they produce a slick, creamy consistency. Thin-set combs out more smoothly, grout flows easily into joints, and both remain workable longer.

Also buy a mixer for your drill. Mixers come in various styles and sizes. Go easy on the trigger. If you run the drill at full speed, you can create millions of tiny air bubbles, which will weaken the mix.

Tile cutting tools
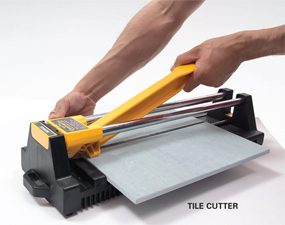
Install a Ceramic Tile Floor in the Bathroom

Tile cutter

A tile cutter is the fastest way to cut tile. Just push the handle forward and a small wheel scores the tile. Then push the handle down and the tile snaps in two. You can’t beat a tile cutter for convenience. It makes no mess and you can drag it around the room as you work. But a tile cutter has zero versatility. It makes straight cuts across the entire tile—no curves or corner cuts. Cutting 1 in. or less off a tile can be difficult or impossible. You can rent one at rental centers and some tile shops.

Install a Ceramic Tile Floor in the Bathroom

Wet saw

A wet saw cuts with a diamond blade while water cools the blade and eliminates dust. You can cut notches, trim off tiny slivers of tile, cut miters and even make curves. You’ll get clean cuts in any type of tile. But wet saws are messy. They spit water and raise a cloud of gritty mist. If you use one indoors, contain the mist with curtains of plastic film and cover nearby surfaces. You can buy a small wet saw like the one shown here or rent a professional model from a tile store or home or rental center. If you only have a few cuts that require a wet saw, call a tile store. Many make cuts for a small fee.

Install a Ceramic Tile Floor in the Bathroom

Angle grinder

An angle grinder equipped with a diamond blade can make straight cuts, curves and notches in any type of tile. Since all your cuts are freehand, this isn’t a precision tool, but you can grind away imperfections with the tip of the blade. Use a grinder only outside. Wear a dust mask and eye protection.

Install a Ceramic Tile Floor in the Bathroom

Nippers

Nippers are useful for rough curves and notches. They don’t cut tile, but bite out small chunks, leaving jagged edges.

Install a Ceramic Tile Floor in the Bathroom

Contour gauge

A contour gauge is a great tool for marking troublesome shapes on tile. Just press it against any odd-shaped surface (like the curved corner of a bathtub) and transfer the profile to tile.

Here are the tools that can cut your tile. Buy or rent the ones that make the most sense for your project.

In addition to the tools shown here, a carbide abrasive blade that fits in a jigsaw cuts slowly but leaves fairly clean cuts in softer types of ceramic tile and natural stone. A carbide abrasive hole saw cuts perfect holes for plumbing pipes and fixtures.

A rubbing stone is simply an abrasive block, similar to the wheel in a bench grinder. Use it to smooth sharp or slightly chipped cuts that will be exposed.

Additional Information

Required Tools for this Project

Have the necessary tools for this DIY project lined up before you start—you’ll save time and frustration.

You’ll also need these specialty tools for working with tile and backer board:
Scoring knife, Margin trowel, Tile cutter, 4-in. diamond blade, Drill mixer, Offset saw, Tile cutter, Nippers, Wet saw
You can also use an angle grinder for cutting tile.